QT网络编程Tcp下C/S架构的即时通信
先写一个客户端,实现简单的,能加入聊天,以及加入服务器的界面。
#ifndef TCPCLIENT_H

#define TCPCLIENT_H

#include <QDialog>

#include <QListWidget>

#include <QLineEdit>

#include <QPushButton>

#include <QLabel>

#include <QGridLayout>

#include <QtNetWork/QHostAddress>

#include <QtNetWork/QTcpSocket>

class TcpClient : public QDialog

{

    Q_OBJECT

public:

    TcpClient(QWidget *parent = 0,Qt::WindowFlags f=0);

    ~TcpClient();

private:

    QListWidget *contentListWidget;

    QLineEdit *sendLineEdit;

    QPushButton *sendBtn;

    QLabel *userNameLabel;

    QLineEdit *userNameLineEdit;

    QLabel *serverIPLabel;

    QLineEdit *serverIPLineEdit;

    QLabel *portLabel;

    QLineEdit *portLineEdit;

    QPushButton *enterBtn;

    QGridLayout *mainLayout;

    bool status;

    int port;

    QHostAddress *serverIP;

    QString userName;

    QTcpSocket *tcpSocket;

public slots:

    void slotEnter();

    void slotConnected();

    void slotDisconnected();

    void dataReceived();

    void slotSend();

};

#endif // TCPCLIENT_H
有一个加入服务器的按钮,还有一个发送消息的按钮,在头文件,先定义两个函数。
#include "tcpclient.h"

#include <QMessageBox>

#include <QHostInfo>

TcpClient::TcpClient(QWidget *parent,Qt::WindowFlags f)

    : QDialog(parent,f)

{

    setWindowTitle(tr("TCP Client"));

    contentListWidget = new QListWidget;

    sendLineEdit = new QLineEdit;

    sendBtn = new QPushButton(tr("send"));

    userNameLabel = new QLabel(tr("name"));

    userNameLineEdit = new QLineEdit;

    serverIPLabel = new QLabel(tr("server"));

    serverIPLineEdit = new QLineEdit;

    portLabel = new QLabel(tr("port"));

    portLineEdit = new QLineEdit;

    enterBtn= new QPushButton(tr("join chat"));

    mainLayout = new QGridLayout(this);

    mainLayout->addWidget(contentListWidget,0,0,1,2);

    mainLayout->addWidget(sendLineEdit,1,0);

    mainLayout->addWidget(sendBtn,1,1);

    mainLayout->addWidget(userNameLabel,2,0);

    mainLayout->addWidget(userNameLineEdit,2,1);

    mainLayout->addWidget(serverIPLabel,3,0);

    mainLayout->addWidget(serverIPLineEdit,3,1);

    mainLayout->addWidget(portLabel,4,0);

    mainLayout->addWidget(portLineEdit,4,1);

    mainLayout->addWidget(enterBtn,5,0,1,2);

    status = false;

    port = 8010;

    portLineEdit->setText(QString::number(port));

    serverIP =new QHostAddress();

    connect(enterBtn,SIGNAL(clicked()),this,SLOT(slotEnter()));

    connect(sendBtn,SIGNAL(clicked()),this,SLOT(slotSend()));

    sendBtn->setEnabled(false);

}

TcpClient::~TcpClient()

{

}

void TcpClient::slotEnter()

{

    if(!status)

    {

        QString ip = serverIPLineEdit->text();

        if(!serverIP->setAddress(ip))

        {

            QMessageBox::information(this,tr("error"),tr("server ip address error!"));

            return;

        }

        if(userNameLineEdit->text()=="")

        {

            QMessageBox::information(this,tr("error"),tr("User name error!"));

            return;

        }

        userName=userNameLineEdit->text();

        tcpSocket = new QTcpSocket(this);

        connect(tcpSocket,SIGNAL(connected()),this,SLOT(slotConnected()));

        connect(tcpSocket,SIGNAL(disconnected()),this,SLOT(slotDisconnected()));

        connect(tcpSocket,SIGNAL(readyRead()),this,SLOT(dataReceived()));

        tcpSocket->connectToHost(*serverIP,port);

        status=true;

    }

    else

    {

        int length=0;

        QString msg=userName+tr(":Leave Chat Room");

        if((length=tcpSocket->write(msg.toLatin1(),msg.length()))!=msg. length())

        {

            return;

        }

        tcpSocket->disconnectFromHost();

        status=false;

    }

}

void TcpClient::slotConnected()

{

    sendBtn->setEnabled(true);

    enterBtn->setText(tr("离开"));

    int length=0;

    QString msg=userName+tr(":Enter Chat Room");

    if((length=tcpSocket->write(msg.toLatin1(),msg.length()))!=msg.length())

    {

        return;

    }

}

void TcpClient::slotSend()

{

    if(sendLineEdit->text()=="")

    {

        return ;

    }

    QString msg=userName+":"+sendLineEdit->text();

    tcpSocket->write(msg.toLatin1(),msg.length());

    sendLineEdit->clear();

}

void TcpClient::slotDisconnected()

{

    sendBtn->setEnabled(false);

    enterBtn->setText(tr("join chat"));

}

void TcpClient::dataReceived()

{

    while(tcpSocket->bytesAvailable()>0)

    {

        QByteArray datagram;

        datagram.resize(tcpSocket->bytesAvailable());

        tcpSocket->read(datagram.data(),datagram.size());

        QString msg=datagram.data();

        contentListWidget->addItem(msg.left(datagram.size()));

    }

}
实现界面布局。在Enter槽函数中,确定加入还是离开的服务器的功能。如果加入了,就将消息,写到tcpsocket中,构造消。
服务端的头文件:
#ifndef TCPSERVER_H

#define TCPSERVER_H

#include <QDialog>

#include <QListWidget>

#include <QLabel>

#include <QLineEdit>

#include <QPushButton>

#include <QGridLayout>

#include "server.h"

class TcpServer : public QDialog

{

    Q_OBJECT

public:

    TcpServer(QWidget *parent = 0,Qt::WindowFlags f=0);

    ~TcpServer();

private:

    QListWidget *ContentListWidget;

    QLabel *PortLabel;

    QLineEdit *PortLineEdit;

    QPushButton *CreateBtn;

    QGridLayout *mainLayout;

    int port;

    Server *server;

public slots:

    void slotCreateServer();

    void updateServer(QString,int);

};

#endif // TCPSERVER_H
这是服务端的界面的,把消息显示而已。实现这个布局。
#include "tcpserver.h"

TcpServer::TcpServer(QWidget *parent,Qt::WindowFlags f)

    : QDialog(parent,f)

{

    setWindowTitle(tr("TCP Server"));

    ContentListWidget = new QListWidget;

    PortLabel = new QLabel(tr(" port"));

    PortLineEdit = new QLineEdit;

    CreateBtn = new QPushButton(tr("create chat"));

    mainLayout = new QGridLayout(this);

    mainLayout->addWidget(ContentListWidget,0,0,1,2);

    mainLayout->addWidget(PortLabel,1,0);

    mainLayout->addWidget(PortLineEdit,1,1);

    mainLayout->addWidget(CreateBtn,2,0,1,2);

    port=8010;

    PortLineEdit->setText(QString::number(port));

    connect(CreateBtn,SIGNAL(clicked()),this,SLOT(slotCreateServer()));

}

TcpServer::~TcpServer()

{

}

void TcpServer::slotCreateServer()

{

    server = new Server(this,port);

    connect(server,SIGNAL(updateServer(QString,int)),this,SLOT(updateServer(QString,int)));

    CreateBtn->setEnabled(false);

}

void TcpServer::updateServer(QString msg,int length)

{

    ContentListWidget->addItem(msg.left(length));

}
创建TCP的套接字,以便实现服务端和客户端的通信。
#ifndef TCPCLIENTSOCKET_H

#define TCPCLIENTSOCKET_H

#include <QtNetWork/QTcpSocket>

#include <QObject>

class TcpClientSocket : public QTcpSocket

{

    Q_OBJECT

public:

    TcpClientSocket();

signals:

    void updateClients(QString,int);

    void disconnected(int);

protected slots:

    void dataReceived();

    void slotDisconnected();

};

#endif // TCPCLIENTSOCKET_H
以上是头文件,具体的是:
#include "tcpclientsocket.h"

TcpClientSocket::TcpClientSocket()

{

    connect(this,SIGNAL(readyRead()),this,SLOT(dataReceived()));

    connect(this,SIGNAL(disconnected()),this,SLOT(slotDisconnected()));

}

void TcpClientSocket::dataReceived()

{

    while(bytesAvailable()>0)

    {

        int length = bytesAvailable();

        char buf[1024];

        read(buf,length);

        QString msg=buf;

        emit updateClients(msg,length);

    }

}

void TcpClientSocket::slotDisconnected()

{

    emit disconnected(this->socketDescriptor());

}
实现服务器,头文件:
#ifndef SERVER_H

#define SERVER_H

#include <QtNetWork/QTcpServer>

#include <QObject>

#include "tcpclientsocket.h"

class Server : public QTcpServer

{

    Q_OBJECT

public:

    Server(QObject *parent=0,int port=0);

    QList<TcpClientSocket*> tcpClientSocketList;

signals:

    void updateServer(QString,int);

public slots:

    void updateClients(QString,int);

    void slotDisconnected(int);

protected:

    void incomingConnection(int socketDescriptor);

};

#endif // SERVER_H
#include "server.h"

Server::Server(QObject *parent,int port)

    :QTcpServer(parent)

{

    listen(QHostAddress::Any,port);

}

void Server::incomingConnection(int socketDescriptor)

{

    TcpClientSocket *tcpClientSocket = new TcpClientSocket;

    connect(tcpClientSocket,SIGNAL(updateClients(QString,int)),this,SLOT(updateClients(QString,int)));

    connect(tcpClientSocket,SIGNAL(disconnected(int)),this,SLOT(slotDisconnected(int)));

    tcpClientSocket->setSocketDescriptor(socketDescriptor);

    tcpClientSocketList.append(tcpClientSocket);

}

void Server::updateClients(QString msg,int length)

{

    emit updateServer(msg,length);

    for(int i=0;i<tcpClientSocketList.count();i++)

    {

        QTcpSocket *item = tcpClientSocketList.at(i);

        if(item->write(msg.toLatin1(),length)!=length)

        {

            continue;

        }

    }

}

void Server::slotDisconnected(int descriptor)

{

    for(int i=0;i<tcpClientSocketList.count();i++)

    {

        QTcpSocket *item = tcpClientSocketList.at(i);

        if(item->socketDescriptor()==descriptor)

        {

            tcpClientSocketList.removeAt(i);

            return;

        }

    }

    return;

}
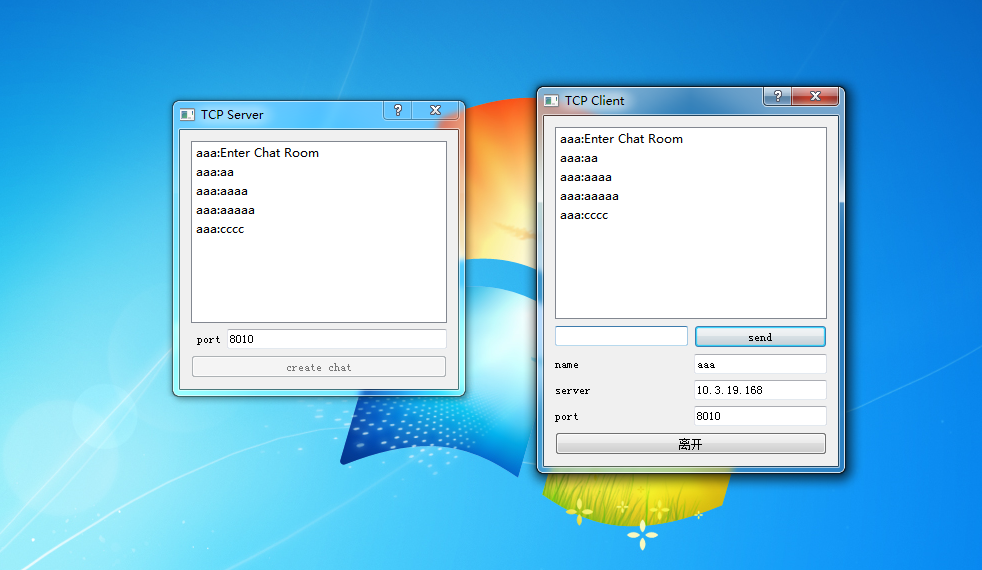
实现后的界面:
QT网络编程Tcp下C/S架构的即时通信的更多相关文章
- QT网络编程UDP下C/S架构广播通信
QT有封装好的UDP协议的类,QUdpSocket,里面有我们想要的函数接口.感兴趣的话,可以看看. 先搞服务端吧,写一个子类,继承QDialog类,起名为UdpServer类.头文件要引用我们上边说 ...
- 详解C# 网络编程系列:实现类似QQ的即时通信程序
https://www.jb51.net/article/101289.htm 引言: 前面专题中介绍了UDP.TCP和P2P编程,并且通过一些小的示例来让大家更好的理解它们的工作原理以及怎样.Net ...
- Socket网络编程(TCP/IP/端口/类)和实例
Socket网络编程(TCP/IP/端口/类)和实例 原文:C# Socket网络编程精华篇 转自:微冷的雨 我们在讲解Socket编程前,先看几个和Socket编程紧密相关的概念: TCP/IP层次 ...
- python 网络编程 TCP/IP socket UDP
TCP/IP简介 虽然大家现在对互联网很熟悉,但是计算机网络的出现比互联网要早很多. 计算机为了联网,就必须规定通信协议,早期的计算机网络,都是由各厂商自己规定一套协议,IBM.Apple和Micro ...
- 网络编程——TCP协议、UDP协议、socket套接字、粘包问题以及解决方法
网络编程--TCP协议.UDP协议.socket套接字.粘包问题以及解决方法 TCP协议(流式协议) 当应用程序想通过TCP协议实现远程通信时,彼此之间必须先建立双向通信通道,基于该双向通道实现数 ...
- Socket网络编程-TCP编程
Socket网络编程-TCP编程 作者:尹正杰 版权声明:原创作品,谢绝转载!否则将追究法律责任. 一.socket介绍 1>.TCP/IP协议 2>.跨网络的主机间通讯 在建立通信连接的 ...
- 网络编程TCP/IP详解
网络编程TCP/IP详解 1. 网络通信 中继器:信号放大器 集线器(hub):是中继器的一种形式,区别在于集线器能够提供多端口服务,多口中继器,每个数据包的发送都是以广播的形式进行的,容易阻塞网络. ...
- GO语言练习:网络编程 TCP 示例
1.代码 2.编译及运行 1.网络编程 TCP 示例 simplehttp.go 代码 package main import ( "net" "os" &qu ...
- 网络编程TCP协议-聊天室
网络编程TCP协议-聊天室(客户端与服务端的交互); <span style="font-size:18px;">1.客户端发数据到服务端.</span> ...
随机推荐
- MySQL PRIMARY KEY 和 UNIQUE的区别
primary key = unique + not null unique 就是唯一,当你需要限定你的某个表字段每个值都唯一,没有重复值时使用.比如说,如果你有一个person 表,并且表中有个身 ...
- 关于mouseleave事件触发的bug问题
在做下拉树搜索功能的时候,下方内容框需要一个鼠标移出时就隐藏的功能,于是使用mouseleave的方法, 但是出现了一个问题就是在点击树展开个隐藏的时候,也触发了leave事件,将下方的树进行隐藏,出 ...
- SeaJS结合javascript面向对象使用笔记(一)
Sea.JS Seajs结合javascript面向对象 所需页面 /app/index.html /lib/factory.js /lib/sea.js /lib/constructor.js /j ...
- 关于myeclipse加载building workspace卡顿的解决办法
在MyEclipse的使用中,在建立新文件或者改动代码后,经常会出现building workspace半天卡顿不动的情况,如果开的程序过多,经常会发生失去响应,电脑要是再烂点,直接死机的情况也常有发 ...
- Node.js中http-server的使用
Node.js中http-server的使用 使用阿里的npm镜像 国外的npm太慢了.查看一下自己使用的源: npm config get registry 应该显示https://registry ...
- Hackers top in China
黑客,英文hacker.精通计算机各类技术的计算机高手,泛指擅长IT技术的人群.计算机科学家. 最近受某机构所托搜集国内活跃黑客近况.本着客观专业,权威可信的原则参考了国内从00年到最新的黑客榜单,以 ...
- Java并发编程之volatile关键字解析
一内存模型的相关概念 二并发编程中的三个概念 三Java内存模型 四深入剖析volatile关键字 五使用volatile关键字的场景 volatile这个关键字可能很多朋友都听说过,或许也都用过.在 ...
- C#实体对象序列化成Json,格式化,并让字段的首字母小写
解决办法有两种:第一种:使用对象的字段属性设置JsonProperty来实现(不推荐,因为需要手动的修改每个字段的属性) public class UserInfo { [JsonProperty(& ...
- 西数常用TREX命令
西数常用TREX命令 trex命令:dut1 简便找盘idp或info did查看硬盘信息chkresfall检测固件smart 查看SMART表clrsmart 清SMART表svmod 0x.. ...
- 关于逻辑删除标识字段value的设定
为了容易记忆,项目里所有表记录的逻辑删除可以用“-1”(或其他值)来表示.