olivettifaces数据集实现人脸识别代码
数据集: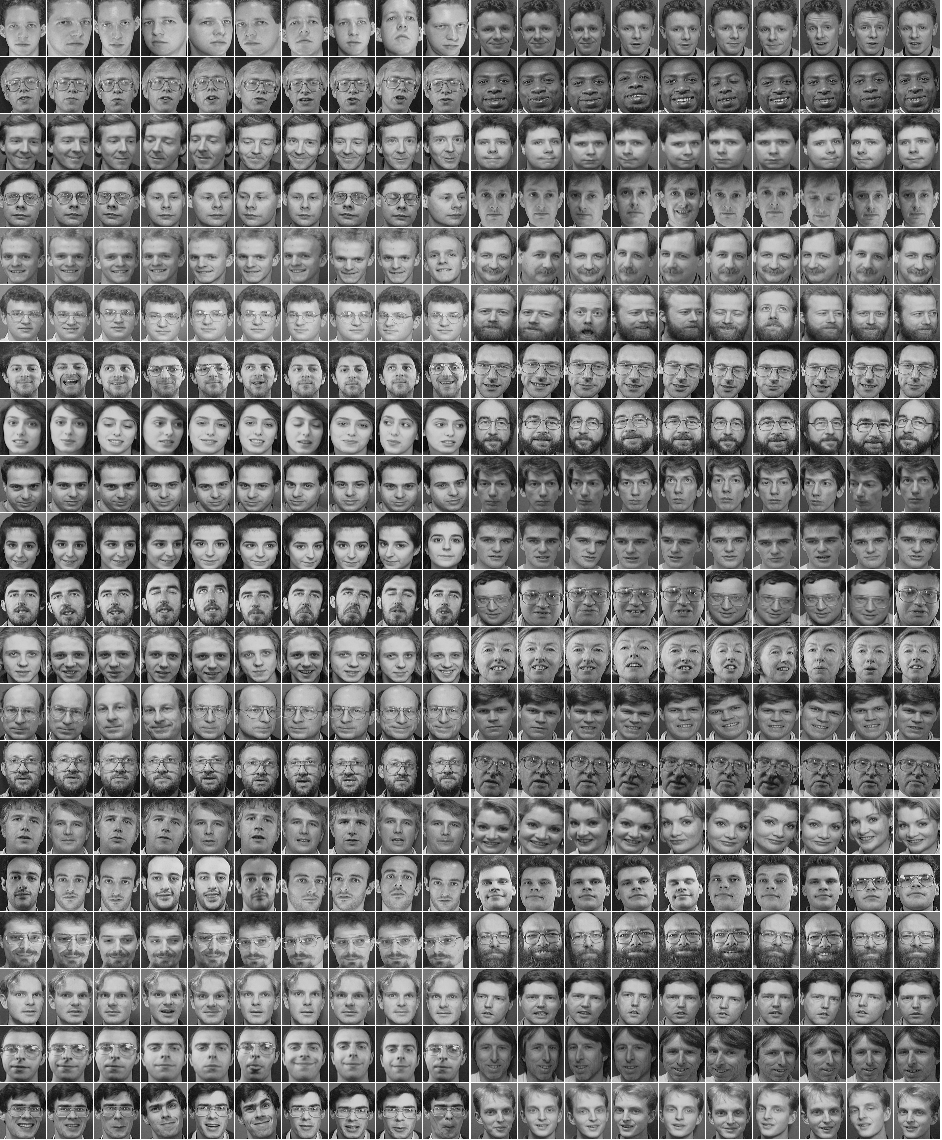
# -*- coding: utf-8 -*-

"""

Created on Wed Apr 24 18:21:21 2019

@author: 92958

"""

import os

import numpy as np

import tensorflow as tf

import matplotlib.pyplot as plt

import matplotlib.image as mpimg

import matplotlib.patches as patches

import numpy

from PIL import Image

dataset_path='./olivettifaces.gifa'

#获取dataset

def load_data(dataset_path):

    img = Image.open(dataset_path)

    # 定义一个20 × 20的训练样本,一共有40个人,每个人都10张样本照片

    img_ndarray = np.asarray(img, dtype='float64') / 256

    #img_ndarray = np.asarray(img, dtype='float32') / 32

    # 记录脸数据矩阵,57 * 47为每张脸的像素矩阵

    faces = np.empty((400, 57 * 47))

    for row in range(20):

        for column in range(20):

            faces[20 * row + column] = np.ndarray.flatten(

                img_ndarray[row * 57: (row + 1) * 57, column * 47 : (column + 1) * 47]

            )

    label = np.zeros((400, 40))

    for i in range(40):

        label[i * 10: (i + 1) * 10, i] = 1

    # 将数据分成训练集,验证集,测试集

    train_data = np.empty((320, 57 * 47))

    train_label = np.zeros((320, 40))

    vaild_data = np.empty((40, 57 * 47))

    vaild_label = np.zeros((40, 40))

    test_data = np.empty((40, 57 * 47))

    test_label = np.zeros((40, 40))

    for i in range(40):

        train_data[i * 8: i * 8 + 8] = faces[i * 10: i * 10 + 8]

        train_label[i * 8: i * 8 + 8] = label[i * 10: i * 10 + 8]

        vaild_data[i] = faces[i * 10 + 8]

        vaild_label[i] = label[i * 10 + 8]

        test_data[i] = faces[i * 10 + 9]

        test_label[i] = label[i * 10 + 9]

    train_data = train_data.astype('float32')

    vaild_data = vaild_data.astype('float32')

    test_data = test_data.astype('float32')

    return [

        (train_data, train_label),

        (vaild_data, vaild_label),

        (test_data, test_label)

    ]

def convolutional_layer(data, kernel_size, bias_size, pooling_size):

    kernel = tf.get_variable("conv", kernel_size, initializer=tf.random_normal_initializer())

    bias = tf.get_variable('bias', bias_size, initializer=tf.random_normal_initializer())

    conv = tf.nn.conv2d(data, kernel, strides=[1, 1, 1, 1], padding='SAME')

    linear_output = tf.nn.relu(tf.add(conv, bias))

    pooling = tf.nn.max_pool(linear_output, ksize=pooling_size, strides=pooling_size, padding="SAME")

    return pooling

def linear_layer(data, weights_size, biases_size):

    weights = tf.get_variable("weigths", weights_size, initializer=tf.random_normal_initializer())

    biases = tf.get_variable("biases", biases_size, initializer=tf.random_normal_initializer())

    return tf.add(tf.matmul(data, weights), biases)

def convolutional_neural_network(data):

    # 根据类别个数定义最后输出层的神经元

    n_ouput_layer = 40

    kernel_shape1=[5, 5, 1, 32]

    kernel_shape2=[5, 5, 32, 64]

    full_conn_w_shape = [15 * 12 * 64, 1024]

    out_w_shape = [1024, n_ouput_layer]

    bias_shape1=[32]

    bias_shape2=[64]

    full_conn_b_shape = [1024]

    out_b_shape = [n_ouput_layer]

    data = tf.reshape(data, [-1, 57, 47, 1])

    # 经过第一层卷积神经网络后,得到的张量shape为:[batch, 29, 24, 32]

    with tf.variable_scope("conv_layer1") as layer1:

        layer1_output = convolutional_layer(

            data=data,

            kernel_size=kernel_shape1,

            bias_size=bias_shape1,

            pooling_size=[1, 2, 2, 1]

        )

    # 经过第二层卷积神经网络后,得到的张量shape为:[batch, 15, 12, 64]

    with tf.variable_scope("conv_layer2") as layer2:

        layer2_output = convolutional_layer(

            data=layer1_output,

            kernel_size=kernel_shape2,

            bias_size=bias_shape2,

            pooling_size=[1, 2, 2, 1]

        )

    with tf.variable_scope("full_connection") as full_layer3:

        # 讲卷积层张量数据拉成2-D张量只有有一列的列向量

        layer2_output_flatten = tf.contrib.layers.flatten(layer2_output)

        layer3_output = tf.nn.relu(

            linear_layer(

                data=layer2_output_flatten,

                weights_size=full_conn_w_shape,

                biases_size=full_conn_b_shape

            )

        )

        # layer3_output = tf.nn.dropout(layer3_output, 0.8)

    with tf.variable_scope("output") as output_layer4:

        output = linear_layer(

            data=layer3_output,

            weights_size=out_w_shape,

            biases_size=out_b_shape

        )

    return output;

def train_facedata(dataset, model_dir,model_path):

    # train_set_x = data[0][0]

    # train_set_y = data[0][1]

    # valid_set_x = data[1][0]

    # valid_set_y = data[1][1]

    # test_set_x = data[2][0]

    # test_set_y = data[2][1]

    # X = tf.placeholder(tf.float32, shape=(None, None), name="x-input")  # 输入数据

    # Y = tf.placeholder(tf.float32, shape=(None, None), name='y-input')  # 输入标签

    batch_size = 40

    # train_set_x, train_set_y = dataset[0]

    # valid_set_x, valid_set_y = dataset[1]

    # test_set_x, test_set_y = dataset[2]

    train_set_x = dataset[0][0]

    train_set_y = dataset[0][1]

    valid_set_x = dataset[1][0]

    valid_set_y = dataset[1][1]

    test_set_x = dataset[2][0]

    test_set_y = dataset[2][1]

    X = tf.placeholder(tf.float32, [batch_size, 57 * 47])

    Y = tf.placeholder(tf.float32, [batch_size, 40])

    predict = convolutional_neural_network(X)

    cost_func = tf.reduce_mean(tf.nn.softmax_cross_entropy_with_logits(logits=predict, labels=Y))

    optimizer = tf.train.AdamOptimizer(1e-2).minimize(cost_func)

    # 用于保存训练的最佳模型

    saver = tf.train.Saver()

    #model_dir = './model'

    #model_path = model_dir + '/best.ckpt'

    with tf.Session() as session:

        # 若不存在模型数据,需要训练模型参数

        if not os.path.exists(model_path + ".index"):

            session.run(tf.global_variables_initializer())

            best_loss = float('Inf')

            for epoch in range(20):

                epoch_loss = 0

                for i in range((int)(np.shape(train_set_x)[0] / batch_size)):

                    x = train_set_x[i * batch_size: (i + 1) * batch_size]

                    y = train_set_y[i * batch_size: (i + 1) * batch_size]

                    _, cost = session.run([optimizer, cost_func], feed_dict={X: x, Y: y})

                    epoch_loss += cost

                print(epoch, ' : ', epoch_loss)

                if best_loss > epoch_loss:

                    best_loss = epoch_loss

                    if not os.path.exists(model_dir):

                        os.mkdir(model_dir)

                        print("create the directory: %s" % model_dir)

                    save_path = saver.save(session, model_path)

                    print("Model saved in file: %s" % save_path)

        # 恢复数据并校验和测试

        saver.restore(session, model_path)

        correct = tf.equal(tf.argmax(predict,1), tf.argmax(Y,1))

        valid_accuracy = tf.reduce_mean(tf.cast(correct,'float'))

        print('valid set accuracy: ', valid_accuracy.eval({X: valid_set_x, Y: valid_set_y}))

        test_pred = tf.argmax(predict, 1).eval({X: test_set_x})

        test_true = np.argmax(test_set_y, 1)

        test_correct = correct.eval({X: test_set_x, Y: test_set_y})

        incorrect_index = [i for i in range(np.shape(test_correct)[0]) if not test_correct[i]]

        for i in incorrect_index:

            print('picture person is %i, but mis-predicted as person %i'

                %(test_true[i], test_pred[i]))

        plot_errordata(incorrect_index, "olivettifaces.gif")

#画出在测试集中错误的数据

def plot_errordata(error_index, dataset_path):

    img = mpimg.imread(dataset_path)

    plt.imshow(img)

    currentAxis = plt.gca()

    for index in error_index:

        row = index // 2

        column = index % 2

        currentAxis.add_patch(

            patches.Rectangle(

                xy=(

                     47 * 9 if column == 0 else 47 * 19,

                     row * 57

                    ),

                width=47,

                height=57,

                linewidth=1,

                edgecolor='r',

                facecolor='none'

            )

    )

    plt.savefig("result.png")

    plt.show()

def main():

    dataset_path = "olivettifaces.gif"

    data = load_data(dataset_path)

    model_dir = './model'

    model_path = model_dir + '/best.ckpt'

    train_facedata(data, model_dir, model_path)

if __name__ == "__main__" :

    main()
控制台信息:
runfile('F:/python/TensorFlow/人脸识别/olive1.py', wdir='F:/python/TensorFlow/人脸识别')
WARNING:tensorflow:From C:\Users\92958\Anaconda3\lib\site-packages\tensorflow\python\framework\op_def_library.py:263: colocate_with (from tensorflow.python.framework.ops) is deprecated and will be removed in a future version.
Instructions for updating:
Colocations handled automatically by placer.
WARNING: The TensorFlow contrib module will not be included in TensorFlow 2.0.
For more information, please see:
- https://github.com/tensorflow/community/blob/master/rfcs/20180907-contrib-sunset.md
- https://github.com/tensorflow/addons
If you depend on functionality not listed there, please file an issue.
WARNING:tensorflow:From C:\Users\92958\Anaconda3\lib\site-packages\tensorflow\contrib\layers\python\layers\layers.py:1624: flatten (from tensorflow.python.layers.core) is deprecated and will be removed in a future version.
Instructions for updating:
Use keras.layers.flatten instead.
WARNING:tensorflow:From F:/python/TensorFlow/人脸识别/olive1.py:158: softmax_cross_entropy_with_logits (from tensorflow.python.ops.nn_ops) is deprecated and will be removed in a future version.
Instructions for updating:
Future major versions of TensorFlow will allow gradients to flow
into the labels input on backprop by default.
See tf.nn.softmax_cross_entropy_with_logits_v2.
0 : 2671140.984375
create the directory: ./model
Model saved in file: ./model/best.ckpt
1 : 610905.9375
Model saved in file: ./model/best.ckpt
2 : 181258.35693359375
Model saved in file: ./model/best.ckpt
3 : 54391.228271484375
Model saved in file: ./model/best.ckpt
4 : 24234.38525390625
Model saved in file: ./model/best.ckpt
5 : 9868.018524169922
Model saved in file: ./model/best.ckpt
6 : 3433.5851974487305
Model saved in file: ./model/best.ckpt
7 : 826.4495697021484
Model saved in file: ./model/best.ckpt
8 : 200.12329292297363
Model saved in file: ./model/best.ckpt
9 : 194.84842109680176
Model saved in file: ./model/best.ckpt
10 : 63.74338483810425
Model saved in file: ./model/best.ckpt
11 : 10.006996154785156
Model saved in file: ./model/best.ckpt
12 : 7.118054211139679
Model saved in file: ./model/best.ckpt
13 : 0.0
Model saved in file: ./model/best.ckpt
14 : 0.0
15 : 0.0
16 : 0.0
17 : 0.0
18 : 0.0
19 : 0.0
WARNING:tensorflow:From C:\Users\92958\Anaconda3\lib\site-packages\tensorflow\python\training\saver.py:1266: checkpoint_exists (from tensorflow.python.training.checkpoint_management) is deprecated and will be removed in a future version.
Instructions for updating:
Use standard file APIs to check for files with this prefix.
INFO:tensorflow:Restoring parameters from ./model/best.ckpt
valid set accuracy: 0.8
picture person is 4, but mis-predicted as person 8
picture person is 18, but mis-predicted as person 14
picture person is 21, but mis-predicted as person 27
picture person is 35, but mis-predicted as person 17

原文:https://blog.csdn.net/hanghangaidoudou/article/details/79347080
olivettifaces数据集实现人脸识别代码的更多相关文章
- opencv人脸识别代码
opencv人脸识别C++代码 /* * Copyright (c) 2011,2012. Philipp Wagner <bytefish[at]gmx[dot]de>. * Relea ...
- 百度Aip人脸识别之python代码
用python来做人脸识别代码量少 思路清晰, 在使用之前我们需要在我们的配置的编译器中通过pip install baidu-aip 即可 from aip import AipFace 就可以开 ...
- CNN卷积神经网络人脸识别
图片总共40个人,每人10张图片,每张图片高57,宽47.共400张图片. 读取图片的py文件 import numpyimport pandasfrom PIL import Imagefrom k ...
- 人脸识别FaceNet+TensorFlow
一.本文目标 利用facenet源码实现从摄像头读取视频,实时检测并识别视频中的人脸.换句话说:把facenet源码中contributed目录下的real_time_face_recognition ...
- [译]Kubernetes 分布式应用部署和人脸识别 app 实例
原文地址:KUBERNETES DISTRIBUTED APPLICATION DEPLOYMENT WITH SAMPLE FACE RECOGNITION APP 原文作者:skarlso 译文出 ...
- Python3利用Dlib19.7实现摄像头人脸识别的方法
0.引言 利用python开发,借助Dlib库捕获摄像头中的人脸,提取人脸特征,通过计算欧氏距离来和预存的人脸特征进行对比,达到人脸识别的目的: 可以自动从摄像头中抠取人脸图片存储到本地,然后提取构建 ...
- 「Python」人脸识别应用
人脸识别主要步骤: face_recognition 库的安装 安装此库,首先需要安装编译dlib,此处我们偷个懒,安装软件Anaconda(大牛绕过),此软件预装了dlib. 安装好后,我们直接通过 ...
- 百度人脸识别AI实践.doc
0, 前言 百度开放了很多AI能力,其中人脸识别就是其中之一. 本文对百度人脸识别AI进行实践检验,看看其使用效果如何. 鉴于是最为基础的实践,基本都是在其接口范例代码修改而来. 百度人脸识别AI网站 ...
- python 与 百度人脸识别api
用python来做人脸识别代码量少 思路清晰, 在使用之前我们需要在我们的配置的编译器中通过pip install baidu-aip 即可 from aip import AipFac ...
随机推荐
- Scrum 冲刺博客
博客链接集合 Alpha阶段敏捷冲刺 敏捷冲刺一 敏捷冲刺二 敏捷冲刺三 敏捷冲刺四 敏捷冲刺五 敏捷冲刺六 敏捷冲刺七 Alpha阶段敏捷冲刺总结 Alpha阶段敏捷冲刺总结
- javascript 易错点、难点笔记
本文主要记录在学习过程中遇到的JavaScript难点或者容易疏忽的细节,也方便自己日后翻阅学习. 1.arr.length === + arr.length arr.length === + arr ...
- POJ 2419 Forests(模拟)
题目链接: https://cn.vjudge.net/problem/POJ-2419 题目描述: If a tree falls in the forest, and there's nobody ...
- LINQ查询操作符 LINQ学习第二篇
一.投影操作符 1. Select Select操作符对单个序列或集合中的值进行投影.下面的示例中使用select从序列中返回Employee表的所有列: using (NorthwindDataCo ...
- WebForm 基础学习
C/S 客户端应用程序(Client/Server) 客户端——服务器端 两种技术 WinForm WPF ...
- JS DOM操作(四) Window.docunment对象——操作内容
操作内容:即对标签所夹内容的操作 一 非表单元素内容操作 定位 var a = document.ElementById( "id" ) 1.获取内容 var s = a.inne ...
- bootstrap-datepicker 开始时间-结束时间 thinkphp
<!DOCTYPE html> <head> <title>开始-结束时间测试</title> </head> <body> & ...
- 当堆遇到STL 代码焕发光芒
来自度娘的释义,堆的含义大概是这样的: 感性理解: 堆(英语:heap)是计算机科学中一类特殊的数据结构的统称.堆通常是一个可以被看做一棵树的数组对象.堆总是满足下列性质: 堆中某个节点的值总是不大于 ...
- Bell(矩阵快速幂+中国剩余定理)
Bell Time Limit:3000MS Memory Limit:32768KB 64bit IO Format:%I64d & %I64u Submit Status ...
- 浙大月赛ZOJ Monthly, August 2014
Abs Problem Time Limit: 2 Seconds Memory Limit: 65536 KB Special Judge Alice and Bob is playing a ga ...