TessorFlow学习 之 神经网络的构建
1.建立一个神经网络添加层
输入值、输入的大小、输出的大小和激励函数
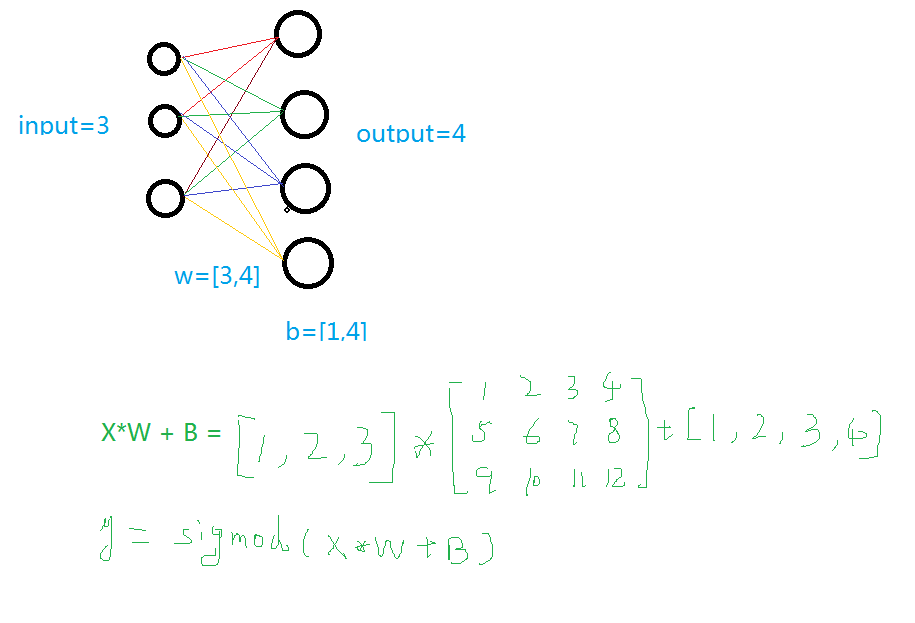
学过神经网络的人看下面这个图就明白了,不懂的去看看我的另一篇博客
 def add_layer(inputs , in_size , out_size , activate = None):

     Weights = tf.Variable(tf.random_normal([in_size,out_size]))#随机初始化

     baises  = tf.Variable(tf.zeros([1,out_size])+0.1)#可以随机但是不要初始化为0,都为固定值比随机好点

     y = tf.matmul(inputs, Weights) + baises #matmul:矩阵乘法,multipy:一般是数量的乘法

     if activate:

         y = activate(y)

     return y
2.训练一个二次函数
 import tensorflow as tf

 import numpy as np

 def add_layer(inputs , in_size , out_size , activate = None):

     Weights = tf.Variable(tf.random_normal([in_size,out_size]))#随机初始化

     baises  = tf.Variable(tf.zeros([1,out_size])+0.1)#可以随机但是不要初始化为0,都为固定值比随机好点

     y = tf.matmul(inputs, Weights) + baises #matmul:矩阵乘法,multipy:一般是数量的乘法

     if activate:

         y = activate(y)

     return y

 if __name__ == '__main__':

     x_data = np.linspace(-1,1,300,dtype=np.float32)[:,np.newaxis]#创建-1,1的300个数,此时为一维矩阵,后面转化为二维矩阵===[1,2,3]-->>[[1,2,3]]

     noise = np.random.normal(0,0.05,x_data.shape).astype(np.float32)#噪声是(1,300)格式,0-0.05大小

     y_data = np.square(x_data) - 0.5 + noise #带有噪声的抛物线

     xs = tf.placeholder(tf.float32,[None,1]) #外界输入数据

     ys = tf.placeholder(tf.float32,[None,1])

     l1 = add_layer(xs,1,10,activate=tf.nn.relu)

     prediction = add_layer(l1,10,1,activate=None)

     loss = tf.reduce_mean(tf.reduce_sum(tf.square(ys - prediction),reduction_indices=[1]))#误差

     train_step = tf.train.GradientDescentOptimizer(0.1).minimize(loss)#对误差进行梯度优化,步伐为0.1

     sess = tf.Session()

     sess.run( tf.global_variables_initializer())

     for i in range(1000):

         sess.run(train_step, feed_dict={xs: x_data, ys: y_data})#训练

         if i%50 == 0:

             print(sess.run(loss, feed_dict={xs: x_data, ys: y_data}))#查看误差

3.动态显示训练过程
显示的步骤程序之中部分进行说明,其它说明请看其它博客
import tensorflow as tf
import numpy as np
import matplotlib.pyplot as plt def add_layer(inputs , in_size , out_size , activate = None):
Weights = tf.Variable(tf.random_normal([in_size,out_size]))#随机初始化
baises = tf.Variable(tf.zeros([1,out_size])+0.1)#可以随机但是不要初始化为0,都为固定值比随机好点
y = tf.matmul(inputs, Weights) + baises #matmul:矩阵乘法,multipy:一般是数量的乘法
if activate:
y = activate(y)
return y
if __name__ == '__main__':
x_data = np.linspace(-1,1,300,dtype=np.float32)[:,np.newaxis]#创建-1,1的300个数,此时为一维矩阵,后面转化为二维矩阵===[1,2,3]-->>[[1,2,3]]
noise = np.random.normal(0,0.05,x_data.shape).astype(np.float32)#噪声是(1,300)格式,0-0.05大小
y_data = np.square(x_data) - 0.5 + noise #带有噪声的抛物线
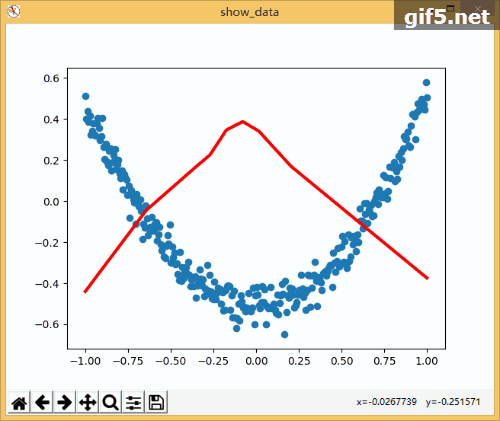
fig = plt.figure('show_data')# figure("data")指定图表名称
ax = fig.add_subplot(111)
ax.scatter(x_data,y_data)
plt.ion()
plt.show()
xs = tf.placeholder(tf.float32,[None,1]) #外界输入数据
ys = tf.placeholder(tf.float32,[None,1]) l1 = add_layer(xs,1,10,activate=tf.nn.relu)
prediction = add_layer(l1,10,1,activate=None) loss = tf.reduce_mean(tf.reduce_sum(tf.square(ys - prediction),reduction_indices=[1]))#误差
train_step = tf.train.GradientDescentOptimizer(0.1).minimize(loss)#对误差进行梯度优化,步伐为0.1 sess = tf.Session()
sess.run( tf.global_variables_initializer())
for i in range(1000):
sess.run(train_step, feed_dict={xs: x_data, ys: y_data})#训练
if i%50 == 0:
try:
ax.lines.remove(lines[0])
except Exception:
pass
prediction_value = sess.run(prediction, feed_dict={xs: x_data})
lines = ax.plot(x_data,prediction_value,"r",lw = 3)
print(sess.run(loss, feed_dict={xs: x_data, ys: y_data}))#查看误差
plt.pause(2)
while True:
plt.pause(0.01)
4.TensorBoard整体结构化显示
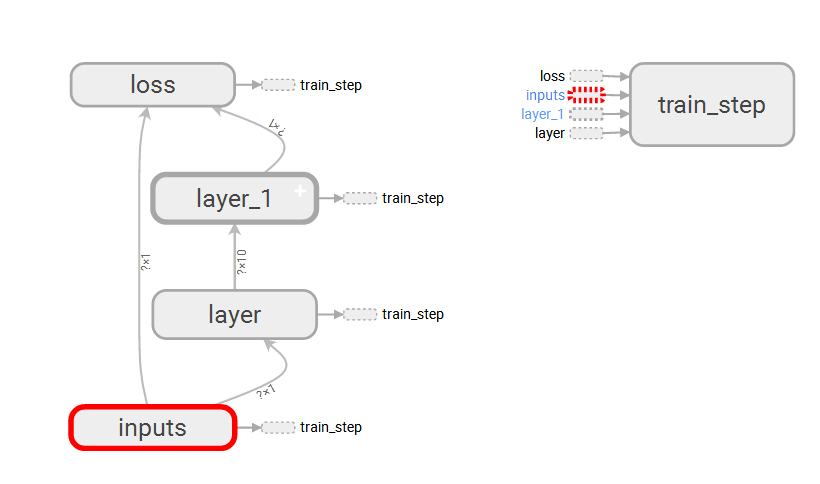
A.利用with tf.name_scope("name")创建大结构、利用函数的name="name"去创建小结构:tf.placeholder(tf.float32,[None,1],name="x_data")
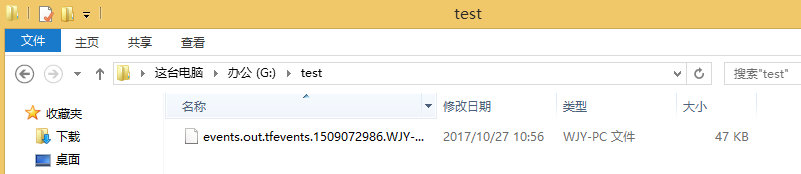
B.利用writer = tf.summary.FileWriter("G:/test/",graph=sess.graph)创建一个graph文件
C.利用TessorBoard去执行这个文件
这里得注意--->>>首先到你存放文件的上一个目录--->>然后再去运行这个文件
tensorboard --logdir=test

5.TensorBoard局部结构化显示
A. tf.summary.histogram(layer_name+"Weight",Weights):直方图显示
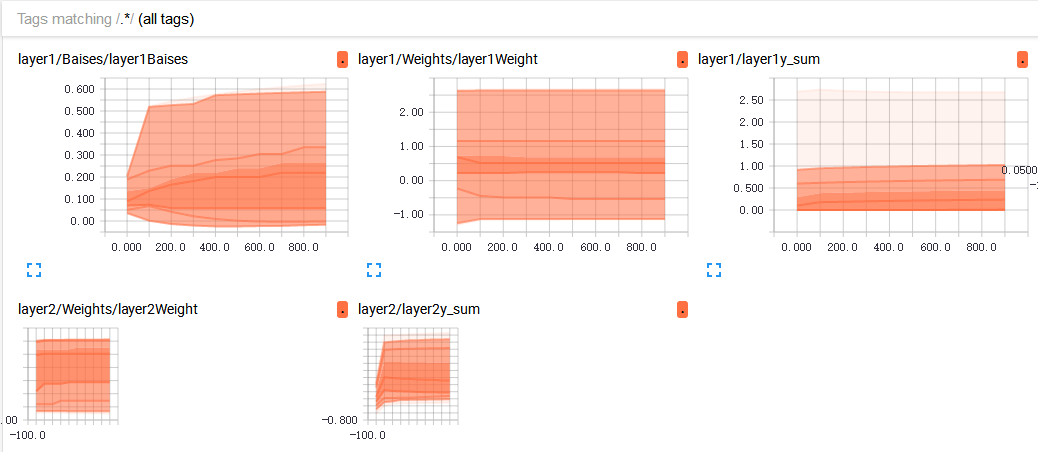
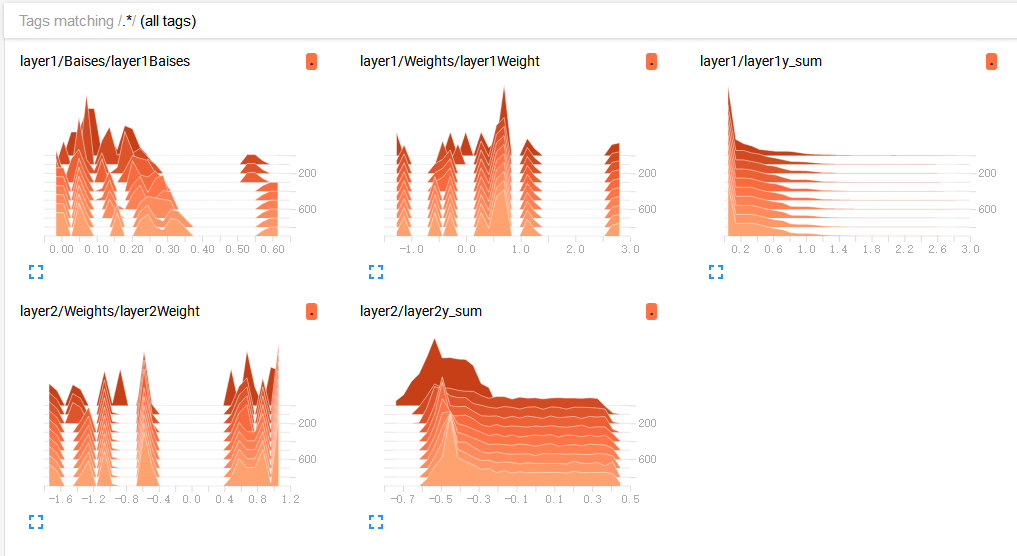
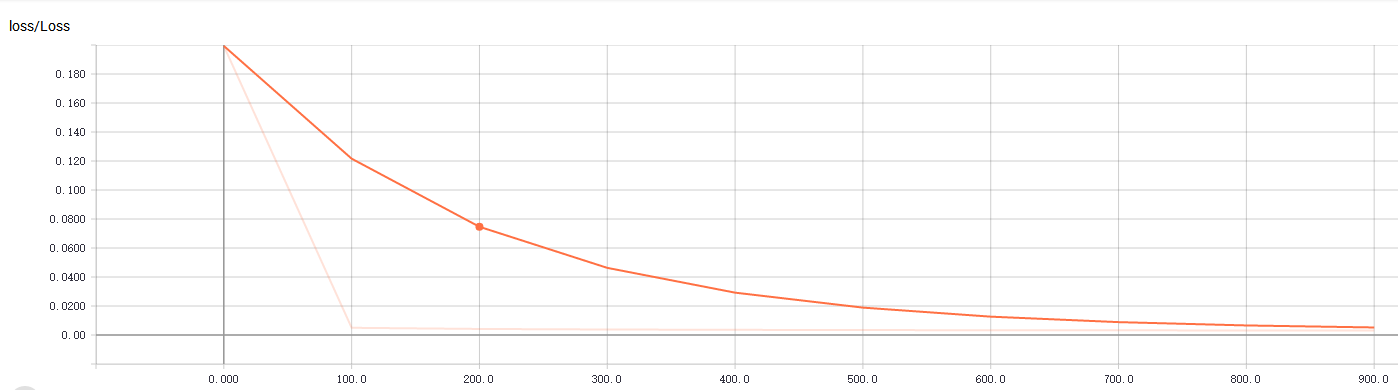
B. tf.summary.scalar("Loss",loss):折线图显示,loss的走向决定你的网络训练的好坏,至关重要一点
C.初始化与运行设定的图表
 merge = tf.summary.merge_all()#合并图表

 writer = tf.summary.FileWriter("G:/test/",graph=sess.graph)#写进文件

 result = sess.run(merge,feed_dict={xs:x_data,ys:y_data})#运行打包的图表merge

 writer.add_summary(result,i)#写入文件,并且单步长50
完整代码及显示效果:
 import tensorflow as tf

 import numpy as np

 import matplotlib.pyplot as plt

 def add_layer(inputs , in_size , out_size , n_layer = 1 , activate = None):

     layer_name = "layer" + str(n_layer)

     with tf.name_scope(layer_name):

         with tf.name_scope("Weights"):

             Weights = tf.Variable(tf.random_normal([in_size,out_size]),name="W")#随机初始化

             tf.summary.histogram(layer_name+"Weight",Weights)

         with tf.name_scope("Baises"):

             baises  = tf.Variable(tf.zeros([1,out_size])+0.1,name="B")#可以随机但是不要初始化为0,都为固定值比随机好点

             tf.summary.histogram(layer_name+"Baises",baises)

         y = tf.matmul(inputs, Weights) + baises #matmul:矩阵乘法,multipy:一般是数量的乘法

         if activate:

             y = activate(y)

         tf.summary.histogram(layer_name+"y_sum",y)

         return y

 if __name__ == '__main__':

     x_data = np.linspace(-1,1,300,dtype=np.float32)[:,np.newaxis]#创建-1,1的300个数,此时为一维矩阵,后面转化为二维矩阵===[1,2,3]-->>[[1,2,3]]

     noise = np.random.normal(0,0.05,x_data.shape).astype(np.float32)#噪声是(1,300)格式,0-0.05大小

     y_data = np.square(x_data) - 0.5 + noise #带有噪声的抛物线

     fig = plt.figure('show_data')# figure("data")指定图表名称

     ax = fig.add_subplot(111)

     ax.scatter(x_data,y_data)

     plt.ion()

     plt.show()

     with tf.name_scope("inputs"):

         xs = tf.placeholder(tf.float32,[None,1],name="x_data") #外界输入数据

         ys = tf.placeholder(tf.float32,[None,1],name="y_data")

     l1 = add_layer(xs,1,10,n_layer=1,activate=tf.nn.relu)

     prediction = add_layer(l1,10,1,n_layer=2,activate=None)

     with tf.name_scope("loss"):

         loss = tf.reduce_mean(tf.reduce_sum(tf.square(ys - prediction),reduction_indices=[1]))#误差

         tf.summary.scalar("Loss",loss)

     with tf.name_scope("train_step"):

         train_step = tf.train.GradientDescentOptimizer(0.1).minimize(loss)#对误差进行梯度优化,步伐为0.1

     sess = tf.Session()

     merge = tf.summary.merge_all()#合并

     writer = tf.summary.FileWriter("G:/test/",graph=sess.graph)

     sess.run( tf.global_variables_initializer())

     for i in range(1000):

         sess.run(train_step, feed_dict={xs: x_data, ys: y_data})#训练

         if i%100 == 0:

             result = sess.run(merge,feed_dict={xs:x_data,ys:y_data})#运行打包的图表merge

             writer.add_summary(result,i)#写入文件,并且单步长50
 注意: 假设你的py文件中写了tf的summary,并且存放在了此目录下“D:\test\logs” 调出cmd,cd到D:\test,然后输入tensorboard –logdir=logs。一定要cd到logs这个文件夹的上一级,其他会出现No graph definition files were found.问题。
主要参考莫凡大大:https://morvanzhou.github.io/
可视化出现问题了,参考这位大神:http://blog.csdn.net/fengying2016/article/details/54289931
TessorFlow学习 之 神经网络的构建的更多相关文章
- Spark MLlib Deep Learning Convolution Neural Network (深度学习-卷积神经网络)3.2
3.Spark MLlib Deep Learning Convolution Neural Network(深度学习-卷积神经网络)3.2 http://blog.csdn.net/sunbow0 ...
- 针对深度学习(神经网络)的AI框架调研
针对深度学习(神经网络)的AI框架调研 在我们的AI安全引擎中未来会使用深度学习(神经网络),后续将引入AI芯片,因此重点看了下业界AI芯片厂商和对应芯片的AI框架,包括Intel(MKL CPU). ...
- Spark MLlib Deep Learning Convolution Neural Network (深度学习-卷积神经网络)3.1
3.Spark MLlib Deep Learning Convolution Neural Network (深度学习-卷积神经网络)3.1 http://blog.csdn.net/sunbow0 ...
- ArcGIS案例学习笔记2_2_模型构建器和山顶点提取批处理
ArcGIS案例学习笔记2_2_模型构建器和山顶点提取批处理 计划时间:第二天下午 背景:数据量大,工程大 目的:自动化,批处理,定制业务流程,不写程序 教程:Pdf/343 数据:chap8/ex5 ...
- Spark MLlib Deep Learning Convolution Neural Network (深度学习-卷积神经网络)3.3
3.Spark MLlib Deep Learning Convolution Neural Network(深度学习-卷积神经网络)3.3 http://blog.csdn.net/sunbow0 ...
- ReLeQ:一种自动强化学习的神经网络深度量化方法
ReLeQ:一种自动强化学习的神经网络深度量化方法 ReLeQ:一种自动强化学习的神经网络深度量化方法ReLeQ: An Automatic Reinforcement Learning Ap ...
- 深度学习——卷积神经网络 的经典网络(LeNet-5、AlexNet、ZFNet、VGG-16、GoogLeNet、ResNet)
一.CNN卷积神经网络的经典网络综述 下面图片参照博客:http://blog.csdn.net/cyh_24/article/details/51440344 二.LeNet-5网络 输入尺寸:32 ...
- 【CV知识学习】神经网络梯度与归一化问题总结+highway network、ResNet的思考
这是一篇水货写的笔记,希望路过的大牛可以指出其中的错误,带蒟蒻飞啊~ 一. 梯度消失/梯度爆炸的问题 首先来说说梯度消失问题产生的原因吧,虽然是已经被各大牛说烂的东西.不如先看一个简单的网络结构 ...
- ML学习笔记- 神经网络
神经网络 有的模型可以有多种算法.而有的算法可能可用于多种模型.在神经网络中,对外部环境提供的模式样本进行学习训练,并能存储这种模式,则称为感知器;对外部环境有适应能力,能自动提取外部环境变化特征,则 ...
随机推荐
- go thrift报错问题--WriteStructEnd
问题 go thrift开发过程中,多个goroutine共用一个client时,报错: panic: runtime error: index out of range goroutine 24 [ ...
- Zookeeper Ha集群简介+jdbcClient访问Ha集群环境
Hadoop-HA机制HA概述high available(高可用) 所谓HA(high available),即高可用(7*24小时不中断服务). 实现高可用最关键的策略是消除单点故障.HA严格来说 ...
- Java通过webservice接口获取天气信息
通过SOAP请求的方式获取天气信息并解析返回的XML文件. 参考: http://www.webxml.com.cn/WebServices/WeatherWS.asmx import java.io ...
- 写了一个hiero检查任务渲染结果的脚本
基本思路是写了一个时间判断函数(postSequence_check)来对比transcode任务提交时间和目标文件夹内文件的修改时间来确定渲染是否成功执行,然后通过Hiero提供的postSeque ...
- linux 修改mac地址,干坏事必备
首先关闭无线 wlan0 ifconfig wlan0 down 修改mac地址 macchanger -m [MAC] [INTERFACE] 例如:macchanger -m ::::: wlan ...
- vi命令【方向键】变字母键的解决方法
vi命令[方向键]变字母键的解决方法 最近在SSH下玩Debian发现了一个有趣的现象,就是在一些个别版本的Debian镜像下,使用vi命令时会出现键盘输出出错的现象,使用方向键时会变成C,D等字 ...
- 测试教程网.unittest教程.3. 实例: 测试弱密码
From: http://www.testclass.net/pyunit/test_example_1/ 背景 考虑这样一个测试弱密码的实例,这个我们在pytest相关教程中也有过描述. 我们需要判 ...
- C/C++基础----用于大型程序的工具(异常处理,命名空间,多重继承)
独立开发的子系统间协同处理错误的能力 使用各种库(可能包含独立开发的库进行协同开发的能力) 对比复杂的应用概念建模的能力 异常处理 异常将问题的检测和解决过程分离开 当执行一个throw之后,程序控制 ...
- C++进阶--解谜operator new/delete
//############################################################################ // 解谜operator new/del ...
- springboot springcloud 热部署
本文转载自:https://www.cnblogs.com/moly/p/7978303.html 可以在配置修改某些文件重启,建议配置一个控制文件,只有此文件修改才会重启. 1. pom中添加: & ...