
Silverlight中使用MVVM(4)—演练
本来打算用MVVM实现CRUD操作的,这方面例子网上资源还挺多的,毕竟CRUD算是基本功了,因为最近已经开始学习Cailburn框架了,感觉时间
挺紧的,这篇就实现其中的更新操作吧。
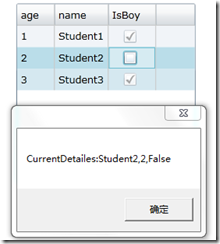
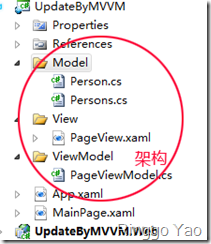
功能很明确,当我们更改DataGrid中的CheckBox时,将源中当前发生变化的数据项在界面上显示出来。我们仍然在前面项目的基础上实现这个功能
首先我们需要给实体Person类添加一个Bool的属性,因为这里我们只对这个属性值操作,所以对于age,name属性也就无必要实现更改通知了
public class Person:INotifyPropertyChanged
{
public int age { get; set; }
public string name { get; set; }
private bool _isBoy;
public bool IsBoy
{
get { return _isBoy; }
set { _isBoy = value;
if (PropertyChanged != null)
{
PropertyChanged(this, new PropertyChangedEventArgs("IsBoy"));
}
}
}
public event PropertyChangedEventHandler PropertyChanged;
}
我们仍然从Persons中获取数据集合,这里我们因为操作时源集合将发生变化,所以这里我们继承了ObservableCollection<T>类
public class Persons:ObservableCollection<Person>
{
public Persons() : base()
{
}
public new event PropertyChangedEventHandler PropertyChanged;
public new void Add(Person person)
{
//添加项时自动绑定,并且向上传递发生改变的属性
((INotifyPropertyChanged)person).PropertyChanged += (obj, e) =>
{
if (PropertyChanged != null)
{
PropertyChanged(obj, new PropertyChangedEventArgs(e.PropertyName));
}
};
base.Add(person);
}
}
这里的Persons类通过new关键字隐藏了ObservableCollection<Person>原来的事件和方法,在Persons类中这里我们还需要
添加一个获取源数据的集合
public Persons GetPerson()
{
//获取数据源集合
Persons getAllpersons = new Persons();
for (int i = 1; i < 4; i++)
{
getAllpersons.Add(new Person() {age=i,name="Student"+i,IsBoy=true});
}
return getAllpersons;
}
现在对于Model我们已经完成了工作,下面就是修改ViewModel了,这个部分其实没有太大的变化
public Persons GetPersons { get; set; }
public PageViewModel()
{
GetPersons = new Persons().GetPerson();
//数据源发生变化时的操作
GetPersons.PropertyChanged += (obj, e) =>
{
Person person = (Person)obj;
MessageBox.Show(string.Format("CurrentDetailes:{0},{1},{2}",person.name,person.age,person.IsBoy));
};
}
我们对于这个GetPersons这个源集合进行了一个操作,就是当它的属性发生变化时执行一个动作,这里我们只是用对话框将当前项显示出来
对于UI,我们仍然只是用之前的Xaml
<data:DataGrid ItemsSource="{Binding GetPersons}" AutoGenerateColumns="True" Height="200" HorizontalAlignment="Left" Name="dataGrid1" />
最后我们将View和Model都放入MainPage页面中
<UserControl.Resources>
<vm:PageViewModel x:Key="model"></vm:PageViewModel>
</UserControl.Resources>
<Grid x:Name="LayoutRoot" Background="White" DataContext="{StaticResource model}">
<viw:PageView></viw:PageView>
</Grid>
好了,这样我们的功能就实现了。不过在这里我们还是可以考虑一点东西的,真实情况是我们的实体类不会只是一个,那么我们就要重复为每一个实体类实现 ObservableCollection<T> 类了,这时可能你已经想到用泛型了,我们把集合用泛型实现.
对于Persons类,我们将其改为泛型集合
public class ViewModelCollection<T> : ObservableCollection<T>
{
public ViewModelCollection() : base()
{
}
public new void Add(T item)
{
((INotifyPropertyChanged)item).PropertyChanged += new PropertyChangedEventHandler(ViewModelCollection_PropertyChanged);
base.Add(item);
}
public new event PropertyChangedEventHandler PropertyChanged;
void ViewModelCollection_PropertyChanged(object sender, PropertyChangedEventArgs e)
{
if (PropertyChanged != null)
{
PropertyChanged(sender, new PropertyChangedEventArgs(e.PropertyName));
}
} }
ViewModel中:
public ViewModelCollection<Person> GetPersons{get;set;}
public PageViewModel()
{
GetPersons = GetMan();
//数据源发生变化时的操作
GetPersons.PropertyChanged += (obj, e) =>
{
Person person = (Person)obj;
MessageBox.Show(string.Format("CurrentDetailes:{0},{1},{2}", person.name, person.age, person.IsBoy));
};
}
public static ViewModelCollection<Person> GetMan()
{
//获取数据源集合
ViewModelCollection<Person> getAllpersons = new ViewModelCollection<Person>();
for (int i = 1; i < 4; i++)
{
getAllpersons.Add(new Person() { age = i, name = "Student" + i, IsBoy = true });
}
return getAllpersons;
}
整体上的是一致的,只不过之前,因为实体类单一,所以我一直将数据源固定在Model模块中的,那么用泛型之后,我就将这个获取数据源的行为就移动到对应的ViewModel中了,这样实现更为优雅一些。
其实通过这个循序渐进的过程,很容易让人感觉的到,从开始到现在除非我们需求的改变,很少修改UI,几乎大部分重构或者修改都是在ViewModel中实 现,这个也的确让人体会到UI与逻辑分离带来的方便之处,同时经过MVVM的分离形式,我感觉对于程序的调试也比先前容易定位。
的确,MVVM模式如果再结合一些主流的框架,可以完成许多丰富的功能,当然这已经是另一个话题了,这里仅仅实现了更新功能,关于MVVM模式的CRUD的完整实现可以参考网上的资源,也可以参考这篇文章。
代码下载:UpdateByMVVM VS2010+SL3
Silverlight中使用MVVM(4)—演练的更多相关文章
- 四、Silverlight中使用MVVM(四)——演练
本来打算用MVVM实现CRUD操作的,这方面例子网上资源还挺多的,毕竟CRUD算是基本功了,因为最近已经开始学习Cailburn框架了,感觉时间 挺紧的,这篇就实现其中的更新操作吧. 功能很明确,当我 ...
- Silverlight中使用MVVM(1)--基础
Silverlight中使用MVVM(1)--基础 Silverlight中使用MVVM(2)—提高 Silverlight中使用MVVM(3)—进阶 Silverlight中使用MVVM(4)—演练 ...
- Silverlight中使用MVVM(4)
Silverlight中使用MVVM(1)--基础 Silverlight中使用MVVM(2)—提高 Silverlight中使用MVVM(3)—进阶 Silverlight中使用MVVM(4)—演练 ...
- Silverlight中使用MVVM(3)
Silverlight中使用MVVM(1)--基础 Silverlight中使用MVVM(2)—提高 Silverlight中使用MVVM(3)—进阶 Silverlight中使用MVVM(4)—演练 ...
- Silverlight中使用MVVM(2)
Silverlight中使用MVVM(1)--基础 Silverlight中使用MVVM(2)—提高 Silverlight中使用MVVM(3)—进阶 Silverlight中使用MVVM(4)—演练 ...
- Silverlight中使用MVVM(1)
Silverlight中使用MVVM(1) Silverlight中使用MVVM(1)--基础 Silverlight中使用MVVM(2)—提高 Silverlight中使用MVVM(3)—进阶 ...
- Silverlight中在MVVM模式下对DatagridRow选择控件封装
在项目中,凡是涉及到表格的地方用的最多的控件,自然少不了DataGrid的身影,它明了的展示各种数据让人十分喜欢.现在要实现一个功能,使DataGrid具有全选和项选中的功能,如果在传统后台代码中完成 ...
- 三、Silverlight中使用MVVM(三)——进阶
这篇主要引申出Command结合MVVM模式在应用程序中的使用 我们要做出的效果是这样的 就是提供了一个简单的查询功能将结果绑定到DataGrid中,在前面的基础上,这个部分相对比较容易实现了 我们在 ...
- Silverlight中使用MVVM(2)-(提高)
在第一篇文章中的示例中,我们已经简单的了解了应用MVVM模式的流程,我的本意是你已经了解了一点MVVM的概念,然后又没有一个较好的例子学习,可以跟着我一起学习MVVM模式,所以这个部分,都是没有理论知 ...
随机推荐
- classmethod,staticmethod
'''1 绑定方法: 在类内部定义的函数,默认就是给对象来用,而且是绑定给对象用的,称为对象的绑定方法 绑定对象的方法特殊之处: 应该由对象来调用,对象来调用,会自动将对象当作第一个参数传入 绑定到类 ...
- 原生JS一些操作
很久没写原生的JS了,上周做了一个小东西让我又重新了解了一下原生JS,以下记录一些常见的原生JS var canvArrow = document.getElementById('js-canv_ar ...
- 28、vSocket模型详解及select应用详解
在上片文章已经讲过了TCP协议的基本结构和构成并举例,也粗略的讲过了SOCKET,但是讲解的并不完善,这里详细讲解下关于SOCKET的编程的I/O复用函数. 1.I/O复用:selec函数 在介绍so ...
- jQuery插件初级练习1答案
html: <script> $(".btn").click(function(){ $.color($("#box"),"blue&qu ...
- DDL和DML的区别
DML(data Manipulation Language)数据库操纵语言: 使用范围:对数据库中的数据进行一些简单的操作,如IDUS(增删改查) DDL(Data Definiton Langua ...
- 在Delphi中处理word文档与数据库的互联 1
在Delphi中处理word文档与数据库的互联 ---- 目前,Delphi被越来越多的人选中作为MIS系统开发中的前台工具.在以Delphi为前台,一些大型数据库为后台的MIS系统中,图形的处理不可 ...
- Android-Kotlin-抽象类与多态的表现
选择包名,然后右键: 选择Class类型,会有class: 选择File类型,不会自动有class: 目录结构: 定义描述抽象类 Person人类: package cn.kotlin.kotlin ...
- C#单例类的实现
C#单例类的实现 单例类保证一个类全局仅有一个实例,并提供一个全局访问点,由于只能生成一个实例,因此我们必须把构造函数设为私有函数以禁止他人创建实例. 实现1:懒汉式,线程不安全 该实现没有额外开销, ...
- DotNetCore依赖注入实现批量注入
文章转载自平娃子(QQ:273206491):http://os.pingwazi.cn/resource/batchinjectservice 一.依赖注入 通过依赖注入,可以实现接口与实现类的松耦 ...
- wpf 导出Excel
private void Button_Click_1(object sender, RoutedEventArgs e) { ExportDataGridSaveAs(true, this.data ...