
ElasticSearch安装和head插件安装
本文主要介绍elasticsearch5.0安装及head插件安装。确保系统已经安装好jdk1.8以上,操作系统CentOS6以上。
一、elasticsearch安装配置
1.官网下载源码包
下载不同版本技巧:
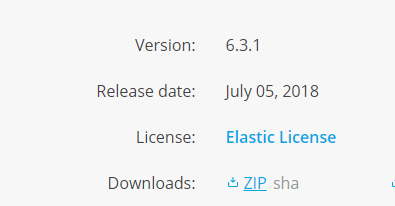
复制下载链接修改版本号!
https://artifacts.elastic.co/downloads/elasticsearch/elasticsearch-6.3.0.zip
2.解压安装
useradd elasticsearch

tar xf elasticsearch-6.3.0.tar.gz -C /usr/local

cd /usr/local

ln -sv elasticsearch-6.3.0 elasticsearch

mkdir -pv /data/elasticsearch/{data,logs}

chown -R elasticsearch.elasticsearch /data/elasticsearch
3.修改配置文件
cat /usr/local/elasticsearch/config/elasticsearch.yml

path.data:/data/elasticsearch/data

path.logs:/data/elasticsearch/logs

network.host:192.168.1.12

http.cors.enabled:true

http.cors.allow-origin:"*"
4.修改系统参数
cat /etc/security/limits.conf

*              soft    nproc          65536

*              hard    nproc          65536

*              soft    nofile          65536

*              hard    nofile          65536

cat /etc/sysctl.conf

vm.max_map_count= 262144

sysctl -p
5.启动服务
su - elasticsearch -c "/usr/local/elasticsearch/bin/elasticsearch &"
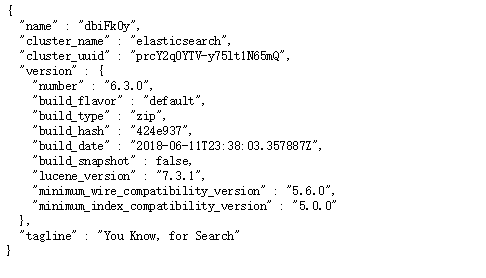
浏览器访问:http://192.168.1.12:9200/
二、head插件的安装
在5.0版本中不支持直接安装head插件,需要启动一个服务
1.下载插件安装
先安装node 自带一个npm。
git clone git://github.com/mobz/elasticsearch-head.git

cd elasticsearch-head

npm install

在elasticsearch-head目录下node_modules/grunt下如果没有grunt二进制程序,需要执行
cd elasticsearch-head

npm install grunt --save
2.修改配置
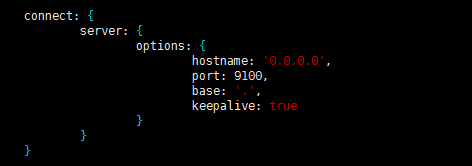
修改elasticsearch-head下Gruntfile.js文件,默认监听在127.0.0.1下9200端口
3.启动服务
/usr/local//node-v4.4.7-linux-x64/bin/npm start

浏览器访问 http://123.56.154.68:9100/

IK分词器安装:
1. 下载
下载对应的版本: https://github.com/medcl/elasticsearch-analysis-ik
2. 编译
配置前关闭elasticsearch,安装完成后再启动。
下载后,进入elasticsearch-analysis-pinyin-master目录,mvn打包(未下载maven的自行下载安装)。
3. 配置
打包成功后,在 elasticsearch-analysis-ik-master\target\releases会有一个elasticsearch-analysis-ik-6.3.0.zip。
把压缩包复制到 \elasticsearch-6.3.0\plugins\ik中, 没有文件夹就创建。
然后重启elasticsearch。
到此安装完成了!
附:
elasticsearch 安装过程中遇到了一些问题,这是在网上找的一些资料
警告提示
[2016-11-06T16:27:21,712][WARN ][o.e.b.JNANatives ] unable to install syscall filter:

java.lang.UnsupportedOperationException: seccomp unavailable: requires kernel 3.5+ with CONFIG_SECCOMP and CONFIG_SECCOMP_FILTER compiled in

at org.elasticsearch.bootstrap.Seccomp.linuxImpl(Seccomp.java:349) ~[elasticsearch-5.0.0.jar:5.0.0]

at org.elasticsearch.bootstrap.Seccomp.init(Seccomp.java:630) ~[elasticsearch-5.0.0.jar:5.0.0]
报了一大串错误,其实只是一个警告。使用心得linux版本,就不会出现此类问题了。
ERROR: bootstrap checks failed
max file descriptors [4096] for elasticsearch process likely too low,

increase to at least [65536]

max number of threads [1024] for user [lishang] likely too low,

 increase to at least [2048]

max virtual memory areas vm.max_map_count [65530] likely too low,

increase to at least [262144]
解决:切换到root用户,编辑limits.conf 添加类似如下内容
vi /etc/security/limits.conf
添加如下内容:
* soft nofile 65536

* hard nofile 131072

* soft nproc 2048

* hard nproc 4096
对于第二条错误同意需要切换到root用户,进入limits.d目录下修改配置文件。
vi /etc/security/limits.d/90-nproc.conf
修改如下内容:
* soft nproc 1024

#修改为

* soft nproc 2048
第三条错误需要切换到root用户修改配置sysctl.conf
vi /etc/sysctl.conf
添加下面配置:
vm.max_map_count=655360
并执行命令:
sysctl -p
然后,重新启动elasticsearch,即可启动成功。
启动问题
**1、Java HotSpot(TM) 64-Bit Server VM warning: INFO: os::commit_memory(0x0000000085330000, 2060255232, 0) failed; error='Cannot allocate memory' (errno=12)**
由于elasticsearch5.0默认分配jvm空间大小为2g,修改jvm空间分配
# vim config/jvm.options

-Xms2g

-Xmx2g

修改为

-Xms512m

-Xmx512m
2、max number of threads [1024] for user [elasticsearch] is too low, increase to at least [2048]修改 /etc/security/limits.d/90-nproc.conf
*          soft    nproc     1024

*          soft    nproc     2048
3、max virtual memory areas vm.max_map_count [65530] is too low, increase to at least [262144]
修改/etc/sysctl.conf配置文件,
cat /etc/sysctl.conf | grep vm.max_map_countvm.max_map_count=262144
如果不存在则添加
echo "vm.max_map_count=262144" >>/etc/sysctl.conf
4、max file descriptors [65535] for elasticsearch process likely too low, increase to at least [65536]
需要执行下面的命令
ulimit -n 65536ElasticSearch安装和head插件安装的更多相关文章
- 【windows环境下】RabbitMq的安装和监控插件安装
RabbitMq的安装: RabbitMQ是基于Erlang的,所以必须先配置Erlang环境. 下载Erlang,地址:http://www.erlang.org/download/otp_win3 ...
- Android模拟器genymotion安装与eclipse 插件安装
推荐一款Android模拟器"Genymotion",有点速度快,占用资源少,可整合eclipse.闲话少谈,看安装步骤. 1.下载地址:https://www.genymotio ...
- Sublime Text3安装及常用插件安装
为了使用强大好用的代码编辑器来进行selenium3+Python3的自动化测试. 使用Sublime Text 3非常适合. 1.下载安装 首先到http://www.sublimetext.com ...
- VScode安装后的插件安装
杭州SEO:Chinese(Simplified) Language Pack for Visual Stidio Code 中文汉化包 对于一些英文不太好的小伙伴,上来第一件事肯定是要切换成中文语言 ...
- jmeter在Windows下安装(含插件安装)
[准备环境] jdk1.8 jmeter的安装包下载 [步骤] 1 把下载下来的压缩包解压,点击jmeter.bat 启动,启动后是英文界面 2 修改默认的英文界面,打开jmeter.properti ...
- gulp的安装以及less插件安装与使用
1.安装node.js 下载地址:http://nodejs.cn/download/ 这时我们输入 node -v 以及 npm -v 检查是否安装成功. 2.为了提高后续使用的快速,我们安装 ...
- ElasticSearch 6.x head插件安装
一.下载node.js yum install -y nodejs 二.安装npm npm install -g cnpm --registry=https://registry.npm.taobao ...
- 18-10-15 服务器删除数据的方法【Elasticsearch 数据删除 (delete_by_query 插件安装使用)】方法二没有成功
rpa 都是5.xx ueba 分为2.0 或者5.0 上海吴工删除数据的方法 在许多项目中,用户提供的数据存储盘大小有限,在运行一段时间后,大小不够就需要删除历史的 Elasticsearch 数 ...
- Elasticsearch学习之head插件安装
通过elasticseach自带的plugin命令 elasticsearch/bin/plugin -install mobz/elasticsearch-head 如下图: 2. zip包安装 ...
随机推荐
- 学习认识Spring原理
学习认识Spring原理 Spring 是一种业务层框架.搭建Spring框架需要Spring开发包和commons-logging包.Spring的核心思想是控制反转也称依赖注入(创建者--(实例) ...
- SQLErrorCodes loaded: [DB2, Derby, H2, HSQL, Informix, MS-SQL, MySQL, Oracle, PostgreSQL, Sybase, Hana]
Loading XML bean definitions from class path resource [org/springframework/jdbc/support/sql-error-co ...
- shell 输出文件内容
cat $filepath | while read line; do echo $line ; done #!/bin/bash #filepath=/opt/jenkins_home/worksp ...
- Javascript一(变量,数据类型,正则表达式,数据,语句)
本文章适合具有一定程序编程语言基础的人士阅读,最好学完Java基础再来阅读本文章更容易理解语言初学者会看起来比较费劲,不易理解 一.导入脚本 在html导入Javascript的格式是: <sc ...
- opencv中Mat格式的数据访问.at
opencv3中图形存储基本为Mat格式,如果我们想获取像素点的灰度值或者RGB值,可以通过image.at<uchar>(i,j)的方式轻松获取. Mat类中的at方法对于获取图像矩阵某 ...
- 一只青蛙从第一级台阶跳到第n级,每次可以跳任意级,共有多少种跳法,并写出递推式
是斐波那契数列问题 假设f(n)是n个台阶跳的次数:(假设已经调到第n个台阶,最后一次是由哪个台阶跳上来的) f(n) = f(n-1)+f(n-2)+...+f(n-(n-1)) + f(n-n) ...
- 服务器环境配置nginx / php / php-fpm(一)
登陆,升级应用,查询和关闭selinux yum update getenforce setenforce 0 vi /etc/selinux 添加非root用户 adduser deploy pas ...
- animation CSS3动画总结
最近一个小游戏项目用到了CSS3的动画属性,例如transition.transform.animation.经过三个星期,终于做完了,利用周末好好梳理总结一下. keyframes这个属性用来定义一 ...
- C++11多线程教学
转自:http://www.cnblogs.com/lidabo/p/3908705.html 本篇教学代码可在GitHub获得:https://github.com/sol-prog/threads ...
- RESTful源码笔记之RESTful Framework的Mixins小结
0x00 引言 本篇对drf中的mixins进行简要的分析总结.Mixins在drf中主要配合viewset共同使用,实现http方法与mixins的相关类与方法进行关联. from rest_fra ...