Nginx(二)-- 配置文件之虚拟主机配置
1.配置文件与解释
#user  nobody;

worker_processes  1;            # 设置工作子进程,默认是1个工作子进程,可以修改,一般设置为CPU的总核数

#error_log  logs/error.log;

#error_log  logs/error.log  notice;

#error_log  logs/error.log  info;

#pid        logs/nginx.pid;

events {

    worker_connections  1024;   # 设置一个工作子进程最大允许多少个连接

}

http {

    include       mime.types;     # 能够支持的类型

    default_type  application/octet-stream;

    #log_format  main  '$remote_addr - $remote_user [$time_local] "$request" '

    #                  '$status $body_bytes_sent "$http_referer" '

    #                  '"$http_user_agent" "$http_x_forwarded_for"';

    #access_log  logs/access.log  main;

    sendfile        on;

    #tcp_nopush     on;

    #keepalive_timeout  0;

    keepalive_timeout  65;

    #gzip  on;

    server {            # 虚拟主机段

        listen       80;

        server_name  localhost;

        #charset koi8-r;

        #access_log  logs/host.access.log  main;

        location / {

            root   html;

            index  index.html index.htm;

        }

        #error_page  404              /404.html;

        # redirect server error pages to the static page /50x.html

        #

        error_page   500 502 503 504  /50x.html;

        location = /50x.html {

            root   html;

        }

        # proxy the PHP scripts to Apache listening on 127.0.0.1:80

        #

        #location ~ \.php$ {

        #    proxy_pass   http://127.0.0.1;

        #}

        # pass the PHP scripts to FastCGI server listening on 127.0.0.1:9000

        #

        #location ~ \.php$ {

        #    root           html;

        #    fastcgi_pass   127.0.0.1:9000;

        #    fastcgi_index  index.php;

        #    fastcgi_param  SCRIPT_FILENAME  /scripts$fastcgi_script_name;

        #    include        fastcgi_params;

        #}

        # deny access to .htaccess files, if Apache's document root

        # concurs with nginx's one

        #

        #location ~ /\.ht {

        #    deny  all;

        #}

    }

    # another virtual host using mix of IP-, name-, and port-based configuration

    #

    #server {

    #    listen       8000;

    #    listen       somename:8080;

    #    server_name  somename  alias  another.alias;

    #    location / {

    #        root   html;

    #        index  index.html index.htm;

    #    }

    #}

    # HTTPS server

    #

    #server {

    #    listen       443 ssl;

    #    server_name  localhost;

    #    ssl_certificate      cert.pem;

    #    ssl_certificate_key  cert.key;

    #    ssl_session_cache    shared:SSL:1m;

    #    ssl_session_timeout  5m;

    #    ssl_ciphers  HIGH:!aNULL:!MD5;

    #    ssl_prefer_server_ciphers  on;

    #    location / {

    #        root   html;

    #        index  index.html index.htm;

    #    }

    #}

}
2.Nginx虚拟主机配置
1.基于域名配置(使用的比较多)
1) 在nginx/conf/nginx.conf文件中的http段中添加一个server,如下所示:
     # 基于域名的虚拟主机配置

     server {

         listen          80;

         server_name     www.xbq.com;

         location / {

             root        html/host;  # 相对路径,在 nginx/html/host目录中

             index       admin.html;

         }

     }
2) 在nginx/html文件夹中新建 host 文件夹,然后在 host文件夹中 新建admin.html文件,admin.html文件中的内容为:
Hello,This is host page,www.xbq.com.
3) 重新加载nginx.conf文件,./nginx -s reload
4) 修改C:\Windows\System32\drivers\etc\hosts文件,添加如下内容,为了将域名解析:
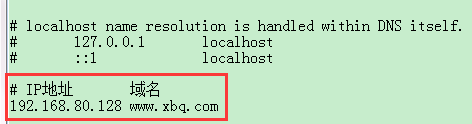
5) 浏览器访问:www.xbq.com,发现和刚刚写的admin.html内容一样,成功!
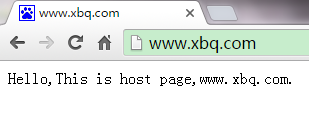
当访问www.xbq.com的时候,会匹配server中 server_name,然后找到html/host文件夹中的admin.html,返回界面。
2.基于端口配置
1) 在nginx/conf/nginx.conf文件中的http段中添加一个server,如下所示:
     # 基于端口号的虚拟主机配置

     server {

         listen          8888;

         server_name     test;      # 无实际意义,可省略

         location / {

             root        html/port; # 相对路径,在nginx/html/port目录中

             index       admin.html;

         }

     }
2) 在nginx/html文件夹中新建 port文件夹,然后在 port文件夹中 新建admin.html文件,admin.html文件中的内容为:
Hello,This is port page.
3) 重新加载nginx.conf文件,./nginx -s reload
4) 浏览器访问:http://192.168.80.128:8888/,出现如下,则成功:

3.基于IP配置(使用的比较少)
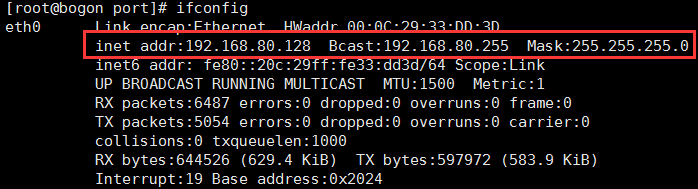
(1) 先查看本机的IP,ifconfig
(2) 添加虚拟网卡
ifconfig eth0:1 192.168.80.150 broadcast 192.168.80.255 netmask 255.255.255.0 up
route add -host 192.168.80.150 dev eth0:1
(3) 检测网络是否通:ping 192.169.80.150

(4) 在nginx/conf/nginx.conf文件中的http段中添加一个server,如下所示:
     # 基于IP的虚拟主机配置

     server {

         listen          80;

         server_name     192.168.80.150;  # 新建的虚拟网卡,是内网IP,只能通过 wget访问

         location / {

             root        html/ip;

             index       admin.html;

         }

     }
(5) 在nginx/html文件夹中新建 ip文件夹,然后在 ip文件夹中 新建admin.html文件,admin.html文件中的内容为:
Hello,This is IP page.
(6) 重新加载nginx.conf文件,./nginx -s reload
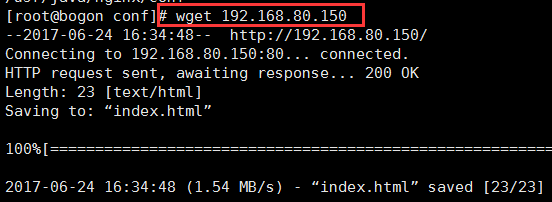
(7) 到nginx/conf 目录下,访问 刚刚的IP地址:wget 192.168.80.150,发现下载成功!
Nginx(二)-- 配置文件之虚拟主机配置的更多相关文章
- [原]生产环境下的nginx.conf配置文件(多虚拟主机)
[原]生产环境下的nginx.conf配置文件(多虚拟主机) 2013-12-27阅读110 评论0 我的生产环境下的nginx.conf配置文件,做了虚拟主机设置的,大家可以根据需求更改,下载即可在 ...
- nginx基于域名的虚拟主机配置(本地分布式项目域名配置及测试方法)
最有用的虚拟主机配置方式. 一个域名只能绑定一个ip地址,一个ip地址可以被多个域名绑定. 可以修改host文件实现域名访问. 前提:即使我们在nginx中配置基于域名的虚拟主机,也需要域名解析,即n ...
- nginx 的三种虚拟主机配置方法
nginx三种虚拟主机配置的方法. 基于端口 在生产环境中一般使用端口或者域名. [root@web01 /etc/nginx/conf.d]# cat web01.conf server { lis ...
- Nginx 的全局和虚拟主机配置
Httpd.conf nginx.conf my-heavy-innode-4G.cnf php.ini 用中文注释 # user:指定 Nginx Worker 进程运行用户和用户组,默认 nob ...
- Nginx总结(四)基于域名的虚拟主机配置
前面讲了如何安装配置Nginx,大家可以去这里看看nginx系列文章:https://www.cnblogs.com/zhangweizhong/category/1529997.html 今天要说的 ...
- 第四百零二节,Django+Xadmin打造上线标准的在线教育平台—生产环境部署,uwsgi安装和启动,nginx的安装与启动,uwsgi与nginx的配置文件+虚拟主机配置
第四百零二节,Django+Xadmin打造上线标准的在线教育平台—生产环境部署,uwsgi安装和启动,nginx的安装与启动,uwsgi与nginx的配置文件+虚拟主机配置 软件版本 uwsgi- ...
- Nginx教程(二) Nginx虚拟主机配置
Nginx教程(二) Nginx虚拟主机配置 1 虚拟主机管理 1.1 Nginx管理虚拟主机 虚拟主机使用的是特殊的软硬件技术,它把一台运行在因特网上的服务器主机分成一台台“虚拟”的主机,每台虚拟主 ...
- Nginx教程(二) Nginx虚拟主机配置 (转)
Nginx教程(二) Nginx虚拟主机配置 1 虚拟主机管理 1.1 Nginx管理虚拟主机 虚拟主机使用的是特殊的软硬件技术,它把一台运行在因特网上的服务器主机分成一台台“虚拟”的主机,每台虚拟主 ...
- 【nginx运维基础(2)】Nginx的配置文件说明及虚拟主机配置示例
配置文件说明 #定义Nginx运行的用户和用户组 user www www; #nginx进程数,建议设置为当前主机的CPU总核心数. worker_processes 8; #全局错误日志定义类型, ...
随机推荐
- ios NSString format 保留小数点 float double
self.orderCost.text = [NSStringstringWithFormat:@"%.1f元",self.order.cost.floatValue]; %.1f ...
- enter快捷键盘
protected override bool ProcessDialogKey(Keys keyData) { #region PageDown if (keyData == Keys.Enter) ...
- linux中的ll(转)
linux中的ll(转) 操作系统:ubuntu 9.04 ll并不是linux下一个基本的命令,它实际上是ls -l的一个别名. Ubuntu默认不支持命令ll,必须用 ls -l,这样使用起来不是 ...
- u-boot中网口处理--硬件部分
1. 网口硬件方案: AT91SAM9G10 + DM9000CEP: DM9000CEP为MAC+PHY解决方案,与MCU链接通过8位或16位数据总线. 内部SRAM为16Kbyte. 2. DM ...
- 常用shell命令实战
#!/bin/sh ################### #### 环境变量 ### ################### #主程序目录 #APP_HOME=/apps/svr/apache-to ...
- yum-plugin-priroites这个插件的一个文件。
yum源优先级的一个文件.是yum-plugin-priroites这个插件的一个文件.用来给yum源分优先级的.比如你在centos下有centos,epel,rpmfusion三个yum源.三个y ...
- Entity Framework应用:Code First的实体继承模式
Entity Framework的Code First模式有三种实体继承模式 1.Table per Type (TPT)继承 2.Table per Class Hierarchy(TPH)继承 3 ...
- (转)MFC:Windows如何区分鼠标双击和两次单击
在Windows平台上,鼠标左键的按下.松开.快速的两次点击会产生WM_LBUTTONDOWN.WM_LBUTTONUP和WM_LBUTTONDBLCLK消息,但是Windows根据什么来区分连续的两 ...
- 【Java面试题】24 sleep() 和 wait() 有什么区别? 详细解析!!!!
第一种解释: 功能差不多,都用来进行线程控制,他们最大本质的区别是:sleep()不释放同步锁,wait()释放同步缩. 还有用法的上的不同是:sleep(milliseconds)可 ...
- Oracle-批量修改语句及相关知识点
问: 有两张表A和B,结构相同,数据量一致,比如都有x,y和z列且都有n行,x为主键,完全相等,如何把表B的y列的数据赋值给A的y列? 我写的是1 update A set A.y=B.y where ...