OpenGL.Tutorial03_Matrices_测试
1、
2、
// ZC: 工程-->右键-->属性--> 配置属性:

// ZC:    C/C++ -->常规-->附加包含目录,里面添加:

// ZC:        E:\OpenGL_something\glfw-3.2.1.bin.WIN32\include

// ZC:        E:\OpenGL_something\glm-0.9.8.5

// ZC:        E:\OpenGL_something\glew-2.1.0\include

// ZC:    链接器-->输入-->附加依赖项,里面添加:

// ZC:        E:\OpenGL_something\glfw-3.2.1.bin.WIN32\lib-vc2010\glfw3.lib        这个应该是静态链接的lib(动态的貌似是glfw3dll.lib[ZC:我是看文件大小判断的...])

// ZC:        E:\OpenGL_something\glew-2.1.0\lib\Release\Win32\glew32.lib

// ZC:        opengl32.lib

// ZC:        glu32.lib

// ZC:        kernel32.lib

// ZC:        user32.lib

// ZC:        gdi32.lib

// ZC:        winspool.lib

// ZC:        shell32.lib

// ZC:        ole32.lib

// ZC:        oleaut32.lib

// ZC:        uuid.lib

// ZC:        comdlg32.lib

// ZC:        advapi32.lib

// ZC: 关于使用glew32.lib还是glew32s.lib:

// ZC:    看文件大小判断 静态链接的lib应该是glew32s.lib,但是我在编译的时候,发现无法定位函数grewInit(...)... 于是只能使用动态的glew32s.lib

// ZC:    于是还要将"E:\OpenGL_something\glew-2.1.0\bin\Release\Win32\glew32.dll"复制到项目的"E:\Project_VS10\OpenGL_Console_zz\Test\Test"中

// Include standard headers

#include <stdio.h>

#include <stdlib.h>

// Include GLEW

#include <GL/glew.h>

// Include GLFW

#include <GLFW/glfw3.h>

extern GLFWwindow* window;

// Include GLM

#include <glm/glm.hpp>

#include <glm/gtc/matrix_transform.hpp>

using namespace glm;

#include <common/shader.hpp>

int mainTutorial03Matrices( void )

{

    // Initialise GLFW

    if( !glfwInit() )

    {

        fprintf( stderr, "Failed to initialize GLFW\n" );

        getchar();

        return -;

    }

    glfwWindowHint(GLFW_SAMPLES, );

    glfwWindowHint(GLFW_CONTEXT_VERSION_MAJOR, );

    glfwWindowHint(GLFW_CONTEXT_VERSION_MINOR, );

    glfwWindowHint(GLFW_OPENGL_FORWARD_COMPAT, GL_TRUE); // To make MacOS happy; should not be needed

    glfwWindowHint(GLFW_OPENGL_PROFILE, GLFW_OPENGL_CORE_PROFILE); //We don't want the old OpenGL

    // Open a window and create its OpenGL context

    /*window = glfwCreateWindow( 1024, 768, "Tutorial 03 - Matrices", NULL, NULL);*/

    window = glfwCreateWindow( , , "Tutorial 03 - Matrices", NULL, NULL);

    if( window == NULL ){

        fprintf( stderr, "Failed to open GLFW window. If you have an Intel GPU, they are not 3.3 compatible. Try the 2.1 version of the tutorials.\n" );

        getchar();

        glfwTerminate();

        return -;

    }

    glfwMakeContextCurrent(window);

    // Initialize GLEW

    glewExperimental = true; // Needed for core profile

    if (glewInit() != GLEW_OK) {

        fprintf(stderr, "Failed to initialize GLEW\n");

        getchar();

        glfwTerminate();

        return -;

    }

    // Ensure we can capture the escape key being pressed below

    glfwSetInputMode(window, GLFW_STICKY_KEYS, GL_TRUE);

    // Dark blue background

    glClearColor(0.0f, 0.0f, 0.4f, 0.0f);

    GLuint VertexArrayID;

    glGenVertexArrays(, &VertexArrayID);

    glBindVertexArray(VertexArrayID);

    // Create and compile our GLSL program from the shaders

    GLuint programID = LoadShaders( "../Test/shaders/SimpleTransform_03.vertexshader", "../Test/shaders/SingleColor_03.fragmentshader" );

    // Get a handle for our "MVP" uniform

    GLuint MatrixID = glGetUniformLocation(programID, "MVP");

    // Projection matrix : 45?Field of View, 4:3 ratio, display range : 0.1 unit <-> 100 units

    //glm::mat4 Projection = glm::perspective(glm::radians(45.0f), 4.0f / 3.0f, 0.1f, 100.0f);

    glm::mat4 Projection = glm::perspective(glm::radians(45.0f), 4.0f / 3.0f, 0.1f, 100.0f);

    // Or, for an ortho camera :

    //glm::mat4 Projection = glm::ortho(-10.0f, 10.0f, -10.0f, 10.0f, 0.0f, 100.0f); // In world coordinates

    // Camera matrix

    //glm::mat4 View       = glm::lookAt(

    //                            glm::vec3(4,3,3), // Camera is at (4,3,3), in World Space

    //                            glm::vec3(0,0,0), // and looks at the origin

    //                            glm::vec3(0,1,0)  // Head is up (set to 0,-1,0 to look upside-down)

    //                       );

    glm::mat4 View       = glm::lookAt(

        glm::vec3(,,),// Camera is at (4,3,3), in World Space

        glm::vec3(,,), // and looks at the origin

        glm::vec3(,,)  // Head is up (set to 0,-1,0 to look upside-down)

        );

    // ZC: 上面的参数的理解:

    // ZC:    第一个参数:摄像机所在的位置(世界坐标系)

    // ZC:    第二个参数:摄像机往哪个点看过去(摄像机往哪个点的方向看去)        (ZC: 这个应该是参与计算的)

    // ZC:    第三个参数:头的位置(这里的"头" 实际就是指"摄像机"):            (ZC: 这个稍微测试了一下,发现 应该就是指方向[即 其次坐标的"w"是0])

    // ZC:        (0,1,0):就是正常的人类头顶朝上的样子,

    // ZC:        (1,0,0):就是头往X轴正方向倒90°,

    // ZC:        (0,0,1):应该就是头朝Z轴正方向倒90°(也就是往后倒,稍微验证了一下,应该就是这样子的)

    // Model matrix : an identity matrix (model will be at the origin)

    glm::mat4 Model      = glm::mat4(1.0f);

    //glm::mat4 Model      = glm::mat4(

    //    2.0f, 0.0f, 0.0f, 0.0f,

    //    0.0f, 2.0f, 0.0f, 0.0f,

    //    0.0f, 0.0f, 2.0f, 0.0f,

    //    0.0f, 0.0f, 0.0f, 1.0f);

    printf("%f, %f, %f, %f\n", Model[].x, Model[].y, Model[].z, Model[].w);

    printf("%f, %f, %f, %f\n", Model[].x, Model[].y, Model[].z, Model[].w);

    printf("%f, %f, %f, %f\n", Model[].x, Model[].y, Model[].z, Model[].w);

    printf("%f, %f, %f, %f\n", Model[].x, Model[].y, Model[].z, Model[].w);

    printf("\n");

    // Our ModelViewProjection : multiplication of our 3 matrices

    glm::mat4 MVP        = Projection * View * Model; // Remember, matrix multiplication is the other way around

    printf("%f, %f, %f, %f\n", MVP[].x, MVP[].y, MVP[].z, MVP[].w);

    printf("%f, %f, %f, %f\n", MVP[].x, MVP[].y, MVP[].z, MVP[].w);

    printf("%f, %f, %f, %f\n", MVP[].x, MVP[].y, MVP[].z, MVP[].w);

    printf("%f, %f, %f, %f\n", MVP[].x, MVP[].y, MVP[].z, MVP[].w);

    printf("\n");

    static const GLfloat g_vertex_buffer_data[] = {

        -1.0f, -1.0f, 0.0f,

        1.0f, -1.0f, 0.0f,

        0.0f,  1.0f, 0.0f,

    };

    //static const GLfloat g_vertex_buffer_data[] = {

    //    -2.0f, -2.0f, 0.0f,

    //    2.0f, -2.0f, 0.0f,

    //    0.0f,  2.0f, 0.0f,

    //};

    GLuint vertexbuffer;

    glGenBuffers(, &vertexbuffer);

    glBindBuffer(GL_ARRAY_BUFFER, vertexbuffer);

    glBufferData(GL_ARRAY_BUFFER, sizeof(g_vertex_buffer_data), g_vertex_buffer_data, GL_STATIC_DRAW);

    do{

        // Clear the screen

        glClear( GL_COLOR_BUFFER_BIT );

        // Use our shader

        glUseProgram(programID);

        // Send our transformation to the currently bound shader,

        // in the "MVP" uniform

        glUniformMatrix4fv(MatrixID, , GL_FALSE, &MVP[][]);

        // 1rst attribute buffer : vertices

        glEnableVertexAttribArray();

        glBindBuffer(GL_ARRAY_BUFFER, vertexbuffer);

        glVertexAttribPointer(

            ,                  // attribute. No particular reason for 0, but must match the layout in the shader.

            ,                  // size

            GL_FLOAT,           // type

            GL_FALSE,           // normalized?

            ,                  // stride

            (void*)            // array buffer offset

            );

        // Draw the triangle !

        glDrawArrays(GL_TRIANGLES, , ); // 3 indices starting at 0 -> 1 triangle

        glDisableVertexAttribArray();

        // Swap buffers

        glfwSwapBuffers(window);

        glfwPollEvents();

    } // Check if the ESC key was pressed or the window was closed

    while( glfwGetKey(window, GLFW_KEY_ESCAPE ) != GLFW_PRESS &&

        glfwWindowShouldClose(window) ==  );

    // Cleanup VBO and shader

    glDeleteBuffers(, &vertexbuffer);

    glDeleteProgram(programID);

    glDeleteVertexArrays(, &VertexArrayID);

    // Close OpenGL window and terminate GLFW

    glfwTerminate();

    return ;

}
3、改变中间的一段代码 用于测试:
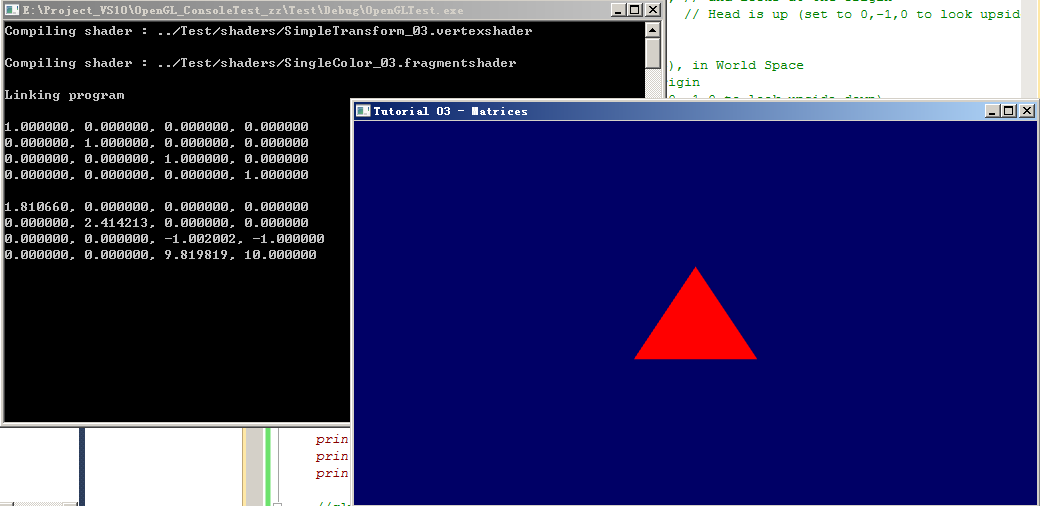
3.1、上面的代码执行的现象:
3.2、放大2倍(方式1):
    // Model matrix : an identity matrix (model will be at the origin)

    //glm::mat4 Model      = glm::mat4(1.0f);  // ZC: 变化的是这里,把X/Y/Z坐标都扩大了2倍

    glm::mat4 Model      = glm::mat4(

        2.0f, 0.0f, 0.0f, 0.0f,

        0.0f, 2.0f, 0.0f, 0.0f,

        0.0f, 0.0f, 2.0f, 0.0f,

        0.0f, 0.0f, 0.0f, 1.0f);

    printf("%f, %f, %f, %f\n", Model[].x, Model[].y, Model[].z, Model[].w);

    printf("%f, %f, %f, %f\n", Model[].x, Model[].y, Model[].z, Model[].w);

    printf("%f, %f, %f, %f\n", Model[].x, Model[].y, Model[].z, Model[].w);

    printf("%f, %f, %f, %f\n", Model[].x, Model[].y, Model[].z, Model[].w);

    printf("\n");

    // Our ModelViewProjection : multiplication of our 3 matrices

    glm::mat4 MVP        = Projection * View * Model; // Remember, matrix multiplication is the other way around

    printf("%f, %f, %f, %f\n", MVP[].x, MVP[].y, MVP[].z, MVP[].w);

    printf("%f, %f, %f, %f\n", MVP[].x, MVP[].y, MVP[].z, MVP[].w);

    printf("%f, %f, %f, %f\n", MVP[].x, MVP[].y, MVP[].z, MVP[].w);

    printf("%f, %f, %f, %f\n", MVP[].x, MVP[].y, MVP[].z, MVP[].w);

    printf("\n");

    static const GLfloat g_vertex_buffer_data[] = {

        -1.0f, -1.0f, 0.0f,

        1.0f, -1.0f, 0.0f,

        0.0f,  1.0f, 0.0f,

    };
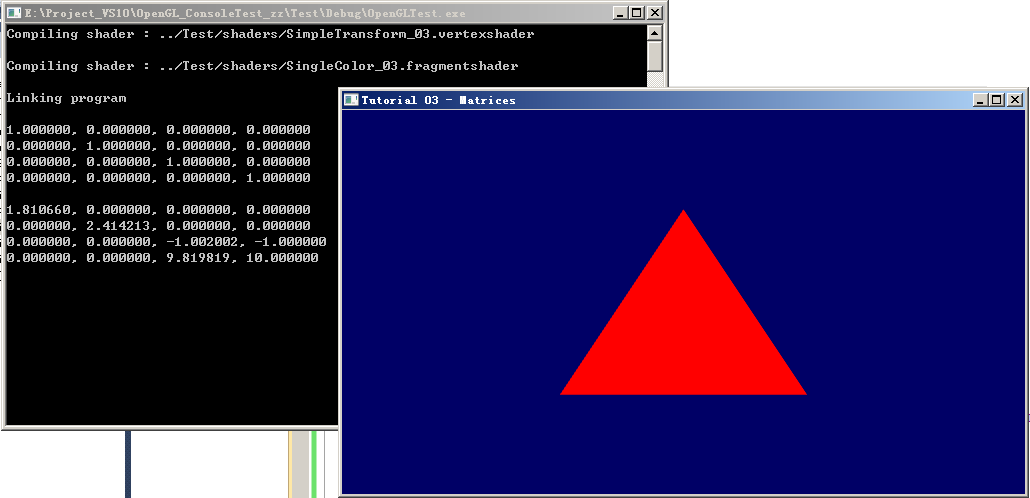
现象:

3.3、放大2倍(方式2):
    // Model matrix : an identity matrix (model will be at the origin)

    glm::mat4 Model      = glm::mat4(1.0f);  // ZC: 这里没改变

    //glm::mat4 Model      = glm::mat4(

    //    2.0f, 0.0f, 0.0f, 0.0f,

    //    0.0f, 2.0f, 0.0f, 0.0f,

    //    0.0f, 0.0f, 2.0f, 0.0f,

    //    0.0f, 0.0f, 0.0f, 1.0f);

    printf("%f, %f, %f, %f\n", Model[].x, Model[].y, Model[].z, Model[].w);

    printf("%f, %f, %f, %f\n", Model[].x, Model[].y, Model[].z, Model[].w);

    printf("%f, %f, %f, %f\n", Model[].x, Model[].y, Model[].z, Model[].w);

    printf("%f, %f, %f, %f\n", Model[].x, Model[].y, Model[].z, Model[].w);

    printf("\n");

    // Our ModelViewProjection : multiplication of our 3 matrices

    glm::mat4 MVP        = Projection * View * Model; // Remember, matrix multiplication is the other way around

    printf("%f, %f, %f, %f\n", MVP[].x, MVP[].y, MVP[].z, MVP[].w);

    printf("%f, %f, %f, %f\n", MVP[].x, MVP[].y, MVP[].z, MVP[].w);

    printf("%f, %f, %f, %f\n", MVP[].x, MVP[].y, MVP[].z, MVP[].w);

    printf("%f, %f, %f, %f\n", MVP[].x, MVP[].y, MVP[].z, MVP[].w);

    printf("\n");//static const GLfloat g_vertex_buffer_data[] = {

    //    -1.0f, -1.0f, 0.0f,

    //    1.0f, -1.0f, 0.0f,

    //    0.0f,  1.0f, 0.0f,

    //};

    static const GLfloat g_vertex_buffer_data[] = { // ZC: 这里改变了,手动的将 三角形的3个点的坐标放大了

        -2.0f, -2.0f, 0.0f,

        2.0f, -2.0f, 0.0f,

        0.0f,  2.0f, 0.0f,

    };
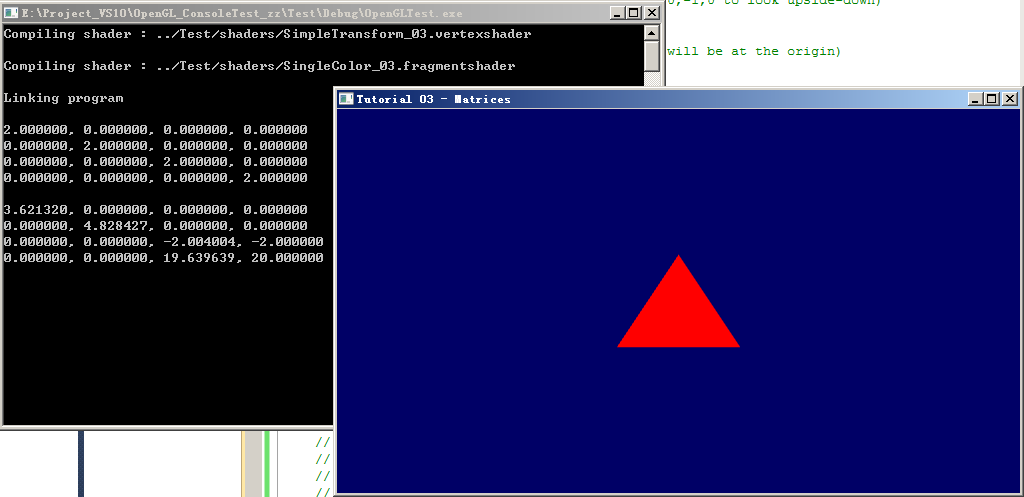
现象:
3.4、测试:刚开始 放大 是使用的 “glm::mat4 Model = glm::mat4(2.0f);”,实际这是没有 放大效果的(视觉上 大小没变化),原因寻找:Model的矩阵信息为:
  2.0f  0.0f  0.0f  0.0f

  0.0f  2.0f  0.0f  0.0f

  0.0f  0.0f  2.0f  0.0f

  0.0f  0.0f  0.0f  2.0f
∵ 它把 X/Y/Z轴的数据放大了,但是 它的最后一行数据“0.0f 0.0f 0.0f 2.0f” 实现了类似这样的功能:把摄像机拉远了一倍距离。这个的数学解释 我暂时还不太明白,只是做了一个实验 验证了一下
3.4.1、
    glm::mat4 View       = glm::lookAt(

        glm::vec3(,,),// Camera is at (4,3,3), in World Space

        glm::vec3(,,), // and looks at the origin

        glm::vec3(,,)  // Head is up (set to 0,-1,0 to look upside-down)

        );

    // Model matrix : an identity matrix (model will be at the origin)

    //glm::mat4 Model      = glm::mat4(1.0f);

    glm::mat4 Model      = glm::mat4(2.0f);  // ZC: 改了这里

    //glm::mat4 Model      = glm::mat4(

    //    2.0f, 0.0f, 0.0f, 0.0f,

    //    0.0f, 2.0f, 0.0f, 0.0f,

    //    0.0f, 0.0f, 2.0f, 0.0f,

    //    0.0f, 0.0f, 0.0f, 1.0f);

    printf("%f, %f, %f, %f\n", Model[].x, Model[].y, Model[].z, Model[].w);

    printf("%f, %f, %f, %f\n", Model[].x, Model[].y, Model[].z, Model[].w);

    printf("%f, %f, %f, %f\n", Model[].x, Model[].y, Model[].z, Model[].w);

    printf("%f, %f, %f, %f\n", Model[].x, Model[].y, Model[].z, Model[].w);

    printf("\n");

    // Our ModelViewProjection : multiplication of our 3 matrices

    glm::mat4 MVP        = Projection * View * Model; // Remember, matrix multiplication is the other way around

    printf("%f, %f, %f, %f\n", MVP[].x, MVP[].y, MVP[].z, MVP[].w);

    printf("%f, %f, %f, %f\n", MVP[].x, MVP[].y, MVP[].z, MVP[].w);

    printf("%f, %f, %f, %f\n", MVP[].x, MVP[].y, MVP[].z, MVP[].w);

    printf("%f, %f, %f, %f\n", MVP[].x, MVP[].y, MVP[].z, MVP[].w);

    printf("\n");
现象:
3.4.2、
    glm::mat4 View       = glm::lookAt(

        glm::vec3(,,),// ZC: 这里,手动将摄像机 拉远了一倍距离

        glm::vec3(,,), // and looks at the origin

        glm::vec3(,,)  // Head is up (set to 0,-1,0 to look upside-down)

        );

    // Model matrix : an identity matrix (model will be at the origin)

    //glm::mat4 Model      = glm::mat4(1.0f);

    //glm::mat4 Model      = glm::mat4(2.0f);

    glm::mat4 Model      = glm::mat4(  // ZC: 这里,将 X/Y/Z轴数据放大1倍

        2.0f, 0.0f, 0.0f, 0.0f,

        0.0f, 2.0f, 0.0f, 0.0f,

        0.0f, 0.0f, 2.0f, 0.0f,

        0.0f, 0.0f, 0.0f, 1.0f);

    printf("%f, %f, %f, %f\n", Model[].x, Model[].y, Model[].z, Model[].w);

    printf("%f, %f, %f, %f\n", Model[].x, Model[].y, Model[].z, Model[].w);

    printf("%f, %f, %f, %f\n", Model[].x, Model[].y, Model[].z, Model[].w);

    printf("%f, %f, %f, %f\n", Model[].x, Model[].y, Model[].z, Model[].w);

    printf("\n");

    // Our ModelViewProjection : multiplication of our 3 matrices

    glm::mat4 MVP        = Projection * View * Model; // Remember, matrix multiplication is the other way around

    printf("%f, %f, %f, %f\n", MVP[].x, MVP[].y, MVP[].z, MVP[].w);

    printf("%f, %f, %f, %f\n", MVP[].x, MVP[].y, MVP[].z, MVP[].w);

    printf("%f, %f, %f, %f\n", MVP[].x, MVP[].y, MVP[].z, MVP[].w);

    printf("%f, %f, %f, %f\n", MVP[].x, MVP[].y, MVP[].z, MVP[].w);

    printf("\n");
现象:

ZC:可以看到,虽然 矩阵Model 的信息不同,但是 最后的 矩阵MVP 的信息是一样的,∴ 肉眼看起来 效果一样...
4、尝试 C++中计算好位置,直接传入 GLSL(不要再在 GLSL中去做乘法计算)
ZC:貌似 这个例子中使用的 "glDrawArrays(GL_TRIANGLES, 0, 3);"的方式,暂时不支持实现 这个尝试,看后面会不会 学习到别的方式,或者 后面水平高了再来尝试吧...
5、
OpenGL.Tutorial03_Matrices_测试的更多相关文章
- OpenGL光照测试
OpenGL光照测试 花了大概半个月,研究了OpenGL的光照.请注意是固定管线渲染的光照,如果使用着色器的高手们请飘过.这个程序是通过光照对模型的照射,来研究OpenGL光照的性质.以后可以通过这个 ...
- Qt OpenGL裁剪测试
剪裁测试(Scissor Test)用于限制绘制区域. 我们可以指定一个矩形的剪裁窗口,当启用剪裁测试后,只有在这个窗口之内的像素才能被绘制,其它像素则会被丢弃. 换句话说,无论怎么绘制,剪裁窗口以外 ...
- opengl 模板测试 glStencilOp glStencilFunc
下面来设置蒙板缓存和蒙板测试. 首先我们启用蒙板测试,这样就可以修改蒙板缓存中的值. 下面我们来解释蒙板测试函数的含义: 当你使用glEnable(GL_STENCIL_TEST)启用蒙板测试之后,蒙 ...
- OpenGL(十四) 模板测试
启用模板测试时,OpenGL会在内存中开辟一块空间作为模板缓冲区,里边保存了每个像素的"模板值",模板测试的过程就是把每一个像素的模板值与一个设定的模板参考值进行比较,符合设定条件 ...
- opengl学习-利用模板测试勾画物体轮廓中出现的一个问题
我在学习OpenGL模板测试勾画物体轮廓的时候,出现了这个问题: 这个出现的原因就是,改变摄像机的时候,每次绘制,上次绘制中模板缓冲区的数据没有清除的原因.也就是在while循环开始的时候,glCle ...
- opengl入门学习
OpenGL入门学习 说起编程作图,大概还有很多人想起TC的#include <graphics.h>吧? 但是各位是否想过,那些画面绚丽的PC游戏是如何编写出来的?就靠TC那可怜的640 ...
- OpenGL入门学习(转)
OpenGL入门学习 http://www.cppblog.com/doing5552/archive/2009/01/08/71532.html 说起编程作图,大概还有很多人想起TC的#includ ...
- Android OpenGL ES .介绍
引自:http://blog.csdn.net/hgl868/article/details/6971624 1. OpenGL ES 简介 Android 3D引擎采用的是OpenGL ES. ...
- OpenGL理解
说起编程作图,大概还有很多人想起TC的#include <graphics.h>吧? 但是各位是否想过,那些画面绚丽的PC游戏是如何编写出来的?就靠TC那可怜的640*480分辨率.16色 ...
随机推荐
- Java 基础 多线程和线程池基础
一,多线程 1.1 多线程介绍 进程:进程指正在运行的程序.确切的来说,当一个程序进入内存运行,即变成一个进程,进程是处于运行过程中的程序,并且具有一定独立功能. 线程:线程是进程中的一个执行单元,负 ...
- 2018-2019-2 网络对抗技术 20165321 Exp2 后门原理与实践
基础问题回答 (1)例举你能想到的一个后门进入到你系统中的可能方式? 答:网络钓鱼植入木马. (2)例举你知道的后门如何启动起来(win及linux)的方式? 答:绑定在合法软件上启动. (3)Met ...
- .NET[C#]中NullReferenceException(未将对象引用到实例)是什么问题?如何修复处理?(转)
.NET[C#]中NullReferenceException(未将对象引用到实例)是什么问题?如何修复处理? 后端开发 作者: Rector 1973 阅读 0 评论 0 收藏 收藏本文 ...
- C++ 自定义订单号
自定义订单号 #include<iostream> #include<stack> #include <time.h> #include <sys/timeb ...
- JDK8 HashMap--treeify()树形化方法
/*创建红黑树*/ final void treeify(Node<K,V>[] tab) { TreeNode<K,V> root = null;// 定义红黑树根节点roo ...
- [macOS] git忽略所有的.DS_Store文件
最彻底的方法如下: vi ~/.gitignore_global 输入以下内容 # OS generated files # ###################### .DS_Store .DS_ ...
- stm32 堆溢出
STM32 堆溢出 遇到的问题 最近在给旧项目添加了段代码,程序经常到某个状态就突然崩溃了,也不一定是在运行新代码的时候崩溃.检查了几遍代码,数组越界访问,除数为0,内存泄露等常见的问题都不存在. 原 ...
- echarts起始角度
series : [ { type: 'pie', startAngle: 180,// minAngle:5,// radius : ['0','60%'], center: ['50%', '50 ...
- Makefile 编译时虽然加上了-g 选项 但是还是无法调试
make 编译时默认的命令是all,不能写成其他的
- shell里连接数据库,将结果输出到变量
result=$(sqlplus -s 'ccc/ccc@21.96.34.34:1521'<<EOF ..... EOF )