Android 自定义view(二) —— attr 使用
前言:
attr 在前一篇文章《Android 自定义view —— attr理解》已经简单的进行了介绍和创建,那么这篇文章就来一步步说说attr的简单使用吧
自定义view简单实现步骤
(1)首先创建attrs自定义属性文件名称,定义属性以及相关数据类型
(2)再次创建自定义view,然后读取相关属性完成需要的view相关布局、绘制等工作
(3)最后在xml布局文件中引用或者直接在代码中new一个相关对象进行使用
任务需求
为了能够简单的练习演示attr 相关使用,我现在自己规定了如下需求
(1)定义view,将需要的属性定义在 attr 中
(2)在自定义view中 显示文字、文字颜色、文字背景、文字大小
(3)在xml中引用或者在代码中new一个对象进行使用
实现任务
为了方便理解,我将编写顺序进行调整
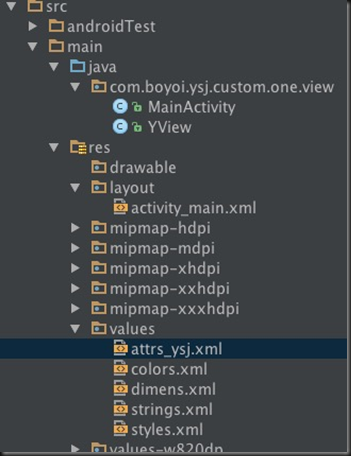
我的目录结构:

第一步:先来看看我们的自定义属性以及相关数据类型 attrs_ysj.xml文件
<?xml version="1.0" encoding="utf-8"?>
<resources>
<!--name 是自定义属性名,一般采用驼峰命名,可以随意。 format 是属性的单位-->
<attr name="viewText" format="string" />
<attr name="viewTextColor" format="color" />
<attr name="viewTextSize" format="dimension" />
<!--name 是自定义控件的类名-->
<declare-styleable name="YText">
<attr name="viewText" />
<attr name="viewTextColor" />
<attr name="viewTextSize" />
<!--注意:一般情况是按照上面这样写,把属性单独定义在上面,然后在styleable这里面引用,但是我要装一下逼,就单独混写在里面了下,取值的时候就需要单独去取名称才能取到值不然是取不到值-->
<attr name="viewTextBg" format="color" />
</declare-styleable>
</resources>
注意:关于attr里面的属性定义或者理解有疑惑请移步《Android 自定义view —— attr理解》
第二步:再次来看看XML布局文件
<?xml version="1.0" encoding="utf-8"?>
<LinearLayout xmlns:android="http://schemas.android.com/apk/res/android"
xmlns:custom="http://schemas.android.com/apk/res-auto"
android:layout_width="match_parent"
android:layout_height="match_parent">
<!--引用自定义view必须是包名.类名-->
<com.boyoi.ysj.custom.one.view.YView
android:layout_width="wrap_content"
android:layout_height="wrap_content"
custom:viewText="这是我的自定义View"
custom:viewTextColor="@android:color/holo_red_dark"
custom:viewTextBg="@android:color/holo_blue_dark"
custom:viewTextSize="18sp" />
</LinearLayout>
哈哈在看了xml还是先来补补点小知识点(很多时候会晕的,特别是面试这些小知识点搞不好你还真说不清楚)——命名空间中的 res/android 和 res-auto
xmlns:android=http://schemas.android.com/apk/res/android
xmlns:customview=http://schemas.android.com/apk/res-auto
注意:这2个实际上前者是就是让你引用系统自带属性的,后者是让你使用lib库里自定义属性的。但是这个地方要注意,在eclipse中如果要使用你自定义的属性 是不能用res-auto的必须得替换成你自定义view所属的包名,如果你在恰好使用的自定义属性被做成了lib那就只能使用res-auto了,而在android-studio里,无论你是自己写自定义view还是引用的lib里的自定义的view 都只能使用res-auto这个写法。以前那个包名的写法在android-studio里是被废弃无法使用的。
第三步:最后让我们来看看我们是怎么自定义view
/**
* Created by yishujun on 16/6/3.
*/
public class YView extends View {
private Context mContext;
//文本
private String mText;
//文本的颜色
private int mTextColor;
//文本的大小
private int mTextSize;
//文本的背景
private int mTextBg;
//绘制时控制文本绘制的范围
private Rect mBound;
//绘制文本画笔
private Paint mPaint;
public YView(Context context) {
this(context, null);
}
public YView(Context context, AttributeSet attrs) {
this(context, attrs, 0);
}
public YView(Context context, AttributeSet attrs, int defStyleAttr) {
super(context, attrs, defStyleAttr);
this.mContext = context;
typedYView(attrs, defStyleAttr);
}
/**
* 获得我们所定义的自定义样式属性
*
* @param attrs
* @param defStyleAttr
*/
private void typedYView(AttributeSet attrs, int defStyleAttr) {
//获得我们所定义的自定义样式属性
//final Resources.Theme theme = mContext.getTheme();
//TypedArray a = theme.obtainStyledAttributes(attrs,R.styleable.YText, defStyleAttr, 0);
//获取自定义属性值的方式一般情况分为两种:styleable组 和 直接获取attr属性
//这里获取的属性用的styleable组,同时我也建议用这种方式方便规范attrs文件,
//另外一种获取方式如下,当然也可以一个个获取属性值,这里不再演示
//int[] custom = {R.attr.viewText, R.attr.viewTextSize};
//TypedArray a = mContext.obtainStyledAttributes(attrs, custom);
TypedArray a = mContext.getTheme().obtainStyledAttributes(attrs, R.styleable.YText, defStyleAttr, 0);
int n = a.getIndexCount();
for (int i = 0; i <= n; i++) {
int attr = a.getIndex(i);
switch (attr) {
//注意获取属性的方式为 styleable的名称_属性名称
case R.styleable.YText_viewText:
mText = a.getString(attr);
break;
case R.styleable.YText_viewTextColor:
// 默认颜色设置为黑色
mTextColor = a.getColor(attr, Color.BLACK);
break;
case R.styleable.YText_viewTextSize:
// 默认设置为16sp,TypeValue也可以把sp转化为px
mTextSize = a.getDimensionPixelSize(attr, (int) TypedValue.applyDimension(
TypedValue.COMPLEX_UNIT_SP, 18, getResources().getDisplayMetrics()));
break;
case R.styleable.YText_viewTextBg:
// 默认颜色设置为黄色
mTextBg = a.getColor(attr, Color.YELLOW);
//但是在这里上面的那种取值方式就是取不到值哦,因为返回后的attr没有YText_viewTextBg,原因是因为我刚装逼了一下,所以我们要单独去取值
break;
}
}
//记得在这里单独取出文本的背景mTextBg值哦,因为上面的mTextBg取不到值哦
mTextBg = a.getColor(R.styleable.YText_viewTextBg, Color.YELLOW);
//回收资源
a.recycle();
//新建画笔对象
mPaint = new Paint();
//设置画笔
mPaint.setTextSize(mTextSize);
mBound = new Rect();
//设置画笔绘制文字及相关区域
mPaint.getTextBounds(mText, 0, mText.length(), mBound);
this.setOnClickListener(new OnClickListener() {
@Override
public void onClick(View v) {
mText = "你摸了我一下";
//刷新画布
postInvalidate();
}
});
}
@Override
protected void onDraw(Canvas canvas) {
//设置画布颜色即文字背景色
mPaint.setColor(mTextBg);
//绘制背景,全屏
canvas.drawRect(0, 0, getMeasuredWidth(), getMeasuredHeight(), mPaint);
//设置文字颜色
mPaint.setColor(mTextColor);
//绘制文字
canvas.drawText(mText, getWidth() / 2 - mBound.width() / 2, getHeight() / 2 + mBound.height() / 2, mPaint);
}
}
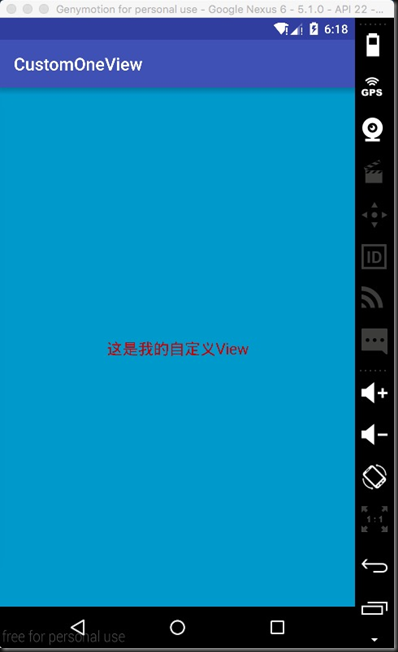
运行效果:


总结:
怎样一个简单的自定义view不就完成了嘛,是不是看起来很简单,对的是很简单,但是对我来说还有很多东西是需要去深究那么
Android 自定义view(二) —— attr 使用的更多相关文章
- Android自定义View (二) 进阶
转载请标明出处:http://blog.csdn.net/lmj623565791/article/details/24300125 继续自定义View之旅,前面已经介绍过一个自定义View的基础的例 ...
- Android 自定义View (二) 进阶
转载请标明出处:http://blog.csdn.net/lmj623565791/article/details/24300125 继续自定义View之旅,前面已经介绍过一个自定义View的基础的例 ...
- Android 自定义View二(深入了解自定义属性attrs.xml)
1.为什么要自定义属性 要使用属性,首先这个属性应该存在,所以如果我们要使用自己的属性,必须要先把他定义出来才能使用.但我们平时在写布局文件的时候好像没有自己定义属性,但我们照样可以用很多属性,这是为 ...
- Android自定义View(二、深入解析自定义属性)
转载请标明出处: http://blog.csdn.net/xmxkf/article/details/51468648 本文出自:[openXu的博客] 目录: 为什么要自定义属性 怎样自定义属性 ...
- Android 自定义View及其在布局文件中的使用示例(二)
转载请注明出处 http://www.cnblogs.com/crashmaker/p/3530213.html From crash_coder linguowu linguowu0622@gami ...
- Android 自定义 view(三)—— onDraw 方法理解
前言: 上一篇已经介绍了用自己定义的属性怎么简单定义一个view<Android 自定义view(二) -- attr 使用>,那么接下来我们继续深究自定义view,下一步将要去简单理解自 ...
- Android自定义View(CustomCalendar-定制日历控件)
转载请标明出处: http://blog.csdn.net/xmxkf/article/details/54020386 本文出自:[openXu的博客] 目录: 1分析 2自定义属性 3onMeas ...
- Android自定义View(LimitScrollerView-仿天猫广告栏上下滚动效果)
转载请标明出处: http://blog.csdn.net/xmxkf/article/details/53303872 本文出自:[openXu的博客] 1分析 2定义组合控件布局 3继承最外层控件 ...
- Android自定义View实战(SlideTab-可滑动的选择器)
转载请标明出处: http://blog.csdn.net/xmxkf/article/details/52178553 本文出自:[openXu的博客] 目录: 初步分析重写onDraw绘制 重写o ...
随机推荐
- CentOS 6.5 下安装 Redis 2.8.7
wget http://download.redis.io/redis-stable.tar.gz tar xvzf redis-stable.tar.gz cd redis-stable make ...
- log4php的配置
网上关于log4php配置的文章很多,下面是我的配置,跟网上部分略有不同 (1)添加日志 1.下载log4php,到官网就可以下载到,下载后解压 我的版本是log4php_2.3.0 ...
- Ajax校验
一.Ajax简介 AJAX即(Asynchronous JavaScript and Xml)(异步JavaScript和XML),是指一种创建交互式网页应用的网页开发技术. Ajax的关键元素包括以 ...
- jquery mobile系列问题汇总整理(传播知识,利己利人)
我在用jquery mobile做项目时,遇到jm在下拉框等组件里不能正常动态更新内容,查找了相关资料,在这里抛砖引玉,先提供一个解决下拉框内容写入更新的解决方法: jm解决下拉框内容写入的方法可以这 ...
- PAT自测-5 Shuffling Machine
原题连接https://pta.patest.cn/pta/test/17/exam/4/question/264 Shuffling is a procedure used to randomize ...
- python字符串前面加r
在Python的string前面加上'r', 是为了告诉编译器这个string是个raw string,不要转意backslash '\' . 例如,\n 在raw string中,是两个字符,\和n ...
- shape
<?xml version="1.0" encoding="utf-8"?><shape xmlns:android="http:/ ...
- Angular2对待一个URL的处理流程
直到一年前我还不会想到我会写一本书出来,直到两三年前我还不会想到会把自己的业余时间放在写作(技术博客)上.当初在机缘巧合之下,我只是想把自己工作中遇到的问题总结起来,发布在博客中以供日后查阅.不想竟然 ...
- [bzoj1072] [SCOI2007]排列perm
有一种暴力算法就是直接枚举. 正解就是状压dp 令f[i][j]:i:使用的数位的状态j:当前的模数 边界:f[0][0] = 1; f[i|1<<k][j*10+k % n] += f[ ...
- Source Insight 3.X utf8支持插件震撼发布
继上次SI多标签插件之后,因为公司内部编码改为utf8编码,因此特意做了这个Source Insight 3.X utf8插件. 下载地址:[点我] 安装说明: 解压msimg32.dll sihoo ...
