Making your first driver - complete walkthrough(使用VisualDDK)
This article describes how to create, build and debug your first driver using Visual Studio and VisualDDK. It provides detailed step-by-step instructions on using the development and debugging tools, leaving the driver API and architecture description behind. If you want to learn more about the API used to develop drivers, consider exploring online WDK help.
In this walkthrough we will create two drivers and test them using a virtual machine:
A dummy driver that simply prints a message when it is loaded
A ramdisk driver, that creates a virtual hard disk
If you prefer to use a second physical machine instead, skip the VM-related stuff. However, you will need either a direct COM, or a direct IEEE1394 (FireWire) connection between the machines.
Before you begin
Before you start making your driver, ensure that you have the required software. You can get the required Microsoft products for free if you are qualified for MSDNAA, DreamSpark or BizSpark. All third-party tools referenced here are free. So, prepare to download:
A virtual machine application (VirtualBox is free and recommended, VMWare is another alternative, any other VM application will also work, but will be slow due to lack of VirtualKD support).
A Windows installation disc or a disc image to install it on the VM.
Visual Studio (2005, 2008 or 2010). The Express edition won't work.
Windows Driver Kit (ask google for the latest version, or download version 7.1.0).
A 32-bit version of Debugging Tools for Windows. They are normally located in the Debuggers directory of the WDK ISO.Note that if you are using a 64-bit Windows version, you will need to install the 32-bit Debugging Tools manually by running V:\Debuggers\setup_x86.exe. Visual Studio is a 32-bit process and won't work with the 64-bit Debug Tools.
Latest version of VisualDDK.
If you don't have a tool to mount the downloaded ISO images, consider WinCDEmu.
Preparing
The first thing you need to do is to install the virtual machine application. This walkthrough refers to VirtualBox, however, if you prefer to use any other VM, the steps will be similar. Then, create a new virtual machine. It is recommended to select the PIX chipset instead of the ICH9 one when setting the VM properties. Once the VM is created, you will need to install Windows on it. This walkthrough uses Windows 7, however, any other modern version will do. After Windows Setup completes, ensure that the virtual machine can access the physical machine via the network: it is recommended to set the network adapter settings in the VM to NAT. If you encounter connection problems later, check your firewall settings.
Once Windows is installed on the VM install VMWare Tools/VirtualBox additions (in VirtualBox, just select "Devices->Install guest additions"). It is also recommended to setup a virtual shared folder (VM Settings->Shared folders), or use a network share to be able to copy files between the physical machine and the VM. Finally, create a snapshot called "clean Windows installation" (it won't consume any additional disk space, but will be useful if anything goes wrong) and switch the VM off.
Now install Visual Studio on the physical machine. Note that you will need support for C++ (enable 64-bit support if you plan to build 64-bit drivers) and C# (required for certain VisualDDK components). Then install Windows Driver kit and Debugging Tools on the physical machine.
Finally install VisualDDK. Note that if you install VisualDDK before installing Visual Studio, it won't be integrated correctly and you will have to re-run VisualDDK installer. If you are using VirtualBox or VMWare, you will need to do some additional steps:
If you are using VirtualBox, go to the VirtualBox install directory, rename VBoxDD.DLL into VBoxDD0.DLL and copyC:\Program Files (x86)\VisualDDK\VirtualBox\{x86/x64}\VBoxDD.dll in the VirtualBox directory. This will enableVirtualKD - a plugin that increases VMWare/VirtualBox debugging speed and usability.
It is recommended to turn of UAC on the virtual machine. Otherwise, VisualDDK monitor won't be able to start automatically every time you start your virtual machine.
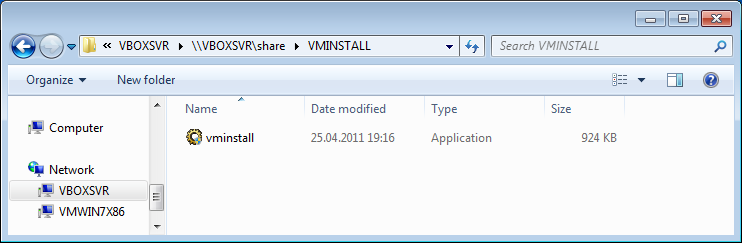
Copy C:\Program Files (x86)\VisualDDK\target\vminstall.exe to your virtual machine and run it there. Do not run vminstall.exe on the physical machine! You can use either VM shared folders, or a network drive to copy the file to VM. Once vminstall is done, it will ask for a reboot. As you are going to create the driver project first, it is recommended that you shut down the VM instead.
Hint: if you have set up a VirtualBox shared folder (e.g. called SHARE), it will be accessible as a network folder\\VBOXSVR\SHARE:
Creating the first driver
Start Visual Studio from in administrator mode (right click-> run as administrator), select "File->New->Project", then select "Visual C++ -> VisualDDK->VisualDDK driver wizard".
Select the directory and project name (e.g. Driver1). Press OK.
In the Driver Wizard dialog box do the following:
Select "A sample legacy driver" as the driver template.
Select "Use Visual Studio project system". This is the easiest way to start developing, but it is not officially supported by Microsoft.
It is recommended that you enable the "Generate CPP files" checkbox. You can write C-style code using C++ compiler, however you will have better debugging experience due to features like built-in wchar_t type.
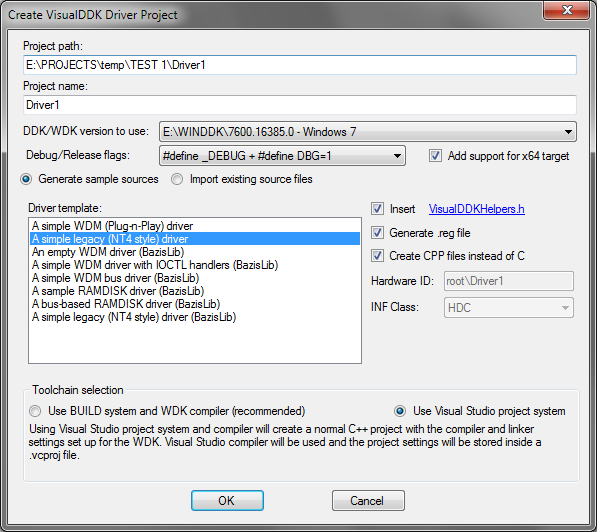
Press OK so that the project is created
Now you can build the driver using "Build->Build solution" command (or just press Ctrl+Shift+B). If the build fails due to missing include files, ensure that the DDKPATH/WDKPATH environment variable is set and that Visual Studio has been restarted since then.
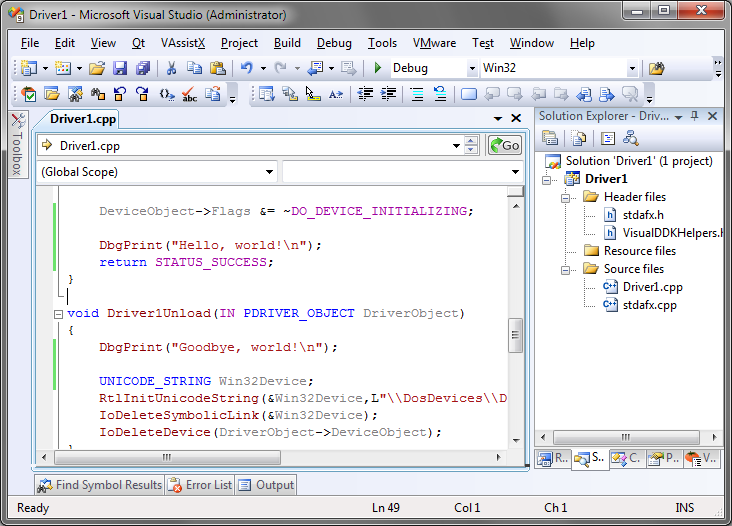
Now let's add some custom code to our driver. In this example, let's just print a message when the driver loads and unloads. Add the following line before the return statement of the DriverEntry() function:
Add the following line in the beginning ofthe Driver1Unload() function:
DbgPrint("Goodbye, world!\n");Your code should look the following way now:
Rebuild the driver by selecting "Build->Build solution". Note that if you want to use a 64-bit target OS, you need to select x64 instead of Win32 as the current build platform.
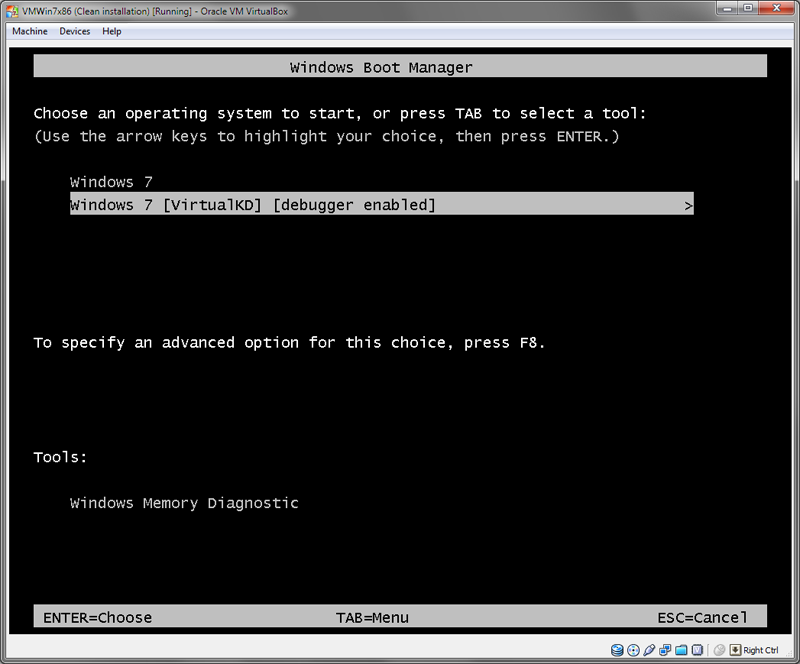
Now let's debug the driver using VisualDDK. Start your virtual machine. When the OS selection menu appears, select the VirtualKD entry and press ENTER:
Switch back to Visual Studio and select "Debug->Start debugging driver". A debugging settings dialog will appear:
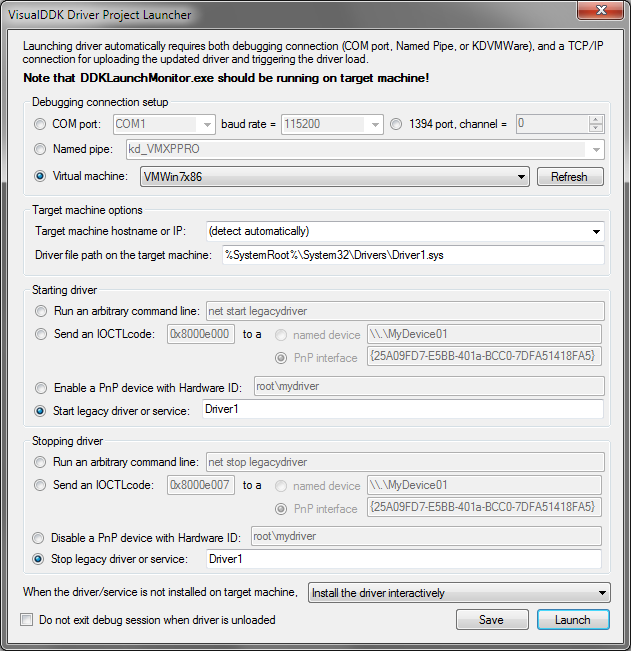
Ensure that "debugging connection" is set to "Virtual machine" and your currently running VM is selected. It it is not in the list, press "refresh". Ensure that the "starting driver" and "stopping driver" settings are set to "legacy driver" and the correct driver name is entered. When done, press "launch".
If you are debugging a driver for the first time, a settings dialog will appear:
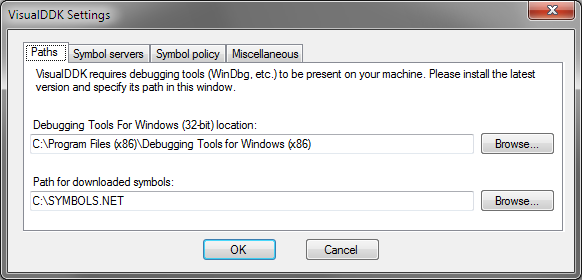
Ensure that the debugging tools location is set correctly (remember, you need a 32-bit version even on a 64-bit machine!) and that the downloaded symbol path points to a valid directory. If you did not debug any drivers before, create a new empty directory (e.g. C:\SYMBOLS.NET) and select it as the directory for downloaded symbols.
Hint: you can significantly speed up symbol loading by going to the Symbol Policy tab and selecting "Load symbols for NT kernel and drivers from current solution only".
- When you're done, press OK. A connection progress dialog will appear:

As we have just started our VM, the Win32 subsystem is not yet running and the driver will not be loaded automatically. VisualDDK will detect it, display a message in debug console and stop the target OS execution:
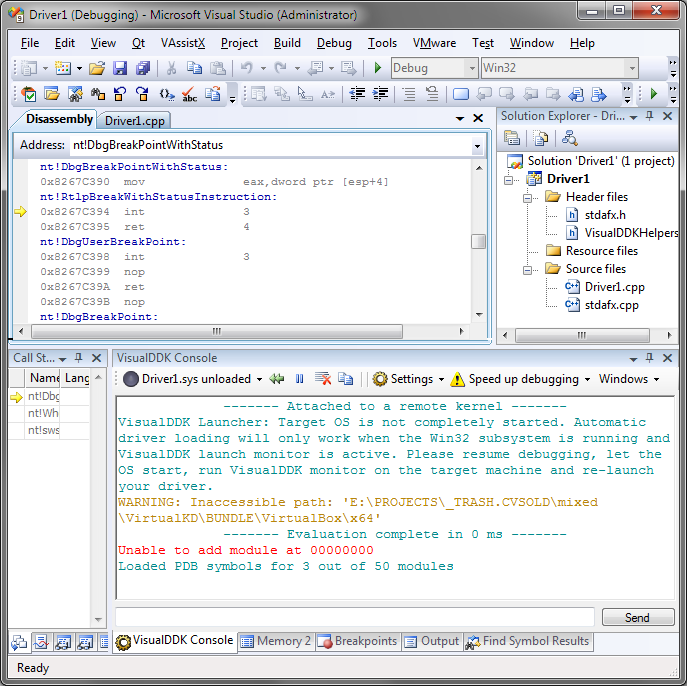
If you are familiar with WinDbg, the current debugging state is equivalent to WinDbg just after connecting to a kernel-mode target. You can enter any WinDbg commands in VisualDDK console, or use the corresponding functions of Visual Studio.
To let VisualDDK load our driver we need to let the OS boot completely. To do that, simply press F5 or select Debug->Continue in Visual Studio menu. Note that the OS may take some time to load.
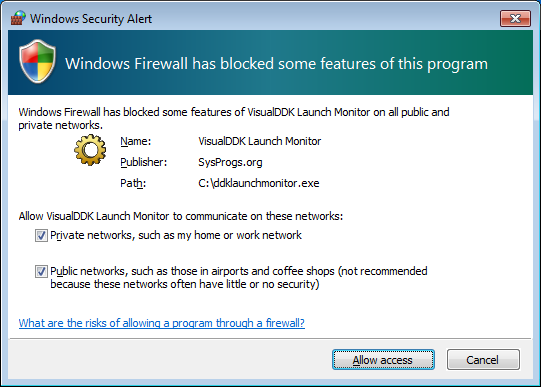
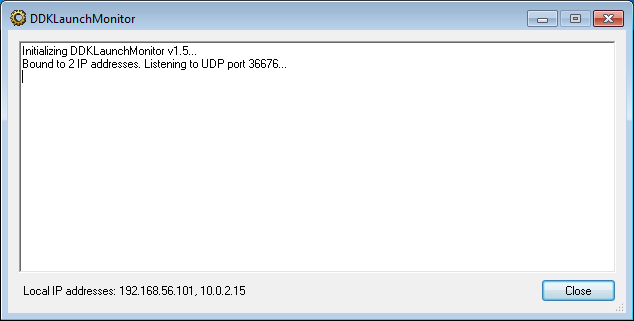
When the operating system has loaded, ensure that VisualDDK monitor has been started on the Virtual Machine. If not, start it manually (default location is c:\DDKLaunchMonitor.exe). If Windows Firewall shows an "access blocked" popup, you need to select both private and public networks and press "allow access":
Once VisualDDK monitor has started, ensure that it has detected the virtual machine IP address(es) correctly:
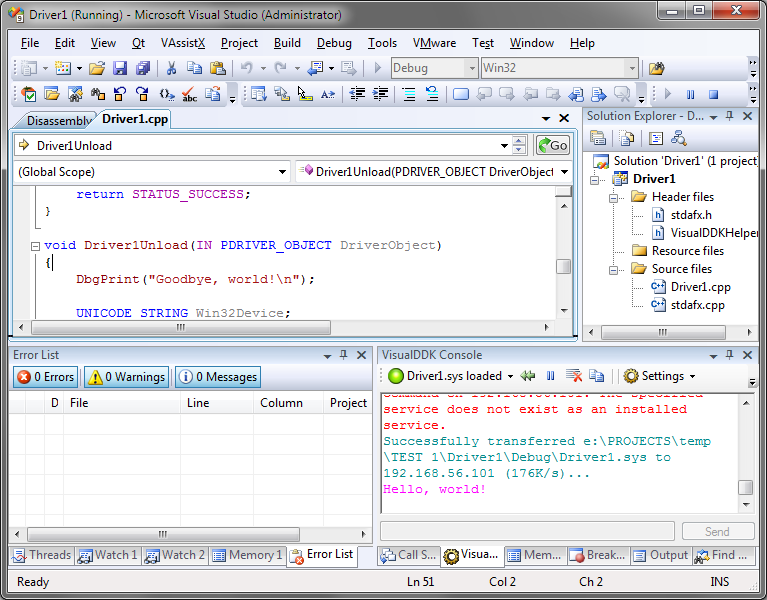
Now switch back to Visual Studio, click at the "driver1.sys unloaded" text in VisualDDK console, and select "load driver". If you cannot find the corresponding button, you can also press shift+F5 to stop debugging and then hit F5 to start another debugging session. Note that it won't restart your target OS, but will unload your driver if it was loaded.
If you are loading this driver for the first time, VisualDDK will show a driver installation prompt:

Ensure that the parameters are set correctly and press "install". Once the installation is complete, the driver will be loaded. Check VisualDDK console window for the "Hello, world" message:
Now let's unload the driver. Click at "Driver1.sys loaded" message and select "unload driver":
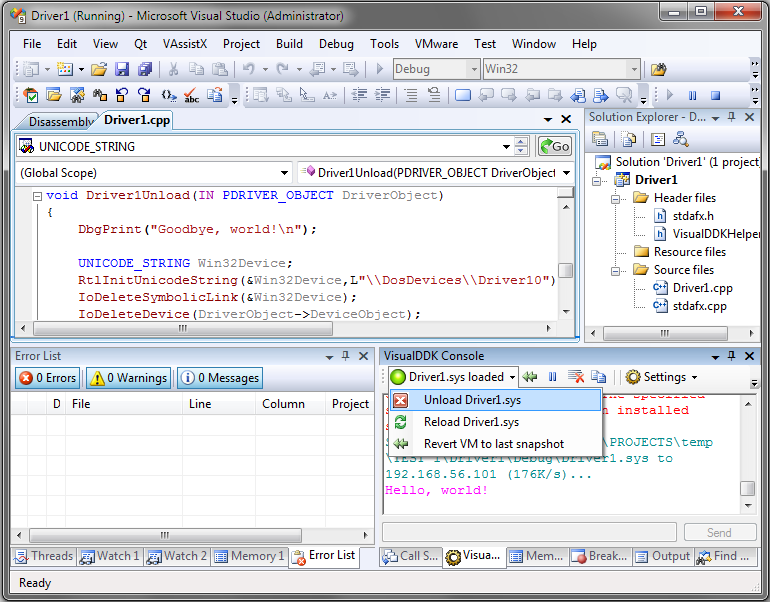
Hint: you can also press Shift+F5 to stop debugging and unload the driver. However, if you want to debug some code that only gets called during unload, using the "unload driver" command is the only way to do.
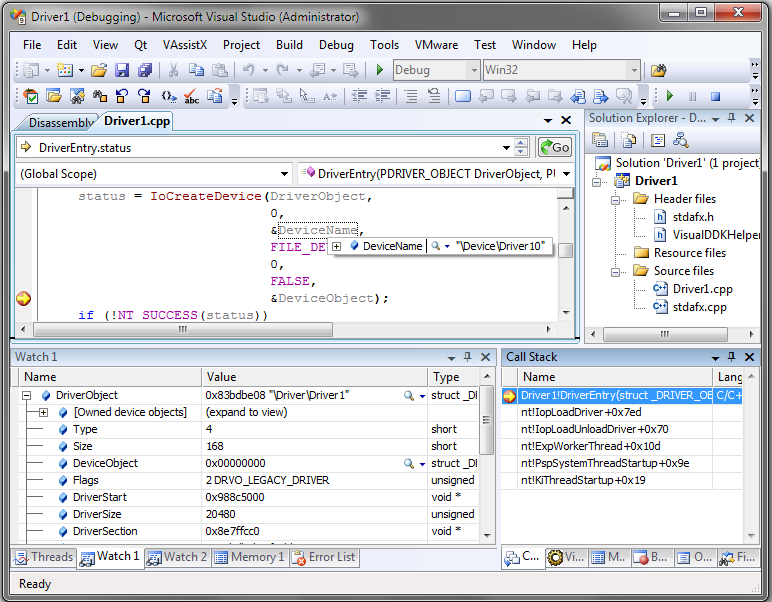
Let's test some simple interactive debugging functionality. Put a breakpoint on the line containing the IoCreateDevice() call and start your driver again by selecting "Debug->Start debugging driver". Once the breakpoint is hit, open the "watch 1" window and add "DriverObject" to watch list. Note that all other debugging techniques common to Visual Studio (e.g. hovering mouse over a variable to view its value) will work:
When you're done checking out the debugging functions, unload the driver again.
Important advice: Now once the OS is booted, VisualDDK monitor is running and no custom drivers are loaded, it is a good time to create another Virtual Machine snapshot. When you want to debug a driver later, you will simply need to restore the snapshot and press "start debugging driver". VisualDDK will do the rest. You won't have to wait until the OS starts or start anything manually. However, please note that shutting down the VM while Visual Studio is running could hang the latter. To do it safely, always use the "Settings->Disconnect from target" command in VisualDDK console.
Creating a sample ramdisk driver
VisualDDK driver wizard allows creating driver projects based on BazisLib, an object-oriented library for simplified driver design. One of sample projects provided by BazisLib is the ramdisk driver. The following walkthrough will show how to create a project based on it.
Start Visual Studio from in administrator mode (right click-> run as administrator), select "File->New->Project", then select "Visual C++ -> VisualDDK->VisualDDK driver wizard".
If you have not installed BazisLib, click at the "Install BazisLib" button to do it automatically.
Select "A bus-based RAMDISK driver (BazisLib)" from the driver template list:
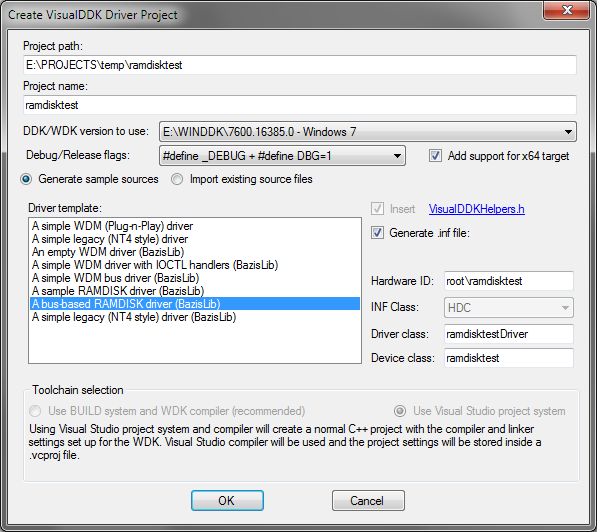
Build the project by pressing Ctrl+Shift+B.
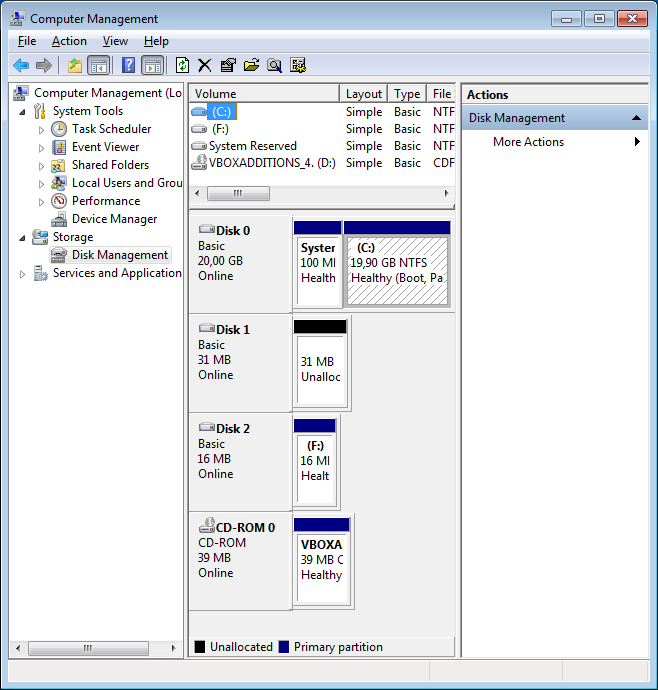
This sample project creates 2 RAM disks:
The first one has a size of 16MB and contains a precomputed MBR describing 1 partition. This disk will immediately receive a drive letter when Windows recognizes it.
The second one is 32MB large and has no precomputed MBR. Thus, you will need to create a partition manually using Disk Management snap-in in Computer Management.
Fore more details, look into the OnStartDevice() method in RamDiskBus.cpp.
Start your driver by selecting "Debug->Start debugging driver". Select default launching options.
When a driver installation prompt appears, press "install driver". Go to your VM and confirm the installation of an unsigned driver.
If everything went right, switch to your VM, right-click at the "computer" item in Start Menu, select "Manage" and go to Disk Management. You will see the 2 virtual disks:
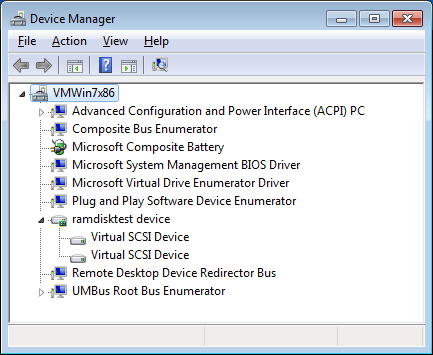
Now go to device manager (press Win+Break and select "device manager"). Select "View->Devices by connection" and ensure that the virtual disks are present:
Now let's do some debugging. Open ramdisk.cpp and put a breakpoint on RamDisk::Read() method. Switch to VM and open the newly created disk in Explorer. The breakpoint wil hit:
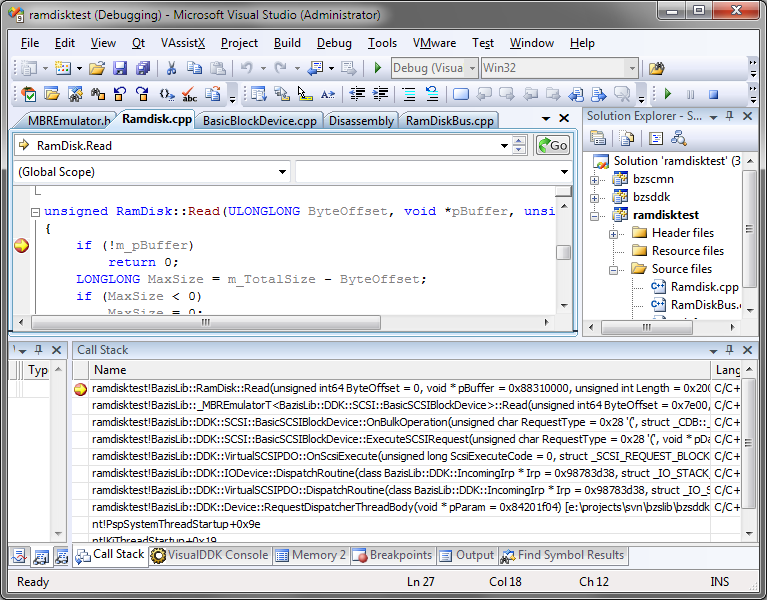
Check out the call stack to see how BazisLib automatically routed the request from the OS to the worker thread, decoded it and invoked a simple Read() method. If you want to implement your own virtual disk driver, consider making your own implementation of the BazisLib::AIBasicDisk interface and reusing BazisLib code to handle all OS-related issues. BazisLib is available under LGPL.
http://articles.sysprogs.org/visualddk/firstdriver/
Making your first driver - complete walkthrough(使用VisualDDK)的更多相关文章
- VS2010+VMWare8+VisualDDK1.5.6 创建并调试你的第一个驱动程序 - 完全教程
本文描述了如何使用Visual Studio+VMMare+VisualDDK来创建.编译和调试你的第一个驱动程序.本文提供在开发和调试工具的环境下详细的操作步骤,而无需太多的关心这些环境背后所做的事 ...
- 【转载】VS2010+VMWare8+VisualDDK1.5.6 创建并调试驱动程序 - 完全教程
原帖:http://techird.blog.163.com/blog/static/1215640362011112385241568/ 本文描述了如何使用Visual Studio+VMMare+ ...
- Burp Suite Walkthrough(英文版)
Burp Suite is one of the best tools available for web application testing. Its wide variety of featu ...
- Burp Suite Walkthrough
Burp Suite is one of the best tools available for web application testing. Its wide variety of featu ...
- PE Header and Export Table for Delphi
Malware Analysis Tutorial 8: PE Header and Export Table 2. Background Information of PE HeaderAny bi ...
- Xamarin.Forms 开发资源集合(复制)
复制:https://www.cnblogs.com/mschen/p/10199997.html 收集整理了下 Xamarin.Forms 的学习参考资料,分享给大家,稍后会不断补充: UI样式 S ...
- Xamarin.Forms 开发资源集合
收集整理了下 Xamarin.Forms 的学习参考资料,分享给大家,稍后会不断补充: UI样式 Snppts: Xamarin Forms UI Snippets. Prebuilt Templat ...
- How it works: Linux audio explained
from: tuxradar.com/content/how-it-works-linux-audio-explained How it works: Linux audio explained Po ...
- [译]Python中的异步IO:一个完整的演练
原文:Async IO in Python: A Complete Walkthrough 原文作者: Brad Solomon 原文发布时间:2019年1月16日 翻译:Tacey Wong 翻译时 ...
随机推荐
- Matlab工程
1.matlab设置默认路径 在原来的默认路径(bin)下创建一个名为startup.m的文件,内容为相对路径 cd ..\..\WorkSpace\ 或绝对路径 cd F:\Program\MATL ...
- Delphi中TWebBrowser中注入Js
最近帮朋友做一个软件,其中要自动化某网页中的操作,最简的操作是调用自己写的代码. 代码如下: procedure TForm1.Button2Click(Sender: TObject);var i ...
- 各种字符串Hash函数比较
常用的字符串Hash函数还有ELFHash,APHash等等,都是十分简单有效的方法.这些函数使用位运算使得每一个字符都对最后的函数值产生影响.另外还有以MD5和SHA1为代表的杂凑函数,这些函数几乎 ...
- 2014第16周三CSS布局再学习摘录
今天尝试写了下前端页面,费了不少时间,做出的结果仍然惨不忍睹,感觉很简单的几个页面,在现有框架多个样式混杂下就是感觉很不自在随意,晚上回来又看了些div+css方面的基础知识. 1.CSS的class ...
- c++多线程编程之互斥对象(锁)的使用之----死锁
一.死锁会在什么情况发生 1.假设有如下代码 mutex; //代表一个全局互斥对象 void A() { mutex.lock(); //这里操作共享数据 B(); //这里调用B方法 mu ...
- JS 网页打印解决方案
这些日子真是太忙了,项目太多了公司总是加班,而且这些项目中好多都用到的打印,所以学习了一段时间js的打印. 其实原来只是用到了简单的功能,现在要深入的了解才发现原来ie的网页打印也是如此的强大. 以下 ...
- Vxlan 原理
https://www.gitbook.com/book/yeasy/openstack_understand_neutron/details 自己总结一下: 分析 VTEP的情况, 即Vxlan跟V ...
- Ubuntu adb devices 出现??? no permissions 的解决方法
在ubuntu 12.10下运行adb devices出现: List of devices attached ???????????? no permissions 1.用命令: lsusb 以 ...
- _extend用法总结
针对对象数组: 后面的属性会覆盖更新前面的属性 看代码: <!DOCTYPE html> <html> <head> <meta charset=" ...
- web前端学习之路
test 随着自己对于web前端知识了解的越多,越来越发现自己真的好菜 一脸茫然阶段 两年前大学接触网页设计,那时对于网页设计一窍不通,只是看了一本自己大学编的一本入门教材,我甚至不知道那些网页设计的 ...