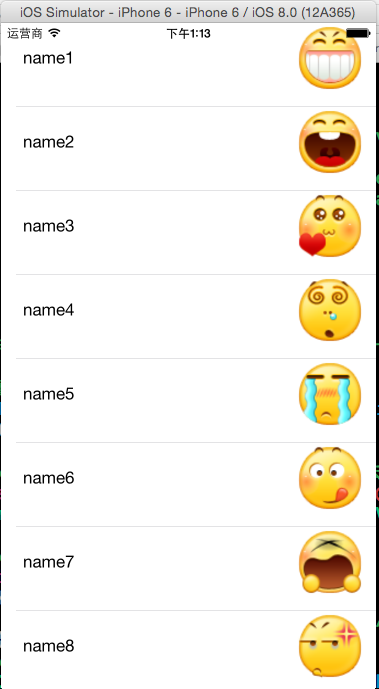
iOS:UITableViewCell自定义单元格
UITableViewCell:自定义的单元格,可以在xib中创建单元格,也可以在storyBorad中创建单元格。有四种创建方式

 #import <Foundation/Foundation.h>

 @interface Contact : NSObject

 @property (copy,nonatomic)NSString *name;

 @property (copy,nonatomic)NSString *faceName;

 -(instancetype)initWithName:(NSString*)name andFaceName:(NSString*) faceName;

 @end
 #import "Contact.h"

 @implementation Contact

 -(instancetype)initWithName:(NSString*)name andFaceName:(NSString*) faceName

 {

     self = [super init];

     if(self)

     {

         _name = [name copy];

         _faceName = [faceName copy];

     }

     return self;

 }

 @end
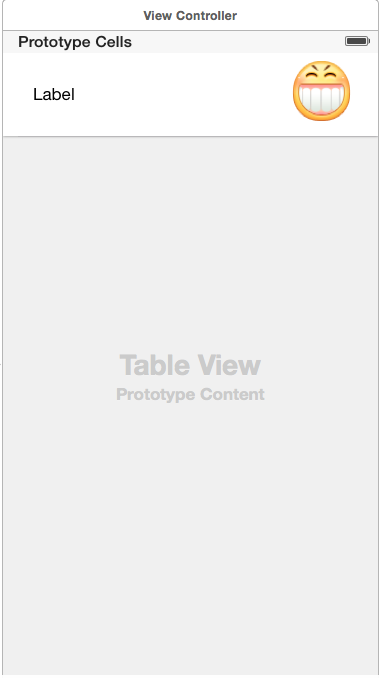
在视图控制器中完成代码:(需要用tag获取单元格的属性控件)
 #import "ViewController.h"

 #import "Contact.h"

 @interface ViewController ()<UITableViewDataSource>

 @property (weak, nonatomic) IBOutlet UITableView *tableView;

 @property (strong,nonatomic)NSMutableArray *contacts;

 @end

 @implementation ViewController

 - (void)viewDidLoad {

     [super viewDidLoad];

     //初始化数据

     self.contacts = [NSMutableArray arrayWithCapacity:];

     for(int i=; i<; i++)

     {

         Contact *conatct = [[Contact alloc]initWithName:[NSString stringWithFormat:@"name%d",i+] andFaceName:[NSString stringWithFormat:@"%d.png",i]];

         [self.contacts addObject:conatct];

     }

     //设置tableView的数据源

     self.tableView.dataSource = self;

 }

 #pragma mark -tableView的数据源方法

 //每一组多少行

 -(NSInteger)tableView:(UITableView *)tableView numberOfRowsInSection:(NSInteger)section

 {

     return self.contacts.count;

 }

 //设置每一个单元格的内容

 -(UITableViewCell *)tableView:(UITableView *)tableView cellForRowAtIndexPath:(NSIndexPath *)indexPath

 {

     //1.根据reuseIdentifier,先到对象池中去找重用的单元格对象

     static NSString *reuseIdentifier = @"myCell";

     UITableViewCell *cell = [self.tableView dequeueReusableCellWithIdentifier:reuseIdentifier];

     //2.设置单元格对象的内容

     Contact *contact = [self.contacts objectAtIndex:indexPath.row];

     UILabel *label = (UILabel*)[cell viewWithTag:];

     label.text = contact.name;

     UIImageView *imageView = (UIImageView*)[cell viewWithTag:];

     [imageView setImage:[UIImage imageNamed:contact.faceName]];

     return cell;

 }

 @end
方法二:直接在storyBoard中创建单元格并关联自定义的类并直接加载,自定义的单元格位置一个UITableView的上面

#import <Foundation/Foundation.h>

@interface Contact : NSObject

@property (copy,nonatomic)NSString *name;

@property (copy,nonatomic)NSString *faceName;

-(instancetype)initWithName:(NSString*)name andFaceName:(NSString*) faceName;

@end

#import "Contact.h"

@implementation Contact

-(instancetype)initWithName:(NSString*)name andFaceName:(NSString*) faceName

{

    self = [super init];

    if(self)

    {

        _name = [name copy];

        _faceName = [faceName copy];

    }

    return self;

}

@end
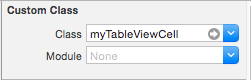
与单元格关联的自定义的类,关联单元格的属性控件(不需要再用tag获取了,直接用self.获取)

还是在视图控制器中完成加载:
 #import "ViewController.h"

 #import "Contact.h"

 #import "myTableViewCell.h"

 @interface ViewController ()<UITableViewDataSource>

 @property (weak, nonatomic) IBOutlet UITableView *tableView;

 @property (strong,nonatomic)NSMutableArray *contacts;

 @end

 @implementation ViewController

 - (void)viewDidLoad {

     [super viewDidLoad];

     //初始化数据

     self.contacts = [NSMutableArray arrayWithCapacity:];

     for(int i=; i<; i++)

     {

         Contact *conatct = [[Contact alloc]initWithName:[NSString stringWithFormat:@"name%d",i+] andFaceName:[NSString stringWithFormat:@"%d.png",i]];

         [self.contacts addObject:conatct];

     }

     //设置tableView的数据源

     self.tableView.dataSource = self;

 }

 #pragma mark -tableView的数据源方法

 //每一组多少行

 -(NSInteger)tableView:(UITableView *)tableView numberOfRowsInSection:(NSInteger)section

 {

     return self.contacts.count;

 }

 //设置每一个单元格的内容

 -(UITableViewCell *)tableView:(UITableView *)tableView cellForRowAtIndexPath:(NSIndexPath *)indexPath

 {

     //1.根据reuseIdentifier,先到对象池中去找重用的单元格对象

     static NSString *reuseIdentifier = @"myCell";

     myTableViewCell *cell = [self.tableView dequeueReusableCellWithIdentifier:reuseIdentifier];

     //2.设置单元格对象的内容

     Contact *contact = [self.contacts objectAtIndex:indexPath.row];

     cell.label.text = contact.name;

     [cell.imgView setImage:[UIImage imageNamed:contact.faceName]];

     return cell;

 }

 @end
方法三:在xib文件中创建单元格,然后再视图控制器中直接加载使用
首先在storyBoard中添加一个UITableView
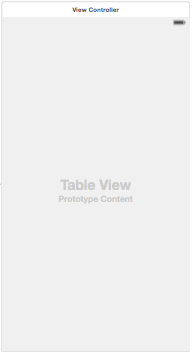
然后在已经创建好的MyCell.xib中创建自定义的单元格为:
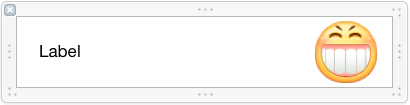
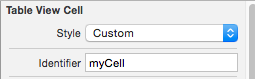
设置该单元格的重用标识符identifier:

创建一个联系人初始化的类:
 #import <Foundation/Foundation.h>

 @interface Contact : NSObject

 @property (copy,nonatomic)NSString *name;

 @property (copy,nonatomic)NSString *faceName;

 -(instancetype)initWithName:(NSString*)name andFaceName:(NSString*) faceName;

 @end

 #import "Contact.h"

 @implementation Contact

 -(instancetype)initWithName:(NSString*)name andFaceName:(NSString*) faceName

 {

     self = [super init];

     if(self)

     {

         _name = [name copy];

         _faceName = [faceName copy];

     }

     return self;

 }

 @end
还是在视图控制器中完成加载:
 #import "ViewController.h"

 #import "Contact.h"

 #import "myTableViewCell.h"

 @interface ViewController ()<UITableViewDataSource>

 @property (weak, nonatomic) IBOutlet UITableView *tableView;

 @property (strong,nonatomic)NSMutableArray *contacts;

 @end

 @implementation ViewController

 - (void)viewDidLoad {

     [super viewDidLoad];

     //初始化数据

     self.contacts = [NSMutableArray arrayWithCapacity:];

     for(int i=; i<; i++)

     {

         Contact *conatct = [[Contact alloc]initWithName:[NSString stringWithFormat:@"name%d",i+] andFaceName:[NSString stringWithFormat:@"%d.png",i]];

         [self.contacts addObject:conatct];

     }

     //设置tableView的数据源

     self.tableView.dataSource = self;

 }

 #pragma mark -tableView的数据源方法

 //每一组多少行

 -(NSInteger)tableView:(UITableView *)tableView numberOfRowsInSection:(NSInteger)section

 {

     return self.contacts.count;

 }

 //直接从xib文件中加载

 //设置每一个单元格的内容

 -(UITableViewCell *)tableView:(UITableView *)tableView cellForRowAtIndexPath:(NSIndexPath *)indexPath

 {

     //1.根据reuseIdentifier,先到对象池中去找重用的单元格对象

     static NSString *reuseIdentifier = @"myCell";

       UITableViewCell *cell = [self.tableView dequeueReusableCellWithIdentifier:reuseIdentifier];

     //2.如果没找到,就自己创建cell

     if(!cell)

     {

         //从xib文件中加载视图

        NSArray *views = [[NSBundle mainBundle]loadNibNamed:@"MyCell" owner:nil options:nil];

         cell = (UITableViewCell*)[views lastObject];

     }

     //3.设置单元格对象的内容

     Contact *contact = [self.contacts objectAtIndex:indexPath.row];

     UILabel *label = (UILabel*)[cell viewWithTag:];

     label.text = contact.name;

     UIImageView *imgView = (UIImageView*)[cell viewWithTag:];

     [imgView setImage:[UIImage imageNamed:contact.faceName]];

     return cell;

 }
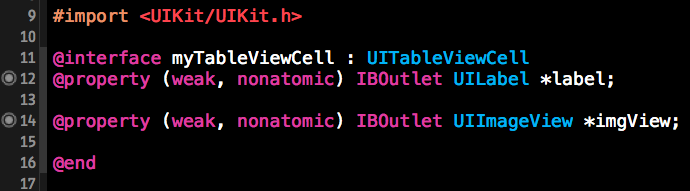
方法四:在xib文件中创建单元格,并创建与之关联的的类,然后将加载过程封装到它的类中帮助初始化完成,同时该类提供类方法,最后再视图控制器中通过这个类方法获取单元格。
首先在storyBoard中添加一个UITableView

然后在已经创建好的MyCell.xib中创建自定义的单元格为:

给单元格设置重用标识符identifier

将单元格与自定义的类关联

创建一个联系人初始化的类:
 #import <Foundation/Foundation.h>

  @interface Contact : NSObject

  @property (copy,nonatomic)NSString *name;

  @property (copy,nonatomic)NSString *faceName;

  -(instancetype)initWithName:(NSString*)name andFaceName:(NSString*) faceName;

  @end

 #import "Contact.h"

 @implementation Contact

 -(instancetype)initWithName:(NSString*)name andFaceName:(NSString*) faceName

 {

     self = [super init];

     if(self)

     {

         _name = [name copy];

         _faceName = [faceName copy];

     }

     return self;

 }

 @end
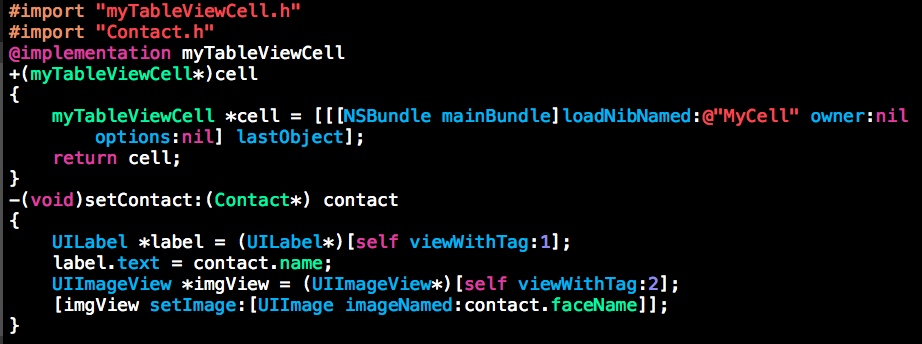
创建一个与单元格关联的类:(将加载单元格的过程和属性封装起来)
在视图控制器中通过上面的类方法获取单元格
 #import "ViewController.h"

 #import "Contact.h"

 #import "myTableViewCell.h"

 @interface ViewController ()<UITableViewDataSource>

 @property (weak, nonatomic) IBOutlet UITableView *tableView;

 @property (strong,nonatomic)NSMutableArray *contacts;

 @end

 @implementation ViewController

 - (void)viewDidLoad {

     [super viewDidLoad];

     //初始化数据

     self.contacts = [NSMutableArray arrayWithCapacity:];

     for(int i=; i<; i++)

     {

         Contact *conatct = [[Contact alloc]initWithName:[NSString stringWithFormat:@"name%d",i+] andFaceName:[NSString stringWithFormat:@"%d.png",i]];

         [self.contacts addObject:conatct];

     }

     //设置tableView的数据源

     self.tableView.dataSource = self;

 }

 #pragma mark -tableView的数据源方法

 //每一组多少行

 -(NSInteger)tableView:(UITableView *)tableView numberOfRowsInSection:(NSInteger)section

 {

     return self.contacts.count;

 }

 //在与xib关联的类中加载xib文件(其实就是封装了一下而已)

 //设置每一个单元格的内容

 -(UITableViewCell *)tableView:(UITableView *)tableView cellForRowAtIndexPath:(NSIndexPath *)indexPath

 {

     //1.根据reuseIdentifier,先到对象池中去找重用的单元格对象

     static NSString *reuseIdentifier = @"myCell";

     myTableViewCell *cell = [self.tableView dequeueReusableCellWithIdentifier:reuseIdentifier];

     //2.如果没找到,就自己创建cell

     if(!cell)

     {

         cell = [myTableViewCell cell];//调用类方法

     }

     //3.设置单元格对象的内容

     Contact *contact = [self.contacts objectAtIndex:indexPath.row];

     [cell setContact:contact];//调用实例方法

     return cell;

 }

 @end
iOS:UITableViewCell自定义单元格的更多相关文章
- Swift - 自定义单元格实现微信聊天界面
1,下面是一个放微信聊天界面的消息展示列表,实现的功能有: (1)消息可以是文本消息也可以是图片消息 (2)消息背景为气泡状图片,同时消息气泡可根据内容自适应大小 (3)每条消息旁边有头像,在左边表示 ...
- 浅谈DevExpress<五>:TreeList简单的美化——自定义单元格,加注释以及行序号
今天就以昨天的列表为例,实现以下效果:预算大于110万的单元格突出显示,加上行序号以及注释,如下图:
- jQuery MiniUI自定义单元格
监听处理"drawcell"事件 使用"drawcell"事件,可以自定义单元格内容.样式.行样式等. grid.on("drawcell" ...
- 使用VUE组件创建SpreadJS自定义单元格(一)
作为近五年都冲在热门框架排行榜首的Vue,大家一定会学到的一部分就是组件的使用.前端开发的模块化,可以让代码逻辑更加简单清晰,项目的扩展性大大加强.对于Vue而言,模块化的体现集中在组件之上,以组件为 ...
- 使用VUE组件创建SpreadJS自定义单元格(二)
在上篇中,我们介绍了如何通过设置runtimeCompiler为true,在Vue中实现了动态创建电子表格组件.想了解具体内容可看点击查看使用VUE组件创建SpreadJS自定义单元格(一). 但是在 ...
- 自己的自定义单元格(IOS)
定义自己的单位格有三种方法 - 代码 - xib - storyboard(推荐) 操作方法故事板 1.在TableView财产Prototype Cells至1.莫感觉1: 2.须要创建自己定义的单 ...
- IOS 取消表格单元格 TableViewCell 去掉高亮状态 点击Cell取消选择状态
以下是两种实现效果 1. 自定义cell 继承UITableViewCell 重写 -(void)setSelected:(BOOL)selected animated:(BOOL)animated ...
- UITableView自定义单元格
随手笔记: RootViewController代码 #import "RootViewController.h" #import "AddressContact.h&q ...
- NPOI 自定义单元格背景颜色-Excel
NPOI针对office2003使用HSSFWorkbook,对于offce2007及以上使用XSSFWorkbook:今天我以HSSFWorkbook自定义颜色为例说明,Office2007的未研究 ...
随机推荐
- bzoj [SDOI2009]学校食堂Dining
感觉这个状压dp比较难想.. dp[ i ][ s ][ k ] 表示前i - 1个都排好了, 从i开始的7个的取没取的状态为s, 且最后一个相对i的位置为k的最少花费. 状态转移方程 if(s &a ...
- [CodeForces]CodeForces - 1025F Disjoint Triangles
题意: 给出平面上n个点,问能在其中选出6个点,组成两个三角形,使得其互不相交 问有多少种选法 大致思路 考虑枚举一条直线,将所有得点分为左右两部分,其中有两个点在直线上, 以这两个点为顶点,分别统 ...
- Wannafly挑战赛9 C - 列一列
链接:https://www.nowcoder.com/acm/contest/71/C来源:牛客网 题目描述 小W在计算一个数列{An},其中A1=1,A2=2,An+2=An+1+An.尽管他计算 ...
- odoo 模型与ORM
型号属性 在/模型添加activity.py文件 class ActivityEvent(models.Model): _name = 'activity.event' _inherit = 'eve ...
- Atcoder681 Typical DP Contest E.数 数位dp
写什么递归....非递归多好写 令$f[i][j]$表示前$i$位的和在模$d$意义下为$j$的方案数,然后转移即可 复杂度$O(10000 * 100 * 10)$ 注意非递归建议高位摆第$n$位. ...
- BZOJ 1174 [Balkan2007]Toponyms(Trie)
[题目链接] http://www.lydsy.com/JudgeOnline/problem.php?id=1174 [题目大意] 选出一些字符串,使得字符串的最长公共前缀*字符串的总个数最大化 [ ...
- 【堆优化Dijkstra+字典序最短路方案】HDU1385-Minimum Transport Cost
[题目大意] 给出邻接矩阵以及到达各个点需要付出的代价(起点和终点没有代价),求出从给定起点到终点的最短路,并输出字典序最小的方案. [思路] 在堆优化Dijkstra中,用pre记录前驱.如果新方案 ...
- 关于void main()的误区
很多人甚至市面上的一些书籍,都使用了void main( ) ,其实这是错误的.C/C++ 中从来没有定义过void main( ) .C++ 之父 Bjarne Stroustrup 在他的主页上的 ...
- hdu 5317 RGCDQ (2015多校第三场第2题)素数打表+前缀和相减求后缀(DP)
题目链接:http://acm.hdu.edu.cn/showproblem.php?pid=5317 题意:F(x) 表示x的不同质因子的个数结果是求L,R区间中最大的gcd( F(i) , F(j ...
- Kibana安装及使用说明
Kibana安装及使用说明 Kibana是一个针对Elasticsearch的开源分析及可视化平台,用来搜索.查看交互存储在Elasticsearch索引中的数据. 官方地址:https://www. ...