
CPF 入门教程 - 数据绑定和命令绑定(二)
CPF netcore跨平台UI框架
系列教程
CPF 入门教程 - 数据绑定和命令绑定(二)
数据绑定和Wpf类似,支持双向绑定。数据绑定和命令绑定是UI和业务逻辑分离的基础。
首先,你需要定义个MainModel,为了可以有属性通知,这个类可以继承CpfObject或者自己实现INotifyPropertyChanged
     public class MainModel : CpfObject

     {

         [PropertyMetadata("默认值")]

         public string Test

         {

             get { return (string)GetValue(); }

             set { SetValue(value); }

         }

     }
这里定义了一个Test属性,并且设置默认值为“默认值”
设计个测试界面,加个TextBlock和Button,同时TextBlock设置绑定,绑定定义在Bindings属性, {nameof(TextBlock.Text),nameof(MainModel.Test) } 表示TextBlock的Text绑定到DataContext的Test属性
    public class Window4 : Window

    {

        protected override void InitializeComponent()

        {

            Title = "标题";

            Width = 344.8f;

            Height = 126.4f;

            Background = null;

            Children.Add(new WindowFrame(this, new Panel

            {

                Width = "100%",

                Height = "100%",

                Children =

                {

                    //内容元素放这里

                    new Button

                    {

                        MarginLeft = 223.8f,

                        MarginTop = 25.7f,

                        Height = 28f,

                        Width = 67.4f,

                        Content = "Button",

                    },

                    new TextBlock

                    {

                        MarginLeft = 36.7f,

                        MarginTop = 31.6f,

                        Text = "TextBlock",

                        Bindings =

                        {

                            {nameof(TextBlock.Text),nameof(MainModel.Test) }

                        }

                    },

                }

            }));

            LoadStyleFile("res://ConsoleApp1.Stylesheet1.css");

            //加载样式文件,文件需要设置为内嵌资源

        }

    }

修改program,设置Window的DataContext和CommandContext
            var model = new MainModel();

            Application.Run(new Window4 { DataContext = model, CommandContext = model });
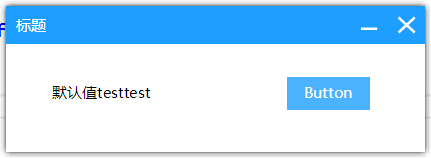
写好之后,运行看看效果。TextBlock那边显示MainModel那边定义的默认值

接下来定义命令,通过按钮点击修改Test值,同时自动更新到TextBlock
MainModel里增加个Click方法
    class MainModel : CpfObject

    {

        [PropertyMetadata("默认值")]

        public string Test

        {

            get

            {

                return (string)GetValue();

            }

            set

            {

                SetValue(value);

            }

        }

        public void Click()

        {

            Test += "test";

        }

    }
Button那边增加命令绑定,Commands里添加, {nameof(Button.Click),nameof(MainModel.Click) } 表示Button的Click事件绑定到CommandContext的Click方法
                    new Button

                    {

                        MarginLeft = 223.8f,

                        MarginTop = 25.7f,

                        Height = 28f,

                        Width = 67.4f,

                        Content = "Button",

                        Commands =

                        {

                            {nameof(Button.Click),nameof(MainModel.Click) }

                        }

                    },
运行效果,点击一次增加一次test。这就是最简单的模型视图分离的数据绑定
接下来绑定集合
设计界面,添加Button和ListBox
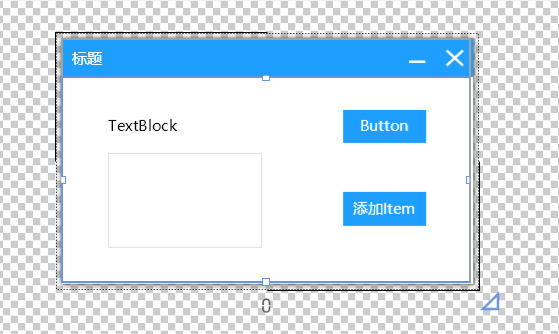
往MainModel里加上Items集合属性,构造函数里初始化集合,用 Collection 是为了有集合变化通知,也可以使用 ObservableCollection。 (string, string) 就是元组里简化的结构体类型定义,是一种偷懒简化数据定义的方式,不过这种方式的话,改item就不能更新到UI了,需要可以更新到UI的就需要自定义类型,继承CpfObject或者继承INotifyPropertyChanged的类型作为Item
        public MainModel()

        {

            Items = new Collection<(string, string)>();

        }

        public Collection<(string,string)> Items

        {

            get

            {

                return (Collection<(string, string)>)GetValue();

            }

            set

            {

                SetValue(value);

            }

        }
MainModel里加个AddItem方法
        public void AddItem()

        {

            Items.Add(("test" + Items.Count, Items.Count.ToString()));

        }
最终代码
using CPF;

using System;

using System.Collections.Generic;

using System.Text;

namespace ConsoleApp1

{

    class MainModel : CpfObject

    {

        [PropertyMetadata("默认值")]

        public string Test

        {

            get

            {

                return (string)GetValue();

            }

            set

            {

                SetValue(value);

            }

        }

        public void Click()

        {

            Test += "test";

        }

        public MainModel()

        {

            Items = new Collection<(string, string)>();

        }

        public Collection<(string, string)> Items

        {

            get

            {

                return (Collection<(string, string)>)GetValue();

            }

            set

            {

                SetValue(value);

            }

        }

        public void AddItem()

        {

            Items.Add(("test" + Items.Count, Items.Count.ToString()));

        }

    }

}
using System;

using System.Collections.Generic;

using System.Linq;

using System.Text;

using CPF;

using CPF.Drawing;

using CPF.Controls;

using CPF.Shapes;

using CPF.Styling;

using CPF.Animation;

namespace ConsoleApp1

{

    public class Window4 : Window

    {

        protected override void InitializeComponent()

        {

            Title = "标题";

            Width = 338.4f;

            Height = 205.6f;

            Background = null;

            Children.Add(new WindowFrame(this, new Panel

            {

                Width = "100%",

                Height = "100%",

                Children =

                {

                    //内容元素放这里

                    new Button

                    {

                        MarginLeft = 223.8f,

                        MarginTop = 25.7f,

                        Height = 28f,

                        Width = 67.4f,

                        Content = "Button",

                        Commands =

                        {

                            {

                                nameof(Button.Click),

                                nameof(MainModel.Click)

                            }

                        }

                    },

                    new TextBlock

                    {

                        MarginLeft = 36.7f,

                        MarginTop = 31.6f,

                        Text = "TextBlock",

                        Bindings =

                        {

                            {

                                nameof(TextBlock.Text),

                                nameof(MainModel.Test)

                            }

                        }

                    },

                    new Button

                    {

                        MarginLeft = 223.8f,

                        MarginTop = 91.6f,

                        Height = 28f,

                        Width = 67.4f,

                        Content = "添加Item",

                        Commands =

                        {

                            {nameof(Button.Click),nameof(MainModel.AddItem) }

                        }

                    },

                    new ListBox

                    {

                        SelectedValuePath = "Item2",//绑定Item里的Item1属性

                        DisplayMemberPath = "Item1",//绑定Item里的Item2属性

                        BorderStroke = "1,Solid",

                        BorderFill = "#DEDEDE",

                        MarginLeft = 36.7f,

                        MarginTop = 60.8f,

                        Height = 76.5f,

                        Width = 123.2f,

                        Bindings =

                        {

                            {nameof(ListBox.Items),nameof(MainModel.Items) }

                        }

                    },

                }

            }));

            LoadStyleFile("res://ConsoleApp1.Stylesheet1.css");

            //加载样式文件,文件需要设置为内嵌资源

        }

    }

}
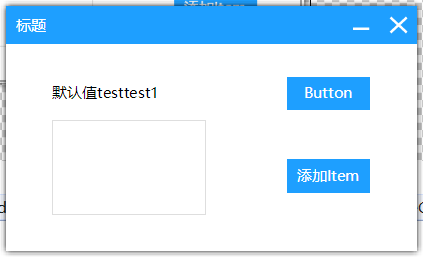
最终运行效果,点击添加Item的按钮,ListBox里会增加Item

数据类型转换,Test属性值后面加1。 数据转换器用方法或者Lambda就行。
                            {

                                nameof(TextBlock.Text),

                                nameof(MainModel.Test),

                                null,

                                BindingMode.OneWay,

                                (string a)=>a+""

                            }
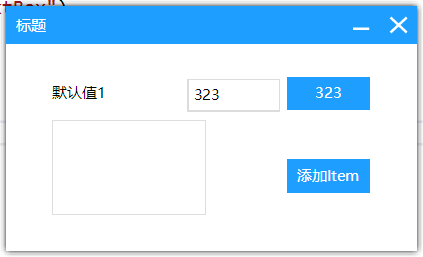
UI元素之间绑定,TextBox的Text绑定到Button的Content,其中TextBox设置PresenterFor=this,是为了标记TextBox的作用域在当前类,因为Name是可以重复的,元素嵌套如果有相同Name会无法判断元素是在哪里的,所以用PresenterFor加标记判断,而且这样可以通过FindPresenterByName方法来获取当前类里的标记元素来绑定
        protected override void InitializeComponent()

        {

            Title = "标题";

            Width = 338.4f;

            Height = 205.6f;

            Background = null;

            Children.Add(new WindowFrame(this, new Panel

            {

                Width = "100%",

                Height = "100%",

                Children =

                {

                    //内容元素放这里

                    new Button

                    {

                        MarginLeft = 223.8f,

                        MarginTop = 25.7f,

                        Height = 28f,

                        Width = 67.4f,

                        Content = "Button",

                        Commands =

                        {

                            {

                                nameof(Button.Click),

                                nameof(MainModel.Click)

                            }

                        },

                        Bindings =

                        {

                            {

                                nameof(Button.Content),

                                nameof(TextBox.Text),

                                FindPresenterByName("textBox")

                            }

                        }

                    },

                    new TextBlock

                    {

                        MarginLeft = 36.7f,

                        MarginTop = 31.6f,

                        Text = "TextBlock",

                        Bindings =

                        {

                            {

                                nameof(TextBlock.Text),

                                nameof(MainModel.Test),

                                null,

                                BindingMode.OneWay,

                                (string a)=>a+""

                            }

                        }

                    },

                    new Button

                    {

                        MarginLeft = 223.8f,

                        MarginTop = 91.6f,

                        Height = 28f,

                        Width = 67.4f,

                        Content = "添加Item",

                        Commands =

                        {

                            {

                                nameof(Button.Click),

                                nameof(MainModel.AddItem)

                            }

                        }

                    },

                    new ListBox

                    {

                        SelectedValuePath = "Item2",

                        //绑定Item里的Item1属性

                        DisplayMemberPath = "Item1",

                        //绑定Item里的Item2属性

                        BorderStroke = "1,Solid",

                        BorderFill = "#DEDEDE",

                        MarginLeft = 36.7f,

                        MarginTop = 60.8f,

                        Height = 76.5f,

                        Width = 123.2f,

                        Bindings =

                        {

                            {

                                nameof(ListBox.Items),

                                nameof(MainModel.Items)

                            }

                        }

                    },

                    new TextBox

                    {

                        Name="textBox",

                        PresenterFor=this,

                        AcceptsReturn= false,

                        HScrollBarVisibility= ScrollBarVisibility.Hidden,

                        VScrollBarVisibility= ScrollBarVisibility.Hidden,

                        MarginLeft = 144.8f,

                        MarginTop = 28.1f,

                        Width = 74.5f

                    },

                }

            }));

            LoadStyleFile("res://ConsoleApp1.Stylesheet1.css");

            //加载样式文件,文件需要设置为内嵌资源

        }
TextBox输入,会自动更新Button的文字
命令绑定除了事件之外,属性变化也可以绑定为命令,比如,鼠标移入和移出就调用
                        Commands =

                        {

                            {

                                nameof(Button.IsMouseOver),

                                nameof(MainModel.Click)

                            }

                        }
主要绑定就这些,如果要双向绑定,命令参数等等,看VS那边的智能提示
CPF 入门教程 - 数据绑定和命令绑定(二)的更多相关文章
- CPF 入门教程 - 样式和动画(三)
CPF NetCore跨平台UI框架 系列教程 CPF 入门教程(一) CPF 入门教程 - 数据绑定和命令绑定(二) CPF 入门教程 - 样式和动画(三) 用样式可以对内部元素进行批量设置属性. ...
- CPF 入门教程 - 绘图(四)
CPF NetCore跨平台UI框架,增加了Vlc支持跨平台播放视频. 系列教程 CPF 入门教程(一) CPF 入门教程 - 数据绑定和命令绑定(二) CPF 入门教程 - 样式和动画(三) CPF ...
- CPF 入门教程 - 控件布局(六)
CPF netcore跨平台桌面UI框架 系列教程 CPF 入门教程(一) CPF 入门教程 - 数据绑定和命令绑定(二) CPF 入门教程 - 样式和动画(三) CPF 入门教程 - 绘图(四) C ...
- CPF 入门教程 - 设计器和模板库的使用(五)
CPF netcore跨平台UI框架 系列教程 CPF 入门教程(一) CPF 入门教程 - 数据绑定和命令绑定(二) CPF 入门教程 - 样式和动画(三) CPF 入门教程 - 绘图(四) CPF ...
- CPF 入门教程 - 属性和事件(七)
CPF C#跨平台桌面UI框架 系列教程 CPF 入门教程(一) CPF 入门教程 - 数据绑定和命令绑定(二) CPF 入门教程 - 样式和动画(三) CPF 入门教程 - 绘图(四) CPF 入门 ...
- CPF 入门教程 - 各个控件介绍(八)
CPF C#跨平台桌面UI框架 系列教程 CPF 入门教程(一) CPF 入门教程 - 数据绑定和命令绑定(二) CPF 入门教程 - 样式和动画(三) CPF 入门教程 - 绘图(四) CPF 入门 ...
- CPF 入门教程 - 各平台各系统发布说明(九)
CPF C#跨平台桌面UI框架,支持Windows,Mac,Linux,支持龙芯.飞腾等CPU 系列教程 CPF 入门教程(一) CPF 入门教程 - 数据绑定和命令绑定(二) CPF 入门教程 - ...
- WPF中的命令与命令绑定(二)
原文:WPF中的命令与命令绑定(二) WPF中的命令与命令绑定(二) 周银辉在WPF中,命令(Commandi ...
- Elasticsearch入门教程(六):Elasticsearch查询(二)
原文:Elasticsearch入门教程(六):Elasticsearch查询(二) 版权声明:本文为博主原创文章,遵循CC 4.0 BY-SA版权协议,转载请附上原文出处链接和本声明. 本文链接:h ...
随机推荐
- FileNotFoundError: [WinError 2] 系统找不到指定的文件。 解决方案
用Idle运行Python脚本的时候发现如下错误: Traceback (most recent call last): File "C:\Users\DangKai\Desktop\pyt ...
- 题解 洛谷 P2254 【[NOI2005]瑰丽华尔兹】
发现在同一时间段中,滑动的方向具有唯一性,所以不难得出\(DP\)方程. \(f_{i,j}=max(f_{i,j},f_{i-dx_,j-dy}+dis_{i,j,i-dx_,j-dy})\) \( ...
- Python 3.x 安装PyQt5
一. 安装PyQt5 官方要求Python版本:Python >=3.5 打开命令行 输入 pip install PyQt5 PyQt5安装成功 安装完成功PyQt5后发现没有design ...
- pyhton 3.6 pip 出现 Fatal error in launcher: Unable to create process using 解决方法
ERROR:Fatal error in launcher: Unable to create process using '"' 出现这个 打开 终端 输入 python36 -m ...
- DJANGO-天天生鲜项目从0到1-012-订单-用户订单页面
本项目基于B站UP主‘神奇的老黄’的教学视频‘天天生鲜Django项目’,视频讲的非常好,推荐新手观看学习 https://www.bilibili.com/video/BV1vt41147K8?p= ...
- MySQL(三)视图
视图:view,是一种有结构(有行有列)但是没有结果(结构中不真实的存放数据)的虚拟表,虚拟表的结构来源不是自己定义,而是从对应的基表中产生(视图的数据来源): 视图意义: 1.视图可以节省SQL语句 ...
- Mosquitto的搭建(websocket、ssl、auth-plug)及坑点总结
Mosquitto的搭建及坑点总结 主要讲述的是eclipse-mosquitto的C语言版本的搭建,主要是为了从1.4.15版本升级到1.6.9,为解决一些webSocket和数据格式问题. 因为根 ...
- 解决node 运行接口 出现 Cannot destructure property `us` of 'undefined' or 'null'.
出现 参数是 undefined or null 一.检查是否安装 body-parser server.js中是否引入 app.use(bodyParser.urlencoded({ extende ...
- springboot + ehcache
一.使用 springboot + ehcache本地堆缓存实现相应功能 1.引入ehcache的jar包 2.创建ehcache的xml配置文件 <?xml version="1.0 ...
- 图解HTTP 2/11
第一章 了解Web及网络基础 *HTTP(HyperText Transfer Protocal, 超文本传输协议),可以说,Web是建立在HTTP协议上通信的. *3项WWW(World Wide ...