路由器配置——路由重分布2(OSPF)
一、实验目的:使用路由重分布达到全网互通的效果
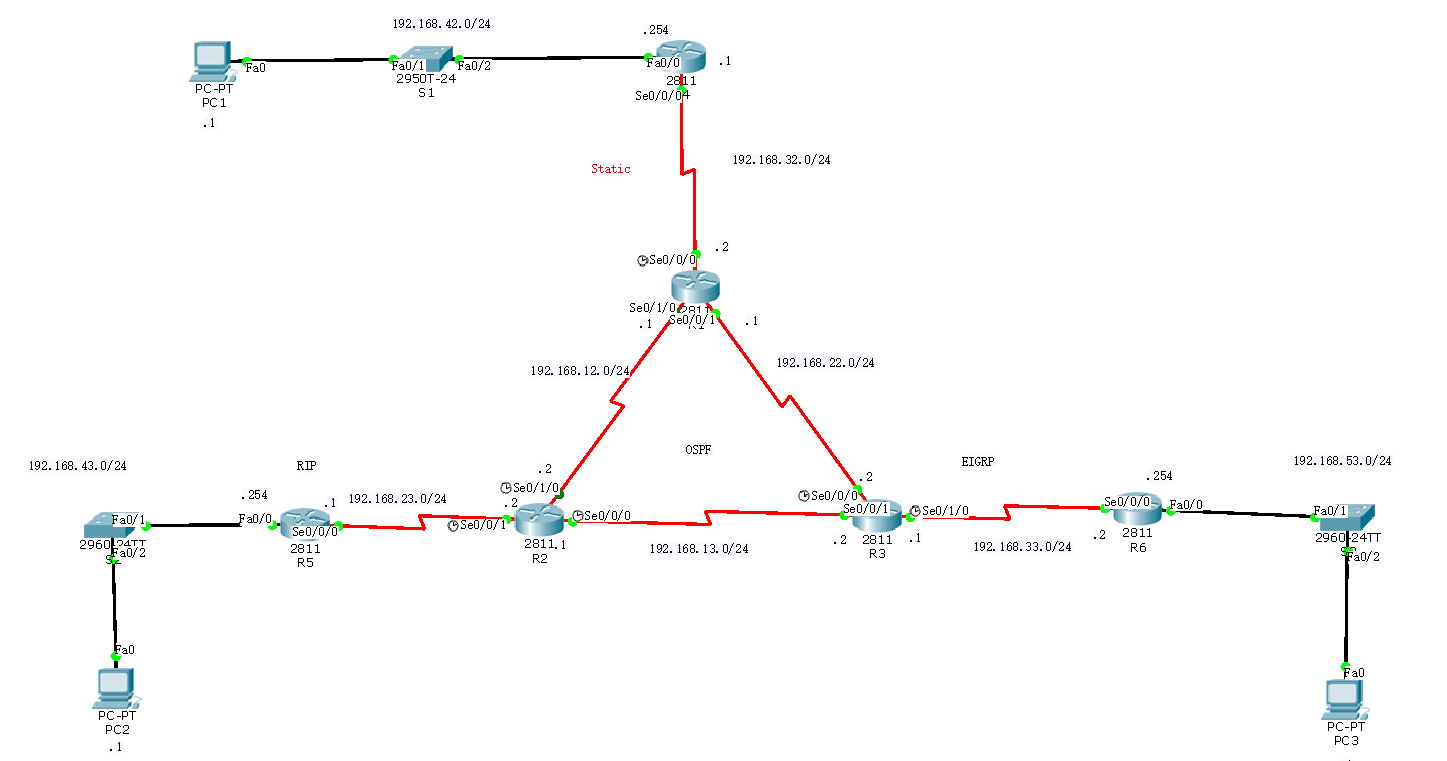
二、拓扑图:
三、具体步骤配置:
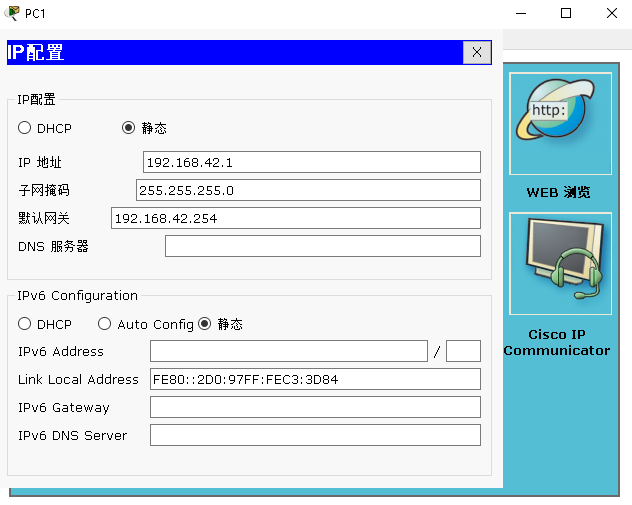
1、先给各台主机配置ip地址及网关,以PC1为例:
2、路由器配置:
(1)R1路由器配置
Router>enable --进入特权模式
Router#configure terminal --进入全局配置模式
Enter configuration commands, one per line. End with CNTL/Z.
Router(config)#hostnam R1 --修改路由器名为R1
R1(config)#interface s0/0/0 --进入端口
R1(config-if)#ip address 192.168.32.2 255.255.255.0 --为端口配置ip地址
R1(config-if)#clock rate 64000 --配置时钟速率
R1(config-if)#no shutdown --激活端口
%LINK-5-CHANGED: Interface Serial0/0/0, changed state to down
R1(config-if)#interface s0/1/0 --进入端口
R1(config-if)#ip address 192.168.12.1 255.255.255.0 --为端口配置ip地址
R1(config-if)#clock rate 64000 --配置时钟速率
This command applies only to DCE interfaces
R1(config-if)#no shutdown --激活端口
%LINK-5-CHANGED: Interface Serial0/1/0, changed state to down
R1(config-if)#interface s0/0/1 --进入端口
R1(config-if)#ip address 192.168.22.1 255.255.255.0 --为端口配置ip地址
R1(config-if)#clock rate 64000 --配置时钟速率
This command applies only to DCE interfaces
R1(config-if)#no shutdown --激活端口
%LINK-5-CHANGED: Interface Serial0/0/1, changed state to down
R1(config-if)#exit --返回上一级
R1(config)#ip route 192.168.42.0 255.255.255.0 192.168.32.1 --配置静态路由
R1(config)#router ospf 1 --将R1的静态路由重分布到OSPF中
R1(config-router)#network 192.168.12.0 0.0.0.255 area 0
R1(config-router)#network 192.168.22.0 0.0.0.255 area 0
R1(config-router)#redistribute static subnet --重分布静态路由
R1(config-router)#redistribute connected subnet --重分布直连路由
R1(config-router)#end --返回特权模式
(2)R2路由器配置
Router>enable --进入特权模式
Router#configure terminal --进入全局配置模式
Enter configuration commands, one per line. End with CNTL/Z.
Router(config)#hostname R2 --修改路由器名为R2
R2(config)#interface s0/1/0 --进入端口
R2(config-if)#ip address 192.168.12.2 255.255.255.0 --为端口配置ip地址
R2(config-if)#clock rate 64000 --配置时钟速率
R2(config-if)#no shutdown --激活端口
R2(config-if)#interface s0/0/1 --进入端口
R2(config-if)#ip address 192.168.23.2 255.255.255.0 --为端口配置ip地址
R2(config-if)#clock rate 64000 --配置时钟速率
This command applies only to DCE interfaces
R2(config-if)#no shutdown --激活端口
%LINK-5-CHANGED: Interface Serial0/0/1, changed state to down
R2(config-if)#interface s0/0/0 --进入端口
R2(config-if)#ip address 192.168.13.1 255.255.255.0 --为端口配置ip地址
R2(config-if)#clock rate 64000 --配置时钟速率
R2(config-if)#no shutdown --激活端口
%LINK-5-CHANGED: Interface Serial0/0/0, changed state to down
R2(config-if)#exit --返回上一级
R2(config)#router ospf 1 --将R2的rip的路由信息重分布到OSPF中
R2(config-router)#network 192.168.12.0 0.0.0.255 area 0
R2(config-router)#network 192.168.13.0 0.0.0.255 area 0
R2(config-router)#redistribute rip metric 1 --重分布rip路由,必须指定度量值
% Only classful networks will be redistributed
R2(config-router)#exit --返回上一级
R2(config)#router rip --开启rip协议
R2(config-router)#version 2 --版本2
R2(config-router)#network 192.168.23.0 --将直连网段添加到rip
R2(config-router)#redistribute ospf 1 metric 1 --重分布OSPF路由
R2(config-router)#end --返回特权模式
(3)R3路由器配置
Router>enable --进入特权模式
Router#configure terminal --进入全局配置模式
Enter configuration commands, one per line. End with CNTL/Z.
Router(config)#hostname R3 --修改路由器名为R3
R3(config)#interface s0/0/0 --进入端口
R3(config-if)#ip address 192.168.22.2 255.255.255.0 --为端口配置ip地址
R3(config-if)#clock rate 64000 --配置时钟速率
R3(config-if)#no shutdown --激活端口
R3(config-if)#interface s0/0/1 --进入端口
R3(config-if)#ip address 192.168.13.2 255.255.255.0 --为端口配置ip地址
R3(config-if)#clock rate 64000 --配置时钟速率
This command applies only to DCE interfaces
R3(config-if)#no shutdown --激活端口
R3(config-if)#interface s0/1/0 --进入端口
R3(config-if)#ip address 192.168.33.1 255.255.255.0 --为端口配置ip地址
R3(config-if)#clock rate 64000 --配置时钟速率
R3(config-if)#no shutdown --激活端口
%LINK-5-CHANGED: Interface Serial0/1/0, changed state to down
R3(config-if)#exit --返回上一级
R3(config)#router ospf 1 --将R3的EIGRP的路由信息重分布到OSPF中
R3(config-router)#network 192.168.12.0 0.0.0.255 area 0
R3(config-router)#network 192.168.13.0 0.0.0.255 area 0
R3(config-router)#redistribute eigrp 1 metric-type 1 subnet --重分布EIGRP路由
R3(config-router)#exit --返回上一级
R3(config)#router eigrp 1 --将OSPF的路由信息重分布到EIGRP中
R3(config-router)#network 192.168.33.0 0.0.0.255
R3(config-router)#redistribute ospf 1 metric 1000 100 255 1 1500 --重分布EIGRP路由
R3(config-router)#end --返回特权模式
(4)R4路由器配置
Router>enable --进入特权模式
Router#configure terminal --进入全局配置模式
Enter configuration commands, one per line. End with CNTL/Z.
Router(config)#hostname R4 --修改路由器名为R4
R4(config)#interface f0/0 --进入端口
R4(config-if)#ip address 192.168.42.254 255.255.255.0 --为端口配置ip地址
R4(config-if)#no shutdown --激活端口
R4(config-if)#interface s0/0/0 --进入端口
R4(config-if)#ip address 192.168.32.1 255.255.255.0 --为端口配置ip地址
R4(config-if)#clock rate 64000 --配置时钟速率
This command applies only to DCE interfaces
R4(config-if)#no shutdown --激活端口
R4(config-if)#exit --返回上一级
R4(config)#ip route 0.0.0.0 0.0.0.0 192.168.32.2 --配置静态路由
R4(config)#end --返回特权模式
(5)R5路由器配置
Router>enable --进入特权模式
Router#configure terminal --进入全局配置模式
Enter configuration commands, one per line. End with CNTL/Z.
Router(config)#hostname R5 --修改路由器名为R5
R5(config)#interface s0/0/0 --进入端口
R5(config-if)#ip address 192.168.23.1 255.255.255.0 --为端口配置ip地址
R5(config-if)#clock rate 64000 --配置时钟速率
This command applies only to DCE interfaces
R5(config-if)#no shutdown --激活端口
R5(config-if)#interface f0/0 --进入端口
R5(config-if)#ip address 192.168.43.254 255.255.255.0 --为端口配置ip地址
R5(config-if)#no shutdown --激活端口
R5(config-if)#exit --返回上一级
R5(config)#route rip --开启rip协议
R5(config-router)#version 2 --版本2
R5(config-router)#network 192.168.43.0 --添加直连网段到rip
R5(config-router)#network 192.168.23.0 --添加直连网段到rip
R5(config-router)#end --返回特权模式
(6)R6路由器配置
Router>enable --进入特权模式
Router#configure terminal --进入全局配模式
Enter configuration commands, one per line. End with CNTL/Z.
Router(config)#hostname R6 --修改路由器名为R6
R6(config)#interface s0/0/0 --进入端口
R6(config-if)#ip address 192.168.33.2 255.255.255.0 --为端口配置ip地址
R6(config-if)#clock rate 64000 --配置时钟速率
R6(config-if)#no shutdown --激活端口
R6(config-if)#interface f0/0 --进入端口
R6(config-if)#ip address 192.168.53.254 255.255.255.0 --为端口配置ip地址
R6(config-if)#no shutdown --激活端口
R6(config-if)#exit --返回上一级
R6(config)#route eigrp 1 --开启EIGRP协议
R6(config-router)#network 192.168.33.0
R6(config-router)#network 192.168.53.0
R6(config-router)#end --返回特权模式
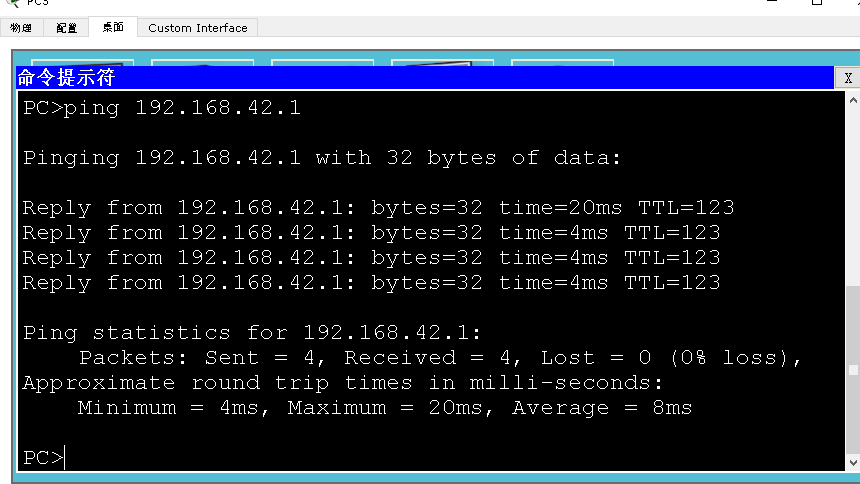
四、验证:三台主机相互ping,看是否全网互通
(1)PC1与PC2

(2)PC2与PC3

(3)PC3与PC1
路由器配置——路由重分布2(OSPF)的更多相关文章
- 路由器配置——路由重分布1(rip)
一.实验目的:使用路由重分布达到全网互通 二.拓扑图: 三.具体实验步骤配置 先给各个主机配置ip地址和网关以PC1为例: (1)R1路由器配置 Router>enable --进入特权模式R ...
- CCNP路由实验之八 路由重公布
CCNP路由实验之八 路由重公布 在前面几个实验,已经学习了静态路由和动态路由.如今,我们要掌握怎样使它们在一个网络中融合,即路由重公布. 使用出站口作为静态路由 0 使用下一跳地址作为静态路由 ...
- CCNA网络工程师学习进程(7)路由器的路由配置
前面一节已经介绍了路由器的端口配置,接着我们介绍路由器的路由配置:静态路由.默认路由和浮动路由的配置:动态路由协议的配置,包括RIP.IGRP.EIGRP和OSPF. (1)路由器的基 ...
- Huawei BGP和OSPF双边界重分布(二)
网络拓扑: 本例主要配置和例一致,主要是在AR3260-AR1和AR3260-AR2的路由域的边界上,从AR3260-AR1上重分布进BGP 65001的路由的时候打tag 650011,在AR326 ...
- Huawei BGP和OSPF双边界重分布(一)
网络拓扑: PS:本例使用明细前缀列表双边界引入 S5700-LSW1 ================================================================ ...
- 路由重分发 最重要 最难 ccnp
路由重分发 多种协议之间 彼此学习到对方的路由 重分发好 结果好 重分发不好 结果最好是产生次优路径 最差事产生路由黑洞和环路 实例1: 重分发一般需要双向重分发 ...
- H3C路由器配置——动态路由OSPF协议
一.介绍 1.OSPF协议介绍 (1).OSPF(Open Shortest Path First,开放最短路径优先)路由协议是用于网际协议(IP)网络的链路状态路由协议.是一个被各厂商设备广泛支持的 ...
- 交换路由中期测验20181226(动态路由配置与重分发、NAT转换、ACL访问控制列表)
测试拓扑: 接口配置信息 HostName 接口 IP地址 网关 Server 0 Fa0 172.16.15.1/24 172.16.15.254 Server 1 Fa0 100.2.15.200 ...
- OSPF协议学习以及路由器配置
OSPF协议学习以及路由器配置 1.实验任务 2,使用eNsp搭建网络拓扑 3.配置路由IP ps:要使用GE(3层口),2层口(E口)需要先配置Vlan才能配置IP地址 4.配置路由器R1的ospf ...
随机推荐
- LC 94. Binary Tree Inorder Traversal
问题描述 Given a binary tree, return the inorder traversal of its nodes' values. (左 - 根 - 右) Example: In ...
- 【思维】ABC
题目描述 You are given a string s consisting of A, B and C.Snuke wants to perform the following operatio ...
- Django Rest Framework 安装
1. 环境要求 Python (3.5, 3.6, 3.7): 查看 python版本:python -V Django (1.11, 2.0, 2.1, 2.2) 查看django版本:pip li ...
- git、git bash、git shell
git 一个快速的分布式版本控制系统(工具),支持该工具的网站有Github等. shell 是linux.unix系统的外壳(区别于核),用于输入并执行命令(命令解析器). 它类似于DOS下的com ...
- CodeFirst实体类中,为什么都把ICollection<x>定义成virtual?
主要是用于延迟加载,提高性能用的 只有定义成virtual后才可以延迟加载. 延迟加载,默认情况下,延迟加载被支持,如果你希望禁用它,必须显式声明,最好的位置是在 DbContext 的构造器中. p ...
- IExtenderProvider,c#组件扩展控件属性
[ProvideProperty("IsEnabled", typeof(LayoutControlItem)), ToolboxItemFilter("System.W ...
- bootstrap-selectpicker 插件事件
$('#id').on('show.bs.select', function (e) { //绑定下拉显示列表触发事件 }); $('#id').on('hidden.bs.select', func ...
- 总结 String、StringBuffer与StringBuilder类中常用的方法
一.String类的常用方法 1.获取: 1)获取字符串str长度 int i = str.length(); 2)根据位置(index)获取字符 char c = str.charAt(index) ...
- 移动端设备管理平台 atx server2实践
目录 1.需求背景 2.初步调研 2.1.云测试平台 2.2.开源工具 2.3.VNC 2.4.企业内部自研云测试平台 3.ATX Server安装 依赖环境 安装rethinkdb 安装atx se ...
- 如何处理不能新建word、excel、PPT的情况?
Office系列办公软件是大家都非常喜欢使用的软件,但是有些朋友反映在使用电脑时,在桌面右键菜单新建选项里没有Word.Excel或PPT,非常的耽误工作. 下面就为大家介绍一下桌面右键菜单新建选项里 ...