(转)SpringMVC学习(三)——SpringMVC的配置文件
http://blog.csdn.net/yerenyuan_pku/article/details/72231527
读者阅读过SpringMVC学习(一)——SpringMVC介绍与入门这篇文章后,想必都会写写SpringMVC的入门小程序,在这个小程序中,SpringMVC的核心配置文件——springmvc.xml为:
<?xml version="1.0" encoding="UTF-8"?>

<beans xmlns="http://www.springframework.org/schema/beans"

    xmlns:xsi="http://www.w3.org/2001/XMLSchema-instance"

    xmlns:p="http://www.springframework.org/schema/p"

    xmlns:context="http://www.springframework.org/schema/context"

    xmlns:mvc="http://www.springframework.org/schema/mvc"

    xsi:schemaLocation="

        http://www.springframework.org/schema/beans

        http://www.springframework.org/schema/beans/spring-beans-4.0.xsd

        http://www.springframework.org/schema/mvc

        http://www.springframework.org/schema/mvc/spring-mvc-4.0.xsd

        http://www.springframework.org/schema/context

        http://www.springframework.org/schema/context/spring-context-4.0.xsd">

    <context:component-scan base-package="com.itheima.springmvc.controller"/>

</beans>
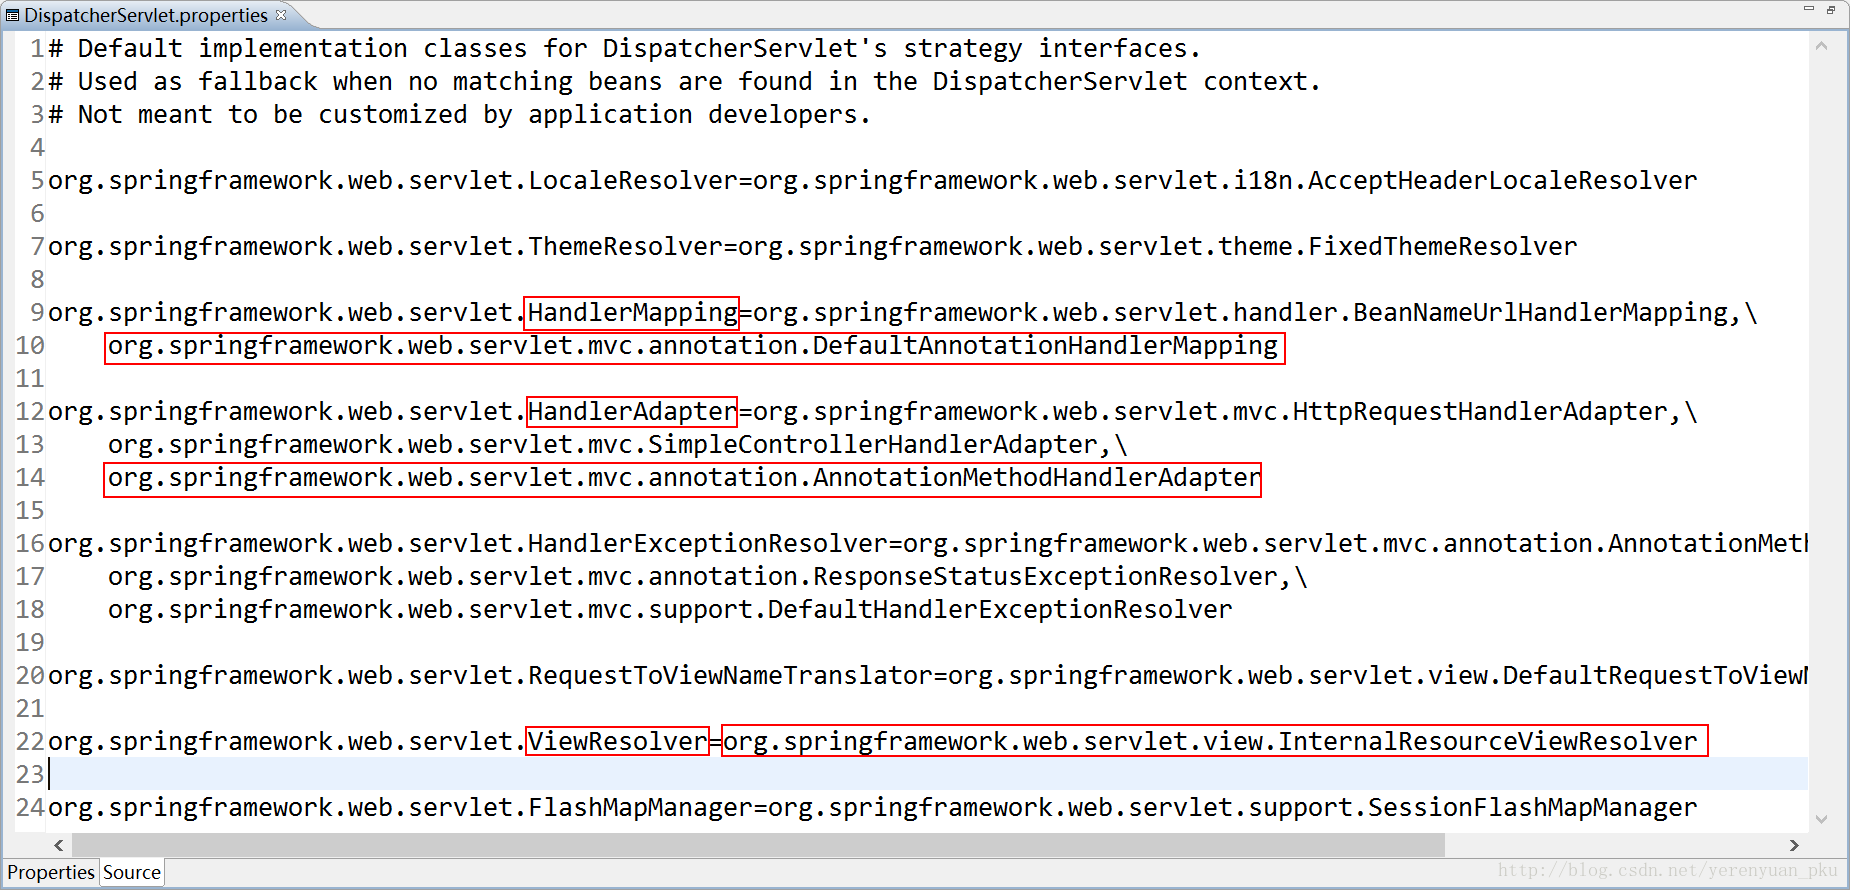
读者可能怀疑这写的不对啊!怎么可能只配这点东西呢?SpringMVC的三大组件哪去了,它们不是要配置吗?且听我慢慢讲解。我们发现这几个组件并没配置,但却是好使的,就是因为它有一个默认配置,DispatcherServlet.properties这个默认配置文件里面默认加载了,看图: 
可以看出我们使用了注解方式的处理器映射器和处理器适配器。
默认加载的注解方式的处理器映射器
org.springframework.web.servlet.mvc.annotation.DefaultAnnotationHandlerMapping默认加载的注解方式的处理器适配器
org.springframework.web.servlet.mvc.annotation.AnnotationMethodHandlerAdapter默认加载的视图适配器(默认解析JSP视图的视图解析器)
org.springframework.web.servlet.view.InternalResourceViewResolver
我们如果使用默认加载的注解方式的映射器和适配器,那么对它们的可控制性是比较小的,所以一般来说,我们都是自己配置的,因为有的时候我们需要扩展一些其他的组件。
注解映射器和适配器
配置组件扫描器
使用组件扫描器可省去在Spring容器中配置每个Controller类的繁琐。使用<context:component-scan>自动扫描标记@controller注解的控制器类,配置如下:
<context:component-scan base-package="com.itheima.springmvc.controller"/>注意:如果要扫描多个包,多个包中间使用半角逗号分隔。很明显在入门小程序中我已经配置了。
配置RequestMappingHandlerMapping
注解式处理器映射器,对类中标记@ResquestMapping注解的方法进行映射,根据@ResquestMapping注解定义的url匹配@ResquestMapping注解标记的方法,匹配成功返回HandlerMethod对象给前端控制器,HandlerMethod对象中封装了url对应的方法Method。
从Spring3.1版本开始,废除了DefaultAnnotationHandlerMapping的使用,推荐使用RequestMappingHandlerMapping完成注解式处理器映射。配置如下:
<!-- 配置注解式处理器映射器 -->

<bean class="org.springframework.web.servlet.mvc.method.annotation.RequestMappingHandlerMapping"></bean>
推荐使用最新版本的注解式处理器映射器,如果你想对其扩展,可以在这个bean里面配置其他的属性。 @RequestMapping注解的描述:定义请求url到处理器功能方法的映射。
配置RequestMappingHandlerAdapter
注解式处理器适配器,对标记@ResquestMapping注解的方法进行适配。
从Spring3.1版本开始,废除了AnnotationMethodHandlerAdapter的使用,推荐使用RequestMappingHandlerAdapter完成注解式处理器适配。配置如下:
<!-- 配置注解式处理器适配器 -->

<bean class="org.springframework.web.servlet.mvc.method.annotation.RequestMappingHandlerAdapter"></bean>
推荐使用最新版本的注解式处理器适配器,如果你想对其扩展,可以在这个bean里面配置其他的属性。
当我们配置完注解式处理器映射器和注解式处理器适配器之后,SpringMVC的核心配置文件——springmvc.xml就应该为:
<?xml version="1.0" encoding="UTF-8"?>

<beans xmlns="http://www.springframework.org/schema/beans"

    xmlns:xsi="http://www.w3.org/2001/XMLSchema-instance"

    xmlns:p="http://www.springframework.org/schema/p"

    xmlns:context="http://www.springframework.org/schema/context"

    xmlns:mvc="http://www.springframework.org/schema/mvc"

    xsi:schemaLocation="

        http://www.springframework.org/schema/beans

        http://www.springframework.org/schema/beans/spring-beans-4.0.xsd

        http://www.springframework.org/schema/mvc

        http://www.springframework.org/schema/mvc/spring-mvc-4.0.xsd

        http://www.springframework.org/schema/context

        http://www.springframework.org/schema/context/spring-context-4.0.xsd">

    <context:component-scan base-package="com.itheima.springmvc.controller"/>

    <!-- 配置注解式处理器映射器 -->

    <bean class="org.springframework.web.servlet.mvc.method.annotation.RequestMappingHandlerMapping"></bean>

    <!-- 配置注解式处理器适配器 -->

    <bean class="org.springframework.web.servlet.mvc.method.annotation.RequestMappingHandlerAdapter"></bean>

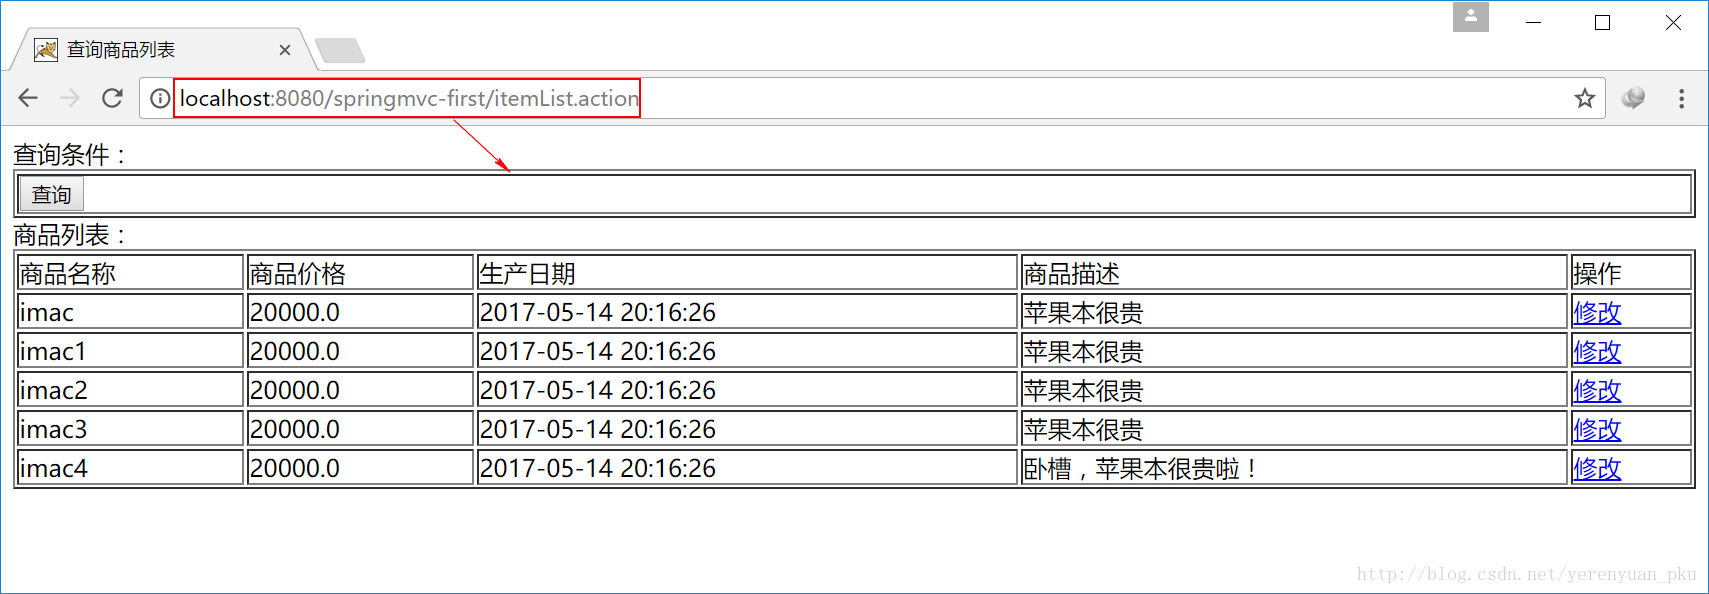
</beans>然后在浏览器地址栏中输入url地址——http://localhost:8080/springmvc-first/itemList.action,回车,也能同样看到如下效果: 
继续优化注解,配置<mvc:annotation-driven>
使用注解要注意一个问题,就是注解适配器和映射器必须配对使用,也就是说,不能一个用注解,一个用非注解。要用一起用,要么都不用。其实在SpringMVC中还有更加简便的注解,SpringMVC使用<mvc:annotation-driven>自动加载RequestMappingHandlerMapping和RequestMappingHandlerAdapter,可在springmvc.xml配置文件中使用<mvc:annotation-driven>替代注解处理器和适配器的配置,如下图所示: 
注意:如果配置一个注解驱动之后,那么就可以不用配置处理器映射器和处理器适配器了。
此时在浏览器地址栏中输入url地址——http://localhost:8080/springmvc-first/itemList.action,回车,同样也能看到如上效果。
配置视图解析器
我们也可在springmvc.xml配置文件中自己手动配置视图解析器,如下:
<!-- 配置视图解析器(对jsp默认解析的视图解析器) -->

<bean class="org.springframework.web.servlet.view.InternalResourceViewResolver">

    <!-- prefix:前缀 -->

    <property name="prefix" value="/WEB-INF/jsp/"></property>

    <!-- suffix:后缀 -->

    <property name="suffix" value=".jsp"></property>

</bean>- InternalResourceViewResolver:支持JSP视图解析。
- viewClass:JstlView表示JSP模板页面需要使用JSTL标签库,所以classpath中必须包含jstl的相关jar 包。此属性可以不设置,默认为JstlView。
- prefix和suffix:查找视图页面的前缀和后缀,最终视图的址为:前缀+逻辑视图名+后缀,逻辑视图名需要在Controller返回的ModelAndView中指定,比如逻辑视图名为hello,则最终返回的jsp物理视图地址就为 “WEB-INF/jsp/hello.jsp”。
这样一来,ItemController类的代码就要修改为:
@Controller

public class ItemController {

    // .action可以省略  (请求的url地址)

    @RequestMapping("/itemList.action")

    public ModelAndView itemList() {

        // 查询商品列表,使用静态数据生成一个商品列表

        List<Items> itemList = new ArrayList<Items>();

        itemList.add(new Items(1, "imac", 20000, new Date(), "苹果本很贵"));

        itemList.add(new Items(2, "imac1", 20000, new Date(), "苹果本很贵"));

        itemList.add(new Items(3, "imac2", 20000, new Date(), "苹果本很贵"));

        itemList.add(new Items(4, "imac3", 20000, new Date(), "苹果本很贵"));

        itemList.add(new Items(5, "imac4", 20000, new Date(), "卧槽,苹果本很贵啦!"));

        // 把商品列表传递给jsp

        ModelAndView modelAndView = new ModelAndView();

        modelAndView.addObject("itemList", itemList);

        // 配置完视图解析器之后只需要返回返回jsp的名称即可

        modelAndView.setViewName("itemList");

        // 返回结果

        return modelAndView;

    }

}
如果这时返回全路径,即/WEB-INF/jsp/itemList.jsp,那就不好使了。
到这就基本总结完了SpringMVC中使用注解方式的适配器和映射器了,很明显,开发中我们就使用注解配置,那样非常方便。
(转)SpringMVC学习(三)——SpringMVC的配置文件的更多相关文章
- (转)SpringMVC学习(一)——SpringMVC介绍与入门
http://blog.csdn.net/yerenyuan_pku/article/details/72231272 SpringMVC介绍 SpringMVC是什么? SpringMVC和Stru ...
- (转)SpringMVC学习(六)——SpringMVC高级参数绑定与@RequestMapping注解
http://blog.csdn.net/yerenyuan_pku/article/details/72511749 高级参数绑定 现在进入SpringMVC高级参数绑定的学习,本文所有案例代码的编 ...
- springMVC学习(3)-springMVC和mybatis整合
一.需求:使用springmvc和mybatis完成商品列表查询. 二.整合思路:springMVC+mybaits的系统架构: 1步):整合dao层 mybatis和spring整合,通过sprin ...
- (转)SpringMVC学习(五)——SpringMVC的参数绑定
http://blog.csdn.net/yerenyuan_pku/article/details/72511611 SpringMVC中的参数绑定还是蛮重要的,所以单独开一篇文章来讲解.本文所有案 ...
- springMVC学习三 注解开发环境搭建
第一步:导入jar包 第二步:配置DispatcherServlet 前端控制器 因为此处把DsipatcherServlet的映射路径配置成了"/",代表除了.jsp文件之外, ...
- SpringMVC学习三
实现有点用处的增删改查,并利用了AJAX(javascript)动态修改,还有json的返回读取,以及文件上传和下载. 配置基础Employee类以及Dao类 package com.springmv ...
- springMVC学习(7)-springMVC校验
一.校验理解: 对于安全要求较高点建议在服务端进行校验. 控制层conroller:校验页面请求的参数的合法性.在服务端控制层conroller校验,不区分客户端类型(浏览器.手机客户端.远程调用) ...
- (转)SpringMVC学习(二)——SpringMVC架构及组件
http://blog.csdn.net/yerenyuan_pku/article/details/72231385 相信大家通过前文的学习,已经对SpringMVC这个框架多少有些理解了.还记得上 ...
- SpringMVC学习(二)——SpringMVC架构及组件(及其运行原理)-转载
相信大家通过前文的学习,已经对SpringMVC这个框架多少有些理解了.还记得上一篇文章中SpringMVC的处理流程吗? 这个图大致描述了SpringMVC的整个处理流程,这个流程图还是相对来说比 ...
随机推荐
- mysql :库操作
一 系统数据库 information_schema:虚拟库,不占用磁盘空间,存储的是数据库启动后的一些参数,如用户表信息,列信息, 权限信息, 字符信息等. performance_schema:M ...
- 挨踢职场求生法则-----我在IT职场打滚超过15年了,从小小的程序员做到常务副总
摘要我在IT职场打滚超过15年了,从小小的程序员做到常务副总.相对于其它行业,IT职场应该算比较光明的了,但也陷阱重重,本文说说我的亲身体会,希望大家能在IT职场上战无不胜! 通用法则 法则1:忍耐是 ...
- LeetCode: 412 Fizz Buzz(easy)
题目: Write a program that outputs the string representation of numbers from 1 to n. But for multiples ...
- ASP.NET中在后台用C#,往前台插入HTML代码
//你的div加ID号,然后写上runat="server",变成服务器端控件,然后后台可以直接用ID号.innerhtml="html内容",这样就可以了 & ...
- Mecanim Control
http://www.ufe3d.com/doku.php/mecanimcontrol Mecanim Control Your ultimate solution for Mecanim base ...
- unity5之代码创建状态机,玩的666
http://blog.csdn.net/litaog00/article/details/50483189 最近做项目的时候用到了状态机,网上搜了一下帖子,大部分都是简单介绍使用方法的,讲解的详细的 ...
- game学习资源收集
一些国外网站 游戏ai相关 http://aigamedev.com/ http://www.gdcvault.com/ http://www-cs-students.stanford.edu/~am ...
- printf汇总
Reference: http://www.cplusplus.com/reference/cstdio/printf/ printf("%02d:%02d:%02d.%03d", ...
- Educational Codeforces Round 19 A, B, C, E(xjb)
题目链接:http://codeforces.com/contest/797 A题 题意:给出两个数n, k,问能不能将n分解成k个因子相乘的形式,不能输出-1,能则输出其因子: 思路:将n质因分解, ...
- bzoj 5120: [2017国家集训队测试]无限之环【最小费用最大流】
玄妙的建图-- 这种平衡度数的题按套路是先黑白染色然后分别连ST点,相邻格子连黑向白连费用1流量0的边,然后考虑费用怎么表示 把一个点拆成五个,上下左右中,中间点黑白染色连ST, 对于连S的点,中点连 ...
