Vouch-proxy 实现 Zabbix4.4 对接 SSO
Vouch-proxy 实现 Zabbix 对接 SSO
Zabbix 自身不支持 SSO 对接,我使用 Nginx 代理 Zabbix,将请求转发至 Vouch-proxy,由 Vouch-proxy 对接 SSO,对接完毕 Vouch-proxy 将返回 Nginx,Nginx 此时将获取到用户信息,使用 HTTP Basic Auth 接入 Zabbix。
注意
Zabbix 5 已经支持了 SAML 协议,本文针对的是 Zabbix 4
环境
Zabbix            192.168.10.227:80

Nginx             192.168.10.227:8080

Vouch-proxy       192.168.10.227:9090

SSO               sso.mydomain.com:80    域名是修改 hosts 实现的,实际 IP 为 xxx.xxx.xxx.xxx
在 SSO(Keycloak) 中创建客户端
具体对接情况取决于实际情况,Vouch-proxy 支持多种协议,该方案应该满足各种协议。
我用的是 OpenID Connect 协议,需要在 SSO 中创建客户端,得到以下信息:
客户端ID:myzabbix
秘钥:xxxxxxxxxxxxxxxxxxxxxxxxxxxxxxx
三个对接需要的 URL:
http://sso.mydomain.com/auth/realms/master/protocol/openid-connect/auth
http://sso.mydomain.com/auth/realms/master/protocol/openid-connect/token
http://sso.mydomain.com/auth/realms/master/protocol/openid-connect/userinfo
同时需要在 SSO 中配置重定向地址:http://192.168.10.227:9090/auth,注意这是 Vouch-proxy 的地址
SSO 中的配置到此结束。
搭建 Vouch-proxy
创建并进入项目目录
mkdir -p /usr/local/zabbixsso && cd /usr/local/zabbixsso
创建映射目录
mkdir -p /usr/local/zabbixsso/config && \

mkdir -p /usr/local/zabbixsso/data
创建配置文件 /usr/local/zabbixsso/config/config.yml,配置文件的模板来自 config.yml_example_oidc
vouch:

  domains:

  - 192.168.10.227

  - sso.mydomain.com

  allowAllUsers: true

  headers:

    claims:

      - groups

      - given_name

      - preferred_username

oauth:

  provider: oidc

  client_id: myzabbix

  client_secret: xxxxxxxxxxxxxxxxxxxxxxxxxxxxxxx

  auth_url: http://sso.mydomain.com/auth/realms/master/protocol/openid-connect/auth

  token_url: http://sso.mydomain.com/auth/realms/master/protocol/openid-connect/token

  user_info_url: http://sso.mydomain.com/auth/realms/master/protocol/openid-connect/userinfo

  scopes:

    - openid

    - email

    - profile

  callback_url: http://192.168.10.227:9090/auth
启动 Vouch-proxy 容器
注意,我的 SSO 域名 sso.mydomain.com 是自己改 hosts 实现的,我必须添加 host,不然无法访问 SSO
docker run \

    --add-host=sso.mydomain.com:xxx.xxx.xxx.xxx \

    -d \

    -p 9090:9090 \

    --name vouch-proxy \

    -v ${PWD}/config:/config \

    -v ${PWD}/data:/data \

    voucher/vouch-proxy
搭建 Nginx(OpenResty)
Nginx 需要用到 http_auth_basic_module 和 lua,默认的 Nginx 没有安装这些组件,我们使用 OpenResty,这是个加强版的 Nginx,有我们需要的一切东西。
创建目录
mkdir -p /usr/local/zabbixsso/conf.d
创建配置文件 /usr/local/zabbixsso/conf.d/default.conf
server {

    listen       80;

    server_name  localhost;

    error_page   500 502 503 504  /50x.html;

    location = /50x.html {

        root   /usr/share/nginx/html;

    }

    auth_request /validate;

    location = /validate {

      # forward the /validate request to Vouch Proxy

      proxy_pass http://192.168.10.227:9090/validate;

      # be sure to pass the original host header

      proxy_set_header Host $http_host;

      # Vouch Proxy only acts on the request headers

      proxy_pass_request_body off;

      proxy_set_header Content-Length "";

      # optionally add X-Vouch-User as returned by Vouch Proxy along with the request

      # auth_request_set $auth_resp_x_vouch_user $upstream_http_x_vouch_user;

      # these return values are used by the @error401 call

      auth_request_set $auth_resp_jwt $upstream_http_x_vouch_jwt;

      auth_request_set $auth_resp_err $upstream_http_x_vouch_err;

      auth_request_set $auth_resp_failcount $upstream_http_x_vouch_failcount;

    }

    # if validate returns `401 not authorized` then forward the request to the error401block

    error_page 401 = @error401;

    location @error401 {

        # redirect to Vouch Proxy for login

        return 302 http://192.168.10.227:9090/login?url=$scheme://$http_host$request_uri&vouch-failcount=$auth_resp_failcount&X-Vouch-Token=$auth_resp_jwt&error=$auth_resp_err;

        # you usually *want* to redirect to Vouch running behind the same Nginx config proteced by https

        # but to get started you can just forward the end user to the port that vouch is running on

    }

    # proxy pass authorized requests to your service

    location / {

      # forward authorized requests to your service protectedapp.yourdomain.com

      # proxy_pass http://192.168.10.227:9091/header/show_headers;

      proxy_pass http://192.168.10.227/;

      # you may need to set these variables in this block as per https://github.com/vouch/vouch-proxy/issues/26#issuecomment-425215810

      # auth_request_set $auth_resp_x_vouch_idp_claims_groups $upstream_http_x_vouch_idp_claims_groups;

      # auth_request_set $auth_resp_x_vouch_idp_claims_given_name $upstream_http_x_vouch_idp_claims_given_name;

      auth_request_set $auth_resp_x_vouch_user $upstream_http_x_vouch_user;

      auth_request_set $auth_resp_x_vouch_preferred_username $upstream_http_x_vouch_idp_claims_preferred_username;

      # set user header (usually an email)

      proxy_set_header X-Vouch-User $auth_resp_x_vouch_user;

      # 这是登陆用户名

      proxy_set_header X-Vouch-Preferred-Username $auth_resp_x_vouch_preferred_username;

      # 设置 Zabbix 需要的 HTTP Basic Auth 请求头

      # 最终的效果是在访问 Zabbix 的请求头中添加 Authorization = 'Basic QWRtaW46MTIzNDU2Nzg5MDExMQ==';

      default_type text/html;

      set $encode_username "";

      access_by_lua_block {

          ngx.var.encode_username = ngx.encode_base64(ngx.var.auth_resp_x_vouch_preferred_username..":1234567890113")

      }

      proxy_set_header Authorization "Basic $encode_username";

    }

}
启动容器
docker run \

    --name openresty-test \

    -p 8080:80 \

    -v ${PWD}/conf.d:/etc/nginx/conf.d \

    openresty/openresty:1.15.8.2-7-centos
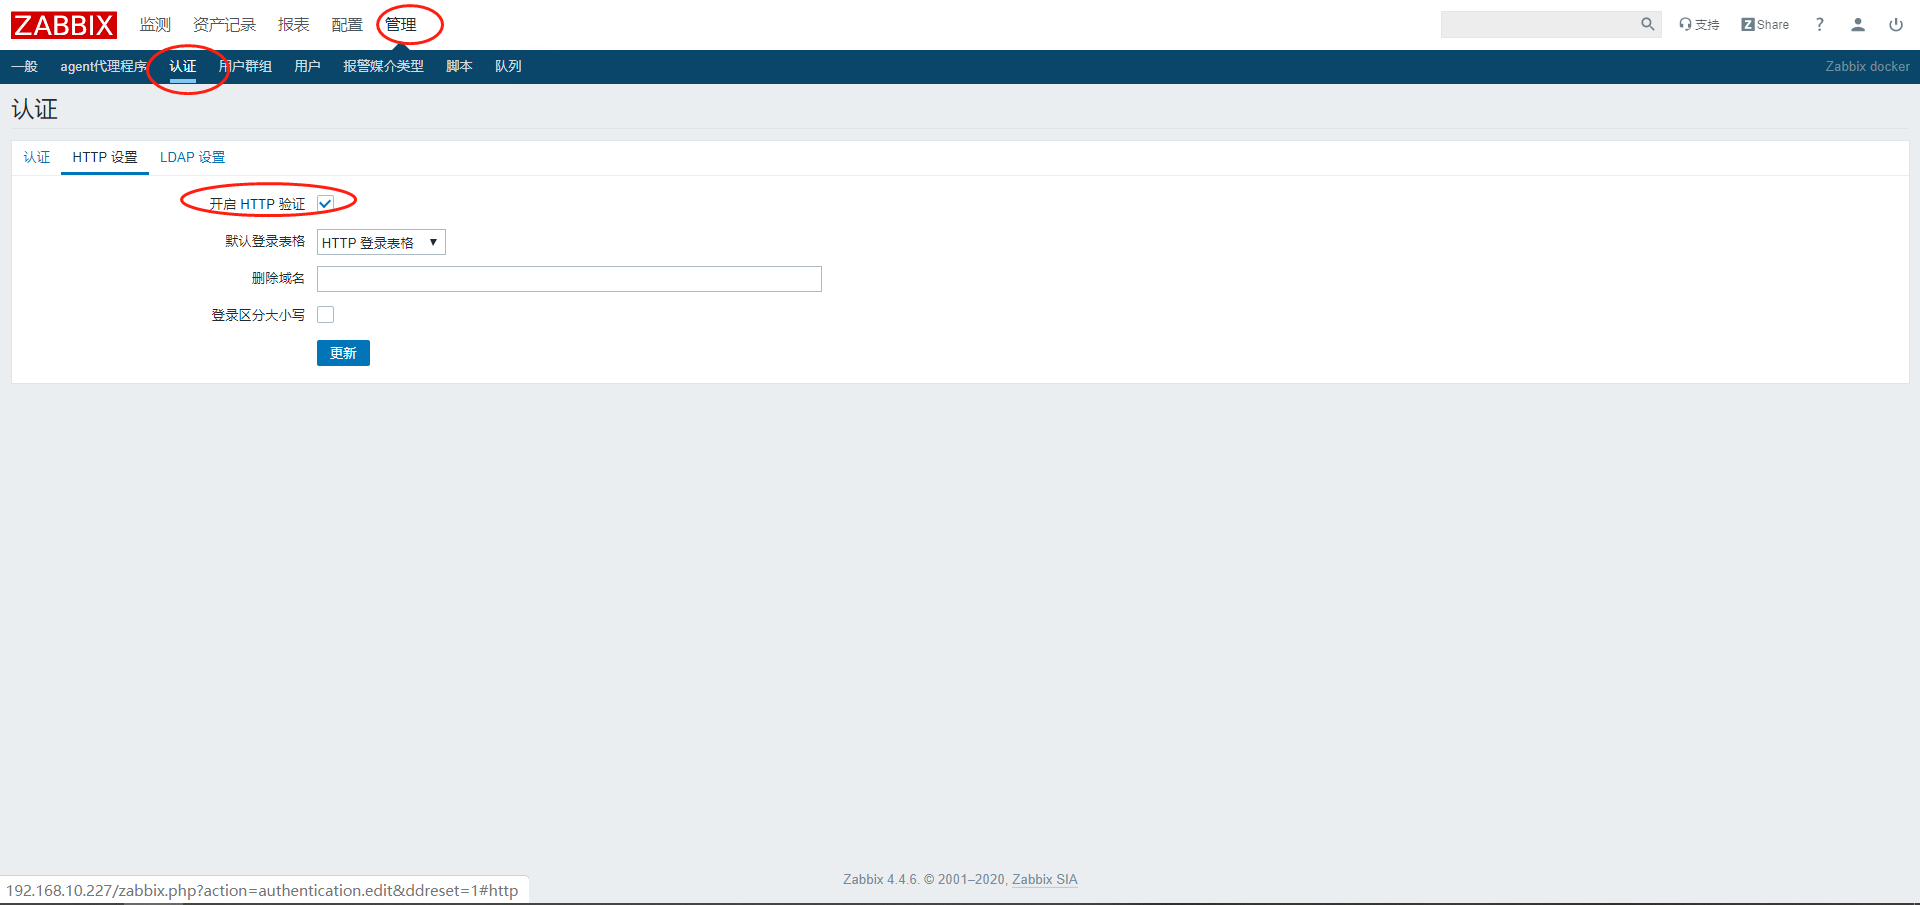
Zabbix 开启 HTTP auth
访问
直接访问 Nginx 地址
http://192.168.10.227:8080/
如果配置正常,将跳转到 sso 页面,登陆成功将会用 Admin 身份进入 Zabbix 系统。
注意,通过 SSO 登陆的用户,必须在 Zabbix 创建好对应用户。
PS:理想的话,应该将 Zabbix 的退出功能,重定向到 Vouch-proxy 的退出,暂时没有这个需求,先不做了。
附带 Docker 搭建 Zabbix
docker run --name mysql-server -t \

      -e MYSQL_DATABASE="zabbix" \

      -e MYSQL_USER="zabbix" \

      -e MYSQL_PASSWORD="zabbix_pwd" \

      -e MYSQL_ROOT_PASSWORD="root_pwd" \

      -d mysql:5.7

docker run --name zabbix-java-gateway -t \

      -d zabbix/zabbix-java-gateway:latest

docker run --name zabbix-server-mysql -t \

      -e DB_SERVER_HOST="mysql-server" \

      -e MYSQL_DATABASE="zabbix" \

      -e MYSQL_USER="zabbix" \

      -e MYSQL_PASSWORD="zabbix_pwd" \

      -e MYSQL_ROOT_PASSWORD="root_pwd" \

      -e ZBX_JAVAGATEWAY="zabbix-java-gateway" \

      --link mysql-server:mysql \

      --link zabbix-java-gateway:zabbix-java-gateway \

      -p 10051:10051 \

      -d zabbix/zabbix-server-mysql:latest

docker run --name zabbix-web-nginx-mysql -t \

      -e DB_SERVER_HOST="mysql-server" \

      -e MYSQL_DATABASE="zabbix" \

      -e MYSQL_USER="zabbix" \

      -e MYSQL_PASSWORD="zabbix_pwd" \

      -e MYSQL_ROOT_PASSWORD="root_pwd" \

      --link mysql-server:mysql \

      --link zabbix-server-mysql:zabbix-server \

      -p 80:80 \

      -d zabbix/zabbix-web-nginx-mysql:latest
Vouch-proxy 实现 Zabbix4.4 对接 SSO的更多相关文章
- 轻松入门CAS系列(1)-轻松看懂企业单点登录的解决方案
常见的企业应用情况 企业内部的信息化一般都是一个过程中的 ,起初企业为了部分管理的需要,会上线几个信息化系统:后来对这块慢慢重视,信息系统会越来越多.开始,只有一两个系统时,员工还好,靠脑袋还能记得住 ...
- Django 基于角色的权限控制
有一种场景, 要求为用户赋予一个角色, 基于角色(比如后管理员,总编, 编辑), 用户拥有相应的权限(比如管理员拥有所有权限, 总编可以增删改查, 编辑只能增改, 有些页面的按钮也只有某些角色才能查看 ...
- zabbix4.4 (server,proxy,agent)安装部署实战
一. 部署架构图 二. 安装环境及版本信息 操作系统:centos7 zabbix版本: 4.4 mysql: 5.7.28 三.zabbix server安装(192.168.182.132) rp ...
- Zabbix5 对接 SAML 协议 SSO
Zabbix5 对接 SAML 协议 SSO 在 Zabbix5.0 开始已经支持 SAML 认证 官文文档: https://www.zabbix.com/documentation/current ...
- (六)SSO之CAS框架扩展 改动CAS源代码实现与ESS动态password验证对接
题记: 偶尔的偶尔我们会听到这个站点的数据泄露了,那个站点的用户数据泄露了.让用户又一次改动登录password,所以,对于用户数据安全性越发的引起我们的重视了,尤其是一些保密性要求高的站点.更须要添 ...
- [AWS] SSO: Single sign-on
由单点登录到aws的http服务. From: https://www.jianshu.com/p/613e44d4a464 单点登录SSO(Single Sign On)说得简单点就是在一个多系统共 ...
- SSO单点登录Spring-Security & CAS使用手册
1.1概述 1.1.1单点登录介绍 单点登录(Single Sign On , 简称 SSO )是目前比较流行的服务于企业业务整合的解决方案之一, SSO 使得在多个应用系统中,用户只需要登录一次就可 ...
- CAS实现SSO单点登录原理
1. CAS 简介 1.1. What is CAS ? CAS ( Central Authentication Service ) 是 Yale 大学发起的一个企业级的.开源的项目,旨 ...
- 【SSO单点系列】(1):CAS4.0 环境的搭建
一.概述 今天开始写CAS相关的第一篇文章,这篇文章主要是关于CAS环境的搭配,提供给刚刚接触CAS的一个入门指南,并演示一个CAS的最简单的实例 二.环境要求 博主的环境如下: win8.1 64 ...
随机推荐
- 数据可视化实例(十七):包点图 (matplotlib,pandas)
排序 (Ranking) 包点图 (Dot Plot) 包点图表传达了项目的排名顺序,并且由于它沿水平轴对齐,因此您可以更容易地看到点彼此之间的距离. https://datawhalechina.g ...
- jsp中获取路径信息的方法
今天在看代码时,发现程序使用了 request.getScheme() .不明白是什么意思,查了一下.结果整理如下: 1.request.getScheme() 返回当前链接使用的协议:一般应用返回h ...
- Burp Suite Spider Module - 网络爬虫模块
Web application spdiering 和scanning 可以结合使用. Burp Suite 的Spider Module - Options 主要包含:Crawler Setting ...
- ClickHouse源码笔记2:聚合流程的实现
上篇笔记讲到了聚合函数的实现并且带大家看了聚合函数是如何注册到ClickHouse之中的并被调用使用的.这篇笔记,笔者会续上上篇的内容,将剖析一把ClickHouse聚合流程的整体实现. 第二篇文章, ...
- 题解 洛谷 P2254 【[NOI2005]瑰丽华尔兹】
发现在同一时间段中,滑动的方向具有唯一性,所以不难得出\(DP\)方程. \(f_{i,j}=max(f_{i,j},f_{i-dx_,j-dy}+dis_{i,j,i-dx_,j-dy})\) \( ...
- iframe子页面取父页面的变量问题
iframe包含的子页面,想获取父页面的变量,不能直接获取到. 但是子页面可以访问父页面的方法 window.parent.parentFunctionName(); 利用这一点,可以将父页面的变 ...
- springboot 跨域设置
/** * Configuration cors */ @Configuration public class MyConfiguration { @Bean public FilterRegistr ...
- 学习2周C++的收获
学习2周C++的收获 首先,C++是一种实用性很强的程序设计语言.它使用起来灵活.方便,运算符丰富,有结构化的层次…… 那么,我学习这个语言主要是为了参加信息学奥林匹克竞赛,这不仅要熟练地掌握一门语言 ...
- async基本使用
async函数在使用上很简单,我们来看一下下面的例子 async function add(a,b){ return a+b } add(1,2).then((res) =>{ consoel. ...
- 【Laravel】使用 Laravel Excel 实现 Excel/CSV 文件导入导出功能
一.安装配置 使用Composer安装依赖: composer require maatwebsite/excel 发布配置(可选): php artisan vendor:publish --pro ...