
Docker安装基本命令操作,带你了解镜像和容器的概念!
上一章节我们了解了Docker的基本概念,以及相关原理。这一章节进行实操。
《Docker这么火爆。章节一:带你详尽了解Docker容器的介绍及使用》
一、Docker安装
声明:Docker支持Centos 6及以后的版本。
1. 查询是否有安装docker
[root@VM-0-3-centos /]# yum list installed | grep docker

[root@VM-0-3-centos /]#
我的是腾讯云的服务器,什么都没有安装,所以没有查询出docker的安装记录
① 如果有安装过docker的小伙伴,可以执行下面命令进行删除:
[root@VM-0-3-centos /]# yum -y remove docker完整名字
② 如果安装过,那么再将镜像/容器删除,命令如下:
[root@VM-0-3-centos /]# rm -rf /var/lib/docker
因为腾讯云的默认为centos7版本
因此在这里只介绍centos7的安装流程
2. 安装docker
有两种方式安装docker:
① 通过yum直接安装docker。但是,这种方式安装可能并不是最新版的docker版本(存在更新不及时的问题)
[root@VM-0-3-centos /]# sudo yum install docker
② 通过yum从阿里云镜像中进行安装,可以下载安装最新版本,运行三条安装命令(在这里就没有把安装输出信息打印出来了,怕篇幅太长,说我水文章~)
[root@VM-0-3-centos /]# sudo yum install -y yum-utils device-mapper-persistent-data lvm2

[root@VM-0-3-centos /]# sudo yum-config-manager --add-repo https://mirrors.aliyun.com/docker-ce/linux/centos/docker-ce.repo

[root@VM-0-3-centos /]# sudo yum install docker-ce
其中最后一条命令sudo yum install docker-ce安装过程中,需要有两次确认的过程,直接输入字母:y,然后回车即可。
3. 启动docker
[root@VM-0-3-centos /]# sudo service docker start
4. 查看docker版本
[root@VM-0-3-centos /]# docker version

[root@VM-0-3-centos /]# docker info
5. 设置随系统启动
[root@VM-0-3-centos /]# sudo chkconfig docker on
6. docker初体验
输入:docker run hello-world (进入docker世界)
下面会输出一行:Hello from Docker!
[root@VM-0-3-centos /]# docker run hello-world

Unable to find image 'hello-world:latest' locally

latest: Pulling from library/hello-world

0e03bdcc26d7: Pull complete

Digest: sha256:e7c70bb24b462baa86c102610182e3efcb12a04854e8c582838d92970a09f323

Status: Downloaded newer image for hello-world:latest

Hello from Docker!

This message shows that your installation appears to be working correctly.

To generate this message, Docker took the following steps:

 1. The Docker client contacted the Docker daemon.

 2. The Docker daemon pulled the "hello-world" image from the Docker Hub.

    (amd64)

 3. The Docker daemon created a new container from that image which runs the

    executable that produces the output you are currently reading.

 4. The Docker daemon streamed that output to the Docker client, which sent it

    to your terminal.

To try something more ambitious, you can run an Ubuntu container with:

 $ docker run -it ubuntu bash

Share images, automate workflows, and more with a free Docker ID:

 https://hub.docker.com/

For more examples and ideas, visit:

 https://docs.docker.com/get-started/
二、Docker基本操作
1. 容器操作
docker [run | start | stop | restart | kill | rm | pause | unpause]
- run/create [镜像名]:创建一个新的容器,并运行一个命令
- start/stop/restart [容器名]:启动/停止/重启一个容器
- kill [容器名]:直接杀掉容器进程,不给进程响应时间
- rm [容器名]:删除已经停止的容器
- pause/unpause [容器名]:暂停/恢复容器中的进程
docker [ps | inspect | exec | logs | export | import]
- ps:查看容器列表(默认查看正在运行的容器,-a查看所有容器)
- inspect [容器名]:查看容器配置元数据
- exec -it [容器名] /bin/bash:进入容器环境中交互操作
- logs --since="2020-11-25" -f --tail=10 [容器名]:查看容器日志
- cp path1 [容器名]:path容器与主机之间的数据拷贝
- export -o test.tar [容器名]/docker export [容器名]>test.tar:文件系统作为一个tar归档文件
- import test.tar [镜像名:版本号]:导入归类文档,成为一个镜像
三、镜像操作
docker [images | rmi | tag | build | history | save | load]
- images:列出本地镜像列表
- rmi [镜像名:版本]:删除镜像
- tag [镜像名:版本] [仓库]/[镜像名:版本]:标记本地镜像,将其归入某一仓库
- build -t [镜像名:版本] [path]:Dockerfile 创建镜像
- history [镜像名:版本]:查看指定镜像的创建历史
- save -o xxx.tar [镜像名:版本] /save [镜像名:版本] > xxx.tar:将镜像保存成tar归档文件
- load --input xxx.tar / docker load < xxx.tar:从归档文件中加载镜像
四、镜像与容器原理及用法探究
1. history命令查看镜像层
例如:docker history hello-world
[root@VM-0-3-centos /]# docker history hello-world

IMAGE               CREATED             CREATED BY                                      SIZE                COMMENT

bf756fb1ae65        10 months ago       /bin/sh -c #(nop)  CMD ["/hello"]               0B

<missing>           10 months ago       /bin/sh -c #(nop) COPY file:7bf12aab75c3867a鈥  13.3kB
显示镜像hello-world分三层,其中2个空层
2. 查看镜像文件
镜像存放在imagedb里
一般在image/overlay2/imagedb/content/sha256 下面
打开一个镜像文件查看其内容:
[root@VM-0-3-centos /]# cat f09fe80eb0e75e97b04b9dfb065ac3fda37a8fac0161f42fca1e6fe4d0977c80

{

 "architecture": "amd64",

 "config": {

  "Hostname": "",

  "Domainname": "",

  "User": "",

  "AttachStdin": false,

  "AttachStdout": false,

  "AttachStderr": false,

  "Tty": false,

  "OpenStdin": false,

  "StdinOnce": false,

  "Env": ["PATH=/usr/local/sbin:/usr/local/bin:/usr/sbin:/usr/bin:/sbin:/bin"],

  "Cmd": ["/hello"],

  "ArgsEscaped": true,

  "Image": "sha256:a6d1aaad8ca65655449a26146699fe9d61240071f6992975be7e720f1cd42440",

  "Volumes": null,

  "WorkingDir": "",

  "Entrypoint": null,

  "OnBuild": null,

  "Labels": null

 },

 "container": "8e2caa5a514bb6d8b4f2a2553e9067498d261a0fd83a96aeaaf303943dff6ff9",

 "container_config": {

  "Hostname": "8e2caa5a514b",

  "Domainname": "",

  "User": "",

  "AttachStdin": false,

  "AttachStdout": false,

  "AttachStderr": false,

  "Tty": false,

  "OpenStdin": false,

  "StdinOnce": false,

  "Env": ["PATH=/usr/local/sbin:/usr/local/bin:/usr/sbin:/usr/bin:/sbin:/bin"],

  "Cmd": ["/bin/sh", "-c", "#(nop) ", "CMD [\"/hello\"]"],

  "ArgsEscaped": true,

  "Image": "sha256:a6d1aaad8ca65655449a26146699fe9d61240071f6992975be7e720f1cd42440",

  "Volumes": null,

  "WorkingDir": "",

  "Entrypoint": null,

  "OnBuild": null,

  "Labels": {}

 },

 "created": "2019-01-01T01:29:27.650294696Z",

 "docker_version": "18.06.1-ce",

 "history": [{

  "created": "2019-01-01T01:29:27.416803627Z",

  "created_by": "/bin/sh -c #(nop) COPY file:f77490f70ce51da25bd21bfc30cb5e1a24b2b65eb37d4af0c327ddc24f0986a6 in / "

 }, {

  "created": "2019-01-01T01:29:27.650294696Z",

  "created_by": "/bin/sh -c #(nop)  CMD [\"/hello\"]",

  "empty_layer": true

 }],

 "os": "linux",

 "rootfs": {

  "type": "layers",

  "diff_ids": ["sha256:af0b15c8625bb1938f1d7b17081031f649fd14e6b233688eea3c5483994a66a3"]

 }

}
其中,history数组内,标识了镜像的历史记录(与history命令内容对应);
rootfs的diff_ids中,对应了依赖使用中镜像层文件(history命令中size大于0的层)。
五、查看镜像层文件
层文件在layerdb里
[root@VM-0-3-centos /]# ll /var/lib/docker/image/overlay2/layerdb/sha256
镜像层文件内结构
六、镜像与容器总结
一个镜像就是一层层的layer层文件,盖楼而成,上层文件叠于下层文件上,若上层文件有与下层文件重复的,则覆盖掉下层文件重复的部分,如下图:
① 初始挂载时读写层为空。
② 当需要修改镜像内的某个文件时,只对处于最上方的读写层进行了变动,不复写下层已有文件系统的内容,已有文件在只读层中的原始版本仍然存在,但会被读写层中的新版本文件所隐藏,当 docker commit 这个修改过的容器文件系统为一个新的镜像时,保存的内容仅为最上层读写文件系统中被更新过的文件。
③ 联合挂载是用于将多个镜像层的文件系统挂载到一个挂载点来实现一个统一文件系统视图的途径,是下层存储驱动(aufs、overlay等) 实现分层合并的方式。
七、容器创建详解
1. 交互式创建容器并进入:
[root@VM-0-3-centos /]# docker run -it --name centos centos /bin/bash

[root@b4f93894687c /]# <---- 这里启动了容器,并进入容器(这一句不是命令)
docker run -it --name centos centos /bin/bash(前台进程)
exit退出也关闭容器;Ctrl+P+Q退出不关闭容器
2. 后台启动容器
[root@VM-0-3-centos /]# docker run -dti --name cent2 centos

153f66e0d07aedc7e6d96ebae771621590b6ad187a45ec600b8a8fdf42e7d68d
d:后台运行, ti/it:交互shell进程
3. 进入已运行的容器
[root@VM-0-3-centos /]# docker exec -it nginx /bin/bash
查看容器的元数据:docker inspect nginx
4. 绑定容器端口到主机
[root@VM-0-3-centos /]# docker run -d -p 8080:80 --name nginx nginx:latest
5. 挂载主机文件目录到容器内
[root@VM-0-3-centos /]# docker run -dit -v /root/peter_dir/:/pdir --name cent centos
6. 复制主机文件到容器内
[root@VM-0-3-centos /]# docker cp anaconda-ks.cfg cent:/var
编后语
本文介绍了Docker的安装部署,基本操作;其中包括了容器操作、镜像操作;镜像及容器的原理及用法。通过对Docker的介绍,让小伙伴们能够了解对Docker的基本从操作和常用命令。
下一章节将介绍:《Docker仓库使用》
更多精彩敬请关注公众号
Java极客思维
微信扫一扫,关注公众号
通知:今日公众号将开启送书福利活动,还没有关注公众号的小伙伴尽快关注公众号啦~
② 如果安装过,那么再将镜像/容器删除,命令如下:
[root@VM-0-3-centos /]# rm -rf /var/lib/docker因为腾讯云的默认为centos7版本

因此在这里只介绍centos7的安装流程
2. 安装docker
有两种方式安装docker:
① 通过yum直接安装docker。但是,这种方式安装可能并不是最新版的docker版本(存在更新不及时的问题)
[root@VM-0-3-centos /]# sudo yum install docker② 通过yum从阿里云镜像中进行安装,可以下载安装最新版本,运行三条安装命令(在这里就没有把安装输出信息打印出来了,怕篇幅太长,说我水文章~)
[root@VM-0-3-centos /]# sudo yum install -y yum-utils device-mapper-persistent-data lvm2

[root@VM-0-3-centos /]# sudo yum-config-manager --add-repo https://mirrors.aliyun.com/docker-ce/linux/centos/docker-ce.repo

[root@VM-0-3-centos /]# sudo yum install docker-ce
其中最后一条命令sudo yum install docker-ce安装过程中,需要有两次确认的过程,直接输入字母:y,然后回车即可。
3. 启动docker
[root@VM-0-3-centos /]# sudo service docker start4. 查看docker版本
[root@VM-0-3-centos /]# docker version

[root@VM-0-3-centos /]# docker info
5. 设置随系统启动
[root@VM-0-3-centos /]# sudo chkconfig docker on6. docker初体验
输入:docker run hello-world (进入docker世界)
下面会输出一行:Hello from Docker!
[root@VM-0-3-centos /]# docker run hello-world

Unable to find image 'hello-world:latest' locally

latest: Pulling from library/hello-world

0e03bdcc26d7: Pull complete

Digest: sha256:e7c70bb24b462baa86c102610182e3efcb12a04854e8c582838d92970a09f323

Status: Downloaded newer image for hello-world:latest

Hello from Docker!

This message shows that your installation appears to be working correctly.

To generate this message, Docker took the following steps:

 1. The Docker client contacted the Docker daemon.

 2. The Docker daemon pulled the "hello-world" image from the Docker Hub.

    (amd64)

 3. The Docker daemon created a new container from that image which runs the

    executable that produces the output you are currently reading.

 4. The Docker daemon streamed that output to the Docker client, which sent it

    to your terminal.

To try something more ambitious, you can run an Ubuntu container with:

 $ docker run -it ubuntu bash

Share images, automate workflows, and more with a free Docker ID:

 https://hub.docker.com/

For more examples and ideas, visit:

 https://docs.docker.com/get-started/
二、Docker基本操作
1. 容器操作
docker [run | start | stop | restart | kill | rm | pause | unpause]
- run/create [镜像名]:创建一个新的容器,并运行一个命令
- start/stop/restart [容器名]:启动/停止/重启一个容器
- kill [容器名]:直接杀掉容器进程,不给进程响应时间
- rm [容器名]:删除已经停止的容器
- pause/unpause [容器名]:暂停/恢复容器中的进程
docker [ps | inspect | exec | logs | export | import]
- ps:查看容器列表(默认查看正在运行的容器,-a查看所有容器)
- inspect [容器名]:查看容器配置元数据
- exec -it [容器名] /bin/bash:进入容器环境中交互操作
- logs --since="2020-11-25" -f --tail=10 [容器名]:查看容器日志
- cp path1 [容器名]:path容器与主机之间的数据拷贝
- export -o test.tar [容器名]/docker export [容器名]>test.tar:文件系统作为一个tar归档文件
- import test.tar [镜像名:版本号]:导入归类文档,成为一个镜像
三、镜像操作
docker [images | rmi | tag | build | history | save | load]
- images:列出本地镜像列表
- rmi [镜像名:版本]:删除镜像
- tag [镜像名:版本] [仓库]/[镜像名:版本]:标记本地镜像,将其归入某一仓库
- build -t [镜像名:版本] [path]:Dockerfile 创建镜像
- history [镜像名:版本]:查看指定镜像的创建历史
- save -o xxx.tar [镜像名:版本] /save [镜像名:版本] > xxx.tar:将镜像保存成tar归档文件
- load --input xxx.tar / docker load < xxx.tar:从归档文件中加载镜像
四、镜像与容器原理及用法探究
1. history命令查看镜像层
例如:docker history hello-world
[root@VM-0-3-centos /]# docker history hello-world

IMAGE               CREATED             CREATED BY                                      SIZE                COMMENT

bf756fb1ae65        10 months ago       /bin/sh -c #(nop)  CMD ["/hello"]               0B

<missing>           10 months ago       /bin/sh -c #(nop) COPY file:7bf12aab75c3867a鈥  13.3kB
显示镜像hello-world分三层,其中2个空层
2. 查看镜像文件
镜像存放在imagedb里
一般在image/overlay2/imagedb/content/sha256 下面

打开一个镜像文件查看其内容:
[root@VM-0-3-centos /]# cat f09fe80eb0e75e97b04b9dfb065ac3fda37a8fac0161f42fca1e6fe4d0977c80

{

 "architecture": "amd64",

 "config": {

  "Hostname": "",

  "Domainname": "",

  "User": "",

  "AttachStdin": false,

  "AttachStdout": false,

  "AttachStderr": false,

  "Tty": false,

  "OpenStdin": false,

  "StdinOnce": false,

  "Env": ["PATH=/usr/local/sbin:/usr/local/bin:/usr/sbin:/usr/bin:/sbin:/bin"],

  "Cmd": ["/hello"],

  "ArgsEscaped": true,

  "Image": "sha256:a6d1aaad8ca65655449a26146699fe9d61240071f6992975be7e720f1cd42440",

  "Volumes": null,

  "WorkingDir": "",

  "Entrypoint": null,

  "OnBuild": null,

  "Labels": null

 },

 "container": "8e2caa5a514bb6d8b4f2a2553e9067498d261a0fd83a96aeaaf303943dff6ff9",

 "container_config": {

  "Hostname": "8e2caa5a514b",

  "Domainname": "",

  "User": "",

  "AttachStdin": false,

  "AttachStdout": false,

  "AttachStderr": false,

  "Tty": false,

  "OpenStdin": false,

  "StdinOnce": false,

  "Env": ["PATH=/usr/local/sbin:/usr/local/bin:/usr/sbin:/usr/bin:/sbin:/bin"],

  "Cmd": ["/bin/sh", "-c", "#(nop) ", "CMD [\"/hello\"]"],

  "ArgsEscaped": true,

  "Image": "sha256:a6d1aaad8ca65655449a26146699fe9d61240071f6992975be7e720f1cd42440",

  "Volumes": null,

  "WorkingDir": "",

  "Entrypoint": null,

  "OnBuild": null,

  "Labels": {}

 },

 "created": "2019-01-01T01:29:27.650294696Z",

 "docker_version": "18.06.1-ce",

 "history": [{

  "created": "2019-01-01T01:29:27.416803627Z",

  "created_by": "/bin/sh -c #(nop) COPY file:f77490f70ce51da25bd21bfc30cb5e1a24b2b65eb37d4af0c327ddc24f0986a6 in / "

 }, {

  "created": "2019-01-01T01:29:27.650294696Z",

  "created_by": "/bin/sh -c #(nop)  CMD [\"/hello\"]",

  "empty_layer": true

 }],

 "os": "linux",

 "rootfs": {

  "type": "layers",

  "diff_ids": ["sha256:af0b15c8625bb1938f1d7b17081031f649fd14e6b233688eea3c5483994a66a3"]

 }

}
其中,history数组内,标识了镜像的历史记录(与history命令内容对应);
rootfs的diff_ids中,对应了依赖使用中镜像层文件(history命令中size大于0的层)。
五、查看镜像层文件
层文件在layerdb里
[root@VM-0-3-centos /]# ll /var/lib/docker/image/overlay2/layerdb/sha256
镜像层文件内结构

六、镜像与容器总结
一个镜像就是一层层的layer层文件,盖楼而成,上层文件叠于下层文件上,若上层文件有与下层文件重复的,则覆盖掉下层文件重复的部分,如下图:
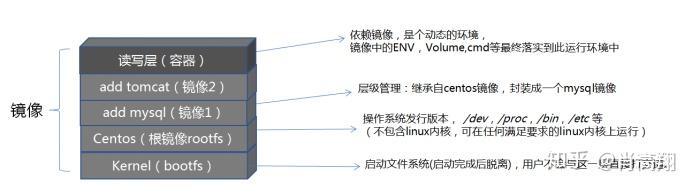
① 初始挂载时读写层为空。
② 当需要修改镜像内的某个文件时,只对处于最上方的读写层进行了变动,不复写下层已有文件系统的内容,已有文件在只读层中的原始版本仍然存在,但会被读写层中的新版本文件所隐藏,当 docker commit 这个修改过的容器文件系统为一个新的镜像时,保存的内容仅为最上层读写文件系统中被更新过的文件。
③ 联合挂载是用于将多个镜像层的文件系统挂载到一个挂载点来实现一个统一文件系统视图的途径,是下层存储驱动(aufs、overlay等) 实现分层合并的方式。
七、容器创建详解
1. 交互式创建容器并进入:
[root@VM-0-3-centos /]# docker run -it --name centos centos /bin/bash

[root@b4f93894687c /]# <---- 这里启动了容器,并进入容器(这一句不是命令)
docker run -it --name centos centos /bin/bash(前台进程)
exit退出也关闭容器;Ctrl+P+Q退出不关闭容器

2. 后台启动容器
[root@VM-0-3-centos /]# docker run -dti --name cent2 centos

153f66e0d07aedc7e6d96ebae771621590b6ad187a45ec600b8a8fdf42e7d68d
d:后台运行, ti/it:交互shell进程
3. 进入已运行的容器
[root@VM-0-3-centos /]# docker exec -it nginx /bin/bash查看容器的元数据:docker inspect nginx
4. 绑定容器端口到主机
[root@VM-0-3-centos /]# docker run -d -p 8080:80 --name nginx nginx:latest5. 挂载主机文件目录到容器内
[root@VM-0-3-centos /]# docker run -dit -v /root/peter_dir/:/pdir --name cent centos6. 复制主机文件到容器内
[root@VM-0-3-centos /]# docker cp anaconda-ks.cfg cent:/var 编后语
本文介绍了Docker的安装部署,基本操作;其中包括了容器操作、镜像操作;镜像及容器的原理及用法。通过对Docker的介绍,让小伙伴们能够了解对Docker的基本从操作和常用命令。
下一章节将介绍:《Docker仓库使用》
更多精彩敬请关注公众号

Java极客思维
微信扫一扫,关注公众号
通知:今日公众号将开启送书福利活动,还没有关注公众号的小伙伴尽快关注公众号啦~
Docker安装基本命令操作,带你了解镜像和容器的概念!的更多相关文章
- docker安装与操作
准备和安装 1.到这个路径下下载docker engine: https://get.docker.com/rpm/1.7.1/centos-7/RPMS/x86_64/docker-engine-1 ...
- docker使(二)—发布node应用镜像和容器
应用在本地是已经ok的了,现在将node应用放进docker容器里面 获取node镜像 docker pull node 编写Dokerfile # 根据node镜像开始创建新的镜像(可以加上:tag ...
- 都9102年了,还不会Docker?10分钟带你从入门操作到实战上手
Docker简述 Docker是一种OS虚拟化技术,是一个开源的应用容器引擎.它可以让开发者将应用打包到一个可移植的容器中,并且该容器可以运行在几乎所有linux系统中(Windows10目前也原生支 ...
- Docker的安装和操作(虚拟机+linux系统)
1.简介 Docker是一个开源的应用容器引擎:是一个轻量级容器技术: Docker支持将软件编译成一个镜像:然后在镜像中各种软件做好配置,将镜像发布出去,其他使用者可以直接使用这个镜像: 运行中的这 ...
- docker安装mysql、es、jenkins等一些步骤以及如何设置docker国内镜像
CentOS7安装Docker步骤: (0)删除旧的可能安装过的包 yum remove docker \ docker-client \ ...
- Docker 镜像与容器管理
镜像与容器简介 Docker的大部分操作都围绕着它的三大核心概念:镜像.容器.仓库而展开.因此,准确把握这三大核心概念对于掌握Docker技术尤为重要,在docker中,我们重点关注的就是镜像和容器了 ...
- docker入门 基础命令 docker安装
docker入门 在学一门新知识的时候,超哥喜欢提问,why?what?how? wiki资料 什么是docker Docker 最初是 dotCloud 公司创始人 Solomon Hykes ...
- Docker安装各种服务
一. centos7设置固定IP 查看当前正在使用的网络情况 [root@localhost ~]# nmcli dev status 显示情况 : DEVICE TYPE STATE C ...
- 【docker】docker安装和使用
一.docker简介: docker是容器技术的一个代表,而容器技术是将程序打包和隔离的一种技术,其实它并不是一个新技术,之前在linux内核中早已存在,真正被大众所用所了解是因为docker的出现. ...
随机推荐
- 设计模式 | 职责链模式(Chain of responsibility)
定义: 使多个对象都有机会处理请求,从而避免请求的发送者和接受者之间的耦合关系.将这个对象连城一条链,并沿着这条链传递该请求,直到有一个对象处理它为止. 结构:(书中图,侵删) 一个抽象的处理者 若干 ...
- STM32入门系列-STM32时钟系统,STM32时钟树
时钟对于单片机来说是非常重要的,它为单片机工作提供一个稳定的机器周期从而使系统能够正常运行.时钟系统犹如人的心脏,一旦有问题整个系统就崩溃.我们知道STM32属于高级单片机,其内部有很多的外设,但不是 ...
- NB-IoT的PSM模式有什么优点
在NB-IoT系统中,PSM模式的优点是可进行长时间休眠,缺点是对终端接收(Mobile Terminated,MT)业务响应不及时,主要应用于远程抄表等对下行实时性要求不高的业务.实际上,物联网设备 ...
- P6064 [USACO05JAN]Naptime G
最近做了多少道 usaco 了,连 FJ 都认识我了呀 题意描述 传送门 给你 \(N\) 段时间其中 \(B\) 段时间你要用来睡眠,再给你每个时间睡眠可获得的效用值 \(U_i\). 可惜的是你每 ...
- Android操作系统及APP
1. Android操作系统 1.1. 介绍 Android操作系统最初由Andy Rubin开发,主要支持手机.2005年8月由Google收购注资.第一部Android智能手机发布于2008 ...
- 使用 C# 9.0 新语法提升 if 语句美感
C# 语言一贯秉承简洁优美的宗旨,每次升级都会带来一些语法糖,让我们可以使代码变得更简洁.本文分享两个使用 C# 9.0 提升 if 语句美感的技巧示例. 使用属性模式代替 IsNullOrEmpty ...
- PHP 教程:Composer 最佳实践
概述 Composer 是 PHP 应用程序的依赖管理器,最初发布于大约 8 年前,2012 年 3 月. 在 php 中使用 Composer 可以提高代码的可重用性,并使你的项目能够轻松地集成来自 ...
- python开发基础(一)-if条件判断,while循环,break,continue,
条件语句 (1)if 基本语句 if 条件 : 内部代码块 else: .... print() (2)if 嵌套 (3)if elif 语句 (4)if 1==1: pass # if不执行,pas ...
- 6、Django之模型层第一篇:单表操作
一 ORM简介 我们在使用Django框架开发web应用的过程中,不可避免地会涉及到数据的管理操作(如增.删.改.查),而一旦谈到数据的管理操作,就需要用到数据库管理软件,例如mysql.oracle ...
- unix进程间通信方式(IPC)
unix进程间通信方式(IPC) 管道(Pipe):管道可用于具有亲缘关系进程间的通信,允许一个进程和另一个与它有共同祖先的进程之间进行通信. 命名管道(named pipe):命名管道克服了管道没有 ...