day87:luffy:结算页面积分&支付宝接口
目录
1.积分
1.关于积分的表结构
1.在user表中添加credit字段 + 设计一个积分的表结构
user/models.py
class User(AbstractUser):

    phone = models.CharField(max_length=16,null=True,blank=True)

    wechat = models.CharField(max_length=16,null=True,blank=True)

    # 为用户表添加积分字段 每个用户都有自己积分

    credit = models.IntegerField(default=0, blank=True, verbose_name="贝里")

class Credit(BaseModel):

    """积分流水"""

    OPERA_OPION = (

        (1, "赚取"),

        (2, "消费"),

    )

    user = models.ForeignKey("User", related_name="user_credit", on_delete=models.CASCADE, verbose_name="用户")

    opera = models.SmallIntegerField(choices=OPERA_OPION,verbose_name="操作类型")

    number = models.SmallIntegerField(default=0, verbose_name="积分数值")

    class Meta:

        db_table = 'ly_credit'

        verbose_name = '积分流水'

        verbose_name_plural = verbose_name

    def __str__(self):

        return "%s %s %s 贝壳" % ( self.user.username, self.OPERA_OPION[self.opera][1], self.number )
2.设置积分和现金的兑换比例
constant.py
CREDIT_MONEY = 10 # 10积分顶一块钱
2.登录成功将积分回复给前端
1.登录成功 给前端回复除了[用户名 id token],也要把[积分和计算公式]回复给前端
user/utils.py
def jwt_response_payload_handler(token, user=None, request=None):

    return {

        'token': token,

        'username': user.username,

        'id':user.id,

         # 登录成功将积分和兑换比例也要返回给前端

        'credit':user.credit,

        'credit_to_money':contains.CREDIT_MONEY,

    }
2.前端将积分存起来
login.vue
 if (this.remember){

              localStorage.token = res.data.token;

              localStorage.username = res.data.username;

              localStorage.id = res.data.id;

              // 前端将积分存起来

              localStorage.credit = res.data.credit;

              localStorage.credit_to_money = res.data.credit_to_money;

              sessionStorage.removeItem('token');

              sessionStorage.removeItem('username');

              sessionStorage.removeItem('id');

              sessionStorage.removeItem('credit');

              sessionStorage.removeItem('credit_to_money');

            }else {

              sessionStorage.token = res.data.token;

              sessionStorage.username = res.data.username;

              sessionStorage.id = res.data.id;

              // 前端将积分存起来

              sessionStorage.credit = res.data.credit;

              sessionStorage.credit_to_money = res.data.credit_to_money;

              localStorage.removeItem('token');

              localStorage.removeItem('username');

              localStorage.removeItem('id');

              localStorage.removeItem('credit');

              localStorage.removeItem('credit_to_money');

            }
3.自行输入使用积分
在input标签中绑定一个change方法 当input标签输入的值发生变化的时候 触发@change下对应的方法
order.vue
<!-- html -->

<p class="discount-num2" v-else><span>总积分:xxxx,

    <el-input-number v-model="num" @change="handleChange" :min="0" :max="10000" label="描述文字"></el-input-number>,已抵扣xxx元,本次花费xxx积分</span></p>
// js

handleChange(value){

        // 如果用户在积分输入框中没有输入值,那么默认使用了0个积分

        if (!value){

          this.num = 0

        }

        console.log(value);

      },
4.拿取积分
order.vue
get_credit(){

    // 从前端拿取积分和兑换比例

    this.credit = localStorage.getItem('credit') || sessionStorage.getItem('credit')

    this.credit_to_money = localStorage.getItem('credit_to_money') || sessionStorage.getItem('credit_to_money')

      },
5.在页面展示出积分
order.vue
<!-- html -->

<p class="discount-num2" v-else><span>总积分:{{credit}},
6.计算可以使用的最大积分
order.vue
max_credit(){

    // 计算此课程能使用的最大积分数:比如100元的课程最多能使用1000积分

    let a = parseFloat(this.total_price) * parseFloat(this.credit_to_money);

    // 如果此课程能使用的最大积分数[1000]小于你的总积分数[1500]:那么你能使用的最大积分数就是[1000]

    if (this.credit >= a){

        return a

    // 如果此课程能使用的最大积分数[1000]大于你的总积分数[600],那么你能使用的最大积分数就是你剩余的积分数[600]

    }else {

        return parseFloat(this.credit)

    }
7.前端发送请求
order.vue
payhander(){

        let token = localStorage.token || sessionStorage.token;

        this.$axios.post(`${this.$settings.Host}/order/add_money/`,{

              "pay_type":this.pay_type,

              "coupon":this.current_coupon,

              "credit":this.num, // 将积分提交给后端,让后端对积分做校验

        },{

          headers:{

              'Authorization':'jwt ' + token

            }

        }).then((res)=>{

          this.$message.success('订单已经生成,马上跳转支付页面')

        }).catch((error)=>{

          this.$message.error(error.response.data.msg);

        })

      }
8.后端对积分做校验
order/serializers.py
def validate(self, attrs):

    # 获取前端发过来的积分

    credit = attrs.get('credit')

    # 查询用户所拥有的的所有积分

    user_credit = self.context['request'].user.credit

    # 如果前端积分大于用户积分,抛出异常

    if credit > user_credit:

        raise serializers.ValidationError('积分超上限了,别乱搞')

    return attrs

def create(self, validated_data):

    # 积分判断

    credit = float(validated_data.get('credit',0)) # 获取前端发过来的验证之后的积分

    if credit > constants.CREDIT_MONEY * total_real_price: # 如果使用积分超过你此课程能使用的最大积分

        transaction.savepoint_rollback(sid) # 回滚到断点处

        raise serializers.ValidationError('使用积分超过了上线,别高事情')

    # 积分计算

    total_real_price -= credit / contains.CREDIT_MONEY
2.支付
1.准备工作
1.安装python-alipay-sdk
pip install python-alipay-sdk --upgrade
2.创建应用payment,并配置INSTALLAPP
python3 manage.py startapp payment
3.在payment应用目录创建keys文件夹
2.公钥和私钥
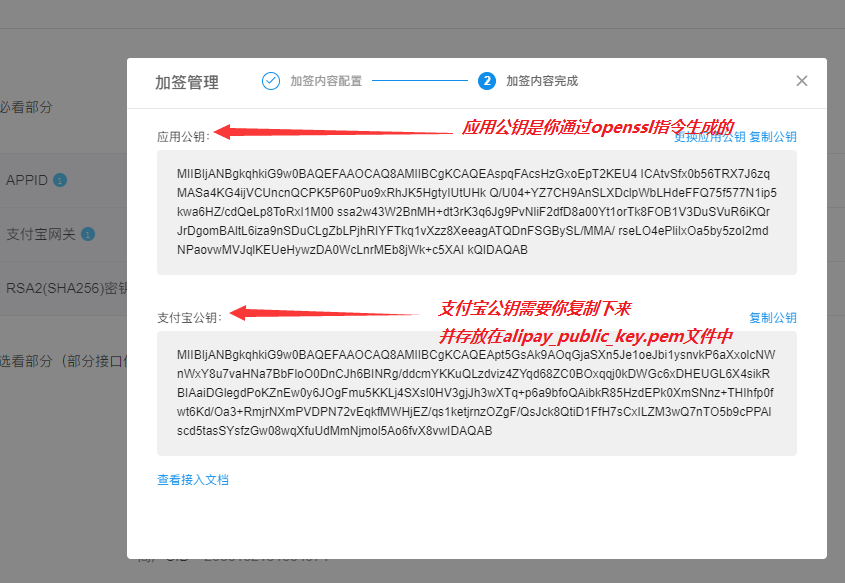

1.OpenSSL命令下生成私钥
openssl

OpenSSL> genrsa -out app_private_key.pem 2048   # 生成私钥到指定文件中
2.OpenSSL命令下生成公钥
openssl

OpenSSL> rsa -in app_private_key.pem -pubout -out app_public_key.pem  # 导出公钥
3.沙箱环境应用公钥要更换成自己在openssl生成的应用公钥
4.支付宝公钥存到alipay_public_key.pem中
3.为支付页面配置路由
payment/urls.py
from django.urls import path,re_path

from . import views

urlpatterns = [

    path('alipay/',views.AlipayView.as_view(),),

]
4.视图
payment/views.py
from alipay import AliPay, DCAliPay, ISVAliPay

from alipay.utils import AliPayConfig

class AlipayView(APIView):

    def get(self,request):

        order_number = request.query_params.get('order_number')

        order_obj = Order.objects.get(order_number=order_number)

        alipay = AliPay(

            appid=settings.ALIAPY_CONFIG['appid'],

            app_notify_url=None,  # 默认回调url

            app_private_key_string=open(settings.ALIAPY_CONFIG['app_private_key_path']).read(),

            # 支付宝的公钥,验证支付宝回传消息使用,不是你自己的公钥,

            alipay_public_key_string=open(settings.ALIAPY_CONFIG['alipay_public_key_path']).read(),

            sign_type=settings.ALIAPY_CONFIG['sign_type'],  # RSA 或者 RSA2

            debug = settings.ALIAPY_CONFIG['debug'],  # 默认False

        )

        order_string = alipay.api_alipay_trade_page_pay(

            out_trade_no=order_obj.order_number,

            total_amount=float(order_obj.real_price),

            subject=order_obj.order_title,

            return_url=settings.ALIAPY_CONFIG['return_url'],

            notify_url=settings.ALIAPY_CONFIG['notify_url'] # 可选, 不填则使用默认notify url

        )

        url = settings.ALIAPY_CONFIG['gateway_url'] + order_string

        return Response({'url': url})
5.支付宝配置信息
dev.py
# 支付宝配置信息

ALIAPY_CONFIG = {

    "gateway_url": "https://openapi.alipaydev.com/gateway.do?",  # 沙箱支付宝网关地址

    "appid": "2016093000633754",  # 沙箱中那个应用id

    "app_notify_url": None,

    "app_private_key_path": os.path.join(BASE_DIR, "apps/payment/keys/app_private_key.pem"),

    "alipay_public_key_path": os.path.join(BASE_DIR, "apps/payment/keys/alipay_public_key.pem"),

    "sign_type": "RSA2",

    "debug": False,

    "return_url": "http://www.lycity.com:8080/payment/result",  # 同步回调地址

    "notify_url": "http://www.lyapi.com:8001/payment/result",  # 异步结果通知
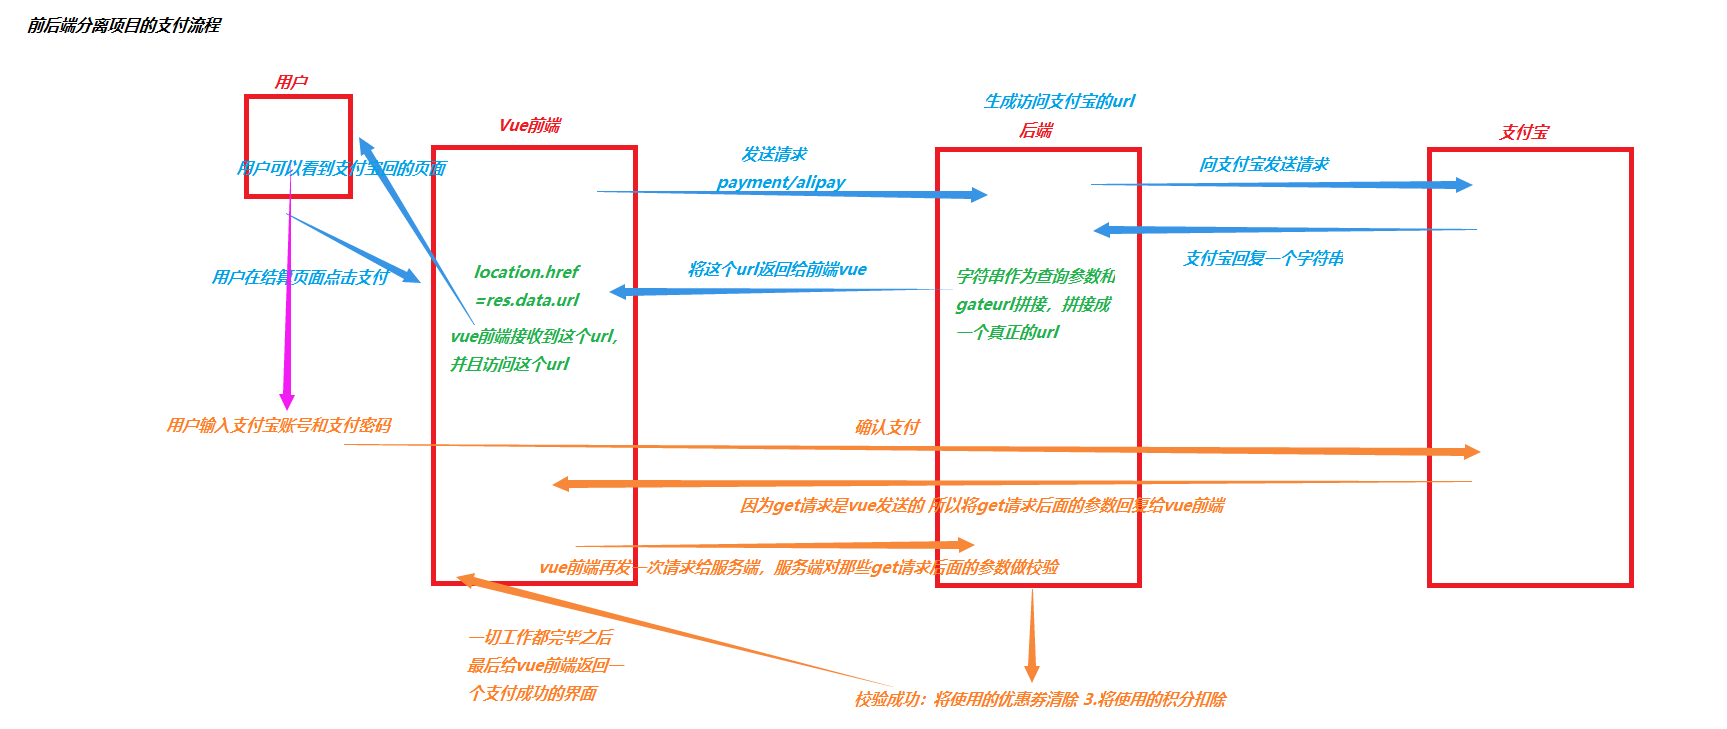
6.前端发送请求获取到一个支付页面的url
payhander(){

        this.$axios.post(`${this.$settings.Host}/order/add_money/`,{

        }).then((res)=>{

          this.$message.success('订单已经生成,马上跳转支付页面')

          let order_number = res.data.order_number

          this.$axios.get(`${this.$settings.Host}/payment/alipay/?order_number=${order_number}`)

            .then((res)=>{

              // res.data :  alipay.trade...?a=1&b=2....

              location.href = res.data.url;

            })

        }).catch((error)=>{

          this.$message.error(error.response.data.msg);

        })

      }
7.支付成功的页面-初始化
Success.vue


<template>
<div class="success">
<Header/>
<div class="main">
<div class="title">
<!-- <img src="../../static/images/right.svg" alt="">-->
<div class="success-tips">
<p class="tips1">您已成功购买 1 门课程!</p>
<p class="tips2">你还可以加入QQ群 <span>747556033</span> 学习交流</p>
</div>
</div>
<div class="order-info">
<p class="info1"><b>付款时间:</b><span>2019/04/02 10:27</span></p>
<p class="info2"><b>付款金额:</b><span >0</span></p>
<p class="info3"><b>课程信息:</b><span><span>《Pycharm使用秘籍》</span></span></p>
</div>
<div class="wechat-code">
<!-- <img src="../../static/image/server.cf99f78.png" alt="" class="er">-->
<!-- <p><img src="../../static/image/tan.svg" alt="">重要!微信扫码关注获得学习通知&课程更新提醒!否则将严重影响学习进度和课程体验!</p>-->
</div>
<div class="study">
<span>立即学习</span>
</div>
</div>
<Footer/>
</div>
</template> <script>
import Header from "./common/Header"
import Footer from "./common/Footer"
export default{
name:"Success",
data(){
return {
current_page:0,
};
},
created(){
// 把地址栏上面的支付结果,转发给后端 },
components:{
Header,
Footer,
}
}
</script> <style scoped>
.success{
padding-top: 80px;
}
.main{
height: 100%;
padding-top: 25px;
padding-bottom: 25px;
margin: 0 auto;
width: 1200px;
background: #fff;
}
.main .title{
display: flex;
-ms-flex-align: center;
align-items: center;
padding: 25px 40px;
border-bottom: 1px solid #f2f2f2;
}
.main .title .success-tips{
box-sizing: border-box;
}
.title img{
vertical-align: middle;
width: 60px;
height: 60px;
margin-right: 40px;
}
.title .success-tips{
box-sizing: border-box;
}
.title .tips1{
font-size: 22px;
color: #000;
}
.title .tips2{
font-size: 16px;
color: #4a4a4a;
letter-spacing: 0;
text-align: center;
margin-top: 10px;
}
.title .tips2 span{
color: #ec6730;
}
.order-info{
padding: 25px 48px;
padding-bottom: 15px;
border-bottom: 1px solid #f2f2f2;
}
.order-info p{
display: -ms-flexbox;
display: flex;
margin-bottom: 10px;
font-size: 16px;
}
.order-info p b{
font-weight: 400;
color: #9d9d9d;
white-space: nowrap;
}
.wechat-code{
display: flex;
-ms-flex-align: center;
align-items: center;
padding: 25px 40px;
border-bottom: 1px solid #f2f2f2;
}
.wechat-code>img{
width: 100px;
height: 100px;
margin-right: 15px;
}
.wechat-code p{
font-size: 14px;
color: #d0021b;
display: -ms-flexbox;
display: flex;
-ms-flex-align: center;
align-items: center;
}
.wechat-code p>img{
width: 16px;
height: 16px;
margin-right: 10px;
}
.study{
padding: 25px 40px;
}
.study span{
display: block;
width: 140px;
height: 42px;
text-align: center;
line-height: 42px;
cursor: pointer;
background: #ffc210;
border-radius: 6px;
font-size: 16px;
color: #fff;
}
</style>
支付成功的页面-初始化
注册Success组件
{

      path: '/payment/result/',

      component: Success

    },
day87:luffy:结算页面积分&支付宝接口的更多相关文章
- day86:luffy:前端发送请求生成订单&结算页面优惠劵的实现
目录 1.前端发送请求生成订单 1.前端点击支付按钮生成订单 2.结算成功之后应该清除结算页面的数据 3.后端计算结算页面总原价格和总的真实价格并存到数据库订单表中 2.优惠劵 1.准备工作 2.前端 ...
- 调用支付宝接口Android客户端没有支付宝APP的情况下解决无法调用支付宝页面的问题
这几天一直研究支付宝接口调用,因为当前应用中需要调用支付宝接口作移动支付. 遇到一个问题困扰几天,就是当我们的手机端未安装支付宝APP的时候,需要在自己应用中调用支付宝的登陆网页进行支付.我是Andr ...
- ThinkPHP实现支付宝接口功能
最近做系统,需要实现在线支付功能,毫不犹豫,选择的是支付宝的接口支付功能.这里我用的是即时到帐的接口,具体实现的步骤如下:一.下载支付宝接口包下载地址:https://doc.open.alipay. ...
- (实用篇)php支付宝接口用法分析
本文实例讲述了php支付宝接口用法.分享给大家供大家参考.具体分析如下: 现在流行的网站支持平台,支付宝当仁不让的老大了,现在我们就来告诉你如何使用支付宝api来做第三方支付,把支付宝放到自己网站来, ...
- 【转载】关于Alipay支付宝接口(Java版)
转载自:http://blog.163.com/lai_chao/blog/static/70340789201412724619514/ 1.alipay 双功能支付简介 2.alipay 提交支付 ...
- android应用程序如何调用支付宝接口
最近在做一个关于购物商城的项目,项目里面付款这块我选的是调用支付宝的接口,因为用的人比较多. 在网上搜索了以下,有很多这方面的教程,但大部分教程过于陈旧,而且描述的过于简单.而且支付宝提供的接口一直在 ...
- [转]支付宝接口程序、文档及解读(ASP.NET)
本文转自:http://www.cnblogs.com/blodfox777/archive/2009/11/03/1595223.html 最近需要为网站加入支付宝的充值接口,而目前关于支付宝接口开 ...
- android应用程序如何调用支付宝接口(转)
最近在做一个关于购物商城的项目,项目里面付款这块我选的是调用支付宝的接口,因为用的人比较多. 在网上搜索了以下,有很多这方面的教程,但大部分教程过于陈旧,而且描述的过于简单.而且支付宝提供的接口一直在 ...
- android开发支付宝接口开发流程(密钥篇)
参考博客:http://blog.it985.com/12276.html 官方下载地址:http://download.alipay.com/public/api/base/WS_MOBILE_PA ...
随机推荐
- JWT安全性第1部分,创建令牌
下载Demo Core 2.0 - 13.2 MB 下载Demo Core 1.2 - 14 MB 介绍 JWT (JSON Web Token)作为保护Web站点和REST服务的标准越来越流行.我将 ...
- 从字节码层次看i++和++i
关于的Java的i++和++i的区别,初学者可能会混淆,这时候有经验的同学或同事就会告诉你,++在后,就会立马加值, ++在后则会等会儿再加,所以如果i == 0 ,那么i++ == 0,++i == ...
- Java 10 种常用第三方服务
严格意义上说,所有软件的第三方服务都可以自己开发,不过从零到一是需要时间和金钱成本的.就像我们研发芯片,投入了巨大的成本,但仍然没有取得理想的成绩,有些事情并不是一朝一夕,投机取巧就能完成的. Jav ...
- 提取swagger内容到csv表格,excel可打开
swagger生成的页面api接口统计,有几种方法 直接在前端用js提取出来,较麻烦(不推荐,不同版本的页面生成的标签有可能不一样,因此可能提取不出来) //apilet a = document.g ...
- vue任意关系组件通信与跨组件监听状态 vue-communication
大家好!我是木瓜太香! 众所周知,组件式开发方式给我们带来了方便,不过也引入了新的问题,组件之间的数据就像被一道无形的墙隔开,如果我们希望临时让两个组件直接通信,vuex 太巨,而 $emit 又不好 ...
- 快速掌握Java8 Stream函数式编程技巧
函数式编程优势 "函数第一位",即函数可以出现在任何地方. 可以把函数作为参数传递给另一个函数,还可以将函数作为返回值. 让代码的逻辑更清晰更优雅. 减少了可变量(Immutabl ...
- centos8平台使用lsof
一,lsof的用途 lsof,List Open Files 列出当前系统打开文件的工具. 在linux环境下,任何事物都以文件的形式存在, 所以lsof通过文件不仅仅可以访问常规数据,还可以访问网络 ...
- centos8平台nginx服务配置打开文件限制max open files limits
一,nginx启动时提示打开文件数,ulimit的配置不起作用: 1, 2020/04/26 14:27:46 [notice] 1553#1553: getrlimit(RLIMIT_NOFILE) ...
- 跟我一起学Redis之看完这篇比常人多会三种类型实战(又搞了几个小时)
前言 对于Redis而言,很多小伙伴只关注其关键的五大基础类型:string.hash.list.set.sorted set(有序集合),其实还有三种特殊类型在很多应用场景也比较适合使用,分别是:b ...
- Spring 事件监听
Spring 的核心是 ApplicationContext,它负责管理 Bean的完整生命周期:当加载 Bean 时,ApplicationContext 发布某些类型的事件:例如,当上下文启动时, ...