iview实战 : 树形组件自定义
Tree树形组件是 iview 中相对复杂的一个组件。
自定义节点内容
使用强大的 Render 函数可以自定义节点显示内容和交互,比如添加图标,按钮等。
——官方文档
但官方的 example 只有增和删的功能,而我想加置顶和修改名字的功能。
上代码:
Helloworld.vue
<template>
<div class="hello">
<div class="core">
<div class="abs-zone" v-if="editZoneDisplayBoolean">
<div class="box">
<Input placeholder="Enter something..." style="width:200px" v-model="beforeSubmitNodeTitleString" />
<Button type="success" :style="{marginLeft:'5px'}" @click="submitNameEditFunc(1)">
<Icon type="md-checkmark" />
</Button>
<Button type="error" :style="{marginLeft:'5px'}" @click="submitNameEditFunc(0)">
<Icon type="md-close" />
</Button>
</div>
</div>
<Tree :data="data5" :render="renderContent" show-checkbox multiple></Tree>
</div>
</div>
</template> <script>
export default {
data () {
return {
root:null,
editZoneDisplayBoolean:false,
beforeSubmitNodeTitleString:'',
edit_root:null,
edit_node:null,
edit_data:null,
data5: [
{
title: 'parent 1',
expand: true,
render: (h, { root, node, data }) => {
return h('span', {
style: {
display: 'inline-block',
width: '100%'
}
}, [
h('span', [
h('Icon', {
props: {
type: 'ios-folder-outline'
},
style: {
marginRight: '8px'
}
}),
h('span', data.title)
]),
h('span', {
style: {
display: 'inline-block',
float: 'right',
marginRight: '32px'
}
}, [
h('Button', {
props: Object.assign({}, this.buttonProps, {
icon: 'ios-add',
type: 'primary'
}),
style: {
width: '135px'
},
on: {
click: () => { this.append(data) }
}
})
])
]);
},
children: [
{
title: 'child 1-1',
expand: true,
children: [
{
title: 'leaf 1-1-1',
expand: true
},
{
title: 'leaf 1-1-2',
expand: true
}
]
},
{
title: 'child 1-2',
expand: true,
children: [
{
title: 'leaf 1-2-1',
expand: true
},
{
title: 'leaf 1-2-2',
expand: true
}
]
}
]
}
],
buttonProps: {
type: 'default',
size: 'small',
}
}
},
methods: {
renderContent (h, { root, node, data }) {
return h('span', {
style: {
display: 'inline-block',
width: '100%'
}
}, [
h('span', [
h('Icon', {
props: {
type: 'ios-paper-outline'
},
style: {
marginRight: '8px'
}
}),
h('span', data.title)
]),
h('span', {
style: {
display: 'inline-block',
float: 'right',
marginRight: '32px'
}
}, [
h('Button', {
props: Object.assign({}, this.buttonProps, {
icon: 'ios-add'
}),
style: {
marginRight: '8px'
},
on: {
click: () => { this.append(data) }
}
}),
h('Button', {
props: Object.assign({}, this.buttonProps, {
icon: 'ios-remove'
}),
style: {
marginRight: '8px'
},
on: {
click: () => { this.remove(root, node, data) }
}
}),
h('Button', {
props: Object.assign({}, this.buttonProps, {
icon: 'ios-create'
}),
style: {
marginRight: '8px'
},
on: {
click: () => { this.openEditName(root, node, data) }
}
}),
h('Button', {
props: Object.assign({}, this.buttonProps, {
icon: 'ios-arrow-round-up'
}),
on: {
click: () => { this.toUp(root, node, data) }
}
})
])
]);
},
append (data) {
const children = data.children || [];
children.push({
title: 'appended node',
expand: true
});
this.$set(data, 'children', children);
},
remove (root, node, data) {
const parentKey = root.find(el => el === node).parent;
const parent = root.find(el => el.nodeKey === parentKey).node;
const index = parent.children.indexOf(data);
parent.children.splice(index, 1);
},
toUp (root, node, data) {
const parentKey = root.find(el => el === node).parent;
const parent = root.find(el => el.nodeKey === parentKey).node;
const index = parent.children.indexOf(data);
const children = parent.children
children.unshift({
...data
});
children.pop()
this.$set(parent, 'children', children);
},
openEditName (root, node, data) {
this.editZoneDisplayBoolean = true
this.edit_root = root
this.edit_node = node
this.edit_data = data
this.beforeSubmitNodeTitleString = this.edit_node.node.title
},
submitNameEditFunc(x){
if (!x) {
this.editZoneDisplayBoolean = false
return
} else {
this.edit_node.node.title = this.beforeSubmitNodeTitleString
this.editZoneDisplayBoolean = false
return
}
}
}
};
</script> <!-- Add "scoped" attribute to limit CSS to this component only -->
<style scoped lang="less">
@edit-zone-height:32px; .core{
width: 500px;
height: 400px;
border:1px solid #979797;
border-radius: 5px;
padding: 10px;
overflow: hidden;
position:relative;
.abs-zone{
position: absolute;
width: 100%;
height: 100%;
top:0;
left: 0;
background: rgba(255,255,255,.8);
z-index: 1;
.box{
position:absolute;
width: 100%;
top:50%;
left: 0;
margin-top: -@edit-zone-height;
text-align: center;
}
}
}
</style>
App.vue
<template>

  <div id="app">

    <HelloWorld/>

  </div>

</template>

<script>

import HelloWorld from './components/HelloWorld'

export default {

  name: 'App',

  components: {

    HelloWorld

  }

};

</script>

<style>

#app {

  font-family: 'Avenir', Helvetica, Arial, sans-serif;

  padding: 20px;

}

</style>
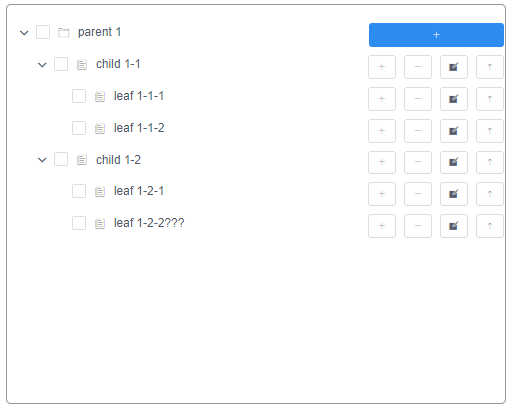
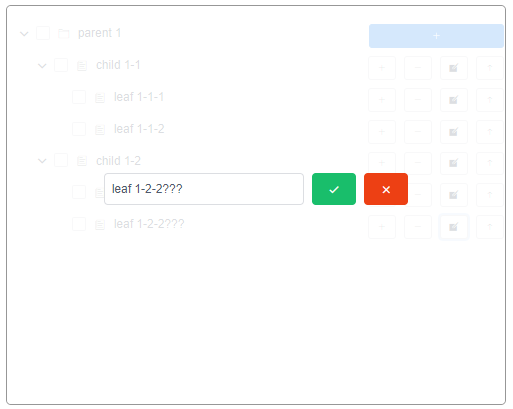
截图:
iview实战 : 树形组件自定义的更多相关文章
- element-ui tree树形组件自定义实现可展开选择表格
最近做项目遇到一个需求,表格里可以展开,可以选择,大概效果如下图: 一开始是在table组件里找方法,使用了表格的合并方法,效果是实现了,但是表格的多选每次触发时,都会执行好几次,而且没法实现一部分的 ...
- iView 实战系列教程(21课时)_1.iView 实战教程之配置篇
1.iView 实战教程之配置篇 点击添加插件,. 选中后安装 全部导入还是按需导入. 2.是否需要自定义主题变量 3.多语言的设置. 这里我们全部选择为默认 然后点击继续. 启动项目 入口文件导入了 ...
- 【技术博客】使用iview的Tree组件写一棵文件树
本次项目的前端部分使用vue框架+iview组件构建,其中IDE的文件树部分使用了iview的Tree组件,但是Tree组件本身的接口功能极其有限,网上的相关资料也不多,在使用时费了一番功夫才摸索清楚 ...
- JS组件系列——分享自己封装的Bootstrap树形组件:jqTree
前言:之前的一篇介绍了下如何封装自己的组件,这篇再次来体验下自己封装组件的乐趣.看过博主博客的园友应该记得之前分享过一篇树形菜单的使用JS组件系列——Bootstrap 树控件使用经验分享,这篇里面第 ...
- 转:vue+element实现树形组件
项目中需要用到树形组件,在网上发现一个用vue+element实现的树形组件,现在记录下: demo地址:https://github.com/wilsonIs/vue-treeSelect
- office 2016 install(office2016组件自定义安装激活程序) v5.9.3中文绿色版
下载地址 http://www.ddooo.com/softdown/71741.htm#dltab office 2016 install是目前下载office2016和office2016组件最 ...
- MVC文件上传06-使用客户端jQuery-File-Upload插件和服务端Backload组件自定义控制器上传多个文件
当需要在控制器中处理除了文件的其他表单字段,执行控制器独有的业务逻辑......等等,这时候我们可以自定义控制器. MVC文件上传相关兄弟篇: MVC文件上传01-使用jquery异步上传并客户端验证 ...
- 在angular7中创建组件/自定义指令/管道
在angular7中创建组件/自定义指令/管道 组件 使用命令创建组件 创建组件的命令:ng generate component 组件名 生成的组件组成: 组件名.html .组件名.ts.组件名. ...
- vue组件中,iview的modal组件爬坑--modal的显示与否应该是使用v-show
这是我第一次写博客,主要是记录下自己解决问题的过程和知识的总结,如有不对的地方欢迎指出来! 需求:点击btn,弹出modal显示图表(以折现图为例) 这应该是很基本的需求也是很容易实现的,代码和效果如 ...
随机推荐
- Redis命令速查
目录 string list set zset hash 记录下常用的,方便查找 string 内部sds,动态扩容.小于1M加倍扩,大于1M每次扩容1M.最大长度512M. SET name val ...
- VMware Workstation 15密钥
在打开的VMware Workstation 15输入许可证密钥对话框里直接输入25位密钥,然后点击确定,如下图所示. 这里提供一个密钥: CG392-4PX5J-H816Z-HYZNG-PQRG2
- 前端笔记:div只显示两行内容,多出内容以...显示
代码: text-overflow: -o-ellipsis-lastline;overflow: hidden;text-overflow: ellipsis;display: -webkit-bo ...
- Freemarker在replace替换是对NULL值的处理
freemarker的对象调用内建函数时,比如userInfo对象的birthDay函数,页面${userInfo.birthDay}调用,当我想将birthDay值中的“-”替换为“/”时,${us ...
- vs code 初始化vue项目框架
1.首先安装npm组件 下载地址:https://nodejs.org/en/ 安装完 2.配置环境变量 3.验证是否成功 node -v npm -v 4.替换npm 输入npm install ...
- css的四种使用方式
方式一:内联样式 内联样式,也叫行内样式,指的是直接在style属性中添加CSS 示例: <DIV style="display: none;background:red"& ...
- lsomap降维
# -*- coding: utf-8 -*- """ lsomap """ import numpy as np import matpl ...
- LeetCode57. 插入区间
对于新插入的区间newInterval,原区间列表intervals可以分为三个部分: 左边与newInterval不重合的区间,这些区间直接加入结果数组中: 中间与newInterval重合的区间, ...
- 51单片机入门(补充)1--与C语言的交接
我写完上一个文章,发现我写的还是不够全面,所以,这篇文章将会延续上一个文章的内容,并且再次补充新的东西,如果还有什么地方需要补充,还请各位一一指出,如果你已经学过这些东西,大可以直接跳过,假如说之后有 ...
- 每天一个Linux命令(mkdir)
每天一个Linux命令(mkdir) mkdir: /bin/mkdir,创建目录( make directories)语法:mkdir [选项]... 不存在的目录...目录:默认时必须该目录不存在 ...