springboot-helloworld
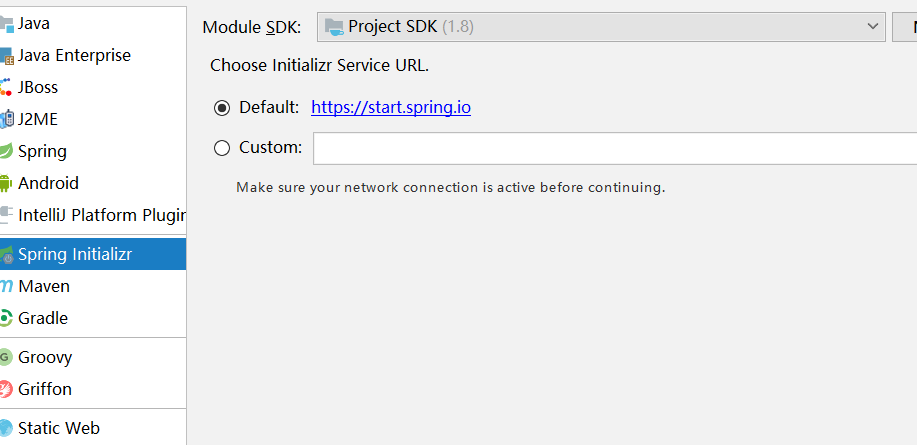
1使用idea创建springboot项目如下图所示 并选择web模块
2,登录springboot官网 http://projects.spring.io/spring-boot/ 引入相关依赖包如图所示我们这里是基于1.5.8

3.引入springboot核心包,开始我们的helloworld之旅,pom文件如图所示
<?xml version="1.0" encoding="UTF-8"?>

<project xmlns="http://maven.apache.org/POM/4.0.0" xmlns:xsi="http://www.w3.org/2001/XMLSchema-instance"

    xsi:schemaLocation="http://maven.apache.org/POM/4.0.0 http://maven.apache.org/xsd/maven-4.0.0.xsd">

    <modelVersion>4.0.</modelVersion>

    <groupId>cm.test.cn</groupId>

    <artifactId>springboot-test</artifactId>

    <version>0.0.-SNAPSHOT</version>

    <packaging>jar</packaging>

    <name>springboot-test</name>

    <description>Demo project for Spring Boot</description>

    <parent>

        <groupId>org.springframework.boot</groupId>

        <artifactId>spring-boot-starter-parent</artifactId>

        <version>1.5..RELEASE</version>

        <relativePath/> <!-- lookup parent from repository -->

    </parent>

    <properties>

        <project.build.sourceEncoding>UTF-</project.build.sourceEncoding>

        <project.reporting.outputEncoding>UTF-</project.reporting.outputEncoding>

        <java.version>1.8</java.version>

    </properties>

    <dependencies>

         <!--引入springboot-starter核心Spring Boot starter,包括自动配置支持,日志和YAML-->

        <dependency>

            <groupId>org.springframework.boot</groupId>

            <artifactId>spring-boot-starter</artifactId>

        </dependency>

        <!--对web应用支持-->

        <dependency>

            <groupId>org.springframework.boot</groupId>

            <artifactId>spring-boot-starter-web</artifactId>

        </dependency>

         <!--测试使用-->

        <dependency>

            <groupId>org.springframework.boot</groupId>

            <artifactId>spring-boot-starter-test</artifactId>

            <scope>test</scope>

        </dependency>

    </dependencies>

      <!--maven插件-->

    <build>

        <plugins>

            <plugin>

                <groupId>org.springframework.boot</groupId>

                <artifactId>spring-boot-maven-plugin</artifactId>

            </plugin>

        </plugins>

    </build>

</project>
4、编写启动类(注意启动类一般放在包的最外包)因为启动类只会扫描本报子包,同级包中的信息不然会报错
package cm.test.cn;

import org.springframework.boot.SpringApplication;

import org.springframework.boot.autoconfigure.SpringBootApplication;

@SpringBootApplication

public class SpringbootTestApplication {

    public static void main(String[] args) {

        SpringApplication.run(SpringbootTestApplication.class, args);

    }

}
5、编写controller
package cm.test.cn.controller;

import org.springframework.boot.SpringApplication;

import org.springframework.boot.autoconfigure.EnableAutoConfiguration;

import org.springframework.stereotype.Controller;

import org.springframework.web.bind.annotation.RequestMapping;

import org.springframework.web.bind.annotation.ResponseBody;

import org.springframework.web.bind.annotation.RestController;

@RestController

@EnableAutoConfiguration

public class SampleController {

    @RequestMapping("/hello")

    public String home() {

        return "Hello World!";

    }

}
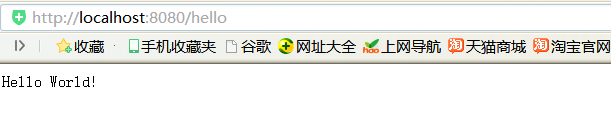
此时我们启动,这个启动类并在浏览器窗口访问如下图所示一个简单的hello,world就完成了,很简单吧!
项目已上传码云:https://gitee.com/wuhongpu/springboot-test.git
springboot-helloworld的更多相关文章
- spring boot 初试,springboot入门,springboot helloworld例子
因为项目中使用了spring boot ,之前没接触过,所以写个helloworld玩玩看,当做springboot的一个入门例子.搜索 spring boot.得到官方地址:http://proje ...
- SpringBoot——HelloWorld
微服务和单体应用的宏观理解 微服务:一组小型应用通过HTTP的方式进行沟通的开发思想 单体应用:ALL IN ONE 单体应用的不足: 随着业务逻辑的不断更新和迭代开发,起初的小型应用会不断膨胀,当应 ...
- Springboot helloworld入门最经典例子
一.建立maven java项目 导入springboot包 二.配置pom.xml <project xmlns="http://maven.apache.org/POM/4.0.0 ...
- 2.SpringBoot HelloWorld详解
1.POM文件 父项目 <parent> <groupId>org.springframework.boot</groupId> <artifactId> ...
- 五、SpringBoot—HelloWorld案例
弱弱的补充一下啊,,,上一讲如果个别同学创建完项目之后发现项目pom.xml文件或者项目其他地方报错,你可以安装下图操作: HelloWorld案例: 编写好之后启动项目(贼姬霸简单) 启动成功: 浏 ...
- SpringBoot — HelloWorld开发部署
springboot官方推荐使用jdk1.8 一.配置pom.xml 二.Application.java 三.HelloController.java 四.项目运行: Application.jav ...
- SpringBoot学习之Helloworld
1. 如果使用Spring开发一个"HelloWorld"的web应用 创建一个web项目并且导入相关jar包.SpringMVC Servlet 创建一个web.xml 编写一个 ...
- SpringBoot的 HelloWorld
SpringBoot HelloWorld 功能需求 浏览器发送hello请求,服务器接收请求并处理,相应HelloWorld字符串 1.创建一个maven工程:(jar) 2.导入SpringB ...
- SpringData 基于SpringBoot快速入门
SpringData 基于SpringBoot快速入门 本章通过学习SpringData 和SpringBoot 相关知识将面向服务架构(SOA)的单点登录系统(SSO)需要的代码实现.这样可以从实战 ...
- springboot-01 helloworld
第一个springboot程序 新建maven项目,添加如下依赖: <?xml version="1.0" encoding="UTF-8"?> & ...
随机推荐
- C++指针的用法
在学习C++或者是C语言时难免会动态分配内存,这时你便要使用到指针.这里以C++为例,讲一下使用指针的注意事项: 比如说,Dog dog = new Dog(),这么一句语句系统就会为你分配内存.当然 ...
- LeetCode 617. Merge Two Binary Tree (合并两个二叉树)
Given two binary trees and imagine that when you put one of them to cover the other, some nodes of t ...
- 从入门到放弃之IO
浅说IO 学到现在利用过的特殊符号不少组合起来很多都有让人眼前一亮的用法,在这里先聊聊I/O的一些相关知识. 本文开始之前先介绍一下需要知道的一些小知识和需要注意的地方. 在linux中也是有优先级的 ...
- python matplotlib 图表局部放大
import matplotlib.pyplot as plt from mpl_toolkits.axes_grid1.inset_locator import zoomed_inset_axes ...
- nvm进行node多版本管理
写在前面 nvm(nodejs version manager)是nodejs的管理工具,如果你需要快速更新node版本,并且不覆盖之前的版本:或者想要在不同的node版本之间进行切换: 使用nvm来 ...
- 【深度学习系列】手写数字识别卷积神经--卷积神经网络CNN原理详解(一)
上篇文章我们给出了用paddlepaddle来做手写数字识别的示例,并对网络结构进行到了调整,提高了识别的精度.有的同学表示不是很理解原理,为什么传统的机器学习算法,简单的神经网络(如多层感知机)都可 ...
- Java 数据结构与算法分析学习
由于之前面试android的时候考到了很多关于java的知识,所以这次重温数据结构知识就打算用java来学习,毕竟android是以java为基础的,而且我现在学习的j2ee架构也是以java为基础的 ...
- (转)linux下如何批量杀JAVA进程或某个进程方法
在工作中经常需要停止JAVA进程,停止时间也比较长,那么有时候因为一些情况,需要把 linux 下JAVA所有进程 kill 掉,又不能用killall 直接杀掉某一进程名称包含的所有运行中进程(我们 ...
- (转)Spark性能优化:资源调优篇
在开发完Spark作业之后,就该为作业配置合适的资源了.Spark的资源参数,基本都可以在spark-submit命令中作为参数设置.很多Spark初学者,通常不知道该设置哪些必要的参数,以及如何 ...
- Python Web框架篇:Django文件上传
上传方式: - Form表单上传文件 - Ajax上传文件 - 基于form表单和iframe自己实现ajax请求 1,创建项目 2,settings配置(注册app01,static路径等等这些)及 ...