
在windows上搭建镜像yum站的方法(附bat脚本)
方法一:支持rsync的网站
对于常用的centos、Ubuntu、等使用官方yum源在 http://mirrors.ustc.edu.cn 都存在镜像。
同时 http://mirrors.ustc.edu.cn 网站又支持 rsync 协议, 可以通过rsync实现 镜像yum源。
 _______________________________________________________________

|         University of Science and Technology of China         |

|           Open Source Mirror  (mirrors.ustc.edu.cn)           |

|===============================================================|

|                                                               |

| Debian primary mirror in China mainland (ftp.cn.debian.org),  |

|     also mirroring a great many OSS projects & Linux distros. |

|                                                               |

| Currently we don't limit speed. To prevent overload, Each IP  |

| is only allowed to start upto 2 concurrent rsync connections. |

|                                                               |

| This site also provides http/https/ftp access.                |

|                                                               |

| Supported by USTC Network Information Center                  |

|          and USTC Linux User Group (http://lug.ustc.edu.cn/). |

|                                                               |

|    Sync Status:  https://mirrors.ustc.edu.cn/status/          |

|           News:  https://servers.ustclug.org/                 |

|        Contact:  lug@ustc.edu.cn                              |

|                                                               |

|_______________________________________________________________|
在windows上使用rsync需要用到 cwRsync 下载地址是 https://www.itefix.net/dl/cwRsync_5.5.0_x86_Free.zip;
其官网为 https://www.itefix.net/cwrsync
使用rsync的时候需要编写脚本,设置要同步的内容

其中centos7_base.bat脚本内容 供大家参考:
@echo off

SETLOCAL

SET CWRSYNCHOME=%~dp0

IF NOT EXIST %CWRSYNCHOME%home\%USERNAME%\.ssh MKDIR  %CWRSYNCHOME%home\%USERNAME%\.ssh

SET CWOLDPATH=%PATH%

SET PATH=%CWRSYNCHOME%bin;%PATH%

rsync  -av --delete rsync://mirrors.ustc.edu.cn/centos/7/os/x86_64/    /cygdrive/f/yum/nginx/html/centos/7/os/x86_64/
方法二:使用wget命令下载不支持rsync协议的源
由于线上跑的系统还有CentOS5.4、6.4、6.5、6.5、6.6、6.8,而各镜像站维护的最早的版本已经是6.9,所以需要爬archive站点的rpm包来自建yum仓库。

# wget -r -p -np -k http://archives.fedoraproject.org/pub/archive/epel/5Server/x86_64/

# wget -r -p -np -k http://archives.fedoraproject.org/pub/epel/6Server/x86_64/

-c, --continue resume getting a partially-downloaded file. 断点续传

-nd, --no-directories don't create directories. 不创建层级目录,所有文件下载到当前目录

-r, --recursive specify recursive download. 递归下载

-p, --page-requisites get all images, etc. needed to display HTML page.

下载页面所有文件,使页面能在本地打开

-k, --convert-links make links in downloaded HTML or CSS point to local files.

转换链接指向本地文件

-np, --no-parent don't ascend to the parent directory. 不下载父级目录的文件

-o, --output-file=FILE log messages to FILE. 指定日志输出文件

-O, --output-document=FILE write documents to FILE. 指定文件下载位置

-L, --relative follow relative links only. 只下载相对链接,如果页面嵌入其他站点不会被下载
windows上wget命令使用方法
下载:http://downloads.sourceforge.net/gnuwin32/wget-1.11.4-1-setup.exe
官网:http://gnuwin32.sourceforge.net/packages/wget.htm
安装
双击即可安装,安装到目录:D:\GnuWin32

修改环境变量
右键计算机 -> 属性 -> 高级系统设置 -> 环境变量 -> 系统变量 GNU_HOME=D:\GnuWin32\bin
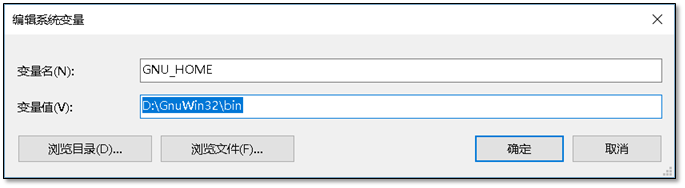
添加path变量,在cmd中可以使用wget命令。 PATH=;%GNU_HOME%

c:\>wget -V

SYSTEM_WGETRC = c:/progra~1/wget/etc/wgetrc

syswgetrc = D:\GnuWin32/etc/wgetrc

GNU Wget 1.11.4

Copyright (C) 2008 Free Software Foundation, Inc.

License GPLv3+: GNU GPL version 3 or later

<http://www.gnu.org/licenses/gpl.html>.

This is free software: you are free to change and redistribute it.

There is NO WARRANTY, to the extent permitted by law.

最初由 Hrvoje Niksic <hniksic@xemacs.org> 编写。

Currently maintained by Micah Cowan <micah@cowan.name>.
提供web服务
同时提供web服务需要用到nginx
nginx 下载 页面 http://nginx.org/en/download.html
附:nginx 配置文件
worker_processes  1;

events {

    worker_connections  1024;

}

http {

    include       mime.types;

    default_type  application/octet-stream;

    sendfile        on;

    keepalive_timeout  65;

    server {

        listen       80;

        server_name  localhost;

        location / {

            autoindex  on;

            root   html;

            index  index.html index.htm;

        }

    }

    server {

        listen       80;

        server_name  repo.zabbix.com;

        location / {

            autoindex  on;

            root   html/zabbix;

            index  index.html index.htm;

        }

    }

    server {

        listen       80;

        server_name  sp.repo.webtatic.com mirror.webtatic.com;

        location / {

            autoindex  on;

            root   html/webtatic;

            index  index.html index.htm;

        }

    }

}
最后使用浏览器访问
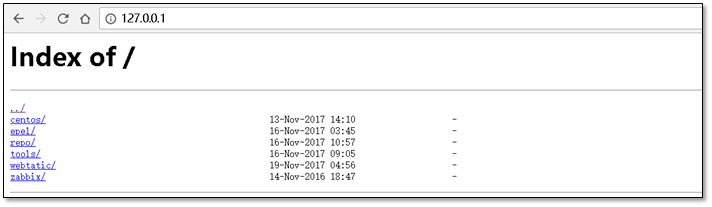
在linux服务器中设置解析
[root@m01 ~]# cat /etc/hosts

127.0.0.1    localhost localhost.localdomain localhost4 localhost4.localdomain4

::1          localhost localhost.localdomain localhost6 localhost6.localdomain6

10.0.0.1     mirrors.aliyuncs.com mirrors.aliyun.com repo.zabbix.com
附件:
附件1、 cwrsync + 全部 bat 脚本 https://files.cnblogs.com/files/clsn/cwRsync.rar
附件2、 nginx + 配置文件 https://files.cnblogs.com/files/clsn/nginx.zip
特别感谢:国强哥提供wget命令使用
此文章出自惨绿少年,转载请注明
在windows上搭建镜像yum站的方法(附bat脚本)的更多相关文章
- 在windows上搭建镜像yum站的方法
在windows上搭建镜像yum站的方法(附bat脚本) 分类: 运维基本功,其他 方法一:支持rsync的网站 对于常用的centos.Ubuntu.等使用官方yum源在 http://mi ...
- 在linux上搭建本地yum源
准备yum仓库的光盘镜像IOS文件: 设置光驱加载本地磁盘的yum仓库的光盘镜像文件: 在linux的命令行输入setup命令打开设置窗口,选择"System Service": ...
- 如何在Windows上搭建Android开发环境
Android开发越来越火,许多小伙伴们纷纷学习Android开发,学习Android开发首要任务是搭建Android开发环境,由于大家 主要实在Windows 上开发Android,下面就详细给大家 ...
- 在Windows上搭建PhoneGAP(crodova)的开发环境
PhoneGAP是一个可以将web应用打包成移动应用的开源框架,使用它可以迅速的将HTML.CSS和JavaScript开发的web应用打包成跨平台的移动应用程序,而Apache Cordova是Ph ...
- Windows上搭建远程访问服务
Windows上搭建远程访问服务 转自:https://blog.51cto.com/13871378/2153308?source=dra 概述:允许客户机通过拨号连接或虚拟专用网连接到公司局域网, ...
- 在windows上搭建git server Gitblit
在Windows上搭建Git Server 第1步:下载Java并安装Java.我这里下载的是jdk1.7.0_79 第2步:配置Java环境变量 右键” 计算机” => ”属性” => ...
- Windows上搭建Flume运行环境
1.如果没有安装过Java环境,则需首先安装JDK. 可参考<Windows上搭建Kafka运行环境>中的搭建环境安装JDK部分 2.官方下载Flume(当前为apache-flume-1 ...
- (转)Windows上搭建Kafka运行环境
转自:<Windows上搭建Kafka运行环境> 完整解决方案请参考: Setting Up and Running Apache Kafka on Windows OS 在环境搭建过 ...
- [转]Windows上搭建Kafka运行环境
[转]http://www.cnblogs.com/alvingofast/p/kafka_deployment_on_windows.html Windows上搭建Kafka运行环境 完整解决方 ...
随机推荐
- JAVA提高三:反射总结
为前期学习过反射,再这里再次复习总结下:[转载请说明来源:http://www.cnblogs.com/pony1223/p/7659210.html ] 一.透彻分析反射的基础_Class类 Cla ...
- win10 uwp 反射
本文在h神的指导下完成. 反射是强大的好用的,我们可以添加新功能不修改之前的代码,通过使用反射得到. 本文下面和大家说如何做一个和WPF一样的反射功能,如何才能获的 UWP 程序集所有类. 先来说下反 ...
- LDAP服务部署
1.安装基本环境 # yum -y install openldap openldap-devel openldap-servers openldap-clients 2.配置LDAP服务端 (1)拷 ...
- 整理一批 国内外优秀设计团队 & 设计相关网站
设计做不好,因为看得少!这里精心整理了一批国内外优秀设计团队的官网,以及同设计相关的网站.每个网站,我都浏览了一下,确保里面真的是有干货,并且保持一定的频率正常更新. [腾讯] 腾讯社交用户体验设计 ...
- ThreadPoolExecutor系列<一、ThreadPoolExecutor 机制>
本文系作者原创,转载请注明出处:http://www.cnblogs.com/further-further-further/p/7681529.html 解决问题: 1. 处理大量异步任务时能减少每 ...
- zookeeper 笔记-机制的特点
zookeeper的getData(),getChildren()和exists()方法都可以注册watcher监听.而监听有以下几个特性: 一次性触发(one-time trigger) 当数据改变 ...
- javascript 之异常处理try catch finally--05
语法结构 try catch finally是ECMAScript-262 第三版提供异常处理机制的标准,语法结构如下: try{ //可能会发生的错误代码 } catch(error){ //错误处 ...
- Xcode9 FFmpeg冲突问题
升级Xcode9之后,工程中FFmpeg中的avutil.h下的AVMediaType与系统的AVFoundation框架冲突了. 报错信息:Typedef 'AVMediaType' cannot ...
- JS的简单用法
JS的简单用法 参考:http://www.w3school.com.cn/js/js_switch.asp JavaScript 是网络的脚本语言 JavaScript 是可插入 HTML 页面的编 ...
- java笔记02
一,编写一个方法,使用以上算法生成指定数目(比如1000个)的随机整数 /** * */ package 课堂2; import java.util.Random; /** * @author 信16 ...