jenkins+springboot+maven多模块部署
一.jenkins的安装配置
1.去官网下载war包,这种方式比较简单方便
java -jar jenkins.war --httpPort=49001
2.首次运行有一个key放在服务器上需要你填入才能进入,同时需要配置账号密码
3.如果没有被墙的话,最好把推荐的包都装上
manage jenkin-》plugin manager-》git,mavne,publish over ssh 这三个插件装上
因为整个流程最要就是用到这三个插件
git获取代码
maven自动构建
publish over ssh通过ssh传送文件以及ssh去运行脚本
------------------------------------------------------------------
advanced里面
http proxy onfiguration 什么都不要填,填了就会出错
如果被墙
uodate site 换成http://mirror.xmission.com/jenkins/updates/update-center.json
然后check now 看看行不行,之前是因为填了代理,所以一直不行
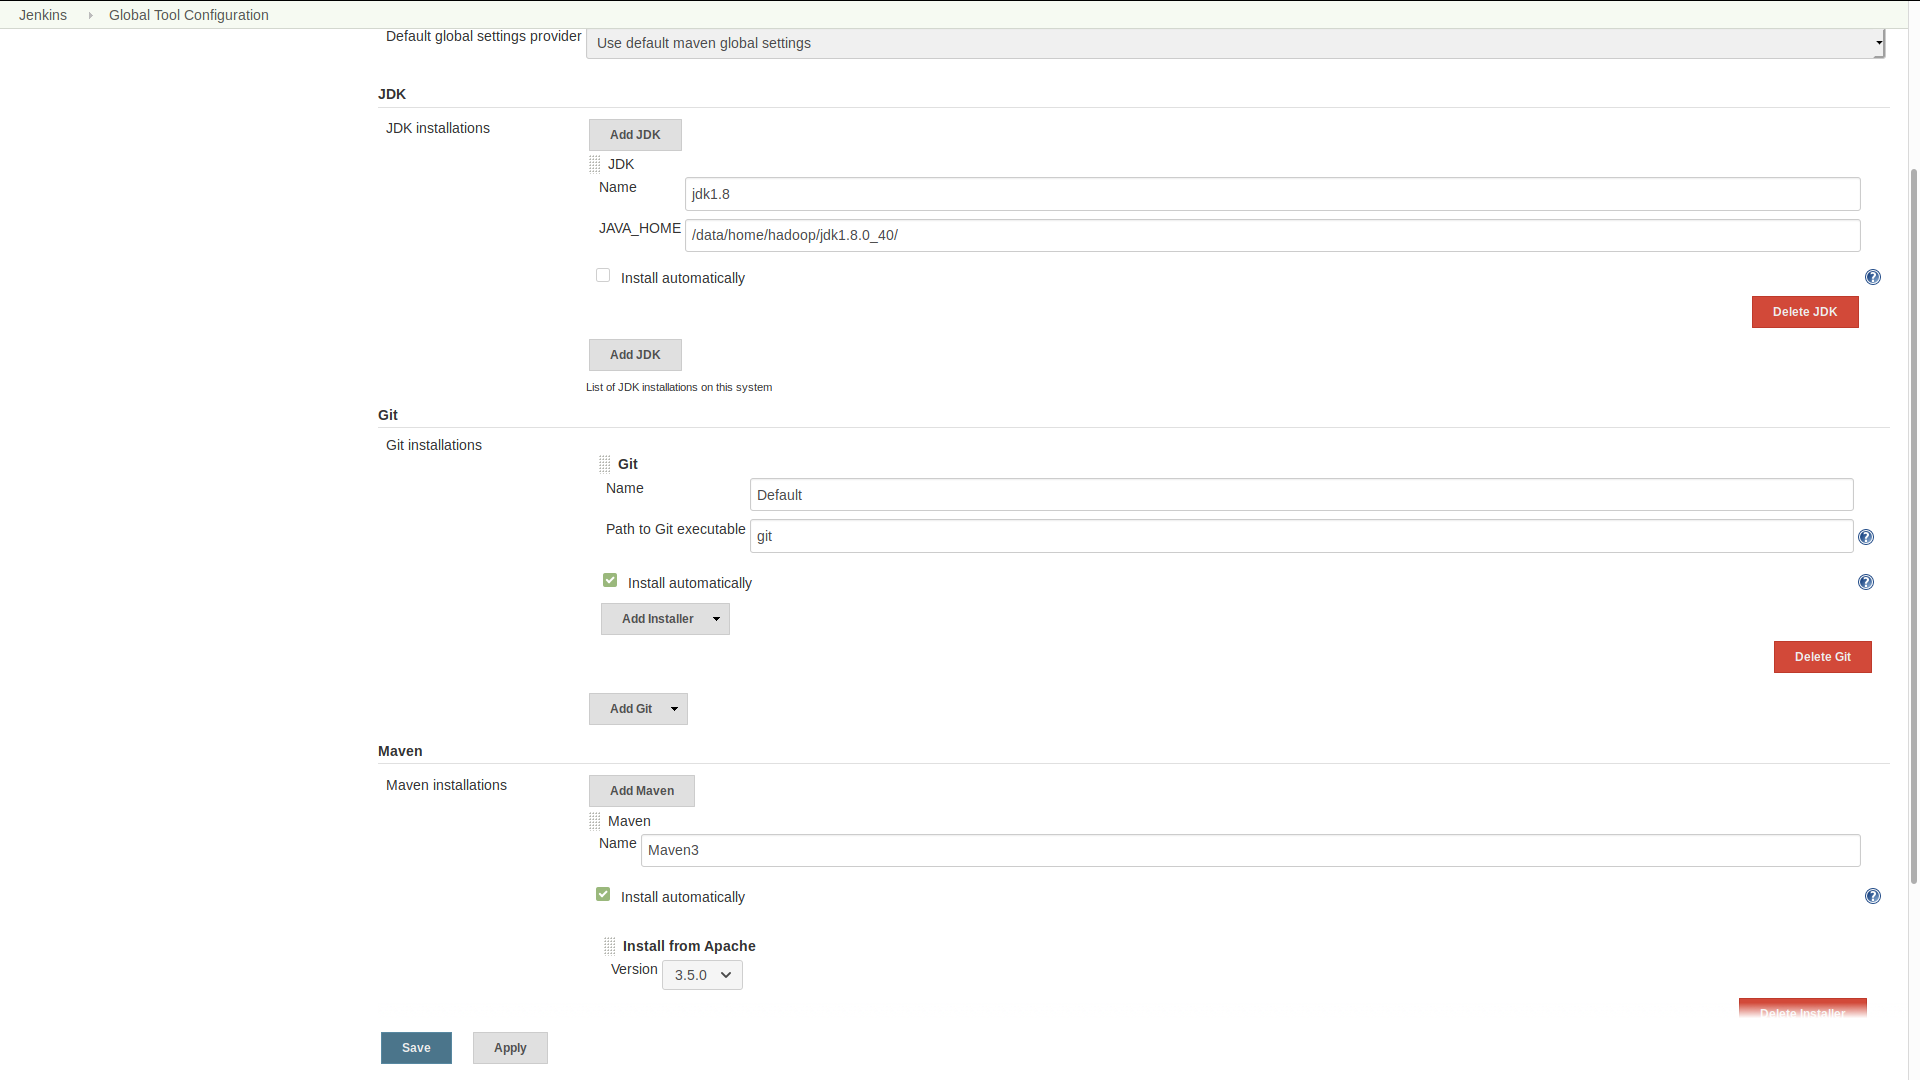
4 manage jenkin-》global tool configuration
jdk配本地的位置
maven和git就勾选自动安装就可以,然后save
5 configure system
填上git pluging github的的相关
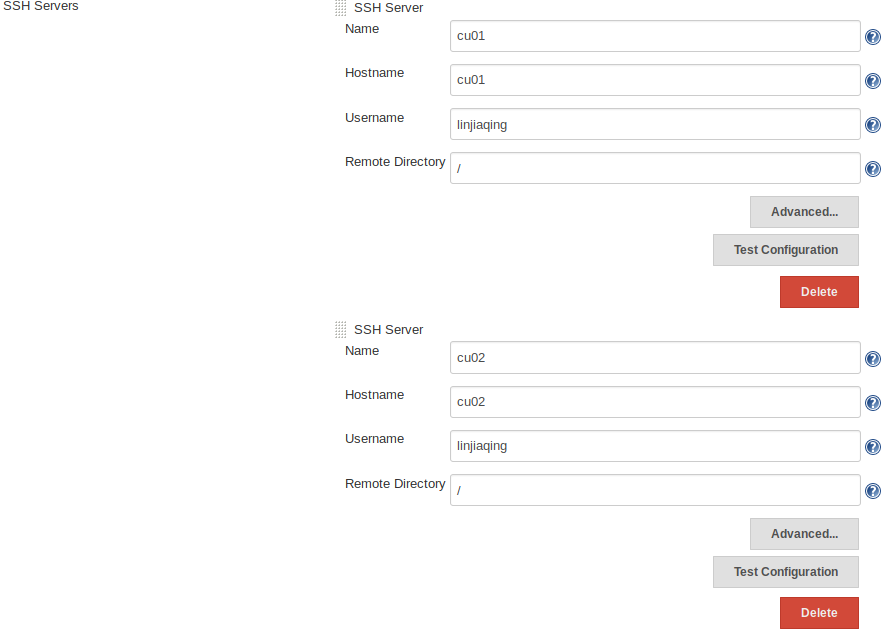
Publish over ssh
passphrase ssh时的密码,
或者不填这个填ssh的key
然后填ssh server,username是登上去的ssh账户哦, remote directory是远程主机可见的所有路径
二 新建项目
jenkintest
里面有一个module叫做client,除了.idea,gitignore,pom.xml,其他全都可以删掉。。idea只是为了维持目前的idea项目架构而已,git的时候也不需要
gitignore文件
### IntelliJ IDEA ###

.idea

*.iws

*.iml

*.ipr

*mvnw

*mvnw.cmd

*HELP.md

*.mvn
这样就把所有模块的都拿掉了
jenkin的pom.xml
1.打包方式用pom,默认不填的话是jar
<packaging>pom</packaging>
2. build的插件用maven而不是springboot
    <build>

        <plugins>

            <plugin>

                <groupId>org.apache.maven.plugins</groupId>

                <artifactId>maven-compiler-plugin</artifactId>

                <configuration>

                    <source>${java.version}</source>

                    <target>${java.version}</target>

                    <!--<encoding>${project.build.sourceEncoding}</encoding>-->

                </configuration>

            </plugin>

        </plugins>

    </build>
3. 模块名写上
  <modules>

        <module>client</module>

    </modules>
<?xml version="1.0" encoding="UTF-8"?>

<project xmlns="http://maven.apache.org/POM/4.0.0" xmlns:xsi="http://www.w3.org/2001/XMLSchema-instance"

    xsi:schemaLocation="http://maven.apache.org/POM/4.0.0 http://maven.apache.org/xsd/maven-4.0.0.xsd">

    <modelVersion>4.0.</modelVersion>

    <parent>

        <groupId>org.springframework.boot</groupId>

        <artifactId>spring-boot-starter-parent</artifactId>

        <version>2.1..RELEASE</version>

        <relativePath/> <!-- lookup parent from repository -->

    </parent>

    <groupId>com.ljq</groupId>

    <artifactId>jenkintest</artifactId>

    <version>0.0.-SNAPSHOT</version>

    <name>jenkinTest</name>

    <packaging>pom</packaging>

    <description>Demo project for Spring Boot</description>

    <properties>

        <java.version>1.8</java.version>

        <spring-cloud.version>Greenwich.SR1</spring-cloud.version>

    </properties>

    <dependencies>

        <dependency>

            <groupId>org.springframework.boot</groupId>

            <artifactId>spring-boot-starter-web</artifactId>

        </dependency>

        <dependency>

            <groupId>org.springframework.cloud</groupId>

            <artifactId>spring-cloud-starter-netflix-eureka-client</artifactId>

        </dependency>

        <dependency>

            <groupId>org.springframework.boot</groupId>

            <artifactId>spring-boot-starter-test</artifactId>

            <scope>test</scope>

        </dependency>

    </dependencies>

    <modules>

        <module>client</module>

    </modules>

    <dependencyManagement>

        <dependencies>

            <dependency>

                <groupId>org.springframework.cloud</groupId>

                <artifactId>spring-cloud-dependencies</artifactId>

                <version>${spring-cloud.version}</version>

                <type>pom</type>

                <scope>import</scope>

            </dependency>

        </dependencies>

    </dependencyManagement>

    <build>

        <plugins>

            <plugin>

                <groupId>org.apache.maven.plugins</groupId>

                <artifactId>maven-compiler-plugin</artifactId>

                <configuration>

                    <source>${java.version}</source>

                    <target>${java.version}</target>

                    <!--<encoding>${project.build.sourceEncoding}</encoding>-->

                </configuration>

            </plugin>

        </plugins>

    </build>

    <!--<build>-->

        <!--<plugins>-->

            <!--<plugin>-->

                <!--<groupId>org.springframework.boot</groupId>-->

                <!--<artifactId>spring-boot-maven-plugin</artifactId>-->

            <!--</plugin>-->

        <!--</plugins>-->

    <!--</build>-->

</project>
4.子模块里的把parent从springboot换成父模块即可,这样就可以把所有的依赖都写在父模块的pom中,更加方便
<parent>
   <groupId>com.ljq</groupId>
   <artifactId>jenkintest</artifactId>
   <version>0.0.1-SNAPSHOT</version>
   <relativePath>../</relativePath>
</parent>
5.这样子之后mvn clean package是生成所有的子模块的jar包,父模块并不会生成
三 jenkin新建item
选择maven project, 然后ok,然后就可以填写configure
在第一次build之前没有workspace,workspace是用来存git下来的文件并在本地进行构建,workspace也可以删除
1 source code management
选择git
填上仓库地址
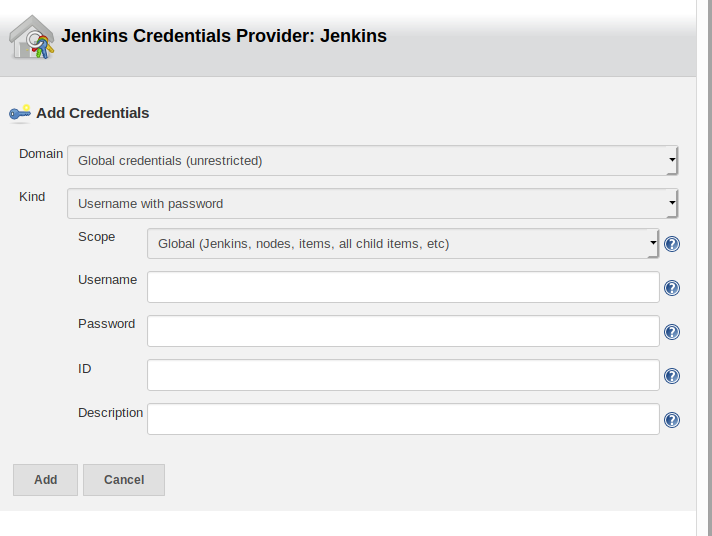
credentials -》 add jenkins 把 git的账号密码填上
credients就可以选择了,那个name ref什么的不用填写
2,。 build trigger
第一个选项是手动构建
第二个是利用url构建
Build periodically,定期构建
Poll SCM:定时检查源码变更(根据SCM软件的版本号),如果有更新就checkout最新code下来,然后执行构建动作
3.定时构建语法
* * * * *
(五颗星,中间用空格隔开)
第一颗*表示分钟,取值0~59
第二颗*表示小时,取值0~23
第三颗*表示一个月的第几天,取值1~31
第四颗*表示第几月,取值1~12
第五颗*表示一周中的第几天,取值0~7,其中0和7代表的都是周日
1.每30分钟构建一次:
H/30 * * * *
2.每2个小时构建一次
H H/2 * * *
3.每天早上8点构建一次
0 8 * * *
4.每天的8点,12点,22点,一天构建3次
0 8,12,22 * * *
(多个时间点,中间用逗号隔开)
4.build
跳过测试clean package -Dmaven.test.skip=True
5. 构建之后执行脚本
sourcefiles 就是你要传送的jar包,可以去workspace看位置
remove prefix 把sourcefile的前缀去掉,只剩jar包名字
remote directory: jar复制到远程机子上的位置

jenkins+springboot+maven多模块部署的更多相关文章
- jenkins+git+maven搭建自动化部署项目环境
简介 折腾了两个晚上,趁着今晚比较有空,把jenkins+git+maven搭建自动化部署项目环境搭建的过程记录一下,这里我把github作为git的远程仓库(https://github.co ...
- SpringBoot+Maven 多模块项目的构建、运行、打包
SpringBoot+Maven 多模块项目的构建.运行.打包 https://blog.csdn.net/zekeTao/article/details/79413919
- 解放双手 | Jenkins + gitlab + maven 自动打包部署项目
前言 记录 Jenkins + gitlab + maven 自动打包部署后端项目详细过程! 需求背景 不会偷懒的程序员不是好码农,传统的项目部署,有时候采用本地手动打包,再通过ssh传到服务器部署运 ...
- Jenkins构建Maven多模块项目时,单独编译子模块,并且不触发构建其它模块
一.Jenkins构建Maven多模块项目时,单独编译子模块 配置: 1.Root POM指向父pom.xml 2.Goals and options指定构建模块的参数:mvn -pl jsoft-w ...
- Jenkins+SVN+Maven+shell 自动化部署实践
JAVA环境中利用Jenkins+svn+maven进行自动化部署实践 一. 前言2 1.介绍jenkins2 1.本地项目打包2 2.通过secureCRT工具,手动传输到服务器2 3.然后 ...
- SpringBoot+Maven 多模块项目的构建、运行、打包实战
前言 最近在做一个很复杂的会员综合线下线上商城大型项目,单模块项目无法满足多人开发和架构,很多模块都是重复的就想到了把模块提出来,做成公共模块,基于maven的多模块项目,也好分工开发,也便于后期微服 ...
- Jenkins+Git+Maven构建并部署springboot(构建多模块中的单个模块)
主要思路:1.jenkins从git中拉取项目源码:jenkins使用maven构建并将生成的jar包通过shell脚本启动. 环境:环境:Centos7.Maven3.5.3.git(单机) 准备工 ...
- SpringBoot+Maven多模块项目(创建、依赖、打包可执行jar包部署测试)完整流程
一,创建Maven多模块项目先建立外层父工程 File →new →project 选择Spring Initializr Next下一步到以下页面 工程结构如下 ...
- Jenkins+Git+Maven构建并部署war包到tomcat
主要思路:1.jenkins从git中拉取项目源码:jenkins使用maven构建并将生成的war部署到tomcat容器下. 环境:Centos7.Maven3.5.3.git(单机) 安装Git ...
随机推荐
- cf1173 D. Nauuo and Circle
链接 [cf]http://codeforces.com/contest/1175/problem/F) 思路 当1在1的位置做dp[i]为i的子树所有的方案. 一条性质是i的子树所占圆上的位置一定一 ...
- Swagger-BootStrap-UI生成的接口文档如何加Basic校验
首先我们来看看swagger-bootstrap-ui的效果,如图所示: 看起来是不是比Swagger要大气的多. 回到重点上,为什么要给接口文档加密呢? 只对内开放,不对外开放,防止被第三方非公司人 ...
- Segment fault 常见原因
[https://blog.csdn.net/qq_22238021/article/details/79872978] 本质原因在于:程序访问了非法的地址 1.引用空指针 2.野指针 3.访问越界 ...
- sqlserver cdc用法
SELECT top(10) * from (SELECT sys.fn_cdc_map_lsn_to_time([__$start_lsn]) 'addtime',* FROM cdc.dbo ...
- mac opencv 提示摄像头权限问题
通常在iOS开发下,我们的app需要在Info.plist文件中配置所需要的各种限制:如摄像头权限: 本次我们在mac下创建了一个command line 程序,并且设定是c++开发,并配置了open ...
- Spring boot与Spring cloud之间的关系
Spring boot 是 Spring 的一套快速配置脚手架,可以基于spring boot 快速开发单个微服务,Spring Boot,看名字就知道是Spring的引导,就是用于启动Spring的 ...
- odoo开发笔记 -- odoo权限管理
odoo框架 整体权限可以分为4个级别: (1) 菜单级别: 不属于指定菜单所包含组的用,看不到相应菜单.不安全,只是隐藏菜单,若用户知道菜单ID,仍然可以通过指定URL访问(2) 对象级别: 对某个 ...
- (转)Ngx_Lua使用分享
原文:https://www.cnblogs.com/yanzi-meng/p/9450999.html ngx_lua 模块详细讲解(基于openresty)---https://www.cnblo ...
- fashion MNIST识别(Tensorflow + Keras + NN)
Fashion MNIST https://www.kaggle.com/zalando-research/fashionmnist Fashion-MNIST is a dataset of Zal ...
- 对step文件进行信息抽取算法
任务描述:给定一个step文件,对该文件的字符串进行信息抽取,结构化的组织文件描述模型的数据.形成抽象化数据结构,存入计算机数据库.并能按照有条理结构把这些数据展示出来. 信息抽取的结果描述: 1 数 ...