智能指针unique_ptr
转自:https://www.cnblogs.com/DswCnblog/p/5628195.html
成员函数
(1) get 获得内部对象的指针, 由于已经重载了()方法, 因此和直接使用对象是一样的.如 unique_ptr<int> sp(new int(1)); sp 与 sp.get()是等价的
(2) release 放弃内部对象的所有权,将内部指针置为空, 返回所内部对象的指针, 此指针需要手动释放
(3) reset 销毁内部对象并接受新的对象的所有权(如果使用缺省参数的话,也就是没有任何对象的所有权, 此时仅将内部对象释放, 并置为空)
(4) swap 交换两个 shared_ptr 对象(即交换所拥有的对象) std::move(up) 所有权转移(通过移动语义), up所有权转移后,变成“空指针” (up 的定义为 std::unique_ptr<Ty> up)
unique_ptr 不支持拷贝和赋值.
std::unique_ptr<A> up1(new A(5));
std::unique_ptr<A> up2(up1); // 错误, unique_ptr 不支持拷贝
std::unique_ptr<A> up2 = up1; // 错误, unique_ptr 不支持赋值
虽然 unique_ptr 不支持拷贝和赋值, 但是我们可以调用 release 或 reset 将指针的所有权从一个(非 const) unique_ptr 转移到另一个.
std::unique_ptr<int> up1(new int(1));
std::unique_ptr<int> up2(up1.release());
虽然 unique_ptr 不支持拷贝, 但是可以从函数中返回, 甚至返回局部对象. 如下面的代码, 编译器知道要返回的对象即将被销毁, 因此执行一种特殊的"拷贝":
template <class Ty>
std::unique_ptr<Ty> Clone(const Ty& obj)
{ return std::unique_ptr<Ty>(new Ty(obj)); }
template <class Ty>
std::unique_ptr<Ty> Clone(const Ty& obj)
{ std::unique_ptr<Ty> temp = std::unique_ptr<Ty>(new Ty(obj)); return temp; }
unique_ptr 不共享它的指针。它无法复制到其他 unique_ptr,无法通过值传递到函数,也无法用于需要副本的任何标准模板库 (STL) 算法。只能移动unique_ptr。这意味着,内存资源所有权将转移到另一 unique_ptr,并且原始 unique_ptr 不再拥有此资源。我们建议你将对象限制为由一个所有者所有,因为多个所有权会使程序逻辑变得复杂。因此,当需要智能指针用于纯 C++ 对象时,可使用 unique_ptr,而当构造 unique_ptr 时,可使用make_unique Helper 函数。
std::unique_ptr实现了独享所有权的语义。一个非空的std::unique_ptr总是拥有它所指向的资源。转移一个std::unique_ptr将会把所有权也从源指针转移给目标指针(源指针被置空)。拷贝一个std::unique_ptr将不被允许,因为如果你拷贝一个std::unique_ptr,那么拷贝结束后,这两个std::unique_ptr都会指向相同的资源,它们都认为自己拥有这块资源(所以都会企图释放)。因此std::unique_ptr是一个仅能移动(move_only)的类型。当指针析构时,它所拥有的资源也被销毁。默认情况下,资源的析构是伴随着调用std::unique_ptr内部的原始指针的delete操作的。
下图演示了两个 unique_ptr 实例之间的所有权转换。

1、如何创建unique_ptr
unique_ptr不像shared_ptr一样拥有标准库函数make_shared来创建一个shared_ptr实例。要想创建一个unique_ptr,我们需要将一个new 操作符返回的指针传递给unique_ptr的构造函数。
示例:

int main()

{

    // 创建一个unique_ptr实例

    unique_ptr<int> pInt(new int(5));

    cout << *pInt;

}
2、无法进行复制构造和赋值操作
unique_ptr没有copy构造函数,不支持普通的拷贝和赋值操作。
int main()

{

    // 创建一个unique_ptr实例

    unique_ptr<int> pInt(new int(5));

    unique_ptr<int> pInt2(pInt);    // 报错

    unique_ptr<int> pInt3 = pInt;   // 报错

}
3、可以进行移动构造和移动赋值操作
unique_ptr虽然没有支持普通的拷贝和赋值操作,但却提供了一种移动机制来将指针的所有权从一个unique_ptr转移给另一个unique_ptr。如果需要转移所有权,可以使用std::move()函数。
示例:
int main()

{

    unique_ptr<int> pInt(new int(5));

    unique_ptr<int> pInt2 = std::move(pInt);    // 转移所有权

    //cout << *pInt << endl; // 出错,pInt为空

    cout << *pInt2 << endl;

    unique_ptr<int> pInt3(std::move(pInt2));

}
4、可以返回unique_ptr
unique_ptr不支持拷贝操作,但却有一个例外:可以从函数中返回一个unique_ptr。
示例:
unique_ptr<int> clone(int p)

{

    unique_ptr<int> pInt(new int(p));

    return pInt;    // 返回unique_ptr

}

int main() {

    int p = 5;

    unique_ptr<int> ret = clone(p);

    cout << *ret << endl;

}
使用举例:

    {

        //创建一个指向int的空指针

        std::unique_ptr<int> fPtr1;

        std::unique_ptr<int> fPtr2(new int(4));

        auto fPtr3 = std::make_unique<int>();

        //fPtr2释放指向对象的所有权,并且被置为nullptr

        std::cout << "fPtr2 release before:" << fPtr2.get() << std::endl;

        int *pF = fPtr2.release();

        std::cout << "fPtr2 release before:" << fPtr2.get() << " and pF value:" << *pF << std::endl;

        //所有权转移,转移后fPtr3变为空指针

        std::cout << "move before fPtr1 address:" << fPtr1.get() << " fPtr3 address:" << fPtr3.get() << std::endl;

        fPtr1 = std::move(fPtr3);

        std::cout << "move after  fPtr1 address:" << fPtr1.get() << " fPtr3 address:" << fPtr3.get() << std::endl;

        std::cout << "move before fPtr1 address:" << fPtr1.get() << std::endl;

        fPtr1.reset();

        std::cout << "move after  fPtr1 address:" << fPtr1.get() << std::endl;

    }

输出:

  fPtr2 release before:00EFB120

  fPtr2 release before:00000000 and pF value:4

  move before fPtr1 address:00000000 fPtr3 address:00EFEC60

  move after fPtr1 address:00EFEC60 fPtr3 address:00000000

  move before fPtr1 address:00EFEC60

  move after fPtr1 address:
unique_ptr使用场景
1、为动态申请的资源提供异常安全保证
我们先来看看下面这一段代码:
void Func()

{

    int *p = new int(5);

    // ...(可能会抛出异常)

    delete p;

}
这是我们传统的写法:当我们动态申请内存后,有可能我们接下来的代码由于抛出异常或者提前退出(if语句)而没有执行delete操作。
解决的方法是使用unique_ptr来管理动态内存,只要unique_ptr指针创建成功,其析构函数都会被调用。确保动态资源被释放。
void Func()

{

    unique_ptr<int> p(new int(5));

    // ...(可能会抛出异常)

}
2、返回函数内动态申请资源的所有权
unique_ptr<int> Func(int p)

{

    unique_ptr<int> pInt(new int(p));

    return pInt;    // 返回unique_ptr

}

int main() {

    int p = 5;

    unique_ptr<int> ret = Func(p);

    cout << *ret << endl;

    // 函数结束后,自动释放资源

}
3、在容器中保存指针
int main()

{

    vector<unique_ptr<int>> vec;

    unique_ptr<int> p(new int(5));

    vec.push_back(std::move(p));    // 使用移动语义

}
4、管理动态数组
标准库提供了一个可以管理动态数组的unique_ptr版本。
int main()

{

    unique_ptr<int[]> p(new int[5] {1, 2, 3, 4, 5});

    p[0] = 0;   // 重载了operator[]

}
5、作为auto_ptr的替代品
创建与释放举例
#include <iostream>

#include <memory>

#include <stdlib.h>

struct Foo

{

    Foo() { std::cout << "Foo::Foo\n"; }

    ~Foo() { std::cout << "Foo::~Foo\n"; }

    void bar() { std::cout << "Foo::bar\n"; }

};

void f(const Foo &)

{

    std::cout << "f(const Foo&)\n";

}

struct D

{

    void operator()(Foo* foo)

    {

        std::cout << "D operator()" << std::endl;

        delete foo;

    }

};

void TestAutoDestroy()

{

    //1. 普通的new对象.

    std::cout << "TestDestroy...................." << std::endl;

    {

        std::unique_ptr<Foo> p1(new Foo);

    }

    //2. 普通的new[]对象.

    {

        std::unique_ptr<Foo[]> p2(new Foo[4]);

    }

    //3. 自定义的deleter.

    {

        std::unique_ptr<Foo, D> p3(new Foo);

    }

}

void TestOwner()

{

    std::cout << "TestOwner...................." << std::endl;

    //1. new object.

    std::unique_ptr<Foo> p1(new Foo);  // p1 owns Foo

    if (p1) p1->bar();

    {

        std::unique_ptr<Foo> p2(std::move(p1));  // now p2 owns Foo

        f(*p2);

        p1 = std::move(p2);  // ownership returns to p1

        p2->bar();

        std::cout << "destroying p2...\n";

    }

    p1->bar();

}

void TestArrayOwner()

{

    std::cout << "TestArrayOwner...................." << std::endl;

    //1. new[] object.

    std::unique_ptr<Foo[]> p1(new Foo[4]);  // p1 owns Foo

    if (p1) p1[0].bar();

    {

        std::unique_ptr<Foo[]> p2(std::move(p1));  // now p2 owns Foo

        f(p2[0]);

        p1 = std::move(p2);  // ownership returns to p1

        p2[0].bar();

        std::cout << "destroying p2...\n";

    }

    p1[0].bar();

}

int main()

{

    TestAutoDestroy();

    TestOwner();

    TestArrayOwner();

}
输出:
TestDestroy....................

Foo::Foo

Foo::~Foo

Foo::Foo

Foo::Foo

Foo::Foo

Foo::Foo

Foo::~Foo

Foo::~Foo

Foo::~Foo

Foo::~Foo

Foo::Foo

D operator()

Foo::~Foo

TestOwner....................

Foo::Foo

Foo::bar

f(const Foo&)

Foo::bar

destroying p2...

Foo::bar

Foo::~Foo

TestArrayOwner....................

Foo::Foo

Foo::Foo

Foo::Foo

Foo::Foo

Foo::bar

f(const Foo&)

Foo::bar

destroying p2...

Foo::bar

Foo::~Foo

Foo::~Foo

Foo::~Foo

Foo::~Foo
一下原文:https://www.cnblogs.com/wangkeqin/p/9383658.html
一个unique_ptr"拥有“他所指向的对象。与shared_ptr不同,某个时刻只能有一个unique_ptr指向一个给定的对象。当unique_ptr被销毁时,它所指向的对象也被销毁。uniptr_ptr表达的是一种独占的思想。
初始化
#include <iostream>

#include <memory>

using namespace std;

//常规操作

int main(int argc, char *argv[])

{

    unique_ptr<double> p1;               //!可指向一个double的unique_ptr

    unique_ptr<int> p2(new int(56));     //!p2指向了一个值为42的int

    unique_ptr<string> pstr(new string("strtest"));

//    unique_ptr<string> pstrCopy(pstr); //!error: 不支持对象的拷贝

    unique_ptr<string> pstrAssin;

//    pstrAssin = pstr                   //!error: uniptr不支持赋值

    return 0;

}
unique_ptr一般操作
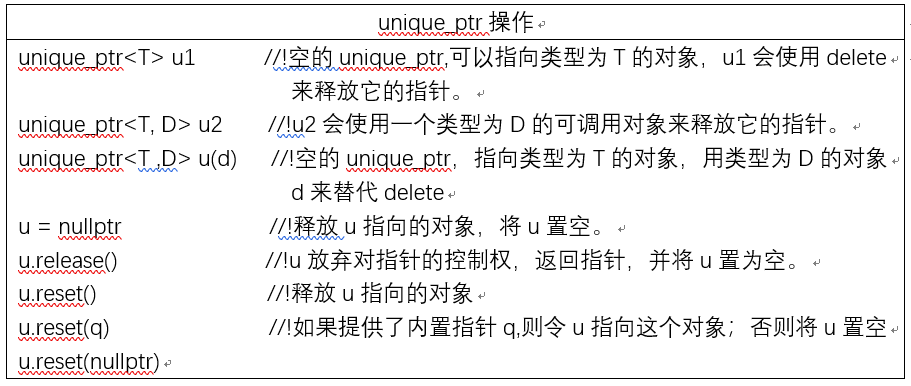
关于unique_ptr还支持哪些操作,在前面的博文中我也做了总结,请参考该篇文章中图表:https://www.cnblogs.com/wangkeqin/p/9351191.html
unique_ptr所有权转移
虽然我们不能拷贝赋值unique_ptr,但是可以通过调用release或者set将指针的所有权从一个(非const)unique_ptr转移给一个unique:
#include <iostream>

#include <memory>

using namespace std;

class TEST

{

public:

    TEST(const string & name)

        :_name(name)

    {cout<<"TEST:"<<_name<<endl;}

    TEST(const TEST & another)

    {   _name = another._name;

        cout<<another._name<<" copyStruct "<<_name<<endl;}

    TEST & operator =(const TEST & another){

        if(&another==this)

            return *this;

        this->_name=another._name;

        cout<<another._name<<" copyAssin to "<<_name<<endl;

    }

    ~TEST(){cout<<"~TEST:"<<_name<<endl;}

//private:

    string _name;

};

//其他操作

int main()

{

    unique_ptr<TEST> p1(new TEST("case_1"));

    unique_ptr<TEST> p2(p1.release());          //!将所有权从p1转移到p2,p1现在指向NULL。

    cout<<"++++++++++++++++++++++++"<<endl;

    unique_ptr<TEST> p3(new TEST("case_2"));

    p2.reset(p3.release());                     //!p2释放了原来指向的内存,接受了p3指向的内存。

    getchar();

}
传递unique_ptr参数和返回unique_ptr
不能拷贝unique_ptr的规则有一个例外:我们可以拷贝或者赋值一个将要被销毁的unique_ptr。其本质就是调用了移动拷贝和移动赋值;最常见的例子是从函数返回一个unique_ptr:
#include <iostream>

#include <memory>

using namespace std;

class TEST

{

public:

    TEST(const string & name)

        :_name(name)

    {cout<<"TEST:"<<_name<<endl;}

    TEST(const TEST & another)

    {   _name = another._name;

        cout<<another._name<<" copyStruct "<<_name<<endl;}

    TEST & operator =(const TEST & another){

        if(&another==this)

            return *this;

        this->_name=another._name;

        cout<<another._name<<" copyAssin to "<<_name<<endl;

    }

    ~TEST(){cout<<"~TEST:"<<_name<<endl;}

//private:

    string _name;

};

//!例外:

//①返回一个即将被销毁的uniptr

unique_ptr<TEST> retDying(string param)

{

    return unique_ptr<TEST>(new TEST(param));

}

//②返回一个局部对象;

unique_ptr<TEST> retTemp(string param)

{

    unique_ptr<TEST> pTemp(new TEST(param));

    return pTemp;

}

int main()

{

    unique_ptr<TEST>ret1 = retDying("dying");

    cout<<(*ret1)._name<<endl;

    unique_ptr<TEST>ret2 = retTemp("temp");

    cout<<(*ret2)._name<<endl;

    getchar();

}
向后兼容:auto_ptr
标准库较早的版本包含了一个名为auto_ptr的类,它具有unique_ptr的部分特性,但不是全部。特别时我们在容器中保存auto_ptr,也不能从函数中返回auto_ptr。虽然auto_ptr仍然是标准库的一部分,但是编写程序时应该使用unique_ptr。
向unique_ptr传递删除器
类似于shared_ptr,unique_ptr默认情况下也是使用delete释放它指向的对象。与shared_ptr一样,我们可以重载一个unique_ptr中默认的删除器。但是unique_ptr管理删除器的方式与shared_ptr不同,其原因我们将在后面继续补充。
重载一个unique_ptr中的删除器会影响到unique_ptr类型如何构造(或reset)该类型的对象。与重载关联器的比较操作类似。我们必须在尖括号中unique_ptr指向类型之后提供删除器类型。在创建或者reset一个这种unique_ptr这种类型的对象时,必须提供一个指定类型的可调用对象:
#include <stdio.h>

#include <memory>

using namespace std;

void closePf(FILE * pf)

{

    cout<<"----close pf after works!----"<<endl;

    fclose(pf);

    cout<<"*****end working****"<<endl;

}

int main()

{

    //    FILE * fp2 = fopen("bin2.txt", "w");

    //    if(!pf)

    //        return -1;

    //    char *buf = "abcdefg";

    //    fwrite(buf, 8, 1, fp2);

    //    fclose(fp2);

    //______________________________________

    //    shared_ptr<FILE> pf(fopen("bin2.txt", "w"),closePf);

    //    cout<<"*****start working****"<<endl;

    //    if(!pf)

    //        return -1;

    //    char *buf = "abcdefg";

    //    fwrite(buf, 8, 1, pf.get());    //!确保fwrite不会删除指针的情况下,可以将shared_ptr内置指针取出来。

    //    cout<<"----write int file!-----"<<endl;

    unique_ptr<FILE,decltype(closePf)*> pf(fopen("bin2.txt", "w"),closePf); //!使用了decltype类型推断

    cout<<"*****start working****"<<endl;

    if(!pf)

        return -1;

    char *buf = "abcdefg";

    fwrite(buf, 8, 1, pf.get());                            //!确保fwrite不会删除指针的情况下,可以将unique_ptr内置指针取出来。

    cout<<"----write int file!-----"<<endl;

    return 0;

}
使用unique_ptr管理动态数组
标准库提供了一个可以管理new分配动态数组的unique_ptr版本。为了用用一个unique_ptr管理动态数组,我们必须在对象类型后面跟一对空方括号;如此,在unique对象销毁的时候,也可以自动调用delete[ ]而非delete来完成内存的释放。
#include <iostream>

#include <memory>

using namespace std;

class ArrTest

{

public:

    ArrTest(){

        static int i = 0;

        _i = i;

        cout<<" ArrTest()"<<":"<<i++<<endl;

    }

    ~ArrTest(){

        static int i = 0;

        cout<<"~ ArrTest()"<<":"<<i++<<endl;

    }

    int _i;

};

int main()

{

    unique_ptr<ArrTest[]> p(new ArrTest[10]);

    cout<<p[4]._i<<endl;    //!获取某个元素值,警告:不要使用越界的下标,unique_ptr也是不检查越界的。

    p.reset();

    return 0;

}

智能指针unique_ptr的更多相关文章
- c/c++ 智能指针 unique_ptr 使用
智能指针 unique_ptr 使用 和shared_ptr不同,可以有多个shared_ptr指向同一个内存,只能有1个unique_ptr指向某个内存.因此unique_ptr不支持普通的拷贝和赋 ...
- c++11 智能指针 unique_ptr、shared_ptr与weak_ptr
c++11 智能指针 unique_ptr.shared_ptr与weak_ptr C++11中有unique_ptr.shared_ptr与weak_ptr等智能指针(smart pointer), ...
- C++智能指针 unique_ptr
C++智能指针 unique_ptr unique_ptr 独占所指向的对象, 同一时刻只能有一个 unique_ptr 指向给定对象(通过禁止拷贝语义, 只有移动语义来实现), 定义于 memory ...
- 智能指针unique_ptr的用法
unique_ptr是独占型的智能指针,它不允许其他的智能指针共享其内部的指针,不允许通过赋值将一个unique_ptr赋值给另一个unique_ptr,如下面错误用法: std::unique_pt ...
- C++11 智能指针unique_ptr使用 -- 以排序二叉树为例
用智能指针可以简化内存管理.以树为例,如果用普通指针,通常是在插入新节点时用new,在析构函数中调用delete:但有了unique_ptr类型的智能指针,就不需要在析构函数中delete了,因为当u ...
- C++——智能指针unique_ptr的实现
起初,我最直观的设计想法,直接设计一个类:包含全部要素(对象,指针计数).然后提供出去. class CPoint { public: CPoint(, ) : x(xVal), y(yVal) {} ...
- 智能指针 unique_ptr
unique_ptr 不共享它的指针.它无法复制到其他 unique_ptr,无法通过值传递到函数,也无法用于需要副本的任何标准模板库 (STL) 算法. 1.不能进行复制构造和赋值操作(unique ...
- 智能指针unique_ptr记录
unique_ptr 对对象独有管理,无法复制,共享,值传递,可以使用move语义来转移控制权. std::default_delete<int> d; std::unique_ptr&l ...
- 第20课 unique_ptr独占型智能指针
一. unique_ptr的基本用法 (一)初始化方式 1. 直接初始化:unique<T> myPtr(new T); //ok.但不能通过隐式转换来构造,如unique<T&g ...
随机推荐
- ansible环境部署及常用模块总结 - 运维笔记
一. Ansible 介绍Ansible是一个配置管理系统configuration management system, python 语言是运维人员必须会的语言, ansible 是一个基于py ...
- linux第四次读书笔记
第四章:进程调度 一.多任务 1.非抢占式多任务 进程会一直执行直到自己主动停止运行(这一步骤称为让步) 2.抢占式多任务 Linux/Unix使用的是抢占式的方式:强制的挂起进程的动作就叫做抢占.进 ...
- elastic-search-kibana-in-docker-dotnet-core-app
[翻译] 使用ElasticSearch,Kibana,ASP.NET Core和Docker可视化数据 原文地址:http://www.dotnetcurry.com/aspnet/1354/e ...
- ajax 异步请求
<%@ page language="java" contentType="text/html; charset=UTF-8" pageEncoding= ...
- node基础 npm、module、exports、require
module 模块.包:可以认为是一个代码包,package,提供特定的功能(暴露给外界接口,让外界调用) exports 输出.导出:导出模块中的各种类型的变量,以及各种方法,导出之后,才可以被外界 ...
- [转帖]关于网络编程中MTU、TCP、UDP优化配置的一些总结
关于网络编程中MTU.TCP.UDP优化配置的一些总结 https://www.cnblogs.com/maowang1991/archive/2013/04/15/3022955.html 感谢原作 ...
- [转帖]从 2G 到 5G,手机上网话语权的三次改变
从 2G 到 5G,手机上网话语权的三次改变 美国第一大电信运营商 Verizon 公司的 CEO Hans Vestberg 手持一部 iPad,屏幕上显示俯瞰地面的飞行地图.400 多公里外的洛杉 ...
- Linux 多主机SSH互信操作---noob....
创建虚拟机后-- ssh-keygen 生成公钥和私钥对 -rw------- 1 root root 1679 11月 4 09:18 id_rsa-rw-r--r-- 1 root root 39 ...
- Jfrog Maven jenkins pipeline 流水线 培训 简单实验
1. 公司购买了一套jfrog artifactory ,然后厂商组织了一次培训 本次简单记录一下 jenkins和jfrog 二进制仓库的简单连接使用 2. 前期环境准备. scp jdk的tar包 ...
- aliyun centos14.04 trusty 上安装docker1.12.1
现在apt这边拿到的docker最新版本就是1.12.1 其实本来这次不准备记录了,本以为一帆风顺的安装最后还是遇到了一点坑,aliyun的锅,卡成狗无法下载.青岛机房 1.更新源,然后安装ca-ce ...