pymyspl模块
pymysql的下载和使用
该模块本质就是一个套接字客户端软件,使用前需要事先安装,能够让我们在
Python程序中操作数据库.
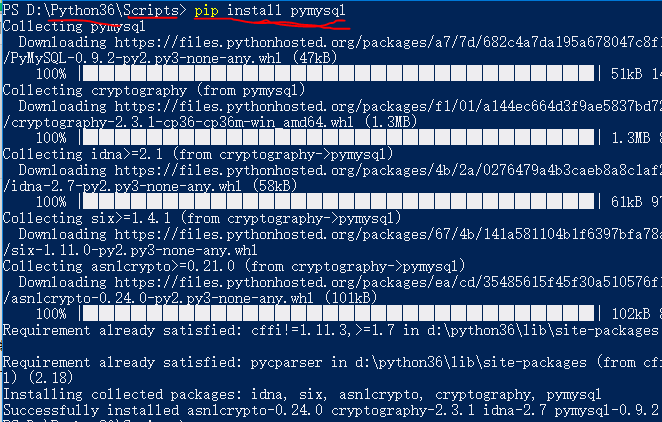
pymysql模块的下载:
在Python安装文件中找到scripts文件 shift+右键打开powershell,接着如下图:
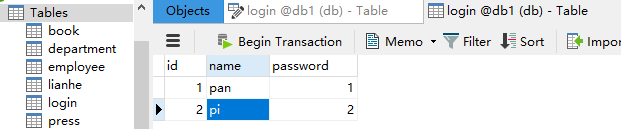
pymysql的使用 (数据均已存在)
实现:
#导入模块
import pymysql username = input('请输入用户名:')
password = input('请输入密码:') #创建连接
conn = pymysql.connect(
host = '127.0.0.1',
user = 'root',
database = 'db1',
port = 3306,
charset = 'utf8'
)
#创建游标
cur = conn.cursor()
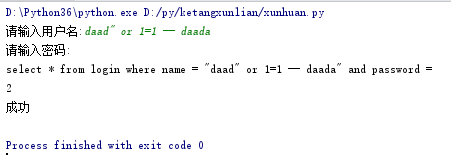
sql = 'select * from login where name = "%s" and password = %s ' %(username,password)
#注意 name 在创建的表中未vachar类型 ,所以必选要加 "" .
print(sql) rescount = cur.execute(sql)#执行sql语句,返回sql查询成功的记录数目
print(rescount) if rescount:
print('成功')
else:
print('失败')
#关闭连接,游标
cur.close()
conn.close
注意 : -- + 空格 为注释
前端是不安全的,在上述的操作中存在漏洞,
正确解决方法为:
#导入模块

import pymysql

username = input('请输入用户名:')

password = input('请输入密码:')

#创建连接

conn = pymysql.connect(

    host = '127.0.0.1',

    user = 'root',

    database = 'db1',

    port = 3306,

    charset = 'utf8'

)

#创建游标

cur = conn.cursor()

sql = 'select * from login where name = %s and password = %s '

#注意 name 在此时不能再加 "" .

print(sql)

rescount = cur.execute(sql,[username,password])

#由我们对sql进行字符串拼接改为execute帮我们做字符串拼接,可以是列表 元祖 字典.pymysql模块自动帮我们解决sql注入问题.

print(rescount)

if rescount:

    print('成功')

else:

    print('失败')

#关闭

cur.close()

conn.close
注意:当为字典时:

增 删 改 (conn.commit())
commit() 方法:在数据库里增删改的时候,必须进行提交,否则插入的数据不生效.
import pymysql

username = input('请输入用户名:')

pwd = input('请输入密码:')

# 1.连接

conn = pymysql.connect(host='localhost', port=3306, user='root', password='', db='db1', charset='utf8')

# 2.创建游标

cursor = conn.cursor()

# 操作

# 增

# sql = "insert into userinfo(username,password) values (%s,%s)"

# effect_row = cursor.execute(sql,(username,password))

#同时插入多条数据

#cursor.executemany(sql,[('李四','110'),('王五','119')])

# print(effect_row)#

# 改

# sql = "update userinfo set username = %s  where id = 2"

# effect_row = cursor.execute(sql,username)

# print(effect_row)

# 删

sql = "delete from userinfo  where id = 2"

effect_row = cursor.execute(sql)

print(effect_row)

#一定记得commit

conn.commit()

# 4.关闭游标

cursor.close()

# 5.关闭连接

conn.close()
查 fetchone , fetchmany , fetchall
fetchone():获取下一行数据,第一次为首行;

fetchall():获取所有行数据源

fetchmany(4):获取4行数据
查看一下表内容:
#导入模块

import pymysql

#创建连接

conn = pymysql.connect(

    host = '127.0.0.1',

    user = 'root',

    database = 'db1',

    port = 3306,

    charset = 'utf8'

)

#创建游标

cur = conn.cursor(cursor=pymysql.cursors.DictCursor)#加入此句可以让结果以字典的形式呈现.

#cur = conn.cursor()#默认我们获取到的返回值是元祖,只能看到每行的数据,却不知到每一列
#代表的是什么.

sql = 'select * from login'

print(sql)

rescount = cur.execute(sql)

print(rescount)

# row = cur.fetchone()

# print(row)

# row = cur.fetchone()#上一条查询后光标会向下移动

# print(row)

row1 = cur.fetchall()#查出所有结果

print(row1)
#fetchmany....

#关闭

cur.close()

conn.close
在fetchone示例中,在获取行数据的时候,可以理解开始的时候,有一个行指针指着第一行的上方,
获取一行,它就向下移动一行,所以当行指针到最后一行的时候,就不能再获取到行的内容,所以
我们可以使用如下方法来移动行指针
cursor.scroll(1,mode='relative')  # 相对当前位置移动

cursor.scroll(2,mode='absolute') # 相对绝对位置移动

第一个值为移动的行数,整数为向下移动,负数为向上移动,mode指定了是相对当前位置移动,还是相对于首行移动
# 1.Python实现用户登录

# 2.Mysql保存数据

import pymysql

# 1.连接

conn = pymysql.connect(host='localhost', port=3306, user='root', password='', db='db8', charset='utf8')

# 2.创建游标

cursor = conn.cursor(cursor=pymysql.cursors.DictCursor)

sql = 'select * from userinfo'

cursor.execute(sql)

# 查询第一行的数据

row = cursor.fetchone()

print(row) # (1, 'mjj', '123')

# 查询第二行数据

row = cursor.fetchone() # (3, '张三', '110')

print(row)

cursor.scroll(-1,mode='relative') #设置之后,光标相对于当前位置往前移动了一行,所以打印的结果为第二行的数据

row = cursor.fetchone()

print(row)

cursor.scroll(0,mode='absolute') #设置之后,光标相对于首行没有任何变化,所以打印的结果为第一行数据

row = cursor.fetchone()

print(row)

# 4.关闭游标

cursor.close()

# 5.关闭连接

conn.close()

#结果如下

{'id': 1, 'username': 'mjj', 'pwd': ''}

{'id': 3, 'username': '张三', 'pwd': ''}

{'id': 3, 'username': '张三', 'pwd': ''}

{'id': 1, 'username': 'mjj', 'pwd': ''}
pymyspl模块的更多相关文章
- npm 私有模块的管理使用
你可以使用 NPM 命令行工具来管理你在 NPM 仓库的私有模块代码,这使得在项目中使用公共模块变的更加方便. 开始前的工作 你需要一个 2.7.0 以上版本的 npm ,并且需要有一个可以登陆 np ...
- node.js学习(三)简单的node程序&&模块简单使用&&commonJS规范&&深入理解模块原理
一.一个简单的node程序 1.新建一个txt文件 2.修改后缀 修改之后会弹出这个,点击"是" 3.运行test.js 源文件 使用node.js运行之后的. 如果该路径下没有该 ...
- ES6模块import细节
写在前面,目前浏览器对ES6的import支持还不是很好,需要用bable转译. ES6引入外部模块分两种情况: 1.导入外部的变量或函数等: import {firstName, lastName, ...
- Python标准模块--ContextManager
1 模块简介 在数年前,Python 2.5 加入了一个非常特殊的关键字,就是with.with语句允许开发者创建上下文管理器.什么是上下文管理器?上下文管理器就是允许你可以自动地开始和结束一些事情. ...
- Python标准模块--Unicode
1 模块简介 Python 3中最大的变化之一就是删除了Unicode类型.在Python 2中,有str类型和unicode类型,例如, Python 2.7.6 (default, Oct 26 ...
- Python标准模块--Iterators和Generators
1 模块简介 当你开始使用Python编程时,你或许已经使用了iterators(迭代器)和generators(生成器),你当时可能并没有意识到.在本篇博文中,我们将会学习迭代器和生成器是什么.当然 ...
- 自己实现一个javascript事件模块
nodejs中的事件模块 nodejs中有一个events模块,用来给别的函数对象提供绑定事件.触发事件的能力.这个别的函数的对象,我把它叫做事件宿主对象(非权威叫法),其原理是把宿主函数的原型链指向 ...
- 理解nodejs模块的scope
描述 原文档地址:https://docs.npmjs.com/misc/scope 所有npm模块都有name,有的模块的name还有scope.scope的命名规则和name差不多,同样不能有ur ...
- nodejs模块发布及命令行程序开发
前置技能 npm工具为nodejs提供了一个模块和管理程序模块依赖的机制,当我们希望把模块贡献出去给他人使用时,可以把我们的程序发布到npm提供的公共仓库中,为了方便模块的管理,npm规定要使用一个叫 ...
随机推荐
- Deep Learning Drizzle
Deep Learning Drizzle Drench yourself in Deep Learning, Reinforcement Learning, Machine Learning, Co ...
- ubuntu桌面便签 sticky note, xpad
sudo apt-get install xpad 软件有一个选项,叫做Show window decorations,显示窗口的标题栏.
- C#中的"?"和"??"
摘自:http://www.cnblogs.com/zxjyuan/archive/2009/10/27/1590795.html 如果你看到C#中的“?”问号脑袋里便充满问号,那么这个贴子便是为你而 ...
- Disruptor
高性能队列Disruptor系列2--浅析Disruptor 目录 1. Disruptor简单介绍2. 为什么Disruptor如此之快3. Disruptor结构分析 1. Disruptor ...
- 一个几百行代码实现的http服务器tinyhttpd
/* J. David's webserver */ /* This is a simple webserver. * Created November 1999 by J. David Blacks ...
- 理解Underscore中的_.template函数
Underscore中提供了_.template函数实现模板引擎功能,它可以将JSON数据源中的数据对应的填充到提供的字符串中去,类似于服务端渲染的模板引擎.接下来看一下Underscore是如何实现 ...
- UVa 658 - It's not a Bug, it's a Feature!(Dijkstra + 隐式图搜索)
链接: https://uva.onlinejudge.org/index.php?option=com_onlinejudge&Itemid=8&page=show_problem& ...
- Centos7 搭建jupyter远程服务器
前提:已经安装好jupyter 和Ipython,个人安装anaconda自带jupyter和Ipython 步骤1:生成配置文件: jupyter notebook --generate-confi ...
- PHP数组和字符串相互转换以及判断字符串长度
这里只介绍最常用的方法: $array=explode(separator,$string); $string=implode(glue,$array); explode() 函数用来将字符串打散成数 ...
- Mabatis入门案例
log4j.properties # Global logging configuration #\u5728\u5f00\u53d1\u9636\u6bb5\uff0c\u8bbe\u7f6e\u4 ...