spring security采用基于简单加密 token 的方法实现的remember me功能
package com.petter.config;
import com.petter.handler.CustomAuthenticationProvider;
import com.petter.service.CustomUserDetailsService;
import org.springframework.context.annotation.Bean;
import org.springframework.context.annotation.Configuration;
import org.springframework.security.config.annotation.authentication.builders.AuthenticationManagerBuilder;
import org.springframework.security.config.annotation.web.builders.HttpSecurity;
import org.springframework.security.config.annotation.web.configuration.EnableWebSecurity;
import org.springframework.security.config.annotation.web.configuration.WebSecurityConfigurerAdapter;
import org.springframework.security.core.userdetails.UserDetailsService;
import org.springframework.security.web.authentication.SavedRequestAwareAuthenticationSuccessHandler;
import javax.annotation.Resource;
/**
* 相当于spring-security.xml中的配置
* @author hongxf
* @since 2017-03-08 9:30
*/
@Configuration
@EnableWebSecurity
public class SecurityConfig extends WebSecurityConfigurerAdapter {
@Resource
private CustomAuthenticationProvider authenticationProvider;
@Resource
private CustomUserDetailsService userDetailsService;
@Override
protected void configure(AuthenticationManagerBuilder auth) throws Exception {
auth.authenticationProvider(authenticationProvider);
}
/**
* 配置权限要求
* 采用注解方式,默认开启csrf
* @param http
* @throws Exception
*/
@Override
protected void configure(HttpSecurity http) throws Exception {
http.authorizeRequests()
.antMatchers("/admin/**").hasRole("ADMIN")
.antMatchers("/dba/**").hasAnyRole("ADMIN", "DBA")
.and()
.formLogin().successHandler(savedRequestAwareAuthenticationSuccessHandler())
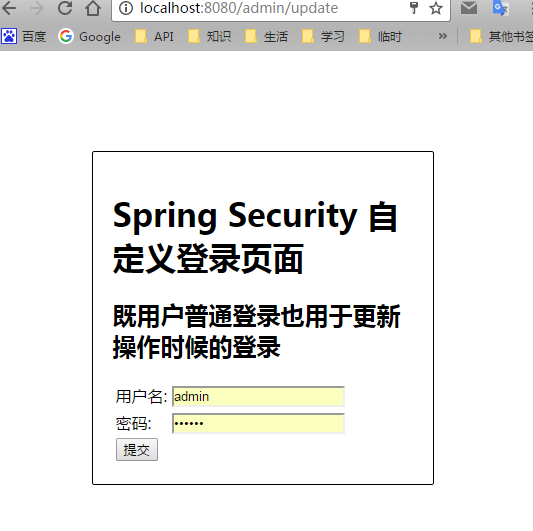
.loginPage("/login") //指定自定义登录页
.failureUrl("/login?error") //登录失败的跳转路径
.loginProcessingUrl("/auth/login_check") //指定了登录的form表单提交的路径,需与表单的action值保存一致,默认是login
.usernameParameter("user-name").passwordParameter("pwd")
.and()
.logout().logoutSuccessUrl("/login?logout")
.and()
.exceptionHandling().accessDeniedPage("/403")
.and()
.csrf()
.and()
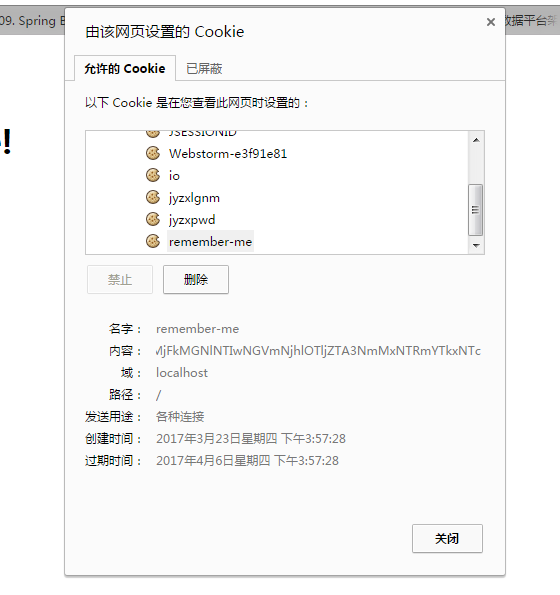
.rememberMe().rememberMeParameter("remember-me") //其实默认就是remember-me,这里可以指定更换
.tokenValiditySeconds(1209600)
.key("hongxf");
}
//使用remember-me必须指定UserDetailsService
@Override
protected UserDetailsService userDetailsService() {
return userDetailsService;
}
/**
* 这里是登录成功以后的处理逻辑
* 设置目标地址参数为targetUrl
* /auth/login_check?targetUrl=/admin/update
* 这个地址就会被解析跳转到/admin/update,否则就是默认页面
*
* 本示例中访问update页面时候会判断用户是手动登录还是remember-me登录的
* 如果是remember-me登录的则会跳转到登录页面进行手动登录再跳转
* @return
*/
@Bean
public SavedRequestAwareAuthenticationSuccessHandler savedRequestAwareAuthenticationSuccessHandler() {
SavedRequestAwareAuthenticationSuccessHandler auth = new SavedRequestAwareAuthenticationSuccessHandler();
auth.setTargetUrlParameter("targetUrl");
return auth;
}
}
这里需要指出几点:
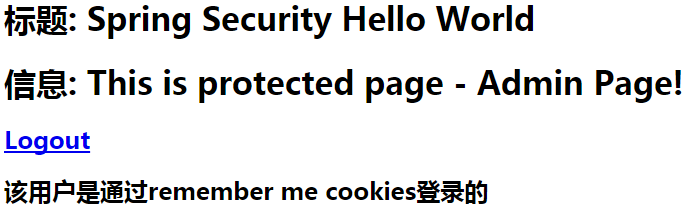
<div sec:authorize="isRememberMe()">

        <h2>该用户是通过remember me cookies登录的</h2>

    </div>

    <div sec:authorize="isFullyAuthenticated()">

        <h2>该用户是通过输入用户名和密码登录的</h2>

    </div>
用于展示
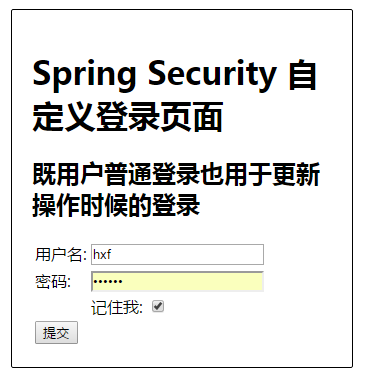
<form name='loginForm' th:action="@{/auth/login_check(targetUrl=${session.targetUrl})}" method='POST'>

            <table>

                <tr>

                    <td>用户名:</td>

                    <td><input type='text' name='user-name' /></td>

                </tr>

                <tr>

                    <td>密码:</td>

                    <td><input type='password' name='pwd' /></td>

                </tr>

                <!-- 如果是进行更新操作跳转过来的页面则不显示记住我 -->

                <div th:if="${loginUpdate} eq null">

                    <tr>

                        <td></td>

                        <td>记住我: <input type="checkbox" name="remember-me" /></td>

                    </tr>

                </div>

                <tr>

                    <td colspan='2'>

                        <input type="submit" value="提交" />

                    </td>

                </tr>

            </table>

        </form>
注意action的值,首先请求路径是/auth/login_check,与SecurityConfig配置的loginProcessingUrl保持一致
<!DOCTYPE html>

<html lang="en">

<head>

    <meta charset="UTF-8">

    <title>update</title>

</head>

<body>

    <h1>Title : 更新页面</h1>

    <h1>只有通过用户名和密码登录的用户才允许进入这个页面,remember me登录的用户不允许,防止被盗用cookie</h1>

    <h2>更新账号信息</h2>

</body>

</html>
五、修改HelloController类
package com.petter.web;

import org.springframework.security.authentication.AnonymousAuthenticationToken;

import org.springframework.security.authentication.BadCredentialsException;

import org.springframework.security.authentication.LockedException;

import org.springframework.security.authentication.RememberMeAuthenticationToken;

import org.springframework.security.core.Authentication;

import org.springframework.security.core.context.SecurityContextHolder;

import org.springframework.security.core.userdetails.UserDetails;

import org.springframework.stereotype.Controller;

import org.springframework.util.StringUtils;

import org.springframework.web.bind.annotation.RequestMapping;

import org.springframework.web.bind.annotation.RequestMethod;

import org.springframework.web.bind.annotation.RequestParam;

import org.springframework.web.servlet.ModelAndView;

import javax.servlet.http.HttpServletRequest;

import javax.servlet.http.HttpSession;

/**

 * @author hongxf

 * @since 2017-03-08 9:29

 */

@Controller

public class HelloController {

    @RequestMapping(value = { "/", "/welcome" }, method = RequestMethod.GET)

    public ModelAndView welcomePage() {

        ModelAndView model = new ModelAndView();

        model.addObject("title", "Spring Security Hello World");

        model.addObject("message", "This is welcome page!");

        model.setViewName("hello");

        return model;

    }

    @RequestMapping(value = "/admin", method = RequestMethod.GET)

    public ModelAndView adminPage() {

        ModelAndView model = new ModelAndView();

        model.addObject("title", "Spring Security Hello World");

        model.addObject("message", "This is protected page - Admin Page!");

        model.setViewName("admin");

        return model;

    }

    @RequestMapping(value = "/dba", method = RequestMethod.GET)

    public ModelAndView dbaPage() {

        ModelAndView model = new ModelAndView();

        model.addObject("title", "Spring Security Hello World");

        model.addObject("message", "This is protected page - Database Page!");

        model.setViewName("admin");

        return model;

    }

    /**

     * 登录页面只允许使用密码登录

     * 如果用户通过remember me的cookie登录则跳转到登录页面输入密码

     * 为了避免盗用remember me cookie 来更新信息

     */

    @RequestMapping(value = "/admin/update", method = RequestMethod.GET)

    public ModelAndView updatePage(HttpServletRequest request) {

        ModelAndView model = new ModelAndView();

        if (isRememberMeAuthenticated()) {

            //把targetUrl放入session中,登录页面使用${session.targetUrl}获取

            setRememberMeTargetUrlToSession(request);

            //跳转到登录页面

            model.addObject("loginUpdate", true);

            model.setViewName("login");

        } else {

            model.setViewName("update");

        }

        return model;

    }

    /**

     * 判断用户是不是通过remember me方式登录,参考

     * org.springframework.security.authentication.AuthenticationTrustResolverImpl

     */

    private boolean isRememberMeAuthenticated() {

        Authentication authentication = SecurityContextHolder.getContext().getAuthentication();

        return authentication != null && RememberMeAuthenticationToken.class.isAssignableFrom(authentication.getClass());

    }

    /**

     * 保存请求的页面targetUrl到session中

     */

    private void setRememberMeTargetUrlToSession(HttpServletRequest request){

        HttpSession session = request.getSession(false);

        if(session != null){

            session.setAttribute("targetUrl", request.getRequestURI());

        }

    }

    //获取session存储的SPRING_SECURITY_LAST_EXCEPTION的值,自定义错误信息

    @RequestMapping(value = "/login", method = RequestMethod.GET)

    public ModelAndView login(

            @RequestParam(value = "error", required = false) String error,

            @RequestParam(value = "logout", required = false) String logout,

            HttpServletRequest request) {

        ModelAndView model = new ModelAndView();

        if (error != null) {

            model.addObject("error", getErrorMessage(request, "SPRING_SECURITY_LAST_EXCEPTION"));

            //在update的登录页面上,判断targetUrl是否有值,没有则显示记住我,有则不显示

            String targetUrl = getRememberMeTargetUrlFromSession(request);

            System.out.println(targetUrl);

            if(StringUtils.hasText(targetUrl)){

                model.addObject("loginUpdate", true);

            }

        }

        if (logout != null) {

            model.addObject("msg", "你已经成功退出");

        }

        model.setViewName("login");

        return model;

    }

    /**

     * 从session中获取targetUrl

     */

    private String getRememberMeTargetUrlFromSession(HttpServletRequest request){

        String targetUrl = "";

        HttpSession session = request.getSession(false);

        if(session != null){

            targetUrl = session.getAttribute("targetUrl") == null ? "" :session.getAttribute("targetUrl").toString();

        }

        return targetUrl;

    }

    //自定义错误类型

    private String getErrorMessage(HttpServletRequest request, String key){

        Exception exception = (Exception) request.getSession().getAttribute(key);

        String error;

        if (exception instanceof BadCredentialsException) {

            error = "不正确的用户名或密码";

        }else if(exception instanceof LockedException) {

            error = exception.getMessage();

        }else{

            error = "不正确的用户名或密码";

        }

        return error;

    }

    @RequestMapping(value = "/403", method = RequestMethod.GET)

    public ModelAndView accessDenied() {

        ModelAndView model = new ModelAndView();

        //检查用户是否已经登录

        Authentication auth = SecurityContextHolder.getContext().getAuthentication();

        if (!(auth instanceof AnonymousAuthenticationToken)) {

            UserDetails userDetail = (UserDetails) auth.getPrincipal();

            model.addObject("username", userDetail.getUsername());

        }

        model.setViewName("403");

        return model;

    }

}
六、进行测试

可以查看此时的cookie中的值

spring security采用基于简单加密 token 的方法实现的remember me功能的更多相关文章
- spring security采用基于持久化 token 的方法实现的remember me功能
采用该方法相较于简单加密方式安全一些.具体的原理见 http://wiki.jikexueyuan.com/project/spring-security/remember-me.html 一.建立 ...
- 255.Spring Boot+Spring Security:使用md5加密
说明 (1)JDK版本:1.8 (2)Spring Boot 2.0.6 (3)Spring Security 5.0.9 (4)Spring Data JPA 2.0.11.RELEASE (5)h ...
- Spring security oauth2最简单入门环境搭建
关于OAuth2的一些简介,见我的上篇blog:http://wwwcomy.iteye.com/blog/2229889 PS:貌似内容太水直接被鹳狸猿干沉.. 友情提示 学习曲线:spring+s ...
- 关于 Spring Security OAuth2 中 Feign 调用 Token 问题
微服务体系中,避免不了服务之间链式调用,一般使用 Feign ,由于使用 Spring Security OAuth2 全局做了安全认证,简单的一种实现方式就是在服务提供方获得 Token 再次通过 ...
- spring security采用自定义登录页和退出功能
更新... 首先采用的是XML配置方式,请先查看 初识Spring security-添加security 在之前的示例中进行代码修改 项目结构如下: 一.修改spring-security.xml ...
- 使用Spring Security OAuth2进行简单的单点登录
1.概述 在本教程中,我们将讨论如何使用Spring Security OAuth和Spring Boot实现SSO - 单点登录. 我们将使用三个单独的应用程序: 授权服务器 - 这是中央身份验证机 ...
- spring security +MySQL + BCryptPasswordEncoder 单向加密验证 + 权限拦截 --- 心得
1.前言 前面学习了 security的登录与登出 , 但是用户信息 是 application 配置 或内存直接注入进去的 ,不具有实用性,实际上的使用还需要权限管理,有些 访问接口需要某些权限才可 ...
- Spring Security实现基于RBAC的权限表达式动态访问控制
昨天有个粉丝加了我,问我如何实现类似shiro的资源权限表达式的访问控制.我以前有一个小框架用的就是shiro,权限控制就用了资源权限表达式,所以这个东西对我不陌生,但是在Spring Securit ...
- Spring Security入门(2-3)Spring Security 的运行原理 4 - 自定义登录方法和页面
参考链接,多谢作者: http://blog.csdn.net/lee353086/article/details/52586916 http元素下的form-login元素是用来定义表单登录信息的. ...
随机推荐
- iOS App 审核被拒的原因搜罗
本文转载至 http://ju.outofmemory.cn/entry/108500 iOS app 审核 1.程序有重大bug,程序不能启动,或者中途退出. 2.绕过苹果的付费渠道,我们之前游 ...
- JZOJ.3769【NOI2015模拟8.14】A+B
Description 对于每个数字x,我们总可以把它表示成一些斐波拉切数字之和,比如8 = 5 + 3, 而22 = 21 + 1,因此我们可以写成 x = a1 * Fib1 + a2 * F ...
- beetl模板的${!}用法
转自:http://ibeetl.com/guide/#beetl 2.20. 安全输出 安全输出是任何一个模板引擎必须重视的问题,否则,将极大困扰模板开发者.Beetl中,如果要输出的模板变量为nu ...
- VMware虚拟机NAT(地址转换模式)
转载于:https://www.linuxidc.com/Linux/2016-09/135521p2.htm 二.NAT(地址转换模式) 刚刚我们说到,如果你的网络ip资源紧缺,但是你又希望你的 ...
- Spring容器初始化的时候如何添加一个定时器?
昨天遇到这个问题,在项目启动的时候添加一个定时器隔一段时间扫描有没有定时发送的邮件(当然也可以是你自己的业务逻辑),也在网上找了资料,加上自己的修改,终于成功了.所以来做个记录. 1.ServletC ...
- C# 利用StringBuilder提升字符串拼接性能
一个项目中有数据图表呈现,数据量稍大时显得很慢. 用Stopwatch分段监控了一下,发现耗时最多的函数是SaveToExcel 此函数中遍列所有数据行,通过Replace替换标签生成Excel行,然 ...
- php 使用imagettftext()函数出问题的原因
<?php header('Content-type: image/png'); $im = imagecreatetruecolor(400, 300); //创建画布 $white = im ...
- 页面的日志服务 web页面渲染 服务 ; 服务耦合带来的问题
情景: 虽然对web服务做了3节点的负载均衡,但是由于埋点数据的落盘的代码也在相同服务器上,导致当flume处理日志的吞吐量达到瓶颈时,3节点的请求积压,挤占服务器资源,导致接口数据处理迟缓,页面加载 ...
- Java 之内部类
概述 内部类修饰符 内部类的细节 局部内部类 匿名内部类及其应用 匿名内部类细节 内部类概述 将一个类定义在另一个类的里面, 里面的那个类就称为内部类(内置类, 嵌套类). class Outer { ...
- windows下安装Composer提示缺少openssl的解决方法
在Windows环境下安装Composer(注:Composer要求PHP版本在5.3.2+),你可能会遇到这种安装失败的情况:出错信息是 "The openssl extension is ...