
spring security采用自定义登录页和退出功能
更新。。。
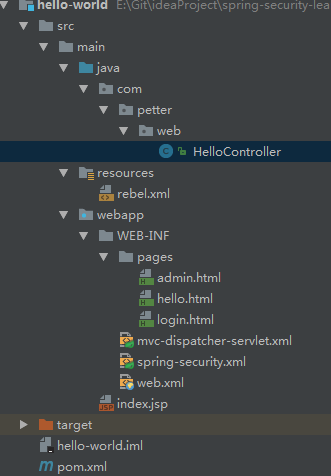
首先采用的是XML配置方式,请先查看 初识Spring security-添加security 在之前的示例中进行代码修改
<security:http auto-config="true">

        <security:intercept-url pattern="/admin**" access="hasRole('ROLE_USER')"/>

        <security:form-login

                login-page="/login"

                default-target-url="/welcome"

                authentication-failure-url="/login?error"

                username-parameter="user-name"

                password-parameter="pwd"/>

        <security:logout

                logout-success-url="/login?logout"/>

        <!-- XML 配置中默认csrf是关闭的,此处设置为打开

            如果这里打开csrf,则在form表单中需要添加

            <input type="hidden" th:name="${_csrf.parameterName}" th:value="${_csrf.token}" />

        -->

        <security:csrf />

    </security:http>
其中:
<!DOCTYPE html>

<html xmlns:th="http://www.thymeleaf.org">

<head>

    <meta charset="UTF-8" />

    <title>login</title>

    <style>

        .error {

            padding: 15px;

            margin-bottom: 20px;

            border-radius: 4px;

            color: #a94442;

            background-color: #f2dede;

            border: 1px solid #ebccd1;

        }

        .msg {

            padding: 15px;

            margin-bottom: 20px;

            border-radius: 4px;

            color: #31708f;

            background-color: #d9edf7;

            border: 1px solid #bce8f1;

        }

        #login-box {

            width: 300px;

            padding: 20px;

            margin: 100px auto;

            background: #fff;

            -webkit-border-radius: 2px;

            -moz-border-radius: 2px;

            border: 1px solid #000;

        }

        .hide {

            display: none;

        }

        .show {

            display: block;

        }

    </style>

</head>

<body>

    <div id="login-box">

        <h1>Spring Security 自定义登录页面</h1>

        <div class="error" th:class="${error}? 'show error' : 'hide'" th:text="${error}"></div>

        <div class="msg" th:class="${msg}? 'show msg' : 'hide'" th:text="${msg}"></div>

        <form name='loginForm' action="/login" method='POST'>

            <table>

                <tr>

                    <td>用户名:</td>

                    <td><input type='text' name='user-name' /></td>

                </tr>

                <tr>

                    <td>密码:</td>

                    <td><input type='password' name='pwd' /></td>

                </tr>

                <tr>

                    <td colspan='2'>

                        <input type="submit" value="提交" />

                    </td>

                </tr>

            </table>

            <input type="hidden" th:name="${_csrf.parameterName}" th:value="${_csrf.token}" />

        </form>

    </div>

</body>

</html>
<form name='loginForm' th:action="@{/login}" method='POST'>
    <table>
        <tr>
            <td>用户名:</td>
            <td><input type='text' name='user-name' autofocus/></td>
        </tr>
        <tr>
            <td>密码:</td>
            <td><input type='password' name='pwd' /></td>
        </tr>
        <tr>
            <td colspan='2'>
                <input type="submit" value="提交" />
            </td>
        </tr>
    </table>
</form>
使用这个表单也可以进行登录,提交时候自动添加_csrf属性
三、修改admin.html
<!DOCTYPE html>

<html xmlns="http://www.w3.org/1999/xhtml"

      xmlns:th="http://www.thymeleaf.org">

<head>

    <meta charset="UTF-8"/>

    <title>admin</title>

</head>

<body>

    <h1 th:text="|标题: ${title}|">Title : XXX</h1>

    <h1 th:text="|信息: ${message}|">Message : XXX</h1>

    <h2><a href="javascript:formSubmit()">Logout</a></h2>

    <!-- csrf for logout-->

    <form action="/logout" method="post" id="logoutForm">

        <input type="hidden" th:name="${_csrf.parameterName}" th:value="${_csrf.token}" />

    </form>

    <script>

        function formSubmit() {

            document.getElementById("logoutForm").submit();

        }

    </script>

</body>

</html>
<!-- 同样可以进行正常退出,自动加入了_csrf的属性值 -->
<form th:action="@{/logout}" method="post" id="logoutForm"></form>
如果使用这种表单也可以实现退出,提交时候自动添加_csrf属性
四、修改HelloController文件,添加代码:
@RequestMapping(value = "/login", method = RequestMethod.GET)

    public ModelAndView login(

            @RequestParam(value = "error", required = false) String error,

            @RequestParam(value = "logout", required = false) String logout) {

        ModelAndView model = new ModelAndView();

        if (error != null) {

            model.addObject("error", "不正确的用户名和密码");

        }

        if (logout != null) {

            model.addObject("msg", "你已经成功退出");

        }

        model.setViewName("login");

        return model;

    }
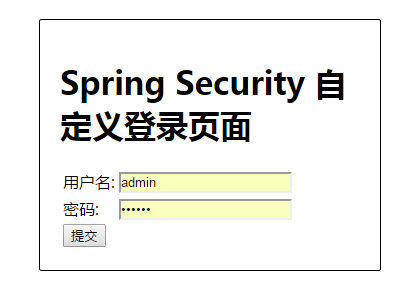
启动程序:访问http://localhost:8010/login 跳转到自定义的登录页面

package com.petter.config;

import org.springframework.beans.factory.annotation.Autowired;

import org.springframework.context.annotation.Configuration;

import org.springframework.security.config.annotation.authentication.builders.AuthenticationManagerBuilder;

import org.springframework.security.config.annotation.web.builders.HttpSecurity;

import org.springframework.security.config.annotation.web.configuration.EnableWebSecurity;

import org.springframework.security.config.annotation.web.configuration.WebSecurityConfigurerAdapter;

/**

 * 相当于spring-security.xml中的配置

 * @author hongxf

 * @since 2017-03-08 9:30

 */

@Configuration

@EnableWebSecurity

public class SecurityConfig extends WebSecurityConfigurerAdapter {

    /**

     * 在内存中设置三个用户

     * @param auth

     * @throws Exception

     */

    @Autowired

    public void configureGlobal(AuthenticationManagerBuilder auth) throws Exception {

        auth.inMemoryAuthentication().withUser("hongxf").password("123456").roles("USER");

        auth.inMemoryAuthentication().withUser("admin").password("123456").roles("ADMIN");

        auth.inMemoryAuthentication().withUser("dba").password("123456").roles("DBA");

    }

    /**

     * 配置权限要求

     * 采用注解方式,默认开启csrf

     * @param http

     * @throws Exception

     */

    @Override

    protected void configure(HttpSecurity http) throws Exception {

        http.authorizeRequests()

                .antMatchers("/admin/**").access("hasRole('ROLE_ADMIN')")

                .antMatchers("/dba/**").access("hasRole('ROLE_ADMIN') or hasRole('ROLE_DBA')")

             .and()

                .formLogin().loginPage("/login")

                .defaultSuccessUrl("/welcome").failureUrl("/login?error")

                .usernameParameter("user-name").passwordParameter("pwd")

            .and()

                .logout().logoutSuccessUrl("/login?logout")

            .and()

                .csrf();

    }

}
修改HelloController文件,添加
@RequestMapping(value = "/login", method = RequestMethod.GET)

    public ModelAndView login(

            @RequestParam(value = "error", required = false) String error,

            @RequestParam(value = "logout", required = false) String logout) {

        ModelAndView model = new ModelAndView();

        if (error != null) {

            model.addObject("error", "不正确的用户名和密码");

        }

        if (logout != null) {

            model.addObject("msg", "你已经成功退出");

        }

        model.setViewName("login");

        return model;

    }
启动程序测试成功
spring security采用自定义登录页和退出功能的更多相关文章
- spring security之 默认登录页源码跟踪
spring security之 默认登录页源码跟踪 2021年的最后2个月,立个flag,要把Spring Security和Spring Security OAuth2的应用及主流程源码研究透 ...
- spring security使用自定义登录界面后,不能返回到之前的请求界面的问题
昨天因为集成spring security oauth2,所以对之前spring security的配置进行了一些修改,然后就导致登录后不能正确跳转回被拦截的页面,而是返回到localhost根目录. ...
- Spring Security笔记:自定义登录页
以下内容参考了 http://www.mkyong.com/spring-security/spring-security-form-login-example/ 接上回,在前面的Hello Worl ...
- spring security 之自定义表单登录源码跟踪
上一节我们跟踪了security的默认登录页的源码,可以参考这里:https://www.cnblogs.com/process-h/p/15522267.html 这节我们来看看如何自定义单表认 ...
- spring security采用基于简单加密 token 的方法实现的remember me功能
记住我功能,相信大家在一些网站已经用过,一些安全要求不高的都可以使用这个功能,方便快捷. spring security针对该功能有两种实现方式,一种是简单的使用加密来保证基于 cookie 的 to ...
- Spring-Security自定义登录页&inMemoryAuthentication验证
Spring Security是为基于Spring的应用程序提供声明式安全保护的安全性框架.框架下内容比较多,可以做到按照角色权限对请求路径进行限制.今天主要验证自定义登录页,在内存用户存储中进行请求 ...
- Spring Security 的注册登录流程
Spring Security 的注册登录流程 数据库字段设计 主要数据库字段要有: 用户的 ID 用户名称 联系电话 登录密码(非明文) UserDTO对象 需要一个数据传输对象来将所有注册信息发送 ...
- Spring Security在标准登录表单中添加一个额外的字段
概述 在本文中,我们将通过向标准登录表单添加额外字段来实现Spring Security的自定义身份验证方案. 我们将重点关注两种不同的方法,以展示框架的多功能性以及我们可以使用它的灵活方式. 我们的 ...
- CAS4.0.4 之自定义登录页实践
因最近公司要用到cas登陆而且要使用自定登陆页面,网络上搜索了一下cas自定义登陆,比较好的两篇文章CAS 之自定义登录页实践和CAS 之 跨域 Ajax 登录实践,感觉写的不错,但是发现改动的地方很 ...
随机推荐
- 63、具有过渡动画效果的布局Layout
下面,下来看一个Demo的效果,代码如下: <FrameLayout xmlns:android="http://schemas.android.com/apk/res/android ...
- VS2010程序打包操作(结合图片详细讲解)
附视频教程:http://www.cnblogs.com/mengdesen/archive/2011/06/14/2080312.html 1. 在vs2010 选择“新建项目”----“其他项 ...
- 面试STAR法则
昨天投了几家公司的简历,A公司还没看简历,B公司没有通过简历,另外的后说(其实只投了这两家),B公司最终给了蛮中肯的回复: 虽然,一开始看到这样的结果,有些失落,仔细看过回复后,有些不屑和好奇.百度了 ...
- 【BZOJ4676】Xor-Mul棋盘 拆位+状压DP
[BZOJ4676]Xor-Mul棋盘 Description 一个n*m的棋盘,左上角为(1,1),右下角为(n,m).相邻的2点之间有连边(如下图中实线)特殊地,(1,i)与(n,i)也连有一条边 ...
- jQuery 对象访问 index([selector|element])
搜索匹配的元素,并返回相应元素的索引值,从0开始计数. 如果不给 .index() 方法传递参数,那么返回值就是这个jQuery对象集合中第一个元素相对于其同辈元素的位置. 如果参数是一组DOM元素或 ...
- mongodb3.0+ 版本内置数据压缩
mongodb3+版本之后支持zlib和snappy. 创建压缩的集合 db.createCollection( "email", {storageEngine:{wiredTig ...
- Java——BeanUtils基本用法
为了操作JavaBean的属性,sun公司自己写了一套内省的api(在Java.beans.*)中,但是我们发现操作起来还是比较复杂的,所以apache公司就自己写了一套api替代了它,大大方便了开发 ...
- 《挑战程序设计竞赛》2.3 动态规划-进阶 POJ1065 1631 3666 2392 2184(5)
POJ1065: Description There is a pile of n wooden sticks. The length and weight of each stick are kno ...
- 三、直播整体流程 五、搭建Nginx+Rtmp直播流服务
HTML5实现视频直播功能思路详解_html5教程技巧_脚本之家 https://m.jb51.net/html5/587215.html 三.直播整体流程 直播整体流程大致可分为: 视频采集端:可以 ...
- wget -d --header
wget -d --header="Host:www.sina.com" http://202.108.33.84 domain differ ip 防止Wget递归下载 假设Ng ...