Bullet核心类介绍(Bullet 2.82 HelloWorld程序及其详解,附程序代码)
实验平台:win7,VS2010
先上结果截图:
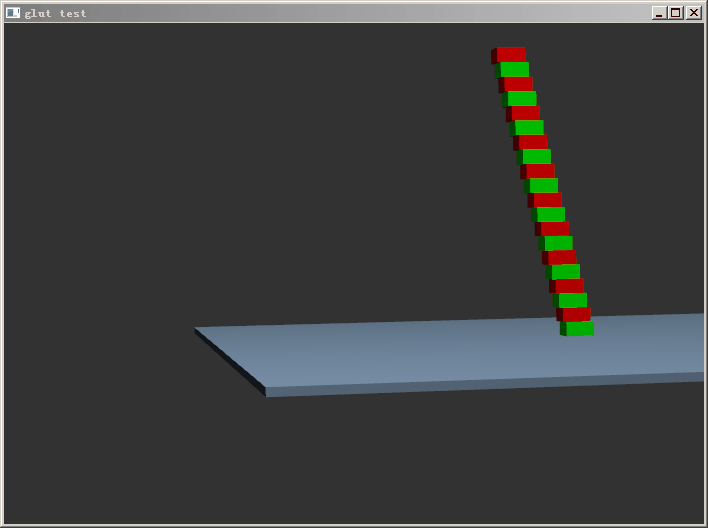
文章最后附有生成该图的程序。
1. 刚体模拟原理
Bullet作为一个物理引擎,其任务就是刚体模拟(还有可变形体模拟)。刚体模拟,就是要计算预测物体的运动,举个例子,我抛一块砖头,砖头砸在地上翻了几圈最后停下来,刚体模拟就是要用计算机把这一切虚拟化(给定砖头形状质量等属性及砖头初始运动状态,还要给定地面的信息,预测砖头未来任意时刻状态)。
刚体模拟的主要理论基础是牛顿力学(高中物理水平)。可以想见,如果刚体之间没有碰撞,刚体模拟很简单,就是自由落体计算。复杂性存在于碰撞的处理,而处理碰撞首先要检测到碰撞。碰撞检测最基本的方法就是两两刚体测试看其是否碰撞,这是不能满足效率要求的,因为每个刚体可能形状很复杂。为了进行快速碰撞检测,一般使用包围盒(Bounding Box,如AABB:Axis-Aligned Bounding Box、OBB:Oriented Bounding Box)技术,包围盒是一种简单几何体(长方体或球),刚体完全被其包含在里边。一般将碰撞检测分为两步:
- Broadphase Collision Detection:两两刚体,测试其包围盒是否重叠(即包围盒的碰撞检测,因为包围盒是一种简单几何体,存在快速算法处理包围盒的碰撞检测)。
- Narrowphase collision detection (dispatcher):对于Broadphase检测出的刚体对,进行刚体碰撞检测,任务为二,检测刚体之间是否碰撞,如果碰撞,计算出接触点(contact point)。
这样,我们总结出,物理引擎要进行刚体模拟所要做的事(每一时间步要做的事):
- Broadphase Collision Detection;
- Narrowphase collision detection;
- 碰撞处理,由接触点及刚体属性根据物理方程计算刚体的新状态(新速度等);
- 更新刚体位置并输出给3D图形接口,以显示动画。
且看Bullet为了完成刚体模拟这一复杂任务而设计的Rigid Body Physics Pipeline(刚体物理引擎管线):
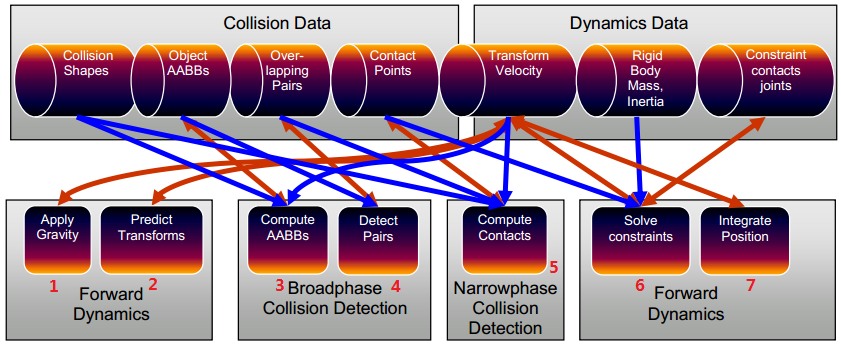
上面是Bullet的数据,下面是Bullet的刚体模拟计算步骤,对应于我们的理论分析,对照关系是这样的(管线图用红色数字标注):
- 第1步对应管线图中:3、4;
- 第2步对应管线图中:5;
- 第3步对应管线图中:6;
- 第4步对应管线图中:7、1、2;
可以看出,为了实现的需要,Bullet将我们分析的刚体模拟循环的起点改了。
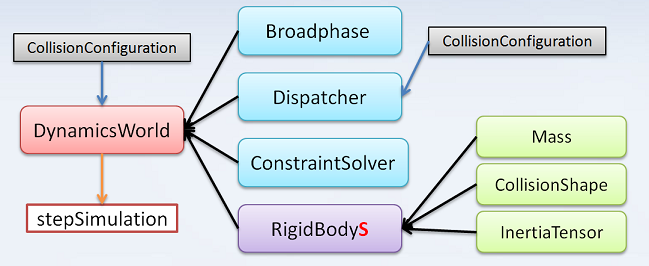
2. 对应刚体模拟几个步骤的Bullet类
- Bullet用btDynamicsWorld类抽象整个被模拟的世界,即btDynamicsWorld包含所有四步,另外还包含数据;
- 负责Broadphase Collision Detection步骤任务的类是btBroadphaseInterface;
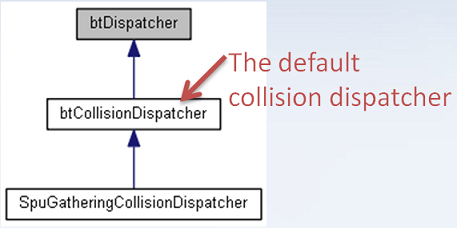
- 负责Narrowphase collision detection的类是btDispatcher ;
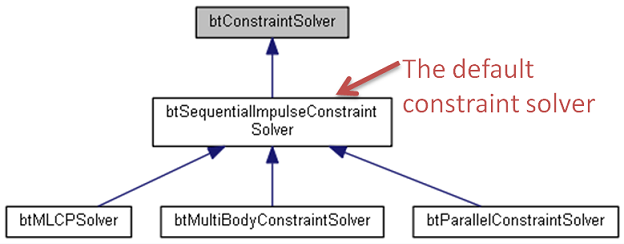
- 负责碰撞处理(约束处理)的类是btConstraintSolver;
- 最后一步则有btDynamicsWorld类的stepSimulation方法完成;
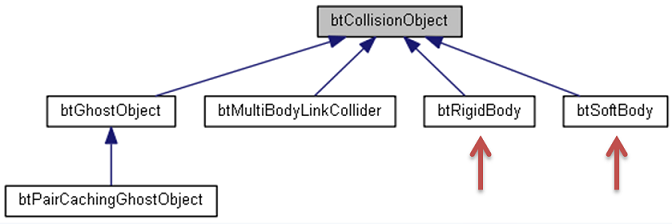
- 另外表示刚体数据的类是btCollisionObject;
上面介绍的类都是基类,实际完成具体任务的可能是他们的子类。
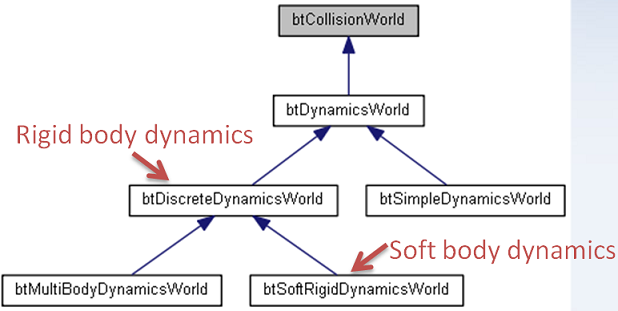
3. 关键类的具体分析
首先将Bullet高层结构总结如下图:
后面几张图示从Bullet API文档中摘的,除了在线Bullet API文档,你也可以自己用Doxygen生成离线API文档。

另外从btDynamicsWorld类的合作图可以看出上述分析的正确性:
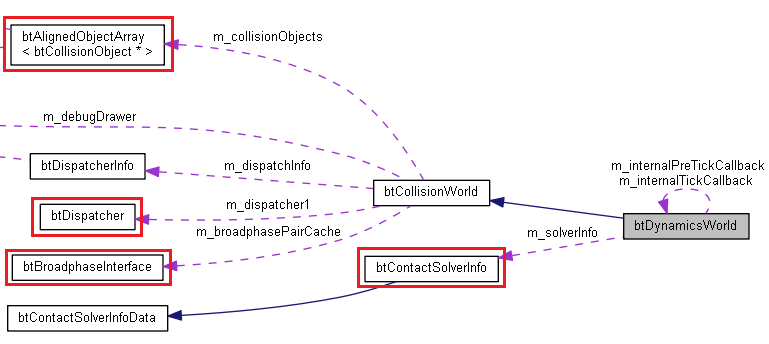
如上图红圈所示,btDynamicsWorld中包含了(或者说指向了)Broadphase、Dispatcher、ConstraintSolver、RigidBodys(多个,RigidBody数组)。
4. Bullet 2.82 HelloWorld程序
代码如下:
 #include"GL/glew.h"

 #include"GL/freeglut.h"

 #include"btBulletDynamicsCommon.h"

 #include"omp.h"

 btDiscreteDynamicsWorld* m_DynamicsWorld;

 btBroadphaseInterface* m_Broadphase;

 btCollisionDispatcher* m_Dispatcher;

 btSequentialImpulseConstraintSolver* m_ConstraintSolver;

 btDefaultCollisionConfiguration* m_CollisionConfiguration;

 btAlignedObjectArray<btCollisionShape*> m_CollisionShapes;

 void bt_rundraw(bool run)

 {

     static double t_Last = omp_get_wtime();

     if(run){

         double t2 = omp_get_wtime();

         m_DynamicsWorld->stepSimulation(float(t2-t_Last),);

         t_Last = t2;

     }else{

         t_Last = omp_get_wtime();

     }

     btCollisionObjectArray& rigidArray = m_DynamicsWorld->getCollisionObjectArray();

     for(int i=; i<rigidArray.size(); ++i){

         btRigidBody* body = btRigidBody::upcast(rigidArray[i]);

         btTransform trans;

         body->getMotionState()->getWorldTransform(trans);

         float m[];

         trans.getOpenGLMatrix(m);

         GLfloat color[]={.5f, .6f, .7f, 1.0f};

         if(i==){

             glMaterialfv(GL_FRONT_AND_BACK, GL_AMBIENT_AND_DIFFUSE, color);

             glMatrixMode(GL_MODELVIEW);

             glPushMatrix();

             glMultMatrixf(m);

             glTranslatef(,-,);

             glScalef(100.0f,1.0f,100.0f);

             glutSolidCube(.f);

             glPopMatrix();

         }else{

             if(i%){

                 color[]=0.0f;color[]=0.9f;color[]=0.0f;color[]=1.0f;

             }else{

                 color[]=0.9f;color[]=0.0f;color[]=0.0f;color[]=1.0f;

             }

             glMaterialfv(GL_FRONT_AND_BACK, GL_AMBIENT_AND_DIFFUSE, color);

             glMatrixMode(GL_MODELVIEW);

             glPushMatrix();

             glMultMatrixf(m);

             glScalef(3.0f,2.0f,4.0f);

             glutSolidCube(.f);

             glPopMatrix();

         }

     }

 }

 void bt_start()

 {

     ///-----initialization_start-----

     m_CollisionConfiguration = new btDefaultCollisionConfiguration();

     m_Dispatcher = new    btCollisionDispatcher(m_CollisionConfiguration);

     m_Broadphase = new btDbvtBroadphase();

     m_ConstraintSolver = new btSequentialImpulseConstraintSolver;

     m_DynamicsWorld = new btDiscreteDynamicsWorld(

         m_Dispatcher,m_Broadphase,m_ConstraintSolver,m_CollisionConfiguration);

     m_DynamicsWorld->setGravity(btVector3(,-,));

     ///-----initialization_end-----

     { // floor

         btCollisionShape* groundShape = new btBoxShape(btVector3(btScalar(.f),btScalar(.f),btScalar(.f)));

         m_CollisionShapes.push_back(groundShape);

         btTransform groundTransform;

         groundTransform.setIdentity();

         groundTransform.setOrigin(btVector3(,,));

         btScalar mass(.f);

         btVector3 localInertia(,,);

         if( mass != .f )

             groundShape->calculateLocalInertia(mass,localInertia);

         //using motionstate is recommended, it provides interpolation capabilities, and only synchronizes 'active' objects

         btDefaultMotionState* myMotionState = new btDefaultMotionState(groundTransform);

         btRigidBody::btRigidBodyConstructionInfo rbInfo(mass,myMotionState,groundShape,localInertia);

         btRigidBody* body = new btRigidBody(rbInfo);

         //add the body to the dynamics world

         m_DynamicsWorld->addRigidBody(body);

     }

     for(int i=; i<; ++i){

         btCollisionShape* boxShape = new btBoxShape(btVector3(btScalar(1.5f),btScalar(.f),btScalar(.f)));

         m_CollisionShapes.push_back(boxShape);

         btTransform groundTransform;

         groundTransform.setIdentity();

         groundTransform.setOrigin(btVector3(,i*2.0f+1.0f,i*0.5f));

         btScalar mass(.f);

         btVector3 localInertia(,,);

         if( mass != .f )

             boxShape->calculateLocalInertia(mass,localInertia);

         //using motionstate is recommended, it provides interpolation capabilities, and only synchronizes 'active' objects

         btDefaultMotionState* myMotionState = new btDefaultMotionState(groundTransform);

         btRigidBody::btRigidBodyConstructionInfo rbInfo(mass,myMotionState,boxShape,localInertia);

         btRigidBody* body = new btRigidBody(rbInfo);

         //add the body to the dynamics world

         m_DynamicsWorld->addRigidBody(body);

     }

 }

 void bt_end()

 {

     //remove the rigidbodies from the dynamics world and delete them

     for (int i=m_DynamicsWorld->getNumCollisionObjects()-; i>= ;i--)

     {

         btCollisionObject* obj = m_DynamicsWorld->getCollisionObjectArray()[i];

         btRigidBody* body = btRigidBody::upcast(obj);

         if (body && body->getMotionState())

             delete body->getMotionState();

         m_DynamicsWorld->removeCollisionObject( obj );

         delete obj;

     }

     //delete collision shapes

     for (int i=;i<m_CollisionShapes.size();i++)

     {

         btCollisionShape* shape = m_CollisionShapes[i];

         m_CollisionShapes[i] = ;

         delete shape;

     }

     //delete dynamicsworld and ...

     delete m_DynamicsWorld;

     delete m_ConstraintSolver;

     delete m_Broadphase;

     delete m_Dispatcher;

     delete m_CollisionConfiguration;

     m_CollisionShapes.clear();

 }
bt_start()函数中构建DynamicsWorld,包括Broadphase、Dispatcher、ConstraintSolver、RigidBodys。Bullet的设计原则是:谁new对象,谁就负责delete它,所以在bt_end()函数中delete所有new出来的对象。bt_rundraw()函数调用btDiscreteDynamicsWorld:: stepSimulation()步进模拟时间,并用OpenGL绘制所模拟的物体。该程序用到了OpenMP库的时间函数,参见:OpenMP共享内存并行编程总结表。
bt_start()、bt_end()、bt_rundraw()的使用方法是:在初始化代码中调用bt_start(),在模拟完成(动画结束)后调用bt_end()释放资源,在绘制每帧时调用bt_rundraw()。
读者也可以看看Bullet Demo中的App_BasicDemo项目,这里指出App_BasicDemo项目中和Bullet相关代码的地方:和bt_start()对应的代码在BasicDemo::initPhysics()(BasicDemo.cpp文件116行);和bt_end()对应的代码在BasicDemo::exitPhysics()(BasicDemo.cpp文件231行);和bt_rundraw()对应的代码在BasicDemo::clientMoveAndDisplay()(BasicDemo.cpp文件64行),具体OpenGL绘制代码在父类里,就不细说了,可以看到,Bullet Demo使用了阴影体技术(Shadow Volumes)绘制阴影。
另外Bullet官网也有教程解释HelloWorld程序,见参考文献所列的链接。
考虑到方便本文的读者做实验,将程序共享出来,程序写的甚是简陋,请轻拍:
链接:http://pan.baidu.com/share/link?shareid=851836958&uk=2299460138 密码:k8sj
可以拖拽鼠标调整视角,滚动滚轮缩放,按键盘r键开始动画,OpenGL程序配置见我的另一篇文章:配置自己的OpenGL库,glew、freeglut库编译,库冲突解决(附OpenGL Demo程序)。Bullet的编译安装见:windows下Bullet 2.82编译安装(Bullet Physics开发环境配置)。
参考文献:
Bullet 2.82 Physics SDK Manual(在下载的Bullet包中)
http://bulletphysics.org/mediawiki-1.5.8/index.php/Hello_World
Bullet Demo App_BasicDemo(在下载的Bullet包中)
Bullet核心类介绍(Bullet 2.82 HelloWorld程序及其详解,附程序代码)的更多相关文章
- java基础:详解类和对象,类和对象的应用,封装思想,构造方法详解,附练习案列
1. 类和对象 面向对象和面向过程的思想对比 : 面向过程 :是一种以过程为中心的编程思想,实现功能的每一步,都是自己实现的 面向对象 :是一种以对象为中心的编程思想,通过指挥对象实现具体的功能 1. ...
- Unity3D核心类介绍
脚本介绍与Unity核心类介绍 -------------------------------------------------------------------------------- 脚本介 ...
- Spring源码分析(1)容器的基本实现——核心类介绍
bean是Spring中最核心的东西,因为Spring就像是个大水桶,而bean就像是容器中的水,水桶脱离了水便也没什么用处了,那么我们先看看bean的定义. public class MyTestB ...
- InheritableThreadLocal类原理简介使用 父子线程传递数据详解 多线程中篇(十八)
上一篇文章中对ThreadLocal进行了详尽的介绍,另外还有一个类: InheritableThreadLocal 他是ThreadLocal的子类,那么这个类又有什么作用呢? 测试代码 p ...
- 007-Scala类的属性和对象私有字段实战详解
007-Scala类的属性和对象私有字段实战详解 Scala类的使用实战 变量里的类必须赋初值 def函数时如果没参数可不带括号 2.不需要加Public声明 getter与setter实战 gett ...
- ES6 类(Class)基本用法和静态属性+方法详解
原文地址:http://blog.csdn.net/pcaxb/article/details/53759637 ES6 类(Class)基本用法和静态属性+方法详解 JavaScript语言的传统方 ...
- Spring源码解析——核心类介绍
前言: Spring用了这么久,虽然Spring的两大核心:IOC和AOP一直在用,但是始终没有搞懂Spring内部是怎么去实现的,于是决定撸一把Spring源码,前前后后也看了有两边,很多东西看了就 ...
- JAVAEE——spring01:介绍、搭建、概念、配置详解、属性注入和应用到项目
一.spring介绍 1.三层架构中spring位置 2.spring一站式框架 正是因为spring框架性质是属于容器性质的. 容器中装什么对象就有什么功能.所以可以一站式. 不仅不排斥其他框架,还 ...
- Solr系列五:solr搜索详解(solr搜索流程介绍、查询语法及解析器详解)
一.solr搜索流程介绍 1. 前面我们已经学习过Lucene搜索的流程,让我们再来回顾一下 流程说明: 首先获取用户输入的查询串,使用查询解析器QueryParser解析查询串生成查询对象Query ...
随机推荐
- linux操作系统基础
计算机概述 1.计算机接收用户输入指令数据,经过cpu数据与逻辑单元运算处理后,产生或储存成有用的信息--->I/O设备+cpu+处理信息=计算机. 2.计算机五大单元:I/O单元 内存单元 c ...
- placeholder 使用
这个属性是用于INPUT当中. 实现效果: 1.鼠标点击进入<input type='buttom' placeholder='用户名'> 2.用户名内容消失:不在使用以前的Value,来 ...
- JAVA动手动脑异常处理
1>请阅读并运行AboutException.java示例,然后通过后面的几页PPT了解Java中实现异常处理的基础知识. import javax.swing.*; class AboutEx ...
- placeholder 颜色更改
::-webkit-input-placeholder { /* WebKit browsers */ color: #999; } :-moz-placeholder { /* Mozilla Fi ...
- 简单尝试利用vultr vps自架PPTP上网用于工作学习需要
因为学习和工作的需要用到登陆海外网站查阅相关的资料和文档,之前有需要使用的时候是问网友索要的账户登录本地电脑拨号的,但是老是跟别人要还是不好,决定自己尝试搭建一个长期使用.看到有不少的介绍提到VULT ...
- Ajax与Comet
1.Ajax核心? XHR >>1.新建XMLHttpRequest >>2.open(),接受3个参数. >>3.send(),接受1个参数. >>4 ...
- CheckBoxList控件获取多选择,需要遍历
CheckBoxList控件获取多选择,需要遍历,环境:vs2008 在页面上添加CheckBoxList控件,输入项值 a,b,c,d.然后添加按钮 Button2确定,如何获取CheckBoxLi ...
- mysql,node.js
var mysql = require('mysql'); var pool = mysql.createPool({ host: 'localhost', user: 'root', passwor ...
- css测试题
1.CSS 指的是? 您的回答:Computer Style Sheets 正确答案:Cascading Style Sheets 2.在以下的 HTML 中,哪个是正确引用外部样式表的方法? 您的回 ...
- java语法基本知识
java中,变量分为局部和成员变量.局部变量在程序运行的过程中在栈stack中分配存储空间. 从上到下是:heap, stack, data segment, code segment.