14. 流、文件和IO
前言
InputStream/OutStream流用来处理设备之间的数据传输
Java.io 包几乎包含了所有操作输入、输出需要的类。所有这些流类代表了输入源和输出目标。
Java.io 包中的流支持很多种格式,比如:基本类型、对象、本地化字符集等等。
一个流可以理解为一个数据的序列。输入流表示从一个源读取数据,输出流表示向一个目标写数据。
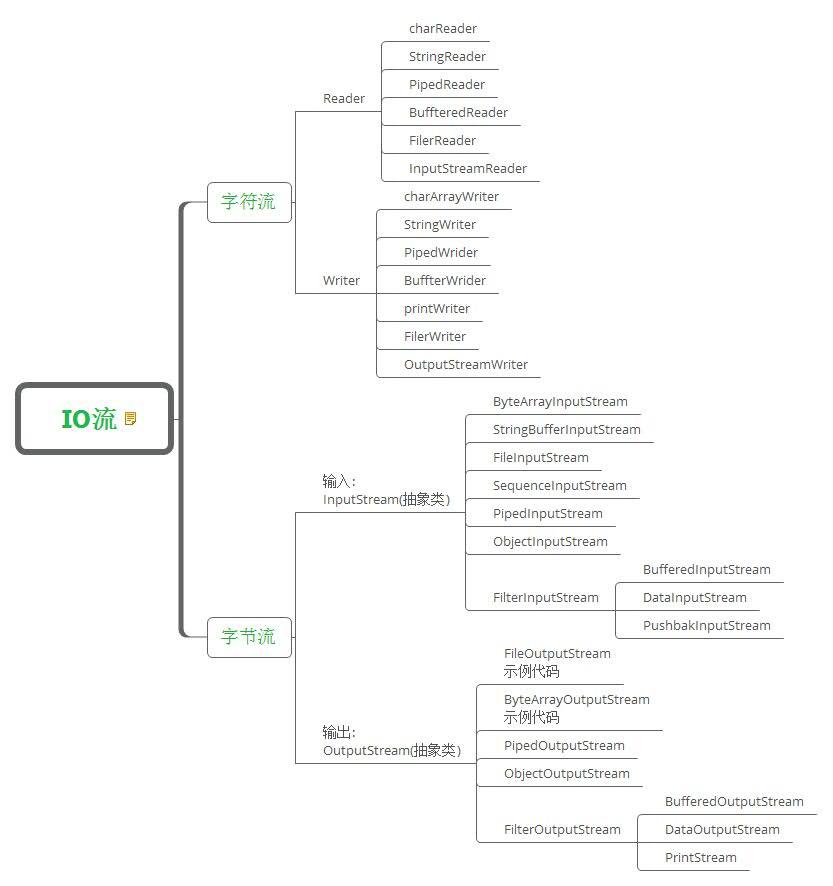
- 流按操作数据分为两种:字节流与字符流
- 按流向分为:输入流(InputStream)和输出流(OutputStream)
Java 为 I/O 提供了强大的而灵活的支持,使其更广泛地应用到文件传输和网络编程中。
IO流常用基类:
字节流的抽象基类:
InputStream,OutputStream
字符流的抽象基类:
Reader,Writer
注意:由这四个类派生出来的子类名称都是以其父类名的后缀
如:InputStream的子类FileInputStream

Reader的子类BufferedReader
1. 控制台IO
1.1 读取控制台输入
Java 的控制台输入由 System.in 完成。
为了获得一个绑定到控制台的字符流,你可以把 System.in 包装在一个 BufferedReader 对象中来创建一个字符流。
下面是创建 BufferedReader 的基本语法:
BufferedReader br = new BufferedReader(new InputStreamReader(System.in));
BufferedReader 对象创建后,我们便可以使用 read() 方法从控制台读取一个字符,或者用 readLine() 方法读取一个字符串。
1.2 从控制台读取多字符输入
从 BufferedReader 对象读取一个字符要使用 read() 方法,它的语法如下:
int read( ) throws IOException
每次调用 read() 方法,它从输入流读取一个字符并把该字符作为整数值返回。 当流结束的时候返回 -1。该方法抛出 IOException。
例子:用 read() 方法从控制台不断读取字符直到用户输入 "q"。
// 使用 BufferedReader 在控制台读取字符

import java.io.*;

public class BRRead {

  public static void main(String args[]) throws IOException

  {

    char c;

    // 使用 System.in 创建 BufferedReader

    BufferedReader br = new BufferedReader(new

                       InputStreamReader(System.in));

    System.out.println("输入字符, 按下 'q' 键退出。");

    // 读取字符

    do {

       c = (char) br.read();

       System.out.println(c);

    } while(c != 'q');

  }

}
1.3 从控制台读取字符串
从标准输入读取一个字符串需要使用 BufferedReader 的 readLine() 方法。
下面的程序读取和显示字符行直到你输入了单词"end"。
格式是:
String readLine( ) throws IOException

// 使用 BufferedReader 在控制台读取字符

import java.io.*;

public class BRReadLines {

  public static void main(String args[]) throws IOException

  {

    // 使用 System.in 创建 BufferedReader

    BufferedReader br = new BufferedReader(new

                            InputStreamReader(System.in));

    String str;

    System.out.println("Enter lines of text.");

    System.out.println("Enter 'end' to quit.");

    do {

       str = br.readLine();

       System.out.println(str);

    } while(!str.equals("end"));

  }

}
JDK 5 后的版本我们也可以使用 Java Scanner 类来获取控制台的输入。
1.4 控制台输出
控制台的输出由 print( ) 和 println() 完成。这些方法都由类 PrintStream 定义,System.out 是该类对象的一个引用。
PrintStream 继承了 OutputStream类,并且实现了方法 write()。这样,write() 也可以用来往控制台写操作。
PrintStream 定义 write() 的最简单格式如下所示:
void write(int byteval)
该方法将 byteval 的低八位字节写到流中。
例子:用 write() 把字符 "A" 和紧跟着的换行符输出到屏幕:
import java.io.*;

// 演示 System.out.write().

public class WriteDemo {

   public static void main(String args[]) {

      int b;

      b = 'A';

      System.out.write(b);

      System.out.write('\n');

   }

}
注意:write() 方法不经常使用,因为 print() 和 println() 方法用起来更为方便。
2. 文件的操作
一个流被定义为一个数据序列。输入流用于从源读取数据,输出流用于向目标写数据。
描述输入流和输出流的类层次图:
两个重要的流是 FileInputStream 和 FileOutputStream:
2.1 FileInputStream
2.1.1 创建
该流用于从文件读取数据,它的对象可以用关键字 new 来创建。
有多种构造方法可用来创建对象。
可以使用字符串类型的文件名来创建一个输入流对象来读取文件:
InputStream f = new FileInputStream("res/text.txt");
也可以使用一个文件对象来创建一个输入流对象来读取文件。我们首先得使用 File() 方法来创建一个文件对象:
File f = new File("res/text.txt");

InputStream out = new FileInputStream(f);
2.1.2 操作
public void close() throws IOException{}

关闭此文件输入流并释放与此流有关的所有系统资源。抛出IOException异常。

protected void finalize()throws IOException {}

这个方法清除与该文件的连接。确保在不再引用文件输入流时调用其 close 方法。抛出IOException异常。

public int read(int r)throws IOException{}

这个方法从 InputStream 对象读取指定字节的数据。返回为整数值。返回下一字节数据,如果已经到结尾则返回-1。

public int read(byte[] r) throws IOException{}

这个方法从输入流读取r.length长度的字节。返回读取的字节数。如果是文件结尾则返回-1。

public int available() throws IOException{}

返回下一次对此输入流调用的方法可以不受阻塞地从此输入流读取的字节数。返回一个整数值。
除了FileInputStream还有其它常用的流:
2.2 FileOutputStream
2.2.1 创建
该类用来创建一个文件并向文件中写数据。
如果该流在打开文件进行输出前,目标文件不存在,那么该流会创建该文件。
有两个构造方法可以用来创建 FileOutputStream 对象。
使用字符串类型的文件名来创建一个输出流对象:
OutputStream f = new FileOutputStream("res/text.txt")
也可以使用一个文件对象来创建一个输出流来写文件。我们首先得使用File()方法来创建一个文件对象:
File f = new File("res/text.txt");

OutputStream f = new FileOutputStream(f);
2.2.2 操作
public void close() throws IOException{}

关闭此文件输入流并释放与此流有关的所有系统资源。抛出IOException异常。

protected void finalize()throws IOException {}

这个方法清除与该文件的连接。确保在不再引用文件输入流时调用其 close 方法。抛出IOException异常。

public void write(int w)throws IOException{}

这个方法把指定的字节写到输出流中。

public void write(byte[] w)

把指定数组中w.length长度的字节写到OutputStream中。
扩展:
FileInputStream和FileOutputStream
除了FileOutputStream外,还有一些其他的常用输出流:
实例1:
import java.io.*;

public class FileStreamTest {

    public static void main(String[] args) throws Exception{

        //输出流

        byte[] bWrite = {1,97,3,65,0,48};

        OutputStream os = new FileOutputStream("res/text.txt");

        for (int i = 0; i < bWrite.length; i++) {

            os.write(bWrite[i]);

        }

        os.close();

        //输入流

        InputStream is = new FileInputStream("res/Text.txt");

        int size = is.available();

        for (int i = 0; i < bWrite.length; i++) {

            System.out.println((char)is.read());

        }

        is.close();

    }

}
上面的程序首先创建文件test.txt,并把给定的数字以二进制形式写进该文件,同时输出到控制台上。
实例2: 以上代码由于是二进制写入,可能存在乱码,你可以使用以下代码实例来解决乱码问题:
package com.rimi.test;

import java.io.*;

public class FileStreamTest {

    public static void main(String[] args) throws IOException{

            //输出流

            byte[] bWrite = {1,97,3,65,0,48};

            OutputStream os = new FileOutputStream("res/text.txt");

            for (int i = 0; i < bWrite.length; i++) {

                os.write(bWrite[i]);

            }

            os.close();

            //输入流

            InputStream is = new FileInputStream("res/Text.txt");

            int size = is.available();

            for (int i = 0; i < bWrite.length; i++) {

                System.out.println((char)is.read());

            }

            is.close();

            //构建FileOutputStream对象,文件不存在会自动新建

            File f = new File("res/text1.txt");

            FileOutputStream fos = new FileOutputStream(f);

            // 构建OutputStreamWriter对象,参数可以指定编码,默认为操作系统默认编码,windows上是gbk

            OutputStreamWriter oswWriter = new OutputStreamWriter(fos);

            // 写入到缓冲区

            oswWriter.append("中文输入");

            //换行

            oswWriter.append("\r\n");

            //写入到缓冲区

            oswWriter.append("Chinese");

            // 刷新缓冲区,写入到文件,如果下面已经没有写入的内容了,直接close也会写入

            oswWriter.flush();

            //关闭写入流,同时会把缓冲区内容写入文件,所以上面的注释掉

            oswWriter.close();

            // 关闭输出流,释放系统资源

            fos.close();

            //构建FileInputStream对象

            FileInputStream fis = new FileInputStream(f);

            //构建InputStreamReader对象,编码与写入相同

            InputStreamReader isReader = new InputStreamReader(fis,"UTF-8");

            StringBuffer sb = new StringBuffer();

            while (isReader.ready()) {

                //读取的数字转换为char加入sb中

                sb.append((char)isReader.read());

            }

            //关闭读取流

            isReader.close();

            //关闭输入流

            fis.close();

            System.out.println(sb);

    }

}
InputStreamReader和OutputStreamWriter
2.2.3 复制文件(非文本)
public static void main(String[] args) {

    try {

        InputStream fis = new FileInputStream("C:\\Users\\hasee\\Pictures\\54f962a8a20a9.jpg");

        OutputStream fos = new FileOutputStream("res/pic1.jpg");

        int ch = 0;//一个一个读

        while ((ch = fis.read()) != -1) {

            fos.write(ch);

        }

        fis.close();

        fos.close();

    } catch (IOException e) {

        e.printStackTrace();

    }

}
还可以一次读一个数组
//装进数组读

    byte[] bt = new byte[1024];

    int ch = 0;

    while((ch = fis.read(bt)) != -1){

    System.out.println(new String(bt,0,ch));

    }

//装进一个刚刚好的数组里读

//返回下一次对此输入流调用的方法可以不受阻塞地从此输入流读取(或跳过)的估计剩余字节数。

//简单讲:返回就是字节数

   int num = fis.available();

// System.out.println(num);

//定义一个刚刚好的缓冲区,省掉循环

   byte[] bt = new byte[num];

   fis.read(bt);
思路:
- 用字节读取流对象和图片关联。
- 用字节写入流对象创建一个图片文件,用语存储获取到的图片数据
- 通过循环读写,完成数据的存储
- 关闭资源
注意java中相对路径用/,绝对路径要用\
2.2.4 字节流缓冲区
public static void main(String[] args) {

    // try {

    // InputStream fis = new

    // FileInputStream("C:\\Users\\hasee\\Pictures\\54f962a8a20a9.jpg");

    // OutputStream fos = new FileOutputStream("res/pic1.jpg");

    // int ch = 0;//一个一个读

    // while ((ch = fis.read()) != -1) {

    // fos.write(ch);

    // }

    // fis.close();

    // fos.close();

    // } catch (IOException e) {

    // e.printStackTrace();

    // }

    long starttime = System.currentTimeMillis();

    try {

        copy();

    } catch (IOException e) {

        e.printStackTrace();

    }

    long endtime = System.currentTimeMillis();

    System.out.println("所需时间:" + (endtime - starttime) + "毫秒");

}

// 通过字节流缓冲区完成复制

public static void copy() throws IOException {

    BufferedInputStream bis = new BufferedInputStream(

            new FileInputStream("res/Curtis Stigers & The Forest Rangers - This Life.mp3"));

    BufferedOutputStream bos = new BufferedOutputStream(

            new FileOutputStream("res/temp.mp3"));

    int ch = 0;

    while ((ch = bis.read()) != -1) {

        bos.write(ch);

    }

    bis.close();

    bos.close();

}
2.3 FileWriter和FileReader
FileWriter类 和 FileReader类的一些基本用法
缓冲读写的BufferedWriter和BufferedReader
扩展:java中为什么BufferedReader,BufferedWriter 要比 FileReader 和 FileWriter高效?
2.3.1 创建文件并写入内容
    FileWriter fw = null;

    try {

     // 创建一个 FileWriter 实例对象,文件写句柄,

        fw = new FileWriter("res/text2.txt");

         // 创建一个 BufferedWriter 实例对象,获取文件的写入句柄,向文件里面写入信息

        BufferedWriter bw = new BufferedWriter(fw);

        //通过write()方法往文件里面写入信息。

        bw.write("你好!hello world!");

        //关闭

        bw.close();

        fw.close();

    } catch (IOException e) {

        // TODO Auto-generated catch block

        e.printStackTrace();

    }
2.3.2 读取文件
    FileReader fr;

    try {

    // FileReader 创建一个文件读句柄

        fr = new FileReader("res/text2.txt");

    //创建一个文件内容读取句柄,读取文件内容

        BufferedReader br = new BufferedReader(fr);

        String str = null ;

        try {

                while((str = br.readLine()) != null){

                    System.out.println(str);

                }

                br.close();

            } catch (IOException e) {

                // TODO Auto-generated catch block

                e.printStackTrace();

            }

        } catch (FileNotFoundException e) {

            // TODO Auto-generated catch block

            e.printStackTrace();

        }
2.3.3 删除文件
    File file =  new File("res/text.txt");

    if(file.delete()){

        System.out.println(file.getName()+"删除成功!");

    }else{

        System.out.println("删除失败!");

    }
2.3.4 往文件添加数据
    // 直接写会把里面的内容覆盖掉

    try {

        FileWriter fw = new FileWriter("res/text2.txt", true);//apend参数true,添加模式

        BufferedWriter bw = new BufferedWriter(fw);

        bw.write("\n你上午好" + new Date());

        bw.close();

        FileReader fr = new FileReader("res/text2.txt");

        char[] chr = new char[1024];

        int num = 0;

        while ((num = fr.read(chr)) != -1) {

            System.out.println(new String(chr, 0, num));

        }

        fw.close();

    } catch (IOException e) {

        e.printStackTrace();

    }
2.3.5 创建临时文件
    File file = new File("res/temp.txt");

    if(file.exists()){

        System.out.println("文件已存在");

    }else{

        System.out.println("文件不存在");

    //  创建一个新的文件

        try {

            file.createNewFile();

        } catch (IOException e) {

            // TODO Auto-generated catch block

            e.printStackTrace();

        }

        System.out.println("成功创建文件");

    //  程序结束自动删除

        file.deleteOnExit();

    }
2.3.6 获取/修改文件最后修改时间
获取文件最后修改时间
    File file = new File("res/text1.txt");

    Date date = new Date(file.lastModified());

    SimpleDateFormat sformat = new SimpleDateFormat("yyyy-MM-dd hh:mm:ss");

    System.out.println("文件最后修改日期:" +  sformat.format(date));
修改文件最后修改时间
    File file = new File("res/text1.txt");

    Date date = new Date(file.lastModified());

    SimpleDateFormat sformat = new SimpleDateFormat("yyyy-MM-dd hh:mm:ss");

    System.out.println("文件创建日期:" +  sformat.format(date));

    System.out.println(file.setLastModified(System.currentTimeMillis()));

    date = new Date(file.lastModified());

    System.out.println("文件修改日期:" +  sformat.format(date));
2.3.7 判断文件是否存在
 File file = new File("res/temp.txt");

 System.out.println("文件是否存在:" + file.exists());
2.3.8 计算文件大小
    File file = new File("res/text2.txt");

    //file.exists()判断文件是否存在,有则返回true

    //file.isFile()表示文件是否是一个标准文件

    if (!file.exists() || !file.isFile()) {

        System.out.println("文件不存在");

    }

    System.out.println(file.length()+"bytes");
2.3.9 文件重命名
    File oldname = new File("res/text2.txt");

    File newname = new File("res/重名后的text2.txt");

    if(oldname.renameTo(newname)){

        System.out.println("重命名成功!");

    }else{

        System.out.println("重命名失败!");

    }
2.3.10 设置文件为只读/可写
    File file = new File("res/text1.txt");

    //设置文件为只读

    System.out.println("设置文件为只读是否成功:" + file.setReadOnly());

    //判断文件是否可以写入

    System.out.println("文件是否可以写入:" + file.canWrite());

    System.out.println("设置文件为可写是否成功:" + file.setWritable(true));

    System.out.println("文件是否可以写入:" + file.canWrite());
2.3.11 在指定目录中创建文件
    File file = new File("d:/abc.txt");//操作c盘根目录或者系统目录时注意权限问题

    try {

        file.createNewFile();

    } catch (IOException e) {

        // TODO Auto-generated catch block

        e.printStackTrace();

    }
2.3.12 全文件名(包括路径)比较
    File file1 = new File("res/text1.txt");

    File file2 = new File("res/重名后的text2.txt");

    if(file1.compareTo(file2) == 0) {

        System.out.println("文件路径一致!");

    } else {

        System.out.println("文件路径不一致!");

    }
2.3.13 复制文件
复制:复制的原理:其实就是将文件数据存储到另一个文件中
- 先创建一个文件,用于存储复制的数据
- 定义读取流和要拷贝的文件进行关联
- 通过不断的读写完成数据的存储
- 关闭资源
复制方法1:
    FileWriter fw = null;

    try {

        // 创建一个新的文件,用于复制的内容存储

        fw = new FileWriter("res/copyOfText1.txt");

    } catch (IOException e) {

        e.printStackTrace();

    }

    FileReader fr;

    try {

        fr = new FileReader("res/text1.txt");

        int ch = 0;

        while ((ch = fr.read()) != -1) {

            fw.write(ch);

        }

        fw.close();

    } catch (IOException e) {

        e.printStackTrace();

    }
复制方法2:
    FileWriter fw = null;

    FileReader fr = null;

    try {

        // 写入的目标文件

        fw = new FileWriter("res/copy2Oftext1.txt");

        // 读取的目标文件

        fr = new FileReader("res/text1.txt");

        // 创建每次读取的大小是1024字节

        char[] chr = new char[1024];

        int len = 0;

        while ((len = fr.read(chr)) != -1) {

            fw.write(chr, 0, len);

        }

    } catch (IOException e) {

        e.printStackTrace();

    } finally {

        if (fr != null) {

            try {

                fr.close();

            } catch (IOException e) {

                e.printStackTrace();

            }

        }

        if (fw != null) {

            try {

                fw.close();

            } catch (IOException e) {

                e.printStackTrace();

            }

        }

    }
2.3.14 流的关闭
我们在关闭流的时候一定要在finally里面,在关闭的时候要加判断,判断我们的文件是否存在,如果前面代码抛出异常是不会运行后面的代码,所以在关闭的时候要加上if判断其是否为空,不为空则关闭。
finally{

    try {

        if(fw != null){

        fw.close();

        }

    } catch (IOException e) {

        // TODO Auto-generated catch block

        e.printStackTrace();

    }

}
练习:
读取一个java文件,在控制台输出这个java文件
3. 流操作的总结
流操作的基本规律:
流对象有很多,我们不知道该用哪一个。我们通过下面三个明确来确定:
明确源和目的
源:输入流 InputStream Reader

目的:输出流 OutputStream Writer
操作的是否是纯文本
是:字符流

不是:字节流
当体系明确后,再明确要使用哪个具体对象
通过设备来进行区分

源设备:内存,硬盘,键盘

目的设备:内存,硬盘,控制台
4. 装饰设计模式
3.1 装饰设计模式概念
当想要对已有的对象进行功能增强时,可以定义类,将已有对象传入,基于已有的功能,并提供加强功能,那么自定义的该类就称之为装饰类。 装饰类通常会通过构造方法接收被装饰的对象。并基于被装饰的对象的功能,提供更强的功能
public class Person {

    public void eat(){

        System.out.println("吃饭!");

}

}

class SuperPerson{

    private Person p;

    SuperPerson(Person p){

        this.p = p;

}

public void superEat(){

    System.out.println("开胃酒");

    p.eat();

    System.out.println("小吃、甜点");

}
3.2 装饰和继承有什么区别?
装饰设计模式:

当想要对已有的对象进行功能增强时,

可以定义类,将已有对象传入,基于已有的功能,并提供加强功能。

那么自定义的该类称为装饰类。

装饰类通常会通过构造方法接收被装饰的对象。

并基于被装饰的对象的功能,提供更强的功能。
装饰和继承
MyReader//专门用于读取数据的类。
|--MyTextReader

    |--MyBufferTextReader

|--MyMediaReader

    |--MyBufferMediaReader

|--MyDataReader

    |--MyBufferDataReader
·
class MyBufferReader

{

    MyBufferReader(MyTextReader text)

    {}

    MyBufferReader(MyMediaReader media)

    {}

}
上面这个类扩展性很差。
找到其参数的共同类型。通过多态的形式。可以提高扩展性。
class MyBufferReader extends MyReader

{

    private MyReader r;

    MyBufferReader(MyReader r)

    {}

}
MyReader//专门用于读取数据的类。
|--MyTextReader

|--MyMediaReader

|--MyDataReader

|--MyBufferReader//装饰类
以前是通过继承将每一个子类都具备缓冲功能。那么继承体系会复杂,并不利于扩展。
现在优化思想。单独描述一下缓冲内容。将需要被缓冲的对象。传递进来。也就是,谁需要被缓冲,谁就作为参数传递给缓冲区。这样继承体系就变得很简单。优化了体系结构。
装饰模式比继承要灵活。避免了继承体系臃肿。而且降低了类于类之间的关系。
装饰类因为增强已有对象,具备的功能和已有的是相同的,只不过提供了更强功能。所以装饰类和被装饰类通常是都属于一个体系中的。
3.3 举例
LineNumberReader:BufferedReader的装饰类,在每一行前加上行号
    FileReader fr = null;

    LineNumberReader lnReader = null;

    try {

         fr = new FileReader("res/重名后的text2.txt");

         lnReader = new LineNumberReader(fr);

        String line = null;

        try {

            while((line = lnReader.readLine()) != null){

            System.out.println(lnReader.getLineNumber()+":"+line);

            }

        } catch (IOException e) {

            e.printStackTrace();

        }

    } catch (FileNotFoundException e) {

        e.printStackTrace();

    }finally{

        try {

            lnReader.close();

        } catch (IOException e) {

            e.printStackTrace();

        }

    }
练习:
模拟LineNumberReader自定义一个实现类。功能有getLineNumber()和readLine()方法
5. 目录的操作
public static void main(String[] args) {

    // 递归创建目录

    String path = "D:\\a\\b\\c\\d\\e\\f\\g";

    addFile(path);

}

public static void addFile(String path) {

    File file = new File(path);

    // mkdir 创建单个目录

    if (file.mkdirs()) { // 创建多个目录

        System.out.println("目录" + path + "创建成功");

    } else {

        System.out.println("目录" + path + "创建失败");

    }

}
1、获取文件的目录
file.getPath();
2、判断一个文件是否为隐藏文件
file.isHidden()返回boolean值
3、查看工作目录
 String curDir = System.getProperty("user.dir");

 System.out.println(curDir);
4、获取文件的上级目录
file.getParent()
5、判断 file 是否是目录
file.isDirectory()
6、获取目录目录下面的文件与文件夹
file.list()
7、目录 dir 必须要是空的,才能被删除
file.delete()
举例: 获取指定目录下的所有目录
    public static void main(String[] args) {

         printDirsStruct("d:\\a",1);

    }

    public static void printDirsStruct(String pathName,int index) {

        File f = new File(pathName);

        // 1 判断是不是目录

        if (f.isDirectory()) {

            for (int i = 0; i < index; i++) {

                System.out.print("-");

            }

            // 2 如果是目录,打印自己

            System.out.println(f.getName());

            // 3 如果该目录里面还有子目录,就要调用自己打印该子目录。

            for (String str : f.list()) {

                String newPath = pathName + "/" + str;

                File f1 = new File(newPath);

                if (f1.isDirectory()) {

                    printDirsStruct(newPath, index + 1);

                }

            }

        }

    }
练习:
实现一个递归删除目录的方法
*:first-child {
margin-top: 0 !important;
}
body>*:last-child {
margin-bottom: 0 !important;
}
/* BLOCKS
=============================================================================*/
p, blockquote, ul, ol, dl, table, pre {
margin: 15px 0;
}
/* HEADERS
=============================================================================*/
h1, h2, h3, h4, h5, h6 {
margin: 20px 0 10px;
padding: 0;
font-weight: bold;
-webkit-font-smoothing: antialiased;
}
h1 tt, h1 code, h2 tt, h2 code, h3 tt, h3 code, h4 tt, h4 code, h5 tt, h5 code, h6 tt, h6 code {
font-size: inherit;
}
h1 {
font-size: 28px;
color: #000;
}
h2 {
font-size: 24px;
border-bottom: 1px solid #ccc;
color: #000;
}
h3 {
font-size: 18px;
}
h4 {
font-size: 16px;
}
h5 {
font-size: 14px;
}
h6 {
color: #777;
font-size: 14px;
}
body>h2:first-child, body>h1:first-child, body>h1:first-child+h2, body>h3:first-child, body>h4:first-child, body>h5:first-child, body>h6:first-child {
margin-top: 0;
padding-top: 0;
}
a:first-child h1, a:first-child h2, a:first-child h3, a:first-child h4, a:first-child h5, a:first-child h6 {
margin-top: 0;
padding-top: 0;
}
h1+p, h2+p, h3+p, h4+p, h5+p, h6+p {
margin-top: 10px;
}
/* LINKS
=============================================================================*/
a {
color: #4183C4;
text-decoration: none;
}
a:hover {
text-decoration: underline;
}
/* LISTS
=============================================================================*/
ul, ol {
padding-left: 30px;
}
ul li > :first-child,
ol li > :first-child,
ul li ul:first-of-type,
ol li ol:first-of-type,
ul li ol:first-of-type,
ol li ul:first-of-type {
margin-top: 0px;
}
ul ul, ul ol, ol ol, ol ul {
margin-bottom: 0;
}
dl {
padding: 0;
}
dl dt {
font-size: 14px;
font-weight: bold;
font-style: italic;
padding: 0;
margin: 15px 0 5px;
}
dl dt:first-child {
padding: 0;
}
dl dt>:first-child {
margin-top: 0px;
}
dl dt>:last-child {
margin-bottom: 0px;
}
dl dd {
margin: 0 0 15px;
padding: 0 15px;
}
dl dd>:first-child {
margin-top: 0px;
}
dl dd>:last-child {
margin-bottom: 0px;
}
/* CODE
=============================================================================*/
pre, code, tt {
font-size: 12px;
font-family: Consolas, "Liberation Mono", Courier, monospace;
}
code, tt {
margin: 0 0px;
padding: 0px 0px;
white-space: nowrap;
border: 1px solid #eaeaea;
background-color: #f8f8f8;
border-radius: 3px;
}
pre>code {
margin: 0;
padding: 0;
white-space: pre;
border: none;
background: transparent;
}
pre {
background-color: #f8f8f8;
border: 1px solid #ccc;
font-size: 13px;
line-height: 19px;
overflow: auto;
padding: 6px 10px;
border-radius: 3px;
}
pre code, pre tt {
background-color: transparent;
border: none;
}
kbd {
-moz-border-bottom-colors: none;
-moz-border-left-colors: none;
-moz-border-right-colors: none;
-moz-border-top-colors: none;
background-color: #DDDDDD;
background-image: linear-gradient(#F1F1F1, #DDDDDD);
background-repeat: repeat-x;
border-color: #DDDDDD #CCCCCC #CCCCCC #DDDDDD;
border-image: none;
border-radius: 2px 2px 2px 2px;
border-style: solid;
border-width: 1px;
font-family: "Helvetica Neue",Helvetica,Arial,sans-serif;
line-height: 10px;
padding: 1px 4px;
}
/* QUOTES
=============================================================================*/
blockquote {
border-left: 4px solid #DDD;
padding: 0 15px;
color: #777;
}
blockquote>:first-child {
margin-top: 0px;
}
blockquote>:last-child {
margin-bottom: 0px;
}
/* HORIZONTAL RULES
=============================================================================*/
hr {
clear: both;
margin: 15px 0;
height: 0px;
overflow: hidden;
border: none;
background: transparent;
border-bottom: 4px solid #ddd;
padding: 0;
}
/* TABLES
=============================================================================*/
table th {
font-weight: bold;
}
table th, table td {
border: 1px solid #ccc;
padding: 6px 13px;
}
table tr {
border-top: 1px solid #ccc;
background-color: #fff;
}
table tr:nth-child(2n) {
background-color: #f8f8f8;
}
/* IMAGES
=============================================================================*/
img {
max-width: 100%
}
-->
14. 流、文件和IO的更多相关文章
- 【java学习笔记】文件读写(IO流)
1.字节流 FileInputStream.FileOutputStream ①FileInputStream import java.io.FileInputStream; public class ...
- 文件和IO流
摘要:本文主要介绍了Java的文件处理以及常用的IO流操作. 文件操作 概念 File是数据源(保存数据的地方)的一种,可以表示一个文件,也可以表示一个文件目录. File类只能对文件和文件夹进行创建 ...
- IO流-文件夹的拷贝
文件夹的拷贝操作 要求: 完成文件夹的拷贝,包括子目录的拷贝和所有文件的拷贝 分析: 首先,得在目标目录下创建一个与源文件夹名称相同的文件夹 遍历源文件夹中的所有文件对象,判断子文件是目录还是文件 如 ...
- java IO流文件的读写具体实例(转载)
引言: 关于java IO流的操作是非常常见的,基本上每个项目都会用到,每次遇到都是去网上找一找就行了,屡试不爽.上次突然一个同事问了我java文件的读取,我一下子就懵了第一反应就是去网上找,虽然也能 ...
- IO流文件拷贝
目录 IO流文件拷贝 前言 字节流(使用FileInputStream和FileOutputStream读取每一个字节...) 字节流(使用FileInputStream和FileOutputStre ...
- 文件读写IO
摘要:本文主要总结了以下有关文件读写的IO,系统调用与库函数. 1.初级IO函数:close,creat,lseek,open,write 文件描述符是一个整型数 1.1close 1.2int cr ...
- 【Go】使用压缩文件优化io (二)
原文链接: https://blog.thinkeridea.com/201907/go/compress_file_io_optimization2.html 上一篇文章<使用压缩文件优化io ...
- 【java】内存流:java.io.ByteArrayInputStream、java.io.ByteArrayOutputStream、java.io.CharArrayReader、java.io.CharArrayWriter
package 内存流; import java.io.ByteArrayInputStream; import java.io.ByteArrayOutputStream; import java. ...
- xilinx Vivado的使用详细介绍(2):创建工程、添加文件、综合、实现、管脚约束、产生比特流文件、烧写程序、硬件验证
xilinx Vivado的使用详细介绍(2):创建工程.添加文件.综合.实现.管脚约束.产生比特流文件.烧写程序.硬件验证 Author:zhangxianhe 新建工程 打开Vivado软件,直接 ...
随机推荐
- 用composer安装php代码(以安装phpmailer为例)
1.安装composer.exe软件 2.下载composer.phar 3.创建composer.json文件 { "require": { "php": & ...
- .NET Core 3.0之深入源码理解Kestrel的集成与应用(一)
写在前面 ASP.NET Core 的 Web 服务器默认采用Kestrel,这是一个基于libuv(一个跨平台的基于Node.js异步I/O库)的跨平台.轻量级的Web服务器. 在开始之前,先回 ...
- spark 2.x在windows环境使用idea本地调试启动了kerberos认证的hive
1 概述 开发调试spark程序时,因为要访问开启kerberos认证的hive/hbase/hdfs等组件,每次调试都需要打jar包,上传到服务器执行特别影响工作效率,所以调研了下如何在window ...
- HBase 学习之路(十一)—— Spring/Spring Boot + Mybatis + Phoenix 整合
一.前言 使用Spring+Mybatis操作Phoenix和操作其他的关系型数据库(如Mysql,Oracle)在配置上是基本相同的,下面会分别给出Spring/Spring Boot 整合步骤,完 ...
- CentOS 网络互通情况下把一个Linux服务器的文件发送到另一个服务器
scp -r 文件名/目录名 root@192.168.2.144:/home/hsw -r 发送目录使用,表示把该目录下的所有子目录以及文件发送过去
- JVM中有哪些内存区域,分别是用来干什么的
前言 之前我们探讨过一个.class文件是如何被加载到jvm中的.但是jvm内又是如何划分内存的呢?这个内被加载到了那一块内存中?jvm内存划分也是面试当中必被问到的一个面试题. 什么是jvm内存区域 ...
- PLT与GOT
0x01 什么是PLT和GOT 名称: PLT : 程序链接表(PLT,Procedure Link Table) GOT : 重局偏移表(GOT, Global Offset Table) 缘由: ...
- Java学习笔记之---方法和数组
Java学习笔记之---方法与数组 (一)方法 (1)什么是方法? 方法是解决一类问题的步骤的有序组合 方法包含于类或对象中 方法在程序中被创建,在其他地方被引用 (2)方法的优点 使程序变得更简短而 ...
- 17.Linux命令
1.网络配置 setup 配置 ifup eth0 启动网卡 文件保存在 /etc/sysconfig/network-scripts/ifcfg-eth0,修改ifcfg-eth0配 ...
- Nginx+Tomat8负载后,利用Redis实现Tomcat8的session共享
网上相应的文章应该都介绍,这里只特别记录下笔者在实操的过程出现的问题.此文件只针对tomcat 8 版本,之前版本可略过. tomcat 8 中的context.xml文件修改,增加以下配置. Jav ...