数据持久化—真机上的Plist写入
其实写入不到真机里面主要是你写入时,当前那文件夹里你要写入的plist根本不存在
所以你怎么写都写不进去,所以你必须先创建你要写入的plist;
你用这样初始化程序就能自己创建:
- NSMutableArray *dictplist = [[NSMutableArray alloc] init];
- [dictplist insertObject:markName atIndex:0];
- [dictplist writeToFile:plistPath atomically:YES];
直接下面这种是不行的
- NSMutableArray *array = [[NSMutableArray alloc] initWithContentsOfFile:plistPath];
- [array insertObject:markName atIndex:0];
- [array writeToFile:plistPath atomically:YES];
下面是具体的实现方法
一般plist 的写入位置在
写入文件的位置:(Library文件夹)
- NSString *lib = [NSSearchPathForDirectoriesInDomains(NSLibraryDirectory, NSUserDomainMask, YES) lastObject];
- NSString *libPath = [lib stringByAppendingString:@"/Caches"];
- NSString* plistPath = [libPath stringByAppendingFormat:@"/bookmark.plist"];
- NSLog(@"%@",plistPath);
- if(![[NSFileManager defaultManager] fileExistsAtPath:plistPath]) {
- NSMutableArray *dictplist = [[NSMutableArray alloc] init];
- [dictplist insertObject:markName atIndex:0];
- [dictplist writeToFile:plistPath atomically:YES];
- NSLog(@"------1-----%@",dictplist);
- }
- else
- {
- NSMutableArray *array = [[NSMutableArray alloc] initWithContentsOfFile:plistPath];
- [array insertObject:markName atIndex:0];
- [array writeToFile:plistPath atomically:YES];
- NSLog(@"-------2----%@",array);
- }
写入文件的位置:( Document 文件夹)
- NSArray *paths = NSSearchPathForDirectoriesInDomains(NSDocumentDirectory, NSUserDomainMask, YES);
- //获取完整路径
- NSString *documentsDirectory = [paths objectAtIndex:0];
- NSString *plistPath = [documentsDirectory stringByAppendingPathComponent:@"test2.plist"];
- NSLog(@"%@",plistPath);
- if(![[NSFileManager defaultManager] fileExistsAtPath:plistPath]) {
- NSMutableArray *dictplist = [[NSMutableArray alloc] init];
- [dictplist insertObject:markName atIndex:0];
- [dictplist writeToFile:plistPath atomically:YES];
- NSLog(@"------1-----%@",dictplist);
- }
- else
- {
- NSMutableArray *array = [[NSMutableArray alloc] initWithContentsOfFile:plistPath];
- [array insertObject:markName atIndex:0];
- [array writeToFile:plistPath atomically:YES];
- NSLog(@"-------2----%@",array);
- }
下面的是参考 http://blog.csdn.net/smallsky_keke/article/details/7431277
这篇文章是自己通过实践获取,在网上查过很多资料,也走了不上的弯路,由于刚开始学子不久,只是把自己遇到的问题贡献给大家
一,创建文件
//获取路径对象
NSArray *paths =NSSearchPathForDirectoriesInDomains(NSDocumentDirectory,NSUserDomainMask,
YES);
//获取完整路径
NSString *documentsDirectory = [paths objectAtIndex:0];
NSString *plistPath = [documentsDirectory stringByAppendingPathComponent:@"test.plist"];
NSMutableDictionary *dictplist = [[NSMutableDictionaryalloc
] init];
//设置属性值
[dictplist
setObject:@"张三" forKey:@"name"];
[dictplist
setObject:@"李四"forKey:@"name1"];
[dictplist
setObject:@"王五"forKey:@"name2"];
//写入文件
[dictplist
writeToFile:plistPath atomically:YES];
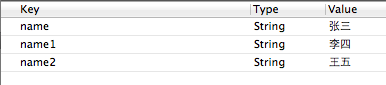
这个是创建了一个简单的plist文件,创建后的图1为:
下面是创建了一种多键值的plist文件,代码和图如下:
//获取路径对象
NSArray *paths =NSSearchPathForDirectoriesInDomains(NSDocumentDirectory,NSUserDomainMask,
YES);
//获取完整路径
NSString *documentsDirectory = [paths objectAtIndex:0];
NSString *plistPath = [documentsDirectory stringByAppendingPathComponent:@"test.plist"];
NSMutableDictionary *dictplist = [[NSMutableDictionaryalloc
] init];
//定义第一个插件的属性
NSMutableDictionary *plugin1 = [[NSMutableDictionaryalloc]init];
[plugin1
setObject:@"张三"forKey:@"name1"];
[plugin1
setObject:@"李四"forKey:@"name2"];
//定义第二个插件的属性
NSMutableDictionary *plugin2 = [[NSMutableDictionaryalloc]init];
[plugin2
setObject:@"王五"forKey:@"name1"];
[plugin2
setObject:@"赵斌"forKey:@"name2"];
//设置属性值
[dictplist
setObject:plugin1 forKey:@"初一班"];
[dictplist
setObject:plugin2 forKey:@"初二班"];
//写入文件
[dictplist
writeToFile:plistPath atomically:YES];
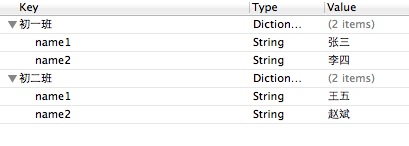
图2:
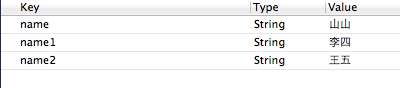
针对图1进行修改的程序,代码如下:
NSString *path = [[NSSearchPathForDirectoriesInDomains(NSDocumentDirectory,NSUserDomainMask,
YES) objectAtIndex:0]stringByAppendingPathComponent:@"test.plist"];
NSMutableDictionary *applist = [[[NSMutableDictionaryalloc]initWithContentsOfFile:path]mutableCopy];
NSString *name = [applist objectForKey:@"name"];
name =
@"山山";
[applist
setObject:name forKey:@"name"];
[applist
writeToFile:path atomically:YES];
执行后如下图:
针对图2进行修改的程序,代码如下:
[dictplist writeToFile:plistPath atomically:YES];
NSString *path = [[NSSearchPathForDirectoriesInDomains(NSDocumentDirectory,NSUserDomainMask,
YES)objectAtIndex:0]stringByAppendingPathComponent:@"test.plist"];
//根据路径获取test.plist的全部内容
NSMutableDictionary *infolist= [[[NSMutableDictionaryalloc]initWithContentsOfFile:path]mutableCopy];
//获取初一班的信息
NSMutableDictionary *info = [infolist objectForKey:@"初一班"];
NSString *name1 = [info objectForKey:@"name1"];
name1 =
@"山山";
[info
setValue:name1 forKey:@"name1"];
[infolist
setValue:info forKey:@"初一班"];
[infolist
writeToFile:path atomically:YES];
图如下:

以上两个修改信息的地方,必须要加入红色标记的方法,才能在表里进行增改操作。
以上是个人的学习心得,请大家多多指教。
数据持久化—真机上的Plist写入的更多相关文章
- iOS数据持久化-OC
沙盒详解 1.IOS沙盒机制 IOS应用程序只能在为该改程序创建的文件系统中读取文件,不可以去其它地方访问,此区域被成为沙盒,所以所有的非代码文件都要保存在此,例如图像,图标,声音,映像,属性列表,文 ...
- 数据持久化-Plist文件写入
数据持久化,常见4种:归档,plist文件,sqlite,coreData.今天复习的是plist文件读写. // // ViewController.m // Test_Plist // // Cr ...
- iOS - OC 数据持久化
1.Sandbox 沙箱 iOS 为每个应用提供了独立的文件空间,一个应用只能直接访问为本应用分配的文件目录,不可以访问其他目录,每个应用自己独立的访问空间被称为该应用的沙盒.也就是说,一个应用与文件 ...
- iOS - Swift 数据持久化
1.Sandbox 沙箱 iOS 为每个应用提供了独立的文件空间,一个应用只能直接访问为本应用分配的文件目录,不可以访问其他目录,每个应用自己独立的访问空间被称为该应用的沙盒.也就是说,一个应用与文件 ...
- iOS中 数据持久化 UI高级_17
数据持久化的本质就是把数据由内写到本地(硬盘中),在iOS指将数据写到沙盒文件夹下: 沙盒机制:指的就是采用沙盒文件夹的形式管理应用程序的本地文件,而且沙盒文件夹的名字是随机分配的,采用十六进制方法命 ...
- iOS -数据持久化方式-以真实项目讲解
前面已经讲解了SQLite,FMDB以及CoreData的基本操作和代码讲解(CoreData也在不断学习中,上篇博客也会不断更新中).本篇我们将讲述在实际开发中,所使用的iOS数据持久化的方式以及怎 ...
- iOS之数据持久化方案
概论 所谓的持久化,就是将数据保存到硬盘中,使得在应用程序或机器重启后可以继续访问之前保存的数据.在iOS开发中,有很多数据持久化的方案,接下来我将尝试着介绍一下5种方案: plist文件(属性列表) ...
- Docker数据持久化与容器迁移
上节讲到当容器运行期间产生的数据是不会在写镜像里面的,重新用此镜像启动新的容器就会初始化镜像,会加一个全新的读写入层来保存数据.如果想做到数据持久化,Docker提供数据卷(Data volume)或 ...
- iOS的数据持久化
所谓的持久化,就是将数据保存到硬盘中,使得在应用程序或机器重启后可以继续访问之前保存的数据.在iOS开发中,有很多数据持久化的方案,接下来我将尝试着介绍一下5种方案: plist文件(属性列表) pr ...
随机推荐
- MMU理解
MMU,全称Memory Manage Unit, 中文名——存储器管理单元. 许多年以前,当人们还在使用DOS或是更古老的操作系统的时候,计算机的内存还非常小,一般都是以K为单位进行计算,相应的,当 ...
- googletest--Test Fixture
前面博客中我们在单元测试之前会做一些变量初始化等工作,而同一个testcase的不同test之间往往会有一些初始化工作是相同的.我们不想做多余的重复的工作,当然同时也不想设置全局变量. 这个时候我们可 ...
- Boost--variant (C++中的union)
union联合体类型的问题 只能用于内部类型,这使得union在C++中几乎没有用 所以boost提供了variant,相当于是C++中的union #include "boost/vari ...
- 解决Sublime Text 3中文显示乱码问题
之前用Sublime Text 2,阅读了你是猴子派的救兵吗写的博客解决Sublime Text 2中文显示乱码问题,解决了问题. 后来嫌版本2启动太慢了,换成Sublime Text 3之后,发现网 ...
- Hive在集群环境配置
本文转载自:https://blog.csdn.net/hanjin7278/article/details/53035739 一.简介 hive是基于Hadoop的一个数据仓库工具,可以将结构化的数 ...
- QLExpress 规则引擎使用介绍
一个轻量级的类java语法规则引擎,作为一个嵌入式规则引擎在业务系统中使用.让业务规则定义简便而不失灵活.让业务人员就可以定义业务规则.支持标准的JAVA语法,还可以支持自定义操作符号.操作符号重载. ...
- HTML和SEO基础知识:H标签全透视
原文地址:http://www.chinaz.com/web/2010/0921/134391.shtml 什么是H标签? h1,h2,h3,h4,h5,h6,作为标题标签,并且依据重要性递减.我认为 ...
- php的语句
1.php流程语句 1.php代码执行从上到下 2.条件语句 if else 和 switch 案例: $name=56; if($name>56) echo "hello world ...
- Linux下的文件操作——基于文件描述符的文件操作(1)
概要: 打开.创建和关闭文件 读写文件 文件定位 获取文件信息 打开.创建和关闭文件 函数原型: #include <sys/types.h> //头文件 #include <sys ...
- OpenStack镜像服务基本操作
查询Glance服务状态 #glance-control all status [root@controller ~]# glance-control all status glance-api (p ...