数据持久化—真机上的Plist写入
其实写入不到真机里面主要是你写入时,当前那文件夹里你要写入的plist根本不存在
所以你怎么写都写不进去,所以你必须先创建你要写入的plist;
你用这样初始化程序就能自己创建:
- NSMutableArray *dictplist = [[NSMutableArray alloc] init];
- [dictplist insertObject:markName atIndex:0];
- [dictplist writeToFile:plistPath atomically:YES];
直接下面这种是不行的
- NSMutableArray *array = [[NSMutableArray alloc] initWithContentsOfFile:plistPath];
- [array insertObject:markName atIndex:0];
- [array writeToFile:plistPath atomically:YES];
下面是具体的实现方法
一般plist 的写入位置在
写入文件的位置:(Library文件夹)
- NSString *lib = [NSSearchPathForDirectoriesInDomains(NSLibraryDirectory, NSUserDomainMask, YES) lastObject];
- NSString *libPath = [lib stringByAppendingString:@"/Caches"];
- NSString* plistPath = [libPath stringByAppendingFormat:@"/bookmark.plist"];
- NSLog(@"%@",plistPath);
- if(![[NSFileManager defaultManager] fileExistsAtPath:plistPath]) {
- NSMutableArray *dictplist = [[NSMutableArray alloc] init];
- [dictplist insertObject:markName atIndex:0];
- [dictplist writeToFile:plistPath atomically:YES];
- NSLog(@"------1-----%@",dictplist);
- }
- else
- {
- NSMutableArray *array = [[NSMutableArray alloc] initWithContentsOfFile:plistPath];
- [array insertObject:markName atIndex:0];
- [array writeToFile:plistPath atomically:YES];
- NSLog(@"-------2----%@",array);
- }
写入文件的位置:( Document 文件夹)
- NSArray *paths = NSSearchPathForDirectoriesInDomains(NSDocumentDirectory, NSUserDomainMask, YES);
- //获取完整路径
- NSString *documentsDirectory = [paths objectAtIndex:0];
- NSString *plistPath = [documentsDirectory stringByAppendingPathComponent:@"test2.plist"];
- NSLog(@"%@",plistPath);
- if(![[NSFileManager defaultManager] fileExistsAtPath:plistPath]) {
- NSMutableArray *dictplist = [[NSMutableArray alloc] init];
- [dictplist insertObject:markName atIndex:0];
- [dictplist writeToFile:plistPath atomically:YES];
- NSLog(@"------1-----%@",dictplist);
- }
- else
- {
- NSMutableArray *array = [[NSMutableArray alloc] initWithContentsOfFile:plistPath];
- [array insertObject:markName atIndex:0];
- [array writeToFile:plistPath atomically:YES];
- NSLog(@"-------2----%@",array);
- }
下面的是参考 http://blog.csdn.net/smallsky_keke/article/details/7431277
这篇文章是自己通过实践获取,在网上查过很多资料,也走了不上的弯路,由于刚开始学子不久,只是把自己遇到的问题贡献给大家
一,创建文件
//获取路径对象
NSArray *paths =NSSearchPathForDirectoriesInDomains(NSDocumentDirectory,NSUserDomainMask,
YES);
//获取完整路径
NSString *documentsDirectory = [paths objectAtIndex:0];
NSString *plistPath = [documentsDirectory stringByAppendingPathComponent:@"test.plist"];
NSMutableDictionary *dictplist = [[NSMutableDictionaryalloc
] init];
//设置属性值
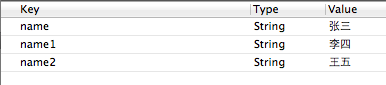
[dictplist
setObject:@"张三" forKey:@"name"];
[dictplist
setObject:@"李四"forKey:@"name1"];
[dictplist
setObject:@"王五"forKey:@"name2"];
//写入文件
[dictplist
writeToFile:plistPath atomically:YES];
这个是创建了一个简单的plist文件,创建后的图1为:
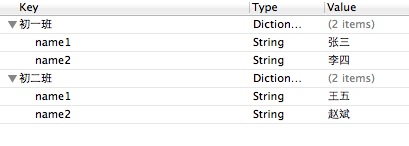
下面是创建了一种多键值的plist文件,代码和图如下:
//获取路径对象
NSArray *paths =NSSearchPathForDirectoriesInDomains(NSDocumentDirectory,NSUserDomainMask,
YES);
//获取完整路径
NSString *documentsDirectory = [paths objectAtIndex:0];
NSString *plistPath = [documentsDirectory stringByAppendingPathComponent:@"test.plist"];
NSMutableDictionary *dictplist = [[NSMutableDictionaryalloc
] init];
//定义第一个插件的属性
NSMutableDictionary *plugin1 = [[NSMutableDictionaryalloc]init];
[plugin1
setObject:@"张三"forKey:@"name1"];
[plugin1
setObject:@"李四"forKey:@"name2"];
//定义第二个插件的属性
NSMutableDictionary *plugin2 = [[NSMutableDictionaryalloc]init];
[plugin2
setObject:@"王五"forKey:@"name1"];
[plugin2
setObject:@"赵斌"forKey:@"name2"];
//设置属性值
[dictplist
setObject:plugin1 forKey:@"初一班"];
[dictplist
setObject:plugin2 forKey:@"初二班"];
//写入文件
[dictplist
writeToFile:plistPath atomically:YES];
图2:
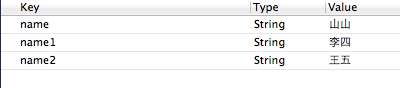
针对图1进行修改的程序,代码如下:
NSString *path = [[NSSearchPathForDirectoriesInDomains(NSDocumentDirectory,NSUserDomainMask,
YES) objectAtIndex:0]stringByAppendingPathComponent:@"test.plist"];
NSMutableDictionary *applist = [[[NSMutableDictionaryalloc]initWithContentsOfFile:path]mutableCopy];
NSString *name = [applist objectForKey:@"name"];
name =
@"山山";
[applist
setObject:name forKey:@"name"];
[applist
writeToFile:path atomically:YES];
执行后如下图:
针对图2进行修改的程序,代码如下:
[dictplist writeToFile:plistPath atomically:YES];
NSString *path = [[NSSearchPathForDirectoriesInDomains(NSDocumentDirectory,NSUserDomainMask,
YES)objectAtIndex:0]stringByAppendingPathComponent:@"test.plist"];
//根据路径获取test.plist的全部内容
NSMutableDictionary *infolist= [[[NSMutableDictionaryalloc]initWithContentsOfFile:path]mutableCopy];
//获取初一班的信息
NSMutableDictionary *info = [infolist objectForKey:@"初一班"];
NSString *name1 = [info objectForKey:@"name1"];
name1 =
@"山山";
[info
setValue:name1 forKey:@"name1"];
[infolist
setValue:info forKey:@"初一班"];
[infolist
writeToFile:path atomically:YES];
图如下:

以上两个修改信息的地方,必须要加入红色标记的方法,才能在表里进行增改操作。
以上是个人的学习心得,请大家多多指教。
数据持久化—真机上的Plist写入的更多相关文章
- iOS数据持久化-OC
沙盒详解 1.IOS沙盒机制 IOS应用程序只能在为该改程序创建的文件系统中读取文件,不可以去其它地方访问,此区域被成为沙盒,所以所有的非代码文件都要保存在此,例如图像,图标,声音,映像,属性列表,文 ...
- 数据持久化-Plist文件写入
数据持久化,常见4种:归档,plist文件,sqlite,coreData.今天复习的是plist文件读写. // // ViewController.m // Test_Plist // // Cr ...
- iOS - OC 数据持久化
1.Sandbox 沙箱 iOS 为每个应用提供了独立的文件空间,一个应用只能直接访问为本应用分配的文件目录,不可以访问其他目录,每个应用自己独立的访问空间被称为该应用的沙盒.也就是说,一个应用与文件 ...
- iOS - Swift 数据持久化
1.Sandbox 沙箱 iOS 为每个应用提供了独立的文件空间,一个应用只能直接访问为本应用分配的文件目录,不可以访问其他目录,每个应用自己独立的访问空间被称为该应用的沙盒.也就是说,一个应用与文件 ...
- iOS中 数据持久化 UI高级_17
数据持久化的本质就是把数据由内写到本地(硬盘中),在iOS指将数据写到沙盒文件夹下: 沙盒机制:指的就是采用沙盒文件夹的形式管理应用程序的本地文件,而且沙盒文件夹的名字是随机分配的,采用十六进制方法命 ...
- iOS -数据持久化方式-以真实项目讲解
前面已经讲解了SQLite,FMDB以及CoreData的基本操作和代码讲解(CoreData也在不断学习中,上篇博客也会不断更新中).本篇我们将讲述在实际开发中,所使用的iOS数据持久化的方式以及怎 ...
- iOS之数据持久化方案
概论 所谓的持久化,就是将数据保存到硬盘中,使得在应用程序或机器重启后可以继续访问之前保存的数据.在iOS开发中,有很多数据持久化的方案,接下来我将尝试着介绍一下5种方案: plist文件(属性列表) ...
- Docker数据持久化与容器迁移
上节讲到当容器运行期间产生的数据是不会在写镜像里面的,重新用此镜像启动新的容器就会初始化镜像,会加一个全新的读写入层来保存数据.如果想做到数据持久化,Docker提供数据卷(Data volume)或 ...
- iOS的数据持久化
所谓的持久化,就是将数据保存到硬盘中,使得在应用程序或机器重启后可以继续访问之前保存的数据.在iOS开发中,有很多数据持久化的方案,接下来我将尝试着介绍一下5种方案: plist文件(属性列表) pr ...
随机推荐
- 排序算法<No.1> 【计数排序】
继上篇博文,今天我将先介绍一下什么是计数排序,将计数排序描述清楚后,再进行后续的桶排序方法解决这个问题. 通常情况下,一提到排序,大家第一反应就是比较,其实,今天我要说的这个计数排序,不是基于比较的排 ...
- Digispark红外接收器
一.红外协议之NEC协议原理 NEC协议格式: 首次发送的是9ms的高电平脉冲,其后是4.5ms的低电平,接下来就是8bit的地址码(从低有效位开始发),而后是8bit的地址码的反码(主要是用于校验是 ...
- Winform 开发基础分层框架
Winform 开发基础分层框架:
- 黄聪:多个wordpress网站(不同域名)共享用户数据的方法
WordPress可以自定义用户数据表,这样多个wordpress网站就可以共享用户数据了,有时候这是非常方便的,这些Wordpress站点应该安装在同一个数据库下,数据表前缀各不相同.由于Wordp ...
- JAVA面向对象编程之购物车界面的设计与功能的实现
1.小组成员及分工 小组成员 负责工作 兰泽祥 负责总体界面.Git代码库 吴修恩 负责MVC模式.类名包名的规范化 2.Git 仓库地址 仓库地址:https://gitee.com/lanzexi ...
- IntelliJ IDEA maven springmvc+shiro简单项目
搭建springmvc简单步骤如:http://www.cnblogs.com/grasp/p/9045242.html,这点就不在描述了. 新建和设置完工程的目录后,结构如下: pom.xml文件内 ...
- CreateUserWizard控件的使用
“CreateUserWizard”控件用于收集潜在用户所提供的信息.默认情况下,“CreateUserWizard”控件会将新用户添加到 ASP.NET 成员身份系统中.有关 ASP.NET 成员资 ...
- SolrServer SolrRequest
SolrServer实现类 HttpSolrServer HttpSolrServer uses the Apache Commons HTTPClient to connect to solr. H ...
- Notepad++ 中使用tail -f功能
想要notepad++中有tail -f的功能吗? 可以如下配置 Settings > Preferences > MISC 在 File Status Auto-Detection下 “ ...
- Jmeter(十五)Logic Controllers 之 while Controller
while Controller是控制循环的Controller,条件判断的Controller.先看看官方Demo. while Controller控制它的子对象,直到false为止.并且还提供了 ...