关于flume的几道题
1,要求:监听一个tcp,udp端口41414将数据打印在控制台

# example.conf: A single-node Flume configuration

# Name the components on this agent

a1.sources = r1

a1.sinks = k1

a1.channels = c1

# Describe/configure the source

a1.sources.r1.type = netcat

a1.sources.r1.bind = 0.0.0.0

a1.sources.r1.port =

# Describe the sink

a1.sinks.k1.type = logger

# Use a channel which buffers events in memory

a1.channels.c1.type = memory

a1.channels.c1.capacity =

a1.channels.c1.transactionCapacity =

# Bind the source and sink to the channel

a1.sources.r1.channels = c1

a1.sinks.k1.channel = c1
启动命令:
bin/flume-ng agent --conf conf/ --conf-file conf/one.conf --name a1 -Dflume.root.logger=INFO,console &
Telnet:
root@Ubuntu-:~# telnet 0.0.0.0

Trying 0.0.0.0...

Connected to 0.0.0.0.

Escape character is '^]'.

huxing

OK
结果:

2,要求:将A机器的日志文件access.log传输到机器B上,并打印到控制台上

这里我假设A机器是131,B机器是132,则 需要将配置文件写在132上,然后正常启动132,而131中只需要启动avro_client,通过avro序列化将文件打到132中。
132中的配置文件内容:
# example.conf: A single-node Flume configuration

# Name the components on this agent

a1.sources = r1

a1.sinks = k1

a1.channels = c1

# Describe/configure the source

a1.sources.r1.type = avro

a1.sources.r1.bind = 0.0.0.0

a1.sources.r1.port =

# Describe the sink

a1.sinks.k1.type = logger

# Use a channel which buffers events in memory

a1.channels.c1.type = memory

a1.channels.c1.capacity =

a1.channels.c1.transactionCapacity =

# Bind the source and sink to the channel

a1.sources.r1.channels = c1

a1.sinks.k1.channel = c1
启动132的flume:
bin/flume-ng agent --conf conf/ --conf-file conf/two.conf --name a1 -Dflume.root.logger=INFO,console &
启动131的avro_client:
bin/flume-ng avro-client --host 192.168.22.132 --port --filename logs/avro.log
查看132控制台:

成功
3,监听一个日志文件access.log,如果有日志追加及时的将数据打印在控制台上,如果是大文件呢?堆?
conf内容:
# example.conf: A single-node Flume configuration

# Name the components on this agent

a1.sources = r1

a1.sinks = k1

a1.channels = c1

# Describe/configure the source

a1.sources.r1.type = exec

a1.sources.r1.command = tail -F /opt/logs/access.log

# Describe the sink

a1.sinks.k1.type = logger

# Use a channel which buffers events in memory

a1.channels.c1.type = memory

a1.channels.c1.capacity =

a1.channels.c1.transactionCapacity =

# Bind the source and sink to the channel

a1.sources.r1.channels = c1

a1.sinks.k1.channel = c1
启动命令:
bin/flume-ng agent --conf conf/ --conf-file conf/three.conf --name a1 -Dflume.root.logger=INFO,console &
打文件到控制台:
root@Ubuntu-:/usr/local/apache-flume/logs# cat hu.log >> avro.log

成功
----------------------------------------------------------------------------------
如果是个很大文件的话怎么办呢?
--将这个文件 中的
中的 的注释消掉。
4,A,B机器中的access.log汇总到C机器上然后统一收集到hdfs上分天存储。
在132,135中写入four_avro_sink.conf文件:
# example.conf: A single-node Flume configuration

# Name the components on this agent

a1.sources = r1

a1.sinks = k1

a1.channels = c1

# Describe/configure the source

a1.sources.r1.type = exec

a1.sources.r1.command = tail -F /usr/local/apache-flume/logs/avro.log

# Describe the sink

a1.sinks.k1.type = avro

a1.sinks.k1.hostname = 192.168.22.131

a1.sinks.k1.port =

# Use a channel which buffers events in memory

a1.channels.c1.type = memory

a1.channels.c1.capacity =

a1.channels.c1.transactionCapacity =

# Bind the source and sink to the channel

a1.sources.r1.channels = c1

a1.sinks.k1.channel = c1
就是将以exec形式持续的输出最新的数据到sink,再以avro的方式将文件序列化的方式传到131的sink上
启动flume:
root@Ubuntu-:/usr/local/apache-flume# bin/flume-ng agent --conf conf/ --conf-file conf/four_avro_sink.conf --name a1 -Dflume.root.logger=INFO,console &
在131中写入four.conf文件:
#定义agent名, source、channel、sink的名称
access.sources = r1
access.channels = c1
access.sinks = k1 #具体定义source
access.sources.r1.type = avro
access.sources.r1.bind = 0.0.0.0
access.sources.r1.port = #具体定义channel
access.channels.c1.type = memory
access.channels.c1.capacity =
access.channels.c1.transactionCapacity = #定义拦截器,为消息添加时间戳
access.sources.r1.interceptors = i1
access.sources.r1.interceptors.i1.type = org.apache.flume.interceptor.TimestampInterceptor$Builder #具体定义sink
access.sinks.k1.type = hdfs
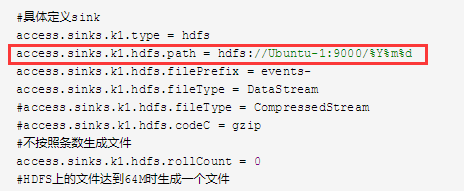
access.sinks.k1.hdfs.path = hdfs://Ubuntu-1:9000/%Y%m%d
access.sinks.k1.hdfs.filePrefix = events-
access.sinks.k1.hdfs.fileType = DataStream
#access.sinks.k1.hdfs.fileType = CompressedStream
#access.sinks.k1.hdfs.codeC = gzip
#不按照条数生成文件
access.sinks.k1.hdfs.rollCount =
#HDFS上的文件达到64M时生成一个文件
access.sinks.k1.hdfs.rollSize =
access.sinks.k1.hdfs.rollInterval = #组装source、channel、sink
access.sources.r1.channels = c1
access.sinks.k1.channel = c1
启动Hadoop:
root@Ubuntu-:/usr/local/hadoop-2.6.# sbin/start-dfs.sh
启动flume:
root@Ubuntu-:/usr/local/apache-flume# bin/flume-ng agent --conf conf/ --conf-file conf/four.conf --name access -Dflume.root.logger=INFO,console &

5,A,B,机器中的access.log ugcheader.log ugctail.log汇总到C机器上。然后统一收集到HDFS的不同目录上
改成
access.sinks.k1.hdfs.path = hdfs://Ubuntu-1:9000/%{type}/%Y%m%d
另132中的配置文件:
# example.conf: A single-node Flume configuration

# Name the components on this agent

a1.sources = r1 r2 r3

a1.sinks = k1

a1.channels = c1

# Describe/configure the source

a1.sources.r1.type = exec

a1.sources.r1.command = tail -F /usr/local/apache-flume/logs/avro.log

a1.sources.r1.interceptors = i1

a1.sources.r1.interceptors.i1.type = static

a1.sources.r1.interceptors.i1.key = type

a1.sources.r1.interceptors.i1.value = access

a1.sources.r2.type = exec

a1.sources.r2.command = tail -F /usr/local/apache-flume/logs/flume.log

a1.sources.r2.interceptors = i2

a1.sources.r2.interceptors.i2.type = static

a1.sources.r2.interceptors.i2.key = type

a1.sources.r2.interceptors.i2.value = ugchead

a1.sources.r3.type = exec

a1.sources.r3.command = tail -F /usr/local/apache-flume/logs/hu.log

a1.sources.r3.interceptors = i3

a1.sources.r3.interceptors.i3.type = static

a1.sources.r3.interceptors.i3.key = type

a1.sources.r3.interceptors.i3.value = ugctail

# Describe the sink

a1.sinks.k1.type = avro

a1.sinks.k1.hostname = 192.168.22.131

a1.sinks.k1.port =

#a1.sinks.k1.type = logger

# Use a channel which buffers events in memory

a1.channels.c1.type = memory

a1.channels.c1.capacity =

a1.channels.c1.transactionCapacity =

# Bind the source and sink to the channel

a1.sources.r1.channels = c1

a1.sources.r2.channels = c1

a1.sources.r3.channels = c1

a1.sinks.k1.channel = c1

6,access.log收集后指定多个目的地【同时,打印到控制台、输出到HDFS】
131中:
#定义agent名, source、channel、sink的名称
access.sources = r1
access.channels = c1 c2
access.sinks = k1 k2 #具体定义source
access.sources.r1.type = avro
access.sources.r1.bind = 0.0.0.0
access.sources.r1.port = #具体定义channel
access.channels.c1.type = memory
access.channels.c1.capacity =
access.channels.c1.transactionCapacity = access.channels.c2.type = memory
access.channels.c2.capacity =
access.channels.c2.transactionCapacity = access.sinks.k2.type = logger !!!!重点是这里的k2!!!!! #定义拦截器,为消息添加时间戳
access.sources.r1.interceptors = i1
access.sources.r1.interceptors.i1.type = org.apache.flume.interceptor.TimestampInterceptor$Builder #具体定义sink
access.sinks.k1.type = hdfs
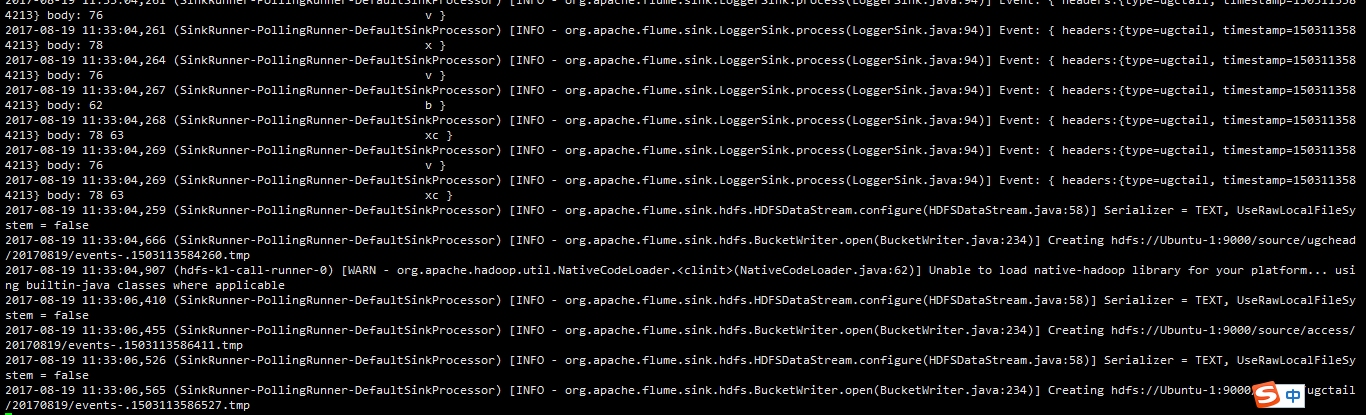
access.sinks.k1.hdfs.path = hdfs://Ubuntu-1:9000/source/%{type}/%Y%m%d
access.sinks.k1.hdfs.filePrefix = events-
access.sinks.k1.hdfs.fileType = DataStream
#access.sinks.k1.hdfs.fileType = CompressedStream
#access.sinks.k1.hdfs.codeC = gzip
#不按照条数生成文件
access.sinks.k1.hdfs.rollCount =
#HDFS上的文件达到64M时生成一个文件
access.sinks.k1.hdfs.rollSize =
access.sinks.k1.hdfs.rollInterval = #组装source、channel、sink access.sources.r1.channels = c1 c2
access.sinks.k1.channel = c1
access.sinks.k2.channel = c2
132中还是之前第5题中的配置
7,在程序里打印日志到flume根据不同的业务指定不同的目的地【控制台、avro】,查看日志的log4j日志的header
pom文件:
<project xmlns="http://maven.apache.org/POM/4.0.0" xmlns:xsi="http://www.w3.org/2001/XMLSchema-instance"

  xsi:schemaLocation="http://maven.apache.org/POM/4.0.0 http://maven.apache.org/xsd/maven-4.0.0.xsd">

  <modelVersion>4.0.</modelVersion>

  <groupId>cn.hx</groupId>

  <artifactId>FlumeSource</artifactId>

  <version>1.0-SNAPSHOT</version>

  <packaging>jar</packaging>

  <name>FlumeSource</name>

  <url>http://maven.apache.org</url>

  <properties>

    <project.build.sourceEncoding>UTF-</project.build.sourceEncoding>

    <maven.compiler.source>1.8</maven.compiler.source>

    <maven.compiler.target>1.8</maven.compiler.target>

  </properties>

  <build>

    <pluginManagement>

      <plugins>

        <plugin>

          <groupId>org.apache.maven.plugins</groupId>

          <artifactId>maven-jar-plugin</artifactId>

          <configuration>

            <archive>

              <manifest>

                <mainClass>cn.hx.test</mainClass>

                <addClasspath>true</addClasspath>

                <classpathPrefix>lib/</classpathPrefix>

              </manifest>

            </archive>

            <classesDirectory>

            </classesDirectory>

          </configuration>

        </plugin>

      </plugins>

    </pluginManagement>

  </build>

  <dependencies>

    <dependency>

      <groupId>junit</groupId>

      <artifactId>junit</artifactId>

      <version>3.8.</version>

      <scope>test</scope>

    </dependency>

    <dependency>

      <groupId>org.apache.hadoop</groupId>

      <artifactId>hadoop-common</artifactId>

      <version>2.6.</version>

    </dependency>

    <dependency>

      <groupId>org.apache.hadoop</groupId>

      <artifactId>hadoop-client</artifactId>

      <version>2.6.</version>

    </dependency>

    <dependency>

      <groupId>org.apache.hadoop</groupId>

      <artifactId>hadoop-hdfs</artifactId>

      <version>2.6.</version>

    </dependency>

    <dependency>

      <groupId>log4j</groupId>

      <artifactId>log4j</artifactId>

      <version>1.2.</version>

    </dependency>

    <dependency>

      <groupId>log4j</groupId>

      <artifactId>log4j</artifactId>

      <version>1.2.</version>

    </dependency>

  </dependencies>

</project>
loj4j文件:
##<!-- ========================== 自定义输出格式说明================================ -->

##<!-- %p 输出优先级,即DEBUG,INFO,WARN,ERROR,FATAL -->

##<!-- %r 输出自应用启动到输出该log信息耗费的毫秒数 -->

##<!-- %c 输出所属的类目,通常就是所在类的全名 -->

##<!-- %t 输出产生该日志事件的线程名 -->

##<!-- %n 输出一个回车换行符,Windows平台为“/r/n”,Unix平台为“/n” -->

##<!-- %d 输出日志时间点的日期或时间,默认格式为ISO8601,也可以在其后指定格式,比如:%d{yyy MMM dd ##HH:mm:ss,SSS},输出类似:2002年10月18日 ::, -->

##<!-- %l 输出日志事件的发生位置,包括类目名、发生的线程,以及在代码中的行数。举例:Testlog4.main(TestLog4.java:) -->

##<!-- ========================================================================== -->

### set log levels ###

#默认logger

#INFO是指级别不小于INFO的日志才会使用stdoutappender。ERROR、WARN、INFO

log4j.rootLogger=INFO,stdout1

#自定义logger

#log4j.logger.accessLogger=INFO,flume

#log4j.logger.ugcLogger=INFO,flume

log4j.logger.std1Logger=INFO,stdout1,

log4j.logger.std2Logger=INFO,stdout2

log4j.logger.access=INFO,flume

log4j.logger.ugchead=INFO,flume

log4j.logger.ugctail=INFO,flume

#某个包的level的appender

#log4j.logger.com.zenith.flume = INFO,flume

### flume ###

log4j.appender.flume=org.apache.flume.clients.log4jappender.Log4jAppender

log4j.appender.flume.layout=org.apache.log4j.PatternLayout

log4j.appender.flume.layout.ConversionPattern=%d{yyyy-MM-dd HH:mm:ss} %c{} [%p] %m%n

log4j.appender.flume.Hostname=192.168.22.131

log4j.appender.flume.Port=

log4j.appender.flume.UnsafeMode = true

### stdout ###

log4j.appender.stdout1=org.apache.log4j.ConsoleAppender

log4j.appender.stdout1.Threshold=DEBUG

log4j.appender.stdout1.Target=System.out

log4j.appender.stdout1.layout=org.apache.log4j.PatternLayout

log4j.appender.stdout1.layout.ConversionPattern=%d{yyyy-MM-dd HH:mm:ss} %c{} [%p] %m%n

### stdout ###

log4j.appender.stdout2=org.apache.log4j.ConsoleAppender

log4j.appender.stdout2.Threshold=DEBUG

log4j.appender.stdout2.Target=System.out

log4j.appender.stdout2.layout=org.apache.log4j.PatternLayout

log4j.appender.stdout2.layout.ConversionPattern=%d{yyyy-MM-dd hh:mm:ss} %c{} [%p] %m%n

### access ###

log4j.appender.access=org.apache.log4j.DailyRollingFileAppender

log4j.appender.access.Threshold=INFO

log4j.appender.access.File=/usr/local/apache-flume/logs/avro.log

log4j.appender.access.Append=true

log4j.appender.access.DatePattern='.'yyyy-MM-dd

log4j.appender.access.layout=org.apache.log4j.PatternLayout

log4j.appender.access.layout.ConversionPattern=%m%n

### ugchead ###

log4j.appender.ugchead=org.apache.log4j.DailyRollingFileAppender

log4j.appender.ugchead.Threshold=INFO

log4j.appender.ugchead.File=/usr/local/apache-flume/logs/flume.log

log4j.appender.ugchead.Append=true

log4j.appender.ugchead.DatePattern='.'yyyy-MM-dd

log4j.appender.ugchead.layout=org.apache.log4j.PatternLayout

log4j.appender.ugchead.layout.ConversionPattern=%m%n

### ugctail ###

log4j.appender.ugctail=org.apache.log4j.DailyRollingFileAppender

log4j.appender.ugctail.Threshold=INFO

log4j.appender.ugctail.File=/usr/local/apache-flume/logs/hu.log

log4j.appender.ugctail.Append=true

log4j.appender.ugctail.DatePattern='.'yyyy-MM-dd

log4j.appender.ugctail.layout=org.apache.log4j.PatternLayout

log4j.appender.ugctail.layout.ConversionPattern=%m%n
程序:
package cn.hx;

import org.apache.log4j.BasicConfigurator;

import org.apache.log4j.Logger;

/**

 * Created by hushiwei on 2017/8/20.

 */

public class test {

    protected static final Logger loggeaccess = Logger.getLogger("access");

    protected static final Logger loggerugc = Logger.getLogger("ugchead");

    public static void main(String[] args) throws Exception {

        BasicConfigurator.configure();

        while (true) {

            loggeaccess.info("this is acccess log");

            loggerugc.info("ugc");

            //KafkaUtil util=new KafkaUtil();

            //util.initProducer();

            //util.produceData("crxy","time",String.valueOf(new Date().getTime()));

            Thread.sleep();

        }

    }

}
在131中执行:
root@Ubuntu-:/usr/local/apache-flume# bin/flume-ng agent --conf conf/ --conf-file conf/avro_source.conf --name agent1 -Dflume.root.logger=INFO,console &
avro.source文件是上面某道题中的文件
打jar包后到131中执行
可是报错,没有解决:
Exception in thread "main" java.lang.NoClassDefFoundError: org/apache/log4j/Logger
Caused by:java.lang.ClassNotFoundException:org.apache.log4j.Logger

8,A机器的access.log日志采集后打印到B、C做负载均衡,打印到控制台上,load_balance
132和135中:
conf文件用avro_source.conf
启动:
root@Ubuntu-:/usr/local/apache-flume# bin/flume-ng agent --conf conf/ --conf-file conf/avro_source.conf --name agent1 -Dflume.root.logger=INFO,console &
131中:
# Name the components on this agent
a1.sources = r1
a1.sinks = k1 k2
a1.channels = c1 # Describe/configure the source
a1.sources.r1.type = exec
a1.sources.r1.channels=c1
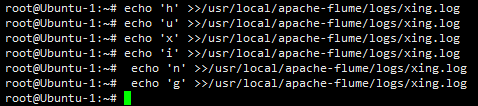
a1.sources.r1.command=tail -F /usr/local/apache-flume/logs/xing.log #define sinkgroups
a1.sinkgroups=g1
a1.sinkgroups.g1.sinks=k1 k2
a1.sinkgroups.g1.processor.type=load_balance
a1.sinkgroups.g1.processor.backoff=true
a1.sinkgroups.g1.processor.selector=round_robin #define the sink 1
a1.sinks.k1.type=avro
a1.sinks.k1.hostname=192.168.22.132
a1.sinks.k1.port= #define the sink 2
a1.sinks.k2.type=avro
a1.sinks.k2.hostname=192.168.22.135
a1.sinks.k2.port= # Use a channel which buffers events in memory
a1.channels.c1.type = memory
a1.channels.c1.capacity =
a1.channels.c1.transactionCapacity = # Bind the source and sink to the channel
a1.sources.r1.channels = c1
a1.sinks.k1.channel = c1
a1.sinks.k2.channel=c1
启动
root@Ubuntu-:/usr/local/apache-flume# bin/flume-ng agent --conf conf/ --conf-file conf/eight.conf --name a1 -Dflume.root.logger=INFO,console &
在131中:
在132中:

在135中:

9,A机器的access.log日志采集后打印到B、C做故障转移,打印到控制台上,failover
132和135中起avro_source的conf文件
131中启:
# Name the components on this agent

a1.sources = r1

a1.sinks = k1 k2

a1.channels = c1

# Describe/configure the source

a1.sources.r1.type = exec

a1.sources.r1.channels=c1

a1.sources.r1.command=tail -F /usr/local/apache-flume/logs/xing.log

#define sinkgroups

a1.sinkgroups=g1

a1.sinkgroups.g1.sinks=k1 k2

a1.sinkgroups.g1.processor.type=failover

a1.sinkgroups.g1.processor.priority.k1=

a1.sinkgroups.g1.processor.priority.k2=

a1.sinkgroups.g1.processor.maxpenalty=

#define the sink 1

a1.sinks.k1.type=avro

a1.sinks.k1.hostname=192.168.22.132

a1.sinks.k1.port=

#define the sink 2

a1.sinks.k2.type=avro

a1.sinks.k2.hostname=192.168.22.135

a1.sinks.k2.port=

# Use a channel which buffers events in memory

a1.channels.c1.type = memory

a1.channels.c1.capacity =

a1.channels.c1.transactionCapacity =

# Bind the source and sink to the channel

a1.sources.r1.channels = c1

a1.sinks.k1.channel = c1

a1.sinks.k2.channel=c1
启131
root@Ubuntu-:/usr/local/apache-flume# bin/flume-ng agent --conf conf/ --conf-file conf/nine.conf --name a1 -Dflume.root.logger=INFO,console &
查看:
关闭132中的flume之后

132宕机之后 可以看到数据直接转到135中了:

关于flume的几道题的更多相关文章
- Flume1 初识Flume和虚拟机搭建Flume环境
前言: 工作中需要同步日志到hdfs,以前是找运维用rsync做同步,现在一般是用flume同步数据到hdfs.以前为了工作简单看个flume的一些东西,今天下午有时间自己利用虚拟机搭建了 ...
- 处理Assetbundle依赖关系时想到的一道题
在处理unit3d的assetbundle依赖关系的时候,想到了一道有趣的题目: 给定一堆数据,例如{A = {1, 3, 4}, B = {3, 4}, C = {5, 6}, D = {6, 7, ...
- Flume(4)实用环境搭建:source(spooldir)+channel(file)+sink(hdfs)方式
一.概述: 在实际的生产环境中,一般都会遇到将web服务器比如tomcat.Apache等中产生的日志倒入到HDFS中供分析使用的需求.这里的配置方式就是实现上述需求. 二.配置文件: #agent1 ...
- Flume(3)source组件之NetcatSource使用介绍
一.概述: 本节首先提供一个基于netcat的source+channel(memory)+sink(logger)的数据传输过程.然后剖析一下NetcatSource中的代码执行逻辑. 二.flum ...
- Flume(2)组件概述与列表
上一节搭建了flume的简单运行环境,并提供了一个基于netcat的演示.这一节继续对flume的整个流程进行进一步的说明. 一.flume的基本架构图: 下面这个图基本说明了flume的作用,以及f ...
- Flume(1)使用入门
一.概述: Flume是Cloudera提供的一个高可用的,高可靠的,分布式的海量日志采集.聚合和传输的系统. 当前Flume有两个版本Flume 0.9X版本的统称Flume-og,Flume1.X ...
- 大数据平台架构(flume+kafka+hbase+ELK+storm+redis+mysql)
上次实现了flume+kafka+hbase+ELK:http://www.cnblogs.com/super-d2/p/5486739.html 这次我们可以加上storm: storm-0.9.5 ...
- flume+kafka+spark streaming整合
1.安装好flume2.安装好kafka3.安装好spark4.流程说明: 日志文件->flume->kafka->spark streaming flume输入:文件 flume输 ...
- flume使用示例
flume的特点: flume是一个分布式.可靠.和高可用的海量日志采集.聚合和传输的系统.支持在日志系统中定制各类数据发送方,用于收集数据;同时,Flume提供对数据进行简单处理,并写到各种数据接受 ...
随机推荐
- [Python 3.X]python练习笔记[2]-----用python实现七段数码管显示年月日
#SevenDigitsDrawV2.py import turtle import time def drawGap(i):#绘制数码管间隔 turtle.penup() turtle.fd(i) ...
- c++返回引用
#include <iostream> #include <ctime> using namespace std; double vals[] = {10.1, 12.6, 3 ...
- ABP框架设置默认语言
在Global.asax文件中设置 private readonly IAbpWebLocalizationConfiguration _webLocalizationConfiguration; p ...
- Python升级3.6 强力Django+Xadmin打造在线教育平台
第 1 章 课程介绍 1-1 项目演示和课程介绍: 第 2 章 Windows下搭建开发环境 2-1 Pycharm.Navicat和Python解释器的安装: Pycharmhttp://www.j ...
- Kubernetes集群(概念篇)
Kubernetes介绍 2013年docker诞生,自此一发不可收拾,它的发展如火如荼,作为一个运维如果不会docker,那真的是落伍了. 而2014年出现的kubernetes(又叫k8s)更加炙 ...
- Flask 学习笔记(一)
一.Web 服务器与 Web 框架 首先明确一下,要运行一个动态网页,我们需要 一个 Web 服务器来监听并响应请求,如果请求的是静态文件它就直接将其返回,如果是动态 url 它就将请求转交给 Web ...
- [leetcode-635-Design Log Storage System]
You are given several logs that each log contains a unique id and timestamp. Timestamp is a string t ...
- memcached简单介绍及在django中的使用
什么是memcached? Memcached是一个高性能的分布式的内存对象缓存系统,全世界有不少公司采用这个缓存项目来构建大负载的网站,来分担数据库的压力.Memcached是通过在内存里维护一个统 ...
- 接触到的一些数据结构: LIST_ENTRY, TAILQ
双链表: LIST_ENTRY: typedef struct _LIST_ENTRY { struct _LIST_ENTRY *Flink; follow: next entry, header ...
- Redis--各个数据类型最大存储量
原文地址:https://redis.io/topics/data-types Strings类型:一个String类型的value最大可以存储512M Lists类型:list的元素个数最多为2^3 ...