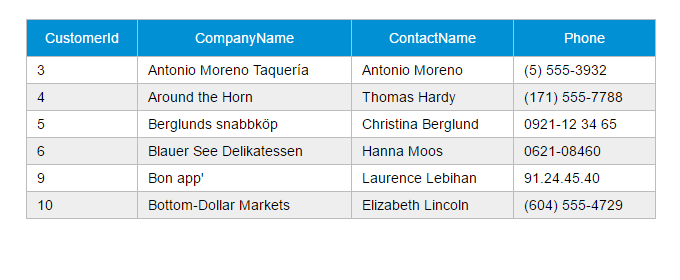
vue-resource CRUD示例
GET请求
var demo = new Vue({

    el: '#app',

    data: {

        gridColumns: ['customerId', 'companyName', 'contactName', 'phone'],

        gridData: [],

        apiUrl: 'http://211.149.193.19:8080/api/customers'

    },

    ready: function() {

        this.getCustomers()

    },

    methods: {

        getCustomers: function() {

            this.$http.get(this.apiUrl)

                .then((response) => {

                    this.$set('gridData', response.data)

                })

                .catch(function(response) {

                    console.log(response)

                })

        }

    }

})
这段程序的then方法只提供了successCallback,而省略了errorCallback。
catch方法用于捕捉程序的异常,catch方法和errorCallback是不同的,errorCallback只在响应失败时调用,而catch则是在整个请求到响应过程中,只要程序出错了就会被调用。
在then方法的回调函数内,你也可以直接使用this,this仍然是指向Vue实例的:
getCustomers: function() {

    this.$http.get(this.apiUrl)

        .then((response) => {

            this.$set('gridData', response.data)

        })

        .catch(function(response) {

            console.log(response)

        })

}
为了减少作用域链的搜索,建议使用一个局部变量来接收this。
demo地址:http://211.149.193.19:8090/vue-tutorials/03.Ajax/vue-resource/http-get.html
JSONP请求
getCustomers: function() {

    this.$http.jsonp(this.apiUrl).then(function(response){

        this.$set('gridData', response.data)

    })

}
demo地址:http://211.149.193.19:8090/vue-tutorials/03.Ajax/vue-resource/http-jsonp.html
POST请求
var demo = new Vue({

    el: '#app',

    data: {

        show: false,

        gridColumns: [{

            name: 'customerId',

            isKey: true

        }, {

            name: 'companyName'

        }, {

            name: 'contactName'

        }, {

            name: 'phone'

        }],

        gridData: [],

        apiUrl: 'http://211.149.193.19:8080/api/customers',

        item: {}

    },

    ready: function() {

        this.getCustomers()

    },

    methods: {

        closeDialog: function() {

            this.show = false

        },

        getCustomers: function() {

            var vm = this

            vm.$http.get(vm.apiUrl)

                .then((response) => {

                    vm.$set('gridData', response.data)

                })

        },

        createCustomer: function() {

            var vm = this

            vm.$http.post(vm.apiUrl, vm.item)

                .then((response) => {

                    vm.$set('item', {})

                    vm.getCustomers()

                })

            this.show = false

        }

    }

})
demo地址:http://211.149.193.19:8090/vue-tutorials/03.Ajax/vue-resource/http-post.html
PUT请求
updateCustomer: function() {

    var vm = this

    vm.$http.put(this.apiUrl + '/' + vm.item.customerId, vm.item)

        .then((response) => {

            vm.getCustomers()

        })

}
demo地址:http://211.149.193.19:8090/vue-tutorials/03.Ajax/vue-resource/http-put.html
Delete请求
deleteCustomer: function(customer){

    var vm = this

    vm.$http.delete(this.apiUrl + '/' + customer.customerId)

        .then((response) => {

            vm.getCustomers()

        })

}
demo地址:http://211.149.193.19:8090/vue-tutorials/03.Ajax/vue-resource/http-delete.html
使用resource服务
vue-resource提供了另外一种方式访问HTTP——resource服务,resource服务包含以下几种默认的action:
get: {method: 'GET'},

save: {method: 'POST'},

query: {method: 'GET'},

update: {method: 'PUT'},

remove: {method: 'DELETE'},

delete: {method: 'DELETE'}
resource对象也有两种访问方式:
- 全局访问:Vue.resource
- 实例访问:this.$resource
apiUrl: 'http://211.149.193.19:8080/api/customers{/id}'
GET请求
使用get方法发送GET请求,下面这个请求没有指定{/id}。
getCustomers: function() {

    var resource = this.$resource(this.apiUrl)

        vm = this

    resource.get()

        .then((response) => {

            vm.$set('gridData', response.data)

        })

        .catch(function(response) {

            console.log(response)

        })

}
demo地址:http://211.149.193.19:8090/vue-tutorials/03.Ajax/vue-resource/resource-get.html
POST请求
createCustomer: function() {

    var resource = this.$resource(this.apiUrl)

        vm = this

    resource.save(vm.apiUrl, vm.item)

        .then((response) => {

            vm.$set('item', {})

            vm.getCustomers()

        })

    this.show = false

}
demo地址:http://211.149.193.19:8090/vue-tutorials/03.Ajax/vue-resource/resource-post.html
PUT请求
updateCustomer: function() {

    var resource = this.$resource(this.apiUrl)

        vm = this

    resource.update({ id: vm.item.customerId}, vm.item)

        .then((response) => {

            vm.getCustomers()

        })

}
{/id}相当于一个占位符,当传入实际的参数时该占位符会被替换。
例如,{ id: vm.item.customerId}中的vm.item.customerId为12,那么发送的请求URL为:
http://211.149.193.19:8080/api/customers/12
demo地址:http://211.149.193.19:8090/vue-tutorials/03.Ajax/vue-resource/resource-post.put
DELETE请求
deleteCustomer: function(customer){

    var resource = this.$resource(this.apiUrl)

        vm = this

    resource.remove({ id: customer.customerId})

        .then((response) => {

            vm.getCustomers()

        })

}
demo地址:http://211.149.193.19:8090/vue-tutorials/03.Ajax/vue-resource/resource-delete.html
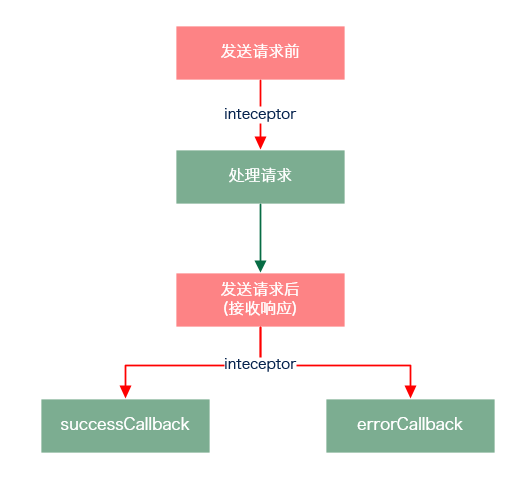
使用inteceptor
拦截器可以在请求发送前和发送请求后做一些处理。
基本用法
Vue.http.interceptors.push((request, next) => {

        // ...

        // 请求发送前的处理逻辑

        // ...

    next((response) => {

        // ...

        // 请求发送后的处理逻辑

        // ...

        // 根据请求的状态,response参数会返回给successCallback或errorCallback

        return response

    })

})
在response返回给successCallback或errorCallback之前,你可以修改response中的内容,或做一些处理。
例如,响应的状态码如果是404,你可以显示友好的404界面。
如果不想使用Lambda函数写法,可以用平民写法:
Vue.http.interceptors.push(function(request, next) {

    // ...

    // 请求发送前的处理逻辑

    // ...

    next(function(response) {

        // ...

        // 请求发送后的处理逻辑

        // ...

        // 根据请求的状态,response参数会返回给successCallback或errorCallback

        return response

    })

})
示例1
之前的CURD示例有一处用户体验不太好,用户在使用一些功能的时候如果网络较慢,画面又没有给出反馈,用户是不知道他的操作是成功还是失败的,他也不知道是否该继续等待。
通过inteceptor,我们可以为所有的请求处理加一个loading:请求发送前显示loading,接收响应后隐藏loading。
具体步骤如下:
1.添加一个loading组件
<template id="loading-template">

    <div class="loading-overlay">

        <div class="sk-three-bounce">

            <div class="sk-child sk-bounce1"></div>

            <div class="sk-child sk-bounce2"></div>

            <div class="sk-child sk-bounce3"></div>

        </div>

    </div>

</template>
2.将loading组件作为另外一个Vue实例的子组件
var help = new Vue({

    el: '#help',

    data: {

        showLoading: false

    },

    components: {

        'loading': {

            template: '#loading-template',

        }

    }

})
3.将该Vue实例挂载到某个HTML元素
<div id="help">

    <loading v-show="showLoading"></loading>

</div>
4.添加inteceptor
Vue.http.interceptors.push((request, next) => {

    loading.show = true

    next((response) => {

        loading.show = false

        return response

    });

});
示例2
你问我为什么不在每个请求里面处理errorCallback,这是因为我比较懒。这个问题,同样也可以通过inteceptor解决。
1. 继续沿用上面的loading组件,在#help元素下加一个对话框
<div id="help">

    <loading v-show="showLoading" ></loading>

    <modal-dialog :show="showDialog">

        <header class="dialog-header" slot="header">

            <h1 class="dialog-title">Server Error</h1>

        </header>

        <div class="dialog-body" slot="body">

            <p class="error">Oops,server has got some errors, error code: {{errorCode}}.</p>

        </div>

    </modal-dialog>

</div>
2.给help实例的data选项添加两个属性
var help = new Vue({

        el: '#help',

        data: {

            showLoading: false,

            showDialog: false,

            errorCode: ''

        },

        components: {

            'loading': {

                template: '#loading-template',

            }

        }

    })
3.修改inteceptor
Vue.http.interceptors.push((request, next) => {

    help.showLoading = true

    next((response) => {

        if(!response.ok){

            help.errorCode = response.status

            help.showDialog = true

        }

        help.showLoading = false

        return response

    });

});
vue-resource CRUD示例的更多相关文章
- vue resource 携带cookie请求 vue cookie 跨域
vue resource 携带cookie请求 vue cookie 跨域 1.依赖VueResource 确保已安装vue-resource到项目中,找到当前项目,命令行输入: npm instal ...
- 一起学Vue:CRUD(增删改查)
目标 使用Vue构建一个非常简单CRUD应用程序,以便您更好地了解它的工作方式. 效果页面 比如我们要实现这样列表.新增.编辑三个页面: 列表页面 新增页面 编辑页面 我们把这些用户信息保存到Todo ...
- java框架之SpringBoot(6)-Restful风格的CRUD示例
准备 环境 IDE:Idea SpringBoot版本:1.5.19 UI:BootStrap 4 模板引擎:thymeleaf 3 效果:Restful 风格 CRUD 功能的 Demo 依赖 &l ...
- 《Entity Framework 6 Recipes》中文翻译系列 (20) -----第四章 ASP.NET MVC中使用实体框架之在MVC中构建一个CRUD示例
翻译的初衷以及为什么选择<Entity Framework 6 Recipes>来学习,请看本系列开篇 第四章 ASP.NET MVC中使用实体框架 ASP.NET是一个免费的Web框架 ...
- Vue.js 基础示例
为 Vue.js 初学者写了一些简单的示例,在线示例 示例源码 了解更多请查看 Vue.js 官网文档:http://vuejs.org.cn/guide/
- Vue.js 学习示例
本篇和大家分享的是学习Vuejs的总结和调用webapi的一个小示例:快到年底了争取和大家多分享点东西,希望能对各位有所帮助:本章内容希望大家喜欢,也希望各位多多扫码支持和推荐谢谢: » Vuejs ...
- vue指令v-model示例解析
限制 <input> <select> <textarea> components 修饰符 .lazy - 取代 input 监听 change 事件 .numbe ...
- vue指令v-bind示例解析
1.绑定一个属性 <img id="app" v-bind:src="imageSrc"> <script> var app = Vue ...
- elementUI vue upload完整示例
elementUI 和vue 还有axios +java的完整示例, 代码敲了很久, 累死了, 以后用就直接复制了 ,很值吧!!! 1.html <!DOCTYPE html> <h ...
随机推荐
- HDU - 4112 Break the Chocolate(规律)
题意:有一块n*m*k的巧克力,最终需要切成n*m*k个1*1*1的块,问用以下两种方法最少掰多少次能达到目的: 1.用手掰:每次只能拿出一块来掰:2.用刀切:可以把很多已经分开的块摞在一起一刀切下来 ...
- oracle 的存储过程
-----推荐视频 https://ke.qq.com/webcourse/index.html#course_id=292495&term_id=100346599&taid= ...
- 【LeetCode 】N皇后II
[问题]n 皇后问题研究的是如何将 n 个皇后放置在 n×n 的棋盘上,并且使皇后彼此之间不能相互攻击. 上图为 8 皇后问题的一种解法.给定一个整数 n,返回 n 皇后不同的解决方案的数量. 示例: ...
- linux 批量kill php进程
一.执行以下命令 ps -ef|grep php|grep -v grep|cut -c 9-15|xargs kill -9 管道符“|”用来隔开两个命令,管道符左边命令的输出会作为管道符右 ...
- docker-compose 安装 mongodb
1. 修改 docker-compose.yml version: "2.1" services: php7.1: build: ./php image: php7.1-ext p ...
- 调用servlet报The requested resource is not available.
调用servlet的时候经常有这种报错,一般来说我直到现在遇到的情况大致有以下几类: 1.参数写错了 在新创建的servlet文件中有这么一行代码,“/LoginCheck”这个一定要和form表单中 ...
- 静听网+python爬虫+多线程+多进程+构建IP代理池
目标网站:静听网 网站url:http://www.audio699.com/ 目标文件:所有在线听的音频文件 附:我有个喜好就是听有声书,然而很多软件都是付费才能听,免费在线网站虽然能听,但是禁ip ...
- 学习spring的第二天
对昨天的查漏:关于<bean>标签的scope属性,是由它决定原型和单例的,而不是说你java代码中用到了单例模式就是单例了. 其二就是lazy-init属性,它对于scope=" ...
- git高级用法之cheery-pick
前言 想象一种情况,你在分支上开发多个功能,现在要将第一个功能推到另一个分支上 master 1_2 | dev \__3_4_5 例如上面的,先基于master创建了分支dev, 然后提交了3个co ...
- [极客大挑战 2019]Knife
根据题目Knife 猜想尝试用蚁剑连接 http://40b92ebd-5234-40b7-b2e0-3c42fb5ad000.node3.buuoj.cn/?Knife.php 密码:Syc 找到f ...