Flutter 拖拽控件Draggable看这一篇就够了

注意:无特殊说明,Flutter版本及Dart版本如下:
- Flutter版本: 1.12.13+hotfix.5
- Dart版本: 2.7.0
Draggable系列组件可以让我们拖动组件。
Draggable
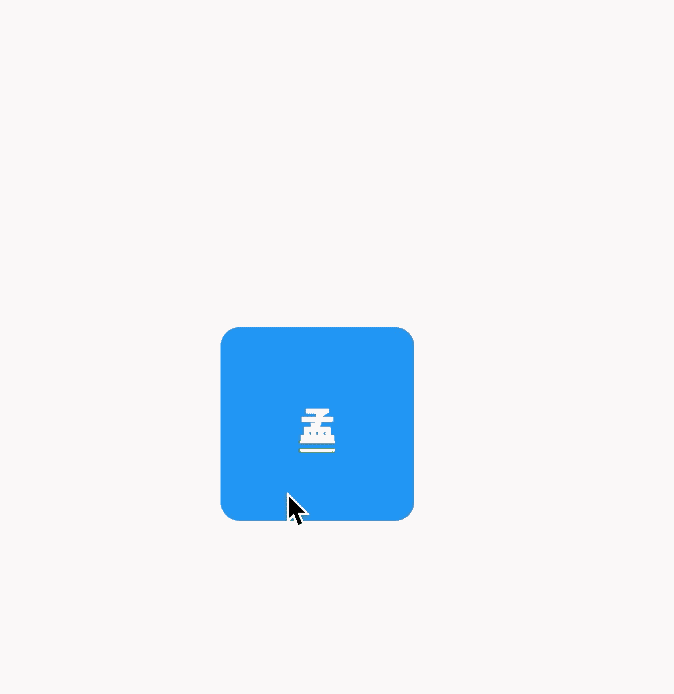
Draggable组件有2个必须填写的参数,child参数是子控件,feedback参数是拖动时跟随移动的组件,用法如下:
Draggable(

  child: Container(

    height: 100,

    width: 100,

    alignment: Alignment.center,

    decoration: BoxDecoration(

      color: Colors.red,

      borderRadius: BorderRadius.circular(10)

    ),

    child: Text('孟',style: TextStyle(color: Colors.white,fontSize: 18),),

  ),

  feedback: Container(

    height: 100,

    width: 100,

    alignment: Alignment.center,

    decoration: BoxDecoration(

        color: Colors.blue,

        borderRadius: BorderRadius.circular(10)

    ),

    child: Text('孟',style: TextStyle(color: Colors.white,fontSize: 18),),

  ),

)
效果如下:

蓝色的组件是feedback,如果想在拖动的时候子组件显示其他样式可以使用childWhenDragging参数,用法如下:
Draggable(

  childWhenDragging: Container(

    height: 100,

    width: 100,

    alignment: Alignment.center,

    decoration: BoxDecoration(

        color: Colors.grey, borderRadius: BorderRadius.circular(10)),

    child: Text(

      '孟',

      style: TextStyle(color: Colors.white, fontSize: 18),

    ),

  ),

  ...

)
效果如下:
我们还可以控制拖动的方向,比如只允许垂直方向移动,代码如下:
Draggable(

  axis: Axis.vertical,

  ...

)
Draggable组件为我们提供了4中拖动过程中的回调事件,用法如下:
Draggable(

  onDragStarted: (){

    print('onDragStarted');

  },

  onDragEnd: (DraggableDetails details){

    print('onDragEnd:$details');

  },

  onDraggableCanceled: (Velocity velocity, Offset offset){

    print('onDraggableCanceled velocity:$velocity,offset:$offset');

  },

  onDragCompleted: (){

    print('onDragCompleted');

  },

  ...

)
说明如下:
- onDragStarted:开始拖动时回调。
- onDragEnd:拖动结束时回调。
- onDraggableCanceled:未拖动到DragTarget控件上时回调。
- onDragCompleted:拖动到DragTarget控件上时回调。
Draggable有一个data参数,这个参数是和DragTarget配合使用的,当用户将控件拖动到DragTarget时此数据会传递给DragTarget。
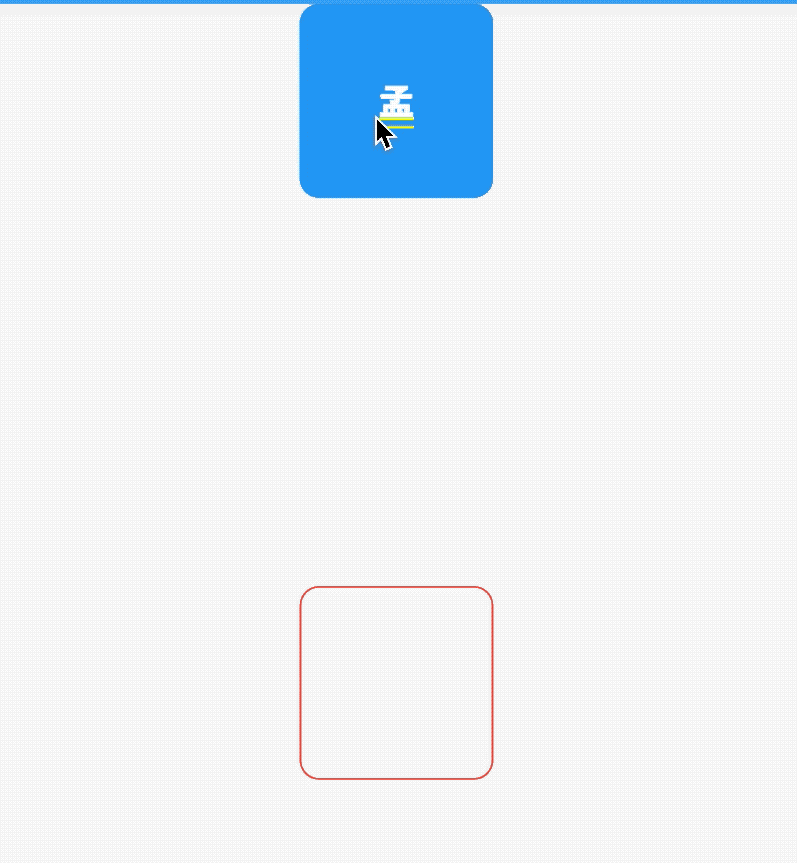
DragTarget
DragTarget就像他的名字一样,指定一个目的地,Draggable组件可以拖动到此控件,用法如下:
DragTarget(

  builder: (BuildContext context, List<dynamic> candidateData,

      List<dynamic> rejectedData) {

      ...

  }

)
当onWillAccept返回true时, candidateData参数的数据是Draggable的data数据。
当onWillAccept返回false时, rejectedData参数的数据是Draggable的data数据,
DragTarget有3个回调,说明如下:
- onWillAccept:拖到该控件上时调用,需要返回true或者false,返回true,松手后会回调onAccept,否则回调onLeave。
- onAccept:onWillAccept返回true时,用户松手后调用。
- onLeave:onWillAccept返回false时,用户松手后调用。
用法如下:
var _dragData;

@override

Widget build(BuildContext context) {

  return Center(

    child: Column(

      children: <Widget>[

        _buildDraggable(),

        SizedBox(

          height: 200,

        ),

        DragTarget<Color>(

          builder: (BuildContext context, List<Color> candidateData,

              List<dynamic> rejectedData) {

            print('candidateData:$candidateData,rejectedData:$rejectedData');

            return _dragData == null

                ? Container(

                    height: 100,

                    width: 100,

                    alignment: Alignment.center,

                    decoration: BoxDecoration(

                        borderRadius: BorderRadius.circular(10),

                        border: Border.all(color: Colors.red)),

                  )

                : Container(

                    height: 100,

                    width: 100,

                    alignment: Alignment.center,

                    decoration: BoxDecoration(

                        color: Colors.red,

                        borderRadius: BorderRadius.circular(10)),

                    child: Text(

                      '孟',

                      style: TextStyle(color: Colors.white, fontSize: 18),

                    ),

                  );

          },

          onWillAccept: (Color color) {

            print('onWillAccept:$color');

            return true;

          },

          onAccept: (Color color) {

            setState(() {

              _dragData = color;

            });

            print('onAccept:$color');

          },

          onLeave: (Color color) {

            print('onLeave:$color');

          },

        ),

      ],

    ),

  );

}

_buildDraggable() {

  return Draggable(

    data: Color(0x000000FF),

    child: Container(

      height: 100,

      width: 100,

      alignment: Alignment.center,

      decoration: BoxDecoration(

          color: Colors.red, borderRadius: BorderRadius.circular(10)),

      child: Text(

        '孟',

        style: TextStyle(color: Colors.white, fontSize: 18),

      ),

    ),

    feedback: Container(

      height: 100,

      width: 100,

      alignment: Alignment.center,

      decoration: BoxDecoration(

          color: Colors.blue, borderRadius: BorderRadius.circular(10)),

      child: DefaultTextStyle.merge(

        style: TextStyle(color: Colors.white, fontSize: 18),

        child: Text(

          '孟',

        ),

      ),

    ),

  );

}
效果如下:
LongPressDraggable
LongPressDraggable继承自Draggable,因此用法和Draggable完全一样,唯一的区别就是LongPressDraggable触发拖动的方式是长按,而Draggable触发拖动的方式是按下。
今天的文章对大家是否有帮助?如果有,请在文章底部留言和点赞,以表示对我的支持,你们的留言、点赞和转发关注是我持续更新的动力!
我创建了一个关于Flutter的微信交流群,欢迎您的加入,让我们一起学习,一起进步,开始我们的故事,生活不止眼前的苟且,还有诗和《远方》。
微信:mqd_zzy
当然我也非常希望您关注我个人的公众号,里面有各种福利等着大家哦。

Flutter 拖拽控件Draggable看这一篇就够了的更多相关文章
- Flutter 拖拽控件Draggable
Flutter提供了强大的拖拽控件,可以灵活定制,并且非常简单.下面作一个拖拽的案例. Draggable Widget Draggable控件负责就是拖拽,父层使用了Draggable,它的子元素就 ...
- flutter Draggable Widget拖拽控件
Draggable Widget Draggable控件负责就是拖拽,父层使用了Draggable,它的子元素就是可以拖动的,子元素可以实容器,可以是图片.用起来非常的灵活. 参数说明: data: ...
- 【C#/WPF】GridSplitter 分割布局,拖拽控件分隔栏以改变控件尺寸
需求:界面由多部分控件组成,想要拖拽控件之间的分隔栏以改变尺寸. MainWindow.xaml: <Grid> <Grid.ColumnDefinitions> <Co ...
- Unity编辑器 - DragAndDrop拖拽控件
Unity编辑器 - DragAndDrop拖拽控件 Unity编辑器的拖拽(DragAndDrop)在网上能找到的资料少,自己稍微研究了一下,写了个相对完整的案例,效果如下 代码: object d ...
- ios-将代码创建的视图控件放入拖拽控件的下面
如图所示 图片是拖拽上去的imageView,橘黄色控件是在代码中创建的添加上去的,此时黄色view在imageView 上方 调用方法bringSubviewToFront:试图将imageView ...
- H5实现多图片预览上传,可点击可拖拽控件介绍
版权声明:欢迎转载,请注明出处:http://blog.csdn.net/weixin_36380516 在做图片上传时发现一个蛮好用的控件,支持多张图片同时上传,可以点击选择图片,也可以将图片拖拽到 ...
- 拖拽控件java版
Button vv = new Button("vvvv"); DragSource.getDefaultDragSource().createDefaultDragGestur ...
- 开发winform程序,在拖拽控件大小时,VS会卡死
你可以看看你最近有没有装什么新的软件,比如说:有道词典就会与VS有冲突,导致卡死,可以把进程关闭.
- Flutter 拖拽排序组件 ReorderableListView
注意:无特殊说明,Flutter版本及Dart版本如下: Flutter版本: 1.12.13+hotfix.5 Dart版本: 2.7.0 ReorderableListView是通过长按拖动某一项 ...
随机推荐
- Eclipse 快捷键(mac)
Option + Command + X: 运行Command + O:显示大纲Command + 1:快速修复Command + D:删除当前行Command + Option + ↓:复制当前行到 ...
- n的m划分
n的m划分: dp[i][j]表示j的i划分,也就是将j颗球放入i个袋子里面,最后的答案是dp[m][n] 状态转移方程为dp[i][j]=dp[i-1][j]+dp[i][j-i]; 划分方法有两种 ...
- H5的localStorage使用总结
一.localstorage 的优缺点 优点: 1.localStorage 的存储大小是5M,而cookie的存储大小只有4K,解决了cookie存储空间不足的问题 2.localStorage 可 ...
- Office customUI中如何动态更新控件标题和图标?
本例,在Excel右键菜单中创建一个按钮,按钮的标题使用getLabel动态获取,图标使用getImage动态获取. customUI XML代码: <customUI xmlns=" ...
- SpringBoot 将自制的Starter 发布到远程公服
上一篇文章:就是简单的介绍了如何自己制作一个starter ,由于上篇文章只是我个人的笔记,就是将其中重要的部分写出来了,少了其他的基础步骤,但是这个我自己就能看懂,也算不上是一篇好的博客,只能算是笔 ...
- [LC] 106. Construct Binary Tree from Inorder and Postorder Traversal
Given inorder and postorder traversal of a tree, construct the binary tree. Note:You may assume that ...
- JAVA单例模式的几种写法
/** * 单例模式懒汉式(双重检锁线程安全.JDK1.5之后) */ public class Singleton { private static volatile Singleton singl ...
- SpringBoot之HandlerInterceptor拦截器的使用 ——(三)获取requestBody解决java.io.IOException: Stream closed
原文地址:https://blog.csdn.net/zhibo_lv/article/details/81875705 感谢原作者
- 基于Springboot注解的策略模式
释义 策略模式和多态很相似 可以理解为定义了一个统一的接口,有许多不同的实现类,可以自由选择不同的实时类去执行. 实现 上代码: 定义一个统一的接口: [JavaScript] 纯文本查看 复制代码 ...
- Docker私有仓库管理
docker load -i registry.tar.gz docker run -d -p 5000:5000 --restart=always --name registry -v /opt/m ...