SpringBoot原理发现(一)
说明:
本系列基于SpringBoot 2.2.9.RELEASE 版本,对SpringBoot的原理进行分析,一共分为四节:
SpringBoot原理发现(一):创建Hello World,对pom依赖以及@SpringBootApplication注解进行分析
SpringBoot原理发现(二):分析SpringBoot自动配置原理
SpringBoot原理发现(三):通过主配置类main方法分析SpringBoot启动配置原理
SpringBoot原理发现(四):了解SpringBoot启动中的几个重要回调机制
Hello World
创建Hello World,主启动类如下:
@SpringBootApplication

public class DemoApplication {

    public static void main(String[] args) {

        SpringApplication.run(DemoApplication.class, args);

    }

    @RestController

    public class HelloController{

        @GetMapping("/")

        public String helloWorld(){

            return "hello world";

        }

    }

}
1. POM文件
1.1 父POM
<!-- 当前项目pom -->

<parent>

    <groupId>org.springframework.boot</groupId>

    <artifactId>spring-boot-starter-parent</artifactId>

    <version>2.2.9.RELEASE</version>

    <relativePath/>

</parent>

<!-- spring-boot-starter-parent 的父pom -->

<parent>

  <groupId>org.springframework.boot</groupId>

  <artifactId>spring-boot-dependencies</artifactId>

  <version>2.2.9.RELEASE</version>

  <relativePath>../../spring-boot-dependencies</relativePath>

</parent>
可以看出当前项目pom中的parent 依赖了 spring-boot-dependencies,而spring-boot-dependencies中管理的就是SpringBoot应用里面的所有依赖版本。(如果其中没包含,需要自定义在父pom中进行依赖)
<!-- spring-boot-dependencies 部分代码 -->

<properties>

    <activemq.version>5.15.13</activemq.version>

    <antlr2.version>2.7.7</antlr2.version>

    <appengine-sdk.version>1.9.81</appengine-sdk.version>

    <artemis.version>2.10.1</artemis.version>

    <aspectj.version>1.9.6</aspectj.version>

    <assertj.version>3.13.2</assertj.version>

    <atomikos.version>4.0.6</atomikos.version>

    <awaitility.version>4.0.3</awaitility.version>

    <bitronix.version>2.1.4</bitronix.version>


  .......
1.2 启动器
SpringBoot将所有的功能场景都抽取成一个个的starter,只需要依赖某个starter,便有了相关依赖信息及功能,这样的starter称之为场景启动器。
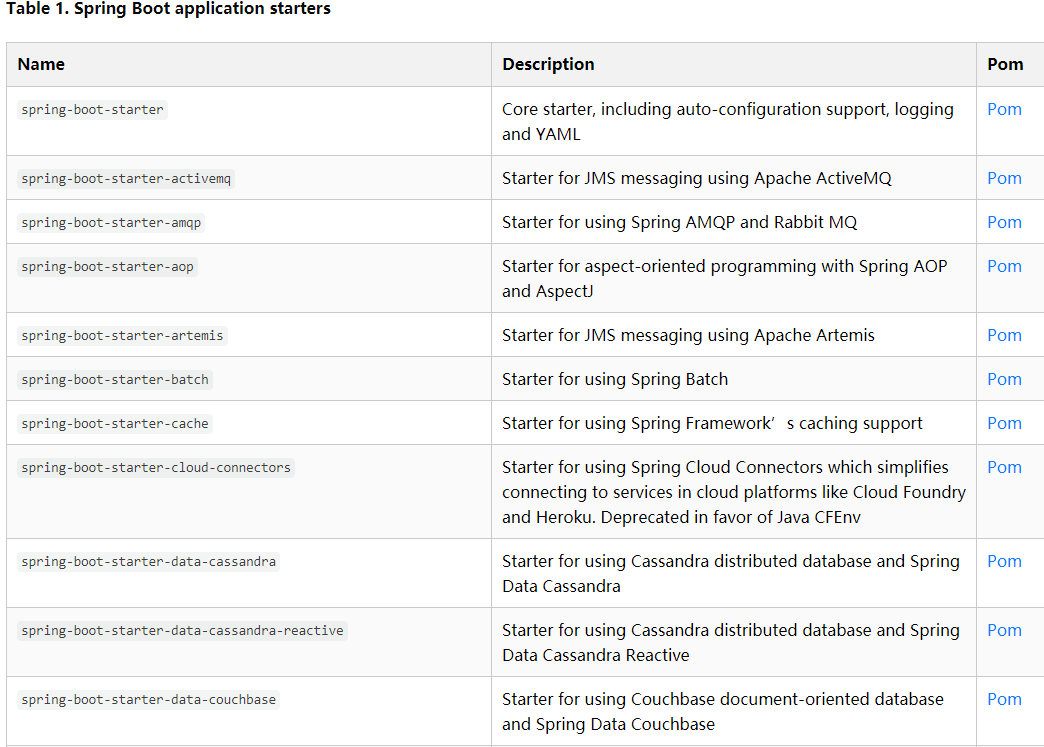
可以通过点击官网进行查看包含哪些starter,如下图:
如开发web应用,只需要引入spring-boot-starter-web便有了web模块的相关功能
<dependencies>

  <dependency>

    <groupId>org.springframework.boot</groupId>

    <artifactId>spring-boot-starter-web</artifactId>

  </dependency>

    ......
spring-boot-starter-web:管理了web模块需要引用的依赖文件,如下图:
<!-- spring-boot-starter-web.pom部分依赖-->
<dependencies>

    <dependency>

      <groupId>org.springframework.boot</groupId>

      <artifactId>spring-boot-starter</artifactId>

      <version>2.2.9.RELEASE</version>

      <scope>compile</scope>

    </dependency>

    <dependency>

      <groupId>org.springframework.boot</groupId>

      <artifactId>spring-boot-starter-json</artifactId>

      <version>2.2.9.RELEASE</version>

      <scope>compile</scope>

    </dependency>

    <dependency>

      <groupId>org.springframework.boot</groupId>

      <artifactId>spring-boot-starter-tomcat</artifactId>

      <version>2.2.9.RELEASE</version>

      <scope>compile</scope>

    </dependency>
2.主程序分析
@SpringBootApplication

public class DemoApplication {

    public static void main(String[] args) {

        SpringApplication.run(DemoApplication.class, args);

    }

    @RestController

    public class HelloController{

        @GetMapping("/")

        public String helloWorld(){

            return "hello world";

        }

    }

}
2.1 @SpringBootApplication
该注解标注在某个类上,说明这个类是SpringBoot的主配置类,SpringBoot应用应该使用这个类的main方法进行启动。
进入该注解,可以看到@SpringBootApplication是一个组合注解,代码如下:
@Target(ElementType.TYPE)

@Retention(RetentionPolicy.RUNTIME)

@Documented

@Inherited

@SpringBootConfiguration

@EnableAutoConfiguration

@ComponentScan(excludeFilters = { @Filter(type = FilterType.CUSTOM, classes = TypeExcludeFilter.class),

        @Filter(type = FilterType.CUSTOM, classes = AutoConfigurationExcludeFilter.class) })

public @interface SpringBootApplication {
2. 1.1 @SpringBootConfiguration
SpringBoot的配置类。进去会发现其实就是一个Spring的配置类@Configuration,而@Configuration其实就是一个组件@Component。
@SpringBootConfiguration是SpringBoot提供的,而@Configuration是Spring提供的
代码如下:
/**

* SpringBootConfiguration

*/

@Target({ElementType.TYPE})

@Retention(RetentionPolicy.RUNTIME)

@Documented

@Configuration

public @interface SpringBootConfiguration {

.....

/**

* Configuration

*/

@Target(ElementType.TYPE)

@Retention(RetentionPolicy.RUNTIME)

@Documented

@Component

public @interface Configuration {
2 .2 @EnableAutoConfiguration
作用:开启自动配置功能
所谓开启自动配置:以前需要提供各种配置文件,如包扫描等,现在使用@EnableAutoConfiguration标注,SpringBoot就会开启自动配置功能。
点开这个注解,会发现它同样是组合注解,如下:
@Target(ElementType.TYPE)

@Retention(RetentionPolicy.RUNTIME)

@Documented

@Inherited

@AutoConfigurationPackage

@Import(AutoConfigurationImportSelector.class)

public @interface EnableAutoConfiguration {
2.2.1 @AutoConfigurationPackage
@Target(ElementType.TYPE)

@Retention(RetentionPolicy.RUNTIME)

@Documented

@Inherited

@Import(AutoConfigurationPackages.Registrar.class)

public @interface AutoConfigurationPackage {

}
@Import(AutoConfigurationPackages.Registrar.class):向容器中导入一个组件,组件由@Import后面传入的类指定
AutoConfigurationPackages.Registrar.class 关键代码如下:
static class Registrar implements ImportBeanDefinitionRegistrar, DeterminableImports {

        @Override

        public void registerBeanDefinitions(AnnotationMetadata metadata, BeanDefinitionRegistry registry) {

            register(registry, new PackageImport(metadata).getPackageName());

        }
通过debug可以查看该注解是标注是在主启动类上,获取主启动类所在的包位置路径,将该路径下面的所有包扫描注入到容器中。类似spring配置文件xml中 <context:component-scan base-package="xx.yyy" />功能。
@AutoConfigurationPackage 其实就是自动获取主配置类下面的所有包并扫描注入进IOC容器中。
2.2.2 @Import(AutoConfigurationImportSelector.class)
同样是往IOC容器中导入AutoConfigurationImportSelector.class中指定的组件。
AutoConfigurationImportSelector主要代码:
protected AutoConfigurationEntry getAutoConfigurationEntry(AutoConfigurationMetadata autoConfigurationMetadata,

            AnnotationMetadata annotationMetadata) {

        if (!isEnabled(annotationMetadata)) {

            return EMPTY_ENTRY;

        }

        AnnotationAttributes attributes = getAttributes(annotationMetadata);

        List<String> configurations = getCandidateConfigurations(annotationMetadata, attributes);

        configurations = removeDuplicates(configurations);

        Set<String> exclusions = getExclusions(annotationMetadata, attributes);

        checkExcludedClasses(configurations, exclusions);

        configurations.removeAll(exclusions);

        configurations = filter(configurations, autoConfigurationMetadata);

        fireAutoConfigurationImportEvents(configurations, exclusions);

        return new AutoConfigurationEntry(configurations, exclusions);

    }
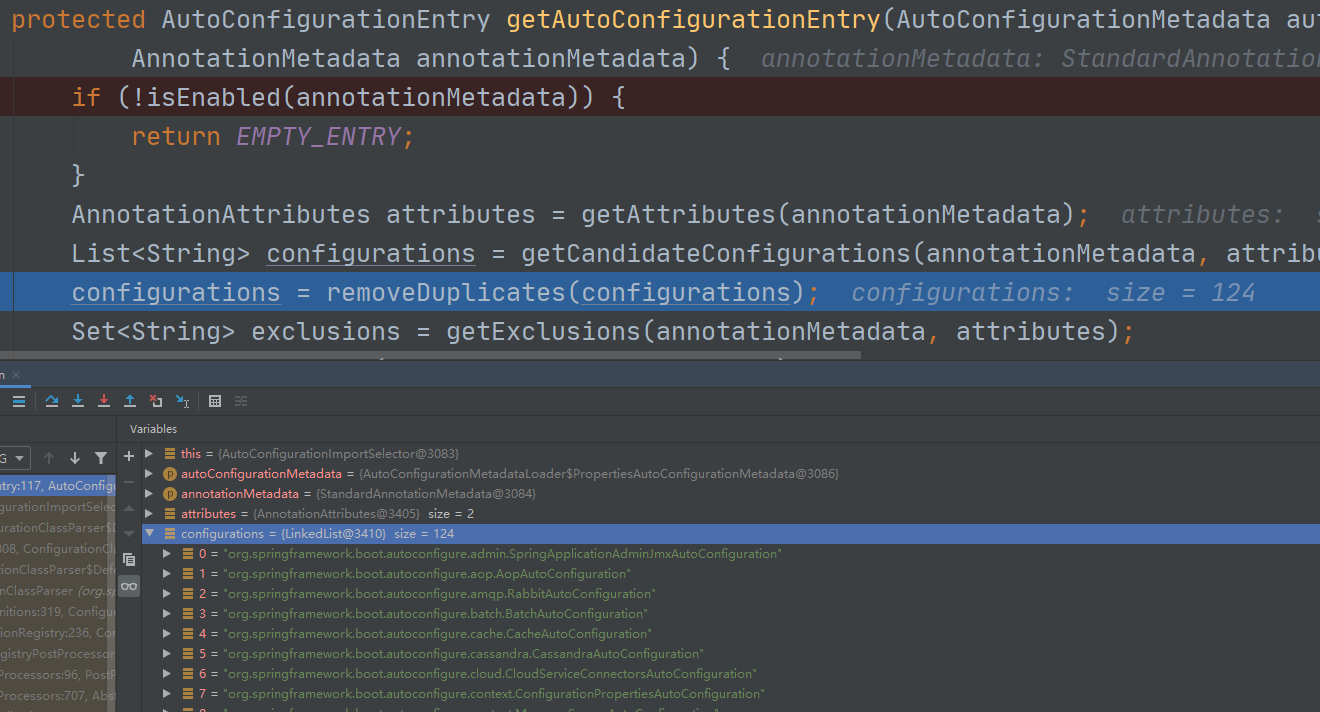
通过debug可以看出,它会返回各种XXXAutoConfiguration。而有了这些XXXAutoConfiguration,就不需要我们在手动去编写相关场景的注入功能组件等工作,如下图:
这些XXXAutoConfiguration又是从何而来呢?
protected List<String> getCandidateConfigurations(AnnotationMetadata metadata, AnnotationAttributes attributes) {

        List<String> configurations = SpringFactoriesLoader.loadFactoryNames(getSpringFactoriesLoaderFactoryClass(),

                getBeanClassLoader());

        Assert.notEmpty(configurations, "No auto configuration classes found in META-INF/spring.factories. If you "

                + "are using a custom packaging, make sure that file is correct.");

        return configurations;

    }
SpringFactoriesLoader.loadFactoryNames(getSpringFactoriesLoaderFactoryClass(),getBeanClassLoader())
第一个参数:EnableAutoConfiguration.class
第二个参数:ClassLoader
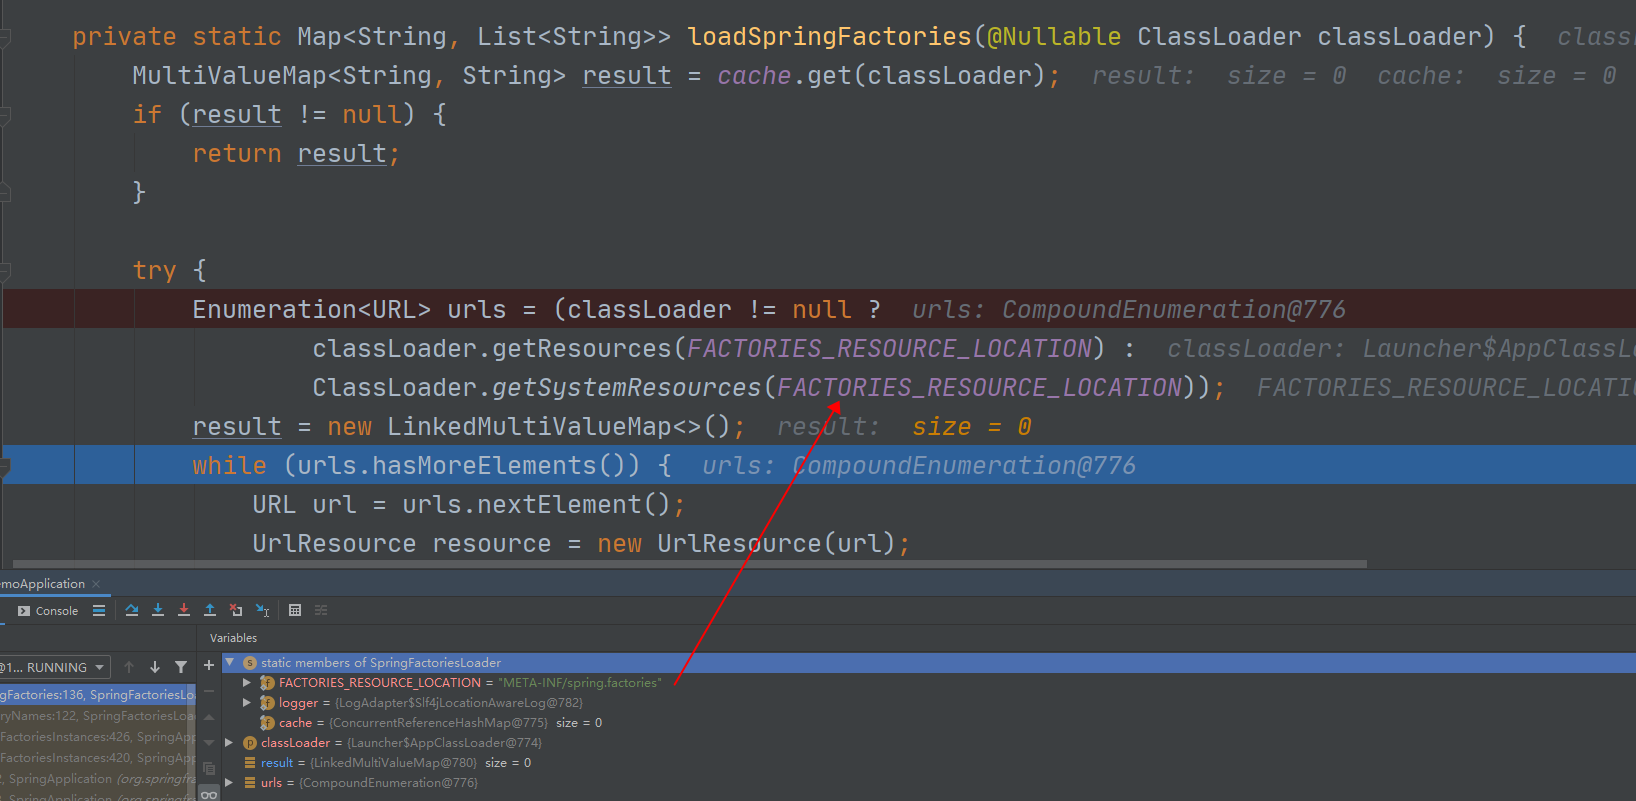
进入loadFactoryNames方法,SpringBoot会扫描类路径下的META-INF/spring.factories 文件中定义的数据,并返回第一个参数EnableAutoConfiguration指定的值,并将这些值作为自动配置类导入到容器中,
在后续该方法会经常出现,用于扫描spring.factories中定义的值,如下图:
# Auto Configure

org.springframework.boot.autoconfigure.EnableAutoConfiguration=\

org.springframework.boot.autoconfigure.admin.SpringApplicationAdminJmxAutoConfiguration,\

org.springframework.boot.autoconfigure.aop.AopAutoConfiguration,\

org.springframework.boot.autoconfigure.amqp.RabbitAutoConfiguration,\

org.springframework.boot.autoconfigure.batch.BatchAutoConfiguration,\

org.springframework.boot.autoconfigure.cache.CacheAutoConfiguration,\

org.springframework.boot.autoconfigure.cassandra.CassandraAutoConfiguration,\

org.springframework.boot.autoconfigure.cloud.CloudServiceConnectorsAutoConfiguration,\

org.springframework.boot.autoconfigure.context.ConfigurationPropertiesAutoConfiguration,\

org.springframework.boot.autoconfigure.context.MessageSourceAutoConfiguration,\

org.springframework.boot.autoconfigure.context.PropertyPlaceholderAutoConfiguration,\

org.springframework.boot.autoconfigure.couchbase.CouchbaseAutoConfiguration,\

......
至此基本上可以看出SpringBoot是如何进行加载且工作的。说到底spring的配置文件一个也没少,只是SpringBoot底层将我们的配置文件进行自动配置到容器中了,少了手动编写大量的组件配置。
SpringBoot原理发现(一)的更多相关文章
- 深入springboot原理——动手封装一个starter
从上一篇文章<深入springboot原理——一步步分析springboot启动机制(starter机制)> 我们已经知道springboot的起步依赖与自动配置的机制.spring-bo ...
- 深入springboot原理——一步步分析springboot启动机制(starter机制)
前言 使用过springboot的同学应该已经知道,springboot通过默认配置了很多框架的使用方式帮我们大大简化了项目初始搭建以及开发过程.本文的目的就是一步步分析springboot的启动过程 ...
- Spring-boot原理(附带实现一个spring-boot-starter实例和代码下载)
(我就是个封面) Spring-boot自出现后,到现在火的很,大家貌似都在用,连招聘里面也要求会这个.但是说实话,spring-boot无外乎想实现一种可插拔的编程方式,说是简化配置,其实并没有 ...
- SpringBoot原理讲解
一.问题的引入 首先我们来看一个最简单的例子. 我们先创建一个SpringBoot的工程,如何创建一个SpringBoot工程就不说了,不会请自行解决.然后写一个controller类,通过请求路径, ...
- SpringBoot原理分析与配置
1.1 起步依赖原理分析 1.1.1 分析spring-boot-starter-parent 按住Ctrl点击pom.xml中的spring-boot-starter-parent,跳转到了spri ...
- SpringBoot原理—分析SpringBoot启动机制(starter机制)
一:前言使用过springboot的同学应该已经知道,springboot通过默认配置了很多框架的使用方式帮我们大大简化了项目初始搭建以及开发过程.本文的目的就是一步步分析springboot的启动过 ...
- SpringBoot原理深入及源码剖析(一) 依赖管理及自动配置
前言 传统的Spring框架实现一个Web服务需要导入各种依赖jar包,然后编写对应的XML配置文件等,相较而言,SpringBoot显得更加方便.快捷和高效.那么,SpringBoot究竟是如何做到 ...
- Springboot原理
1. SpringBoot特点 一个starter导入所有 依赖管理 父项目做依赖管理:声明了所需依赖的版本号 依赖管理 <parent> <groupId>org.sprin ...
- Spring-Boot原理及应用布署
一.Spring Boot的理念 从最根本上来讲,Spring Boot就是一些库的集合,它能够被任意项目的构建系统所使用.简便起见,该框架也提供了命令行界面,它可以用来运行和测试Boot应用.框架的 ...
随机推荐
- 从四个问题透析Linux下C++编译&链接
摘要:编译&链接对C&C++程序员既熟悉又陌生,熟悉在于每份代码都要经历编译&链接过程,陌生在于大部分人并不会刻意关注编译&链接的原理.本文通过开发过程中碰到的四个典型 ...
- obj2opengl:转换OBJ 3D模型到iPhone OpenGL ES兼容的数组中
原文如下:obj2opengl: convert obj 3D models to arrays compatible with iPhone OpenGL ES obj2opengl在GitHub中 ...
- spring-boot-route(七)整合jdbcTemplate操作数据库
在一部分内容中,我们学习了Restful接口的编写,及接口文档的生成.我们需要将接口数据进行持久化存储,这一部分我们主要学习几种持久化框架将数据进行存储.本部分内容中,我们都将使用mysql为例来做为 ...
- Windows 10 如何在桌面上显示“此电脑”和“控制面板”
新电脑安装好 Windows 10 系统,默认在桌面上是不显示 "此电脑" 和 "控制面板" 图标的. 如果是 Windows 10 家庭版,桌面一般只显示&q ...
- 风车签名 - 让管理APP变成一件简单的事儿
这是一款在Mac平台下安全可控的iOS签名管理软件,旨在对签名后的APP能够完全控制,包括APP的开启或禁用.设置到期时间锁.注入第三方动态库文件.设置安装限量.修改APP名称和自定义Bundle I ...
- OAth 2.0 的白话讲解
一.OAuth2.0是什么,主要做什么用的? 官方注解 简单说,OAuth 就是一种授权机制.数据的所有者告诉系统,同意授权第三方应用进入系统,获取这些数据.系统从而产生一个短期的进入令牌(token ...
- ubuntu 19.10 中防火墙iptables配置
$sudo which iptables /usr/sbin/iptables说明有安装 如果没有安装,那么使用sudo apt-get install iptables 安装. 刚装机,是这个样 ...
- Linux桌面环境配置
目录 更换软件源 中文输入法 firefox安装flash插件 编译安装Vim 关闭蓝牙开机自启 yakuake无法正常使用 在中文环境下将默认目录修改成英文 电脑换成了thinkpad x1c 20 ...
- golang API 请求队列
概要 实现思路 使用方法 启动队列服务 使用队列服务 概要 在调用第三方 API 的时候, 基本都有访问限速的限制条件. 第三方的 API 有多个的时候, 就不太好控制访问速度, 常常会导致 HTTP ...
- 多测师讲解python_os模块_高级讲师肖sir
#os.path.isfile()#:判断当前是否为文件,返回布尔值是文件则True否者Falsea_path='F:\cms搭建.rar' #lesson包b_path=r'D:\bao\kk '# ...