gitlab的安装和基本使用
一、gitlab的安装
1)安装依赖包
sudo yum install git vim gcc glibc-statc telnet -y

sudo yum install -y curl policycoreutils-python openssh-server

sudo systemctl enable sshd

sudo systemctl start sshd

sudo yum install postfix

sudo systemctl enable postfix

sudo systemctl start postfix
安装依赖
2)设置防火墙(可选)
sudo firewall-cmd --permanent --add-service=http

sudo systemctl reload firewalld
3)添加gitlab安装源
3.1)设置国内安装源,如设置清华大学的源
vim /etc/yum.repos.d/gitlab-ce.repo

[gitlab-ce]

name=Gitlab CE Repository

baseurl=https://mirrors.tuna.tsinghua.edu.cn/gitlab-ce/yum/el$releasever/

gbgcheck=

enable=
国内清华源
3.2)在国外,设置国外源
curl https://packages.gitlab.com/install/repositories/gitlab/gitlab-ee/script.rpm.sh | sudo bash
国外源
4)安装gitlab
4.1)设置域名方式安装
sudo EXTERNAL_URL="http://gitlab.example.com" yum install -y gitlab-ce
域名安装
4.11)可购买真实发域名方式,替换上面的域名
4.12)本地域名测试,在 /etc/hosts里面添加
192.168.1.20 gitlab.example.com
4.2)不设置域名安装方式
yum install gitlab-ce    安装

gitlab-ctl reconfigure   修改配置
4.3)如果安装遇到问题解决。--nogpgcheck

EXTERNAL_URL="http://gitlab.example.com" yum install -y gitlab-ce --nogpgcheck
安装好修改配置文件

5)启动查看状态
gitlab-ctl reconfigure

[root@gitlab ~]# gitlab-ctl status

run: alertmanager: (pid ) 431s; run: log: (pid ) 430s

run: gitaly: (pid ) 432s; run: log: (pid ) 432s

run: gitlab-monitor: (pid ) 432s; run: log: (pid ) 431s

run: gitlab-workhorse: (pid ) 432s; run: log: (pid ) 431s

run: logrotate: (pid ) 487s; run: log: (pid ) 432s

run: nginx: (pid ) 493s; run: log: (pid ) 432s

run: node-exporter: (pid ) 475s; run: log: (pid ) 432s

run: postgres-exporter: (pid ) 430s; run: log: (pid ) 430s

run: postgresql: (pid ) 534s; run: log: (pid ) 432s

run: prometheus: (pid ) 431s; run: log: (pid ) 431s

run: redis: (pid ) 540s; run: log: (pid ) 432s

run: redis-exporter: (pid ) 463s; run: log: (pid ) 431s

run: sidekiq: (pid ) 501s; run: log: (pid ) 432s

run: unicorn: (pid ) 507s; run: log: (pid ) 432s
启动
6)本地测试访问注意问题
虚拟机中   /etc/hosts里面添加

192.168.0.49   gitlab.example.com

本地电脑中 C:\Windows\System32\drivers\etc\hosts

192.168.0.49   gitlab.example.com
强调hosts文件
访问成功
7)gitlab常用命令
sudo gitlab-ctl start # 启动所有 gitlab 组件;
sudo gitlab-ctl stop # 停止所有 gitlab 组件;
sudo gitlab-ctl restart # 重启所有 gitlab 组件;
sudo gitlab-ctl status # 查看服务状态;
sudo gitlab-ctl reconfigure # 启动服务;
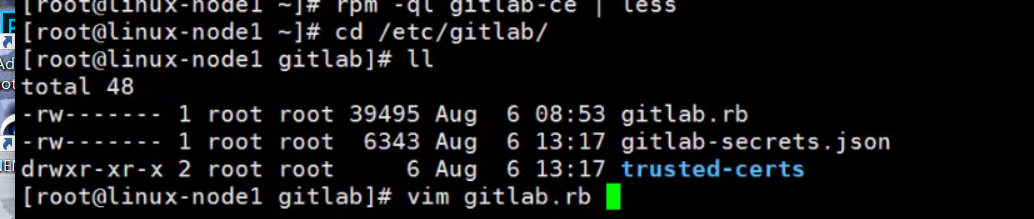
sudo vim /etc/gitlab/gitlab.rb # 修改默认的配置文件;
gitlab-rake gitlab:check SANITIZE=true --trace # 检查gitlab;
sudo gitlab-ctl tail # 查看日志;
gitlab常用命令
二、使用gitlab
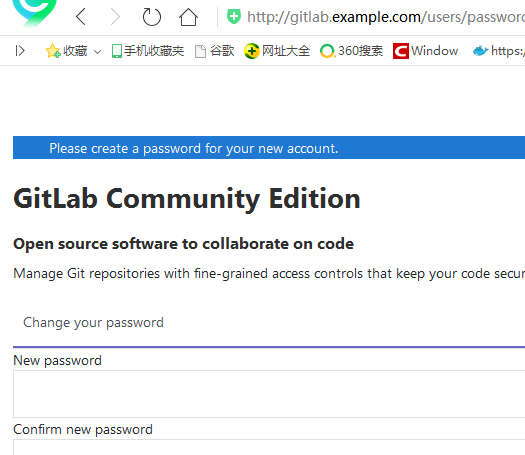
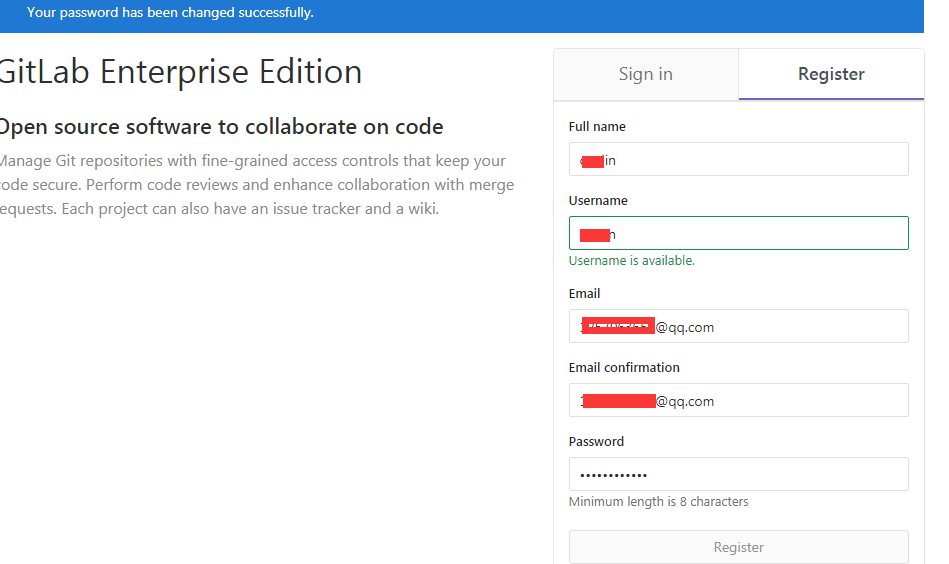
1)创建用户名登录
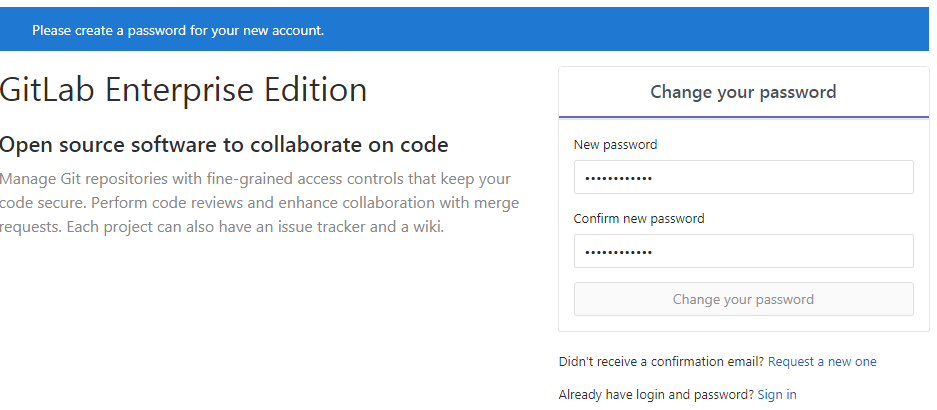
跳转至登录界面

2)添加秘钥设置
在服务器上生成秘钥,复制公钥内容进来
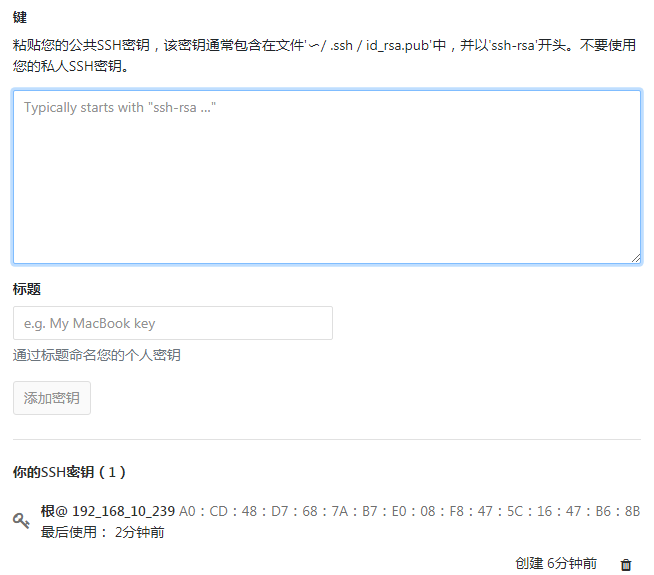
可使用ssh秘钥免费下载
[root@redis02 gitlab_test]# git clone git@192.168.10.239:user/public.git

Cloning into 'public'...

The authenticity of host '192.168.10.239 (192.168.10.239)' can't be established.

RSA key fingerprint is b5:f4::a4::2f:fd:5d::ba:8c:a4:e4:c2::5d.

Are you sure you want to continue connecting (yes/no)? yes

Warning: Permanently added '192.168.10.239' (RSA) to the list of known hosts.

remote: Enumerating objects: , done.

remote: Counting objects: % (/), done.

remote: Compressing objects: % (/), done.

remote: Total  (delta ), reused  (delta )

Receiving objects: % (/), done.

Checking connectivity... done.
修改代码上传
[root@redis02 public]# git config --global user.email "1257073656@qq.com"

[root@redis02 public]# git config --global user.name "user"

[root@redis02 public]# git commit -m "change on linux"

[master 3bb2d0d] change on linux

  file changed,  insertion(+)

[root@redis02 public]# git push origin master

Counting objects: , done.

Compressing objects: % (/), done.

Writing objects: % (/),  bytes |  bytes/s, done.

Total  (delta ), reused  (delta )

To git@192.168.10.239:caojin/public.git

   18965a3..3bb2d0d  master -> master
三、新版本gitlab测试
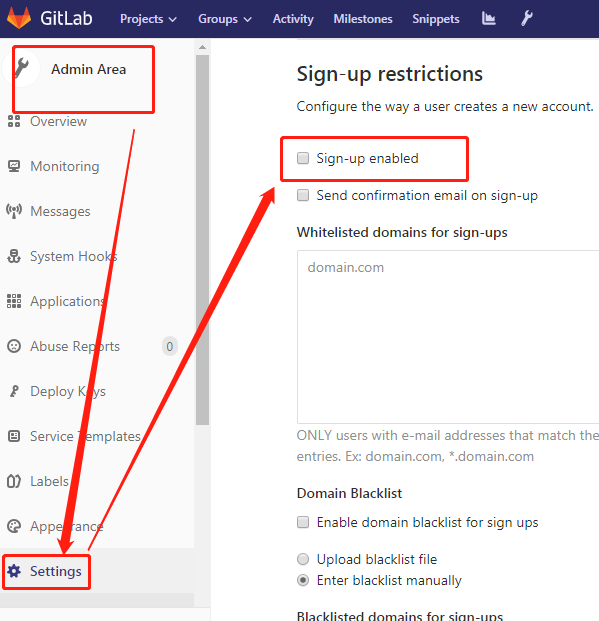
1)取消注册功能
2)创建项目之前先创建组
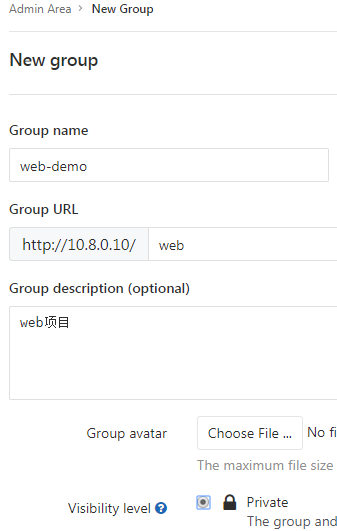
2)创建项目。可以选择之前的建立的组

3)git对提交代码的版本控制
[root@node02 demo]# git show|grep commit

commit f0e08a0c0df9d6e82ebaf4833bd446d7edd48422

[root@node02 demo]# git show|grep commit|cut -d ' ' -f2

f0e08a0c0df9d6e82ebaf4833bd446d7edd48422

[root@node02 demo]# API_VERL=$(git show|grep commit|cut -d ' ' -f2)

[root@node02 demo]# echo $API_VERL

f0e08a0c0df9d6e82ebaf4833bd446d7edd48422

[root@node02 demo]# echo ${API_VERL::}

f0e08a

[root@node02 demo]# API_VER=$(echo ${API_VERL::})

[root@node02 demo]# echo $API_VER

f0e08a
4)修改拉取代码的默认url
vim /etc/gitlab/gitlab.rb

.....

# external_url 'http://gitlab.example.com'

external_url 'http://192.168.10.24'

[root@node02 gitlab]# gitlab-ctl reconfigure  重启
gitlab的安装和基本使用的更多相关文章
- gitlab一键安装 (转)
原文地址:http://www.2cto.com/os/201411/353292.html 0 简介bitnami和gitlab bitnami BitNami是一个开源项目,该项目产生的开源软件包 ...
- gitlab的安装以及汉化
gitlab的安装 首先在网上下载好任意版本gitlab的rpm包 推荐下面的地址: https://mirrors.tuna.tsinghua.edu.cn/gitlab-ce/yum/el7/gi ...
- gitlab一键安装+配置(备份+LADP认证)
gitlab一键安装+配置(备份+LADP认证) #gitlab一键安装 #centos6 mini, GitLab社区版 #参考官方最新文档 https://www.gitlab.com.cn/in ...
- Gitlab的安装与实践
tucao 先让我来吐槽一下下,使用GitHub以及Bitbucket比较不太稳定,尤其是后者,可以说是极其不稳定,甚至无法克隆仓库到本地.因此,决定安装一款开源且免费的Git服务到自己的服务器主机上 ...
- Gitlab的安装及项目新建
1. Gitlab的安装及仓库创建 1.1下载gitlab安装包 1).官网下载速度较慢 建议先行下载 国内的源里面可以找到最新的版本https://mirrors.tuna.tsinghua.edu ...
- DevOps之一 Gitlab的安装与配置
gitlab的安装 参考治疗:https://www.gitlab.com.cn/installation/#centos-7 http://www.21yunwei.com/archives/435 ...
- docker+gitlab的安装和迁移
docker+gitlab的安装 docker search gitlab docker pull docker.io/gitlab/gitlab-ce docker run --name=: -- ...
- Gitlab的安装汉化及问题解决
Gitlab的安装汉化及问题解决(2017/12/14目前版本为10.2.4) 一.前言 Gitlab需要安装的包太TM多了,源码安装能愁死个人,一直出错,后来发现几行命令就装的真是遇到的新大陆一样. ...
- 持续集成(1)gitlab的安装
操作系统:centos 6.5 关闭selinux # 修改/etc/selinux/config 文件 将SELINUX=enforcing改为SELINUX=disabled ,然后重启电脑 # ...
随机推荐
- 微信小程序海报生成功能
如果是H5页面的话给大家推荐一款不错的插件html2canvas,这个插件可以将html元素转为canvas并一键生成png图片,但是本文的重点是在小程序上如何实现生成图片的功能.因为小程序没有DOM ...
- Linux 下配置 nginx + 两个 tomcat 的负载均衡
前提:已经安装了 nginx 和两个 tomcat 1.修改 nginx.conf 配置文件 1)在 http{} 节点之间添加 upstream 配置 2)修改 nginx 的监听端口,默认是 ...
- PowerDesigner工具将表字段转成java实体
首先将数据库的表导出为SQL文件.下载安装PowerDesigner工具. 下面以图文的形式讲解: 图 (1) 图 (2) 图 (3) 图 (4) 图 (5) 图 (6) 图 ...
- 前端笔记-javaScript-1
一.JavaScript概述 1.JavaScript的历史 1992年Nombas开发出C-minus-minus(C--)的嵌入式脚本语言(最初绑定在CEnvi软件中).后将其改名ScriptEa ...
- 循环列表最后一条不显示borderBottom
You could achieve this using some logic: return books.map((book, i) => { return( <View style={ ...
- Python创建随机用户名密码并存放于Access数据库
利用random库随机生成4到32位包含字母跟数字的用户名密码,利用win32com库连接到access数据库并写入table,要更改创建的用户名密码数量修改18行代码的数字即可. import wi ...
- 程序配置的原则和实践以及 Spring Boot 支持方式
原则 软件需要在不同的环境中部署,代码是保持不变的,但是不同的运行环境存在差异,所以需要使用配置适应不同的环境.比如: 数据库,Redis,以及其他 后端服务 的配置: 第三方服务的证书,如 oAut ...
- CPU TFLOPS 计算
CPU TFLOPS 计算 姚伟峰 yaoweifeng0301@126.com] http://www.cnblogs.com/Matrix_Yao/ 深度学习任务是一个计算密集型任务,所以很关注计 ...
- mac book pro macOS10.13.3安装qt、qt creator C++开发环境,qt5.11.1,并解决cmake构建:qt mac this file is not part of any project the code
因为之前在Ubuntu下使用的是qtcreator开发,现在想在mac上装一个系统,因为许久未装了,还是花了点时间,不如写个博客,下次就更快安装了.在Mac OS X下使用Qt开发,需要配置Qt库和编 ...
- vue---checkbox,获取选中的值
html: <input class="weui-check" type="checkbox" name="checkbox1" va ...