springboot整合rabbitmq,支持消息确认机制
安装
推荐一篇博客https://blog.csdn.net/zhuzhezhuzhe1/article/details/80464291
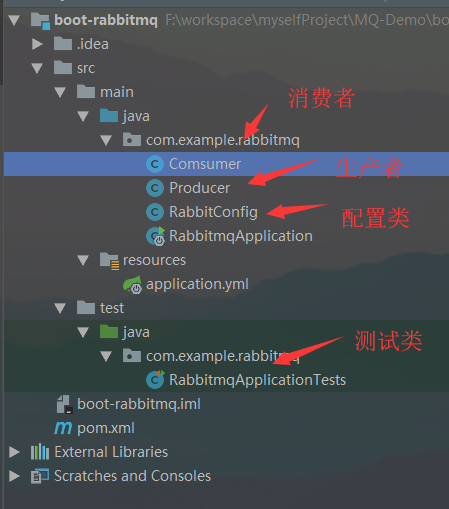
项目结构
POM.XML
 <?xml version="1.0" encoding="UTF-8"?>

 <project xmlns="http://maven.apache.org/POM/4.0.0" xmlns:xsi="http://www.w3.org/2001/XMLSchema-instance"

     xsi:schemaLocation="http://maven.apache.org/POM/4.0.0 http://maven.apache.org/xsd/maven-4.0.0.xsd">

     <modelVersion>4.0.0</modelVersion>

     <groupId>com.example</groupId>

     <artifactId>rabbitmq</artifactId>

     <version>0.0.1-SNAPSHOT</version>

     <packaging>jar</packaging>

     <name>rabbitmq</name>

     <description>Spring Boot 整合RabbitMQ</description>

     <parent>

         <groupId>org.springframework.boot</groupId>

         <artifactId>spring-boot-starter-parent</artifactId>

         <version>2.0.5.RELEASE</version>

         <relativePath/> <!-- lookup parent from repository -->

     </parent>

     <properties>

         <project.build.sourceEncoding>UTF-8</project.build.sourceEncoding>

         <project.reporting.outputEncoding>UTF-8</project.reporting.outputEncoding>

         <java.version>1.8</java.version>

     </properties>

     <dependencies>

         <dependency>

             <groupId>org.springframework.boot</groupId>

             <artifactId>spring-boot-starter</artifactId>

         </dependency>

         <!-- rabbitmq -->

         <dependency>

             <groupId>org.springframework.boot</groupId>

             <artifactId>spring-boot-starter-amqp</artifactId>

         </dependency>

         <dependency>

             <groupId>org.springframework.boot</groupId>

             <artifactId>spring-boot-starter-test</artifactId>

             <scope>test</scope>

         </dependency>

     </dependencies>

     <build>

         <plugins>

             <plugin>

                 <groupId>org.springframework.boot</groupId>

                 <artifactId>spring-boot-maven-plugin</artifactId>

             </plugin>

         </plugins>

     </build>

 </project>
POM.XML
application.yml
需要将publisher-confrems设为true,启动确认回调, 将 publisher-returns设为true 确认返回回调

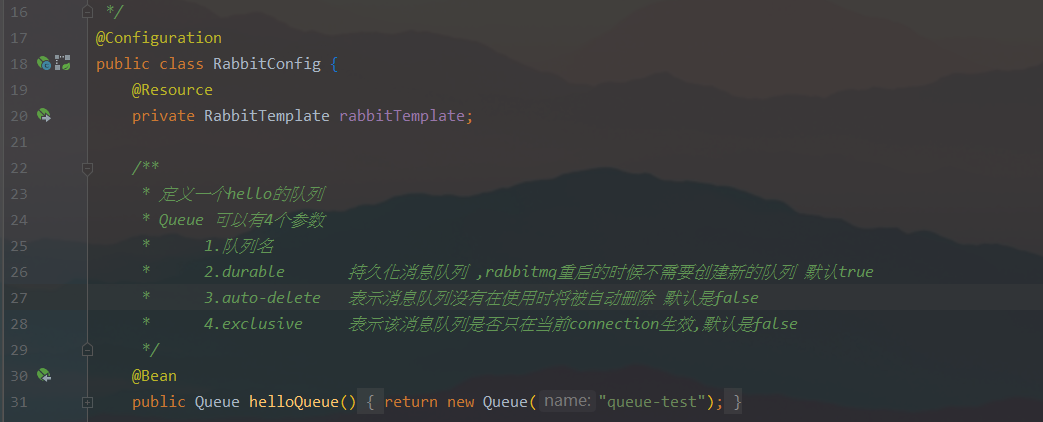
rabbitmq配置类--RabbitConfig
第一部分, 定义队列
第二部分,设置一些消息处理策略

 package com.example.rabbitmq;

 import org.slf4j.Logger;

 import org.slf4j.LoggerFactory;

 import org.springframework.amqp.core.Queue;

 import org.springframework.amqp.rabbit.core.RabbitTemplate;

 import org.springframework.context.annotation.Bean;

 import org.springframework.context.annotation.Configuration;

 import javax.annotation.Resource;

 /**

  * rabbitMq 配置类

  * @author milicool

  * Created on 2018/9/14

  */

 @Configuration

 public class RabbitConfig {

     @Resource

     private RabbitTemplate rabbitTemplate;

     /**

      * 定义一个hello的队列

      * Queue 可以有4个参数

      *      1.队列名

      *      2.durable       持久化消息队列 ,rabbitmq重启的时候不需要创建新的队列 默认true

      *      3.auto-delete   表示消息队列没有在使用时将被自动删除 默认是false

      *      4.exclusive     表示该消息队列是否只在当前connection生效,默认是false

      */

     @Bean

     public Queue helloQueue() {

         return new Queue("queue-test");

     }

     /** ======================== 定制一些处理策略 =============================*/

     /**

      * 定制化amqp模版

      *

      * ConfirmCallback接口用于实现消息发送到RabbitMQ交换器后接收ack回调   即消息发送到exchange  ack

      * ReturnCallback接口用于实现消息发送到RabbitMQ 交换器,但无相应队列与交换器绑定时的回调  即消息发送不到任何一个队列中  ack

      */

     @Bean

     public RabbitTemplate rabbitTemplate() {

         Logger log = LoggerFactory.getLogger(RabbitTemplate.class);

         // 消息发送失败返回到队列中, yml需要配置 publisher-returns: true

         rabbitTemplate.setMandatory(true);

         // 消息返回, yml需要配置 publisher-returns: true

         rabbitTemplate.setReturnCallback((message, replyCode, replyText, exchange, routingKey) -> {

             String correlationId = message.getMessageProperties().getCorrelationIdString();

             log.debug("消息:{} 发送失败, 应答码:{} 原因:{} 交换机: {}  路由键: {}", correlationId, replyCode, replyText, exchange, routingKey);

         });

         // 消息确认, yml需要配置 publisher-confirms: true

         rabbitTemplate.setConfirmCallback((correlationData, ack, cause) -> {

             if (ack) {

                 // log.debug("消息发送到exchange成功,id: {}", correlationData.getId());

             } else {

                 log.debug("消息发送到exchange失败,原因: {}", cause);

             }

         });

         return rabbitTemplate;

     }

 }
配置类
生产者
 /**

  * 生产者

  * @author milicool

  * Created on 2018/9/14

  */

 @Component

 public class Producer {

     @Autowired

     private RabbitTemplate rabbitTemplate;

     /**

      * 给hello队列发送消息

      */

     public void send() {

         for (int i =0; i< 100; i++) {

             String msg = "hello, 序号: " + i;

             System.out.println("Producer, " + msg);

             rabbitTemplate.convertAndSend("queue-test", msg);

         }

     }

 }
消费者
 /**

  * 消费者

  * @author milicool

  * Created on 2018/9/14

  */

 @Component

 public class Comsumer {

     private Logger log = LoggerFactory.getLogger(Comsumer.class);

     @RabbitListener(queues = "queue-test")

     public void process(Message message, Channel channel) throws IOException {

         // 采用手动应答模式, 手动确认应答更为安全稳定

         channel.basicAck(message.getMessageProperties().getDeliveryTag(), true);

         log.info("receive: " + new String(message.getBody()));

     }

 }
测试类
 @RunWith(SpringRunner.class)

 @SpringBootTest

 public class RabbitmqApplicationTests {

     @Autowired

     private Producer producer;

     @Test

     public void contextLoads() {

         producer.send();

     }

 }
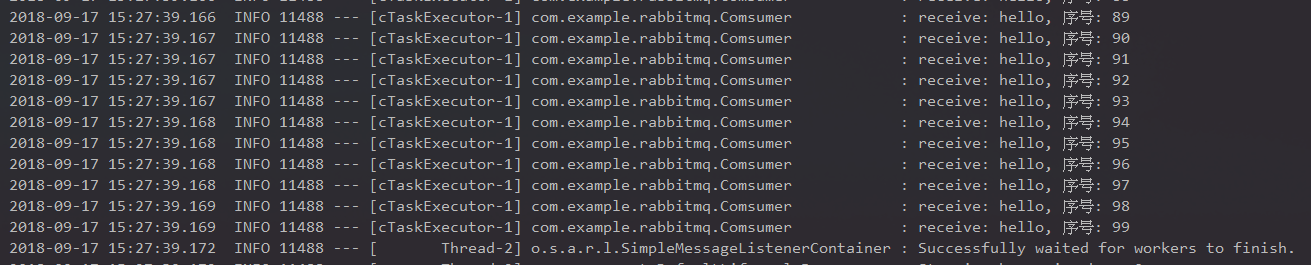
测试结果
测试结果太长,没有截取全部,可以查看到消费者接收到了全部消息,如果有的消息在没有接收完,消息将被持久化,下次启动时消费
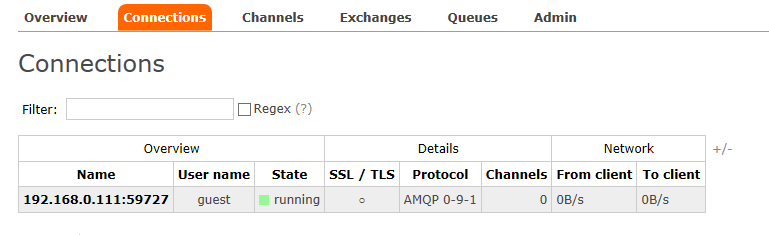
web端查看
感谢阅读 o(∩_∩)o

springboot整合rabbitmq,支持消息确认机制的更多相关文章
- SpringBoot 整合 RabbitMQ 实现消息可靠传输
消息的可靠传输是面试必问的问题之一,保证消息的可靠传输主要在生产端开启 comfirm 模式,RabbitMQ 开启持久化,消费端关闭自动 ack 模式. 环境配置 SpringBoot 整合 Rab ...
- RabbitMQ的消息确认机制
一:确认种类 RabbitMQ的消息确认有两种. 一种是消息发送确认.这种是用来确认生产者将消息发送给交换器,交换器传递给队列的过程中,消息是否成功投递.发送确认分为两步,一是确认是否到达交换器,二是 ...
- RabbitMQ 之消息确认机制(事务+Confirm)
概述 在 Rabbitmq 中我们可以通过持久化来解决因为服务器异常而导致丢失的问题,除此之外我们还会遇到一个问题:生产者将消息发送出去之后,消息到底有没有正确到达 Rabbit 服务器呢?如果不错得 ...
- RabbitMQ (十一) 消息确认机制 - 消费者确认
由于生产者和消费者不直接通信,生产者只负责把消息发送到队列,消费者只负责从队列获取消息(不管是push还是pull). 消息被"消费"后,是需要从队列中删除的.那怎么确认消息被&q ...
- RabbitMQ(四): rabbitmq 的消息确认机制(事务+confirm)
在 rabbitmq 中我们可以通过持久化数据解决 rabbitmq 服务器异常的数据丢失问题. 问题:生产者将消息发送出去之后,消息到底有没有到达 rabbitmq 服务器.默认情况下是不知道的. ...
- springboot整合rabbitMq实现消息延时发送
实现思路:利用mq的ttl设置消息失效时间 当达到设置时间后通过交换机到达死信队列中,消费者端绑定读取死信队列中信息来达到延时发送消息的功能. demo 如下: (1)在pom.xml 中引入rabb ...
- SpringBoot整合Rabbitmq设置消息请求头
String str = "{\"origin\":\"BBC\",\"origin_coupon_id\":51,\" ...
- 【Java】SpringBoot整合RabbitMQ
介绍 RabbitMQ 即一个消息队列,主要是用来实现应用程序的异步和解耦,同时也能起到消息缓冲,消息分发的作用. RabbitMQ是实现AMQP(高级消息队列协议)的消息中间件的一种,AMQP,即A ...
- RabbitMQ消息确认机制
文章目录 1. 事务机制2. Confirm模式2.1 生产者2.1.1 普通Confirm模式2.1.2 批量Confirm模式2.1.3 异步Confirm模式2.2 消费者3. 其他 消费者如何 ...
随机推荐
- unix网络编程 str_cli epoll 非阻塞版本
unix网络编程 str_cli epoll 非阻塞版本 unix网络编程str_cli使用epoll实现讲了使用epoll配合阻塞io来实现str_cli,这个版本是配合非阻塞io. 可以看到采用非 ...
- pch文件配置出现 Expected unqualified-id 和 Unkown type name 'NSString'
1.发生的现象 之前代码还是没有报错的,由于某些代码比较常用,就打算配置一个pch文件引入常用的文件 但是引入的时候就出现了报错 2.原因与解决办法 2.1 原因 你引入的文件可能使用到OC与C++混 ...
- 浅谈 cxx rope
一般说的浅谈是永远不会短的 然后$qwq$本宝宝并不想讲实现原理 会用就行了呗 然后方便起见,本文规定数组$a$的第$1$位为$a[0]$ 并且本文的所有$debug$为了方便看到我们$rope$长度 ...
- lamp centos下一键安装
系统需求 系统支持:CentOS 6+/Debian 7+/Ubuntu 12+ 内存要求:≥ 512MB 硬盘要求:至少 5GB 以上的剩余空间 服务器必须配置好 软件源 和 可连接外网 必须具有系 ...
- 最新cenos执行service httpd restart 报错Failed to restart httpd.service: Unit not found.
原来是需要将Apache注册到Linux服务里面啊!注册Apache到Linux服务在Linux下用源代码方式编译安装完Apache后,启动关闭Apache可以通过如下命令实现: /usr/local ...
- express + vue 项目搭建
最近建了一个node服务端加vue前端的项目 安装node :npm install node 安装express :npm install express -g (-g全局安装) 构建express ...
- Python博文列表
手把手|100行Python代码自动抢火车票!(包教包会):https://zhuanlan.zhihu.com/p/32928355 最全中华古诗词数据库, :https://github.com/ ...
- mac 配置charles
从官网下载链接http://www.charlesproxy.com/download 附上注册码: Registered Name: https://zhile.io License Key: 48 ...
- POJ_1284 Primitive Roots 【原根性质+欧拉函数运用】
一.题目 We say that integer x, 0 < x < p, is a primitive root modulo odd prime p if and only if t ...
- HDU - 5050 (大数二进制gcd)
It's time to fight the local despots and redistribute the land. There is a rectangular piece of land ...