吴裕雄 python神经网络 手写数字图片识别(5)
import keras
import matplotlib.pyplot as plt
from keras.models import Sequential
from keras.layers import Dense,Activation,Flatten,Dropout,Convolution2D,MaxPooling2D
from keras.utils import np_utils
from keras.optimizers import RMSprop
from skimage import io
nb_classes=10
batch_size=128
####因为是卷积神经网络,输入数据的格式是图像格式,所以要进行reshape
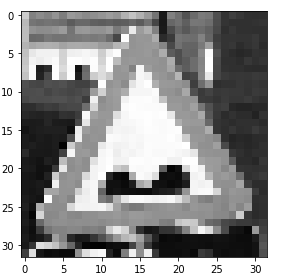
train_X = io.imread("E:\\WaySign\\0_0_colorrgb0.ppm")
train_x=np.reshape(train_X,(train_X.shape[0],32,32,1))
# test_x=np.reshape(test_X,(test_X.shape[0],28,28,1))
# train_y=np_utils.to_categorical(train_Y,nb_classes)
# test_y=np_utils.to_categorical(test_Y,nb_classes)
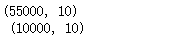
print(train_y.shape,'\n',test_y.shape)
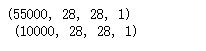
print(train_x.shape,'\n',test_x.shape)
train_x[:,:,:,0].shape

###reshape后的数据显示
import matplotlib.pyplot as plt
%matplotlib inline
f,a=plt.subplots(1,10,figsize=(10,5))
for i in range(10):
a[i].imshow(train_x[i,:,:,0],cmap='gray')
print(train_Y[i])

####establish a convolution nerual network
model=Sequential()
####Convolution layer 1
model.add(Convolution2D(filters=32,kernel_size=(3,3),input_shape=(28,28,1),strides=(1,1),\
padding='same',activation='relu'))
#####pooling layer with dropout
model.add(MaxPooling2D(pool_size=(2,2), strides=(2,2), padding='valid'))
model.add(Dropout(0.2))
####Convolution layer 2
model.add(Convolution2D(filters=64,kernel_size=(3,3),strides=(1,1),padding='same',\
activation='relu'))
model.add(MaxPooling2D(pool_size=(2,2), strides=(2,2), padding='valid'))
model.add(Dropout(0.2))
####Convolution layer 3
model.add(Convolution2D(filters=128,kernel_size=(3,3),strides=(1,1),padding='same',\
activation='relu'))
model.add(MaxPooling2D(pool_size=(2,2), strides=(2,2), padding='valid'))
model.add(Flatten())###理解扁平化
model.add(Dropout(0.2))
#model.add(Flatten())?
####fully connected layer 1 (fc layer)
model.add(Dense(output_dim=625,activation='relu'))
model.add(Dropout(0.5))
####fully connected layer 2 (fc layer)
model.add(Dense(output_dim=10,activation='softmax'))
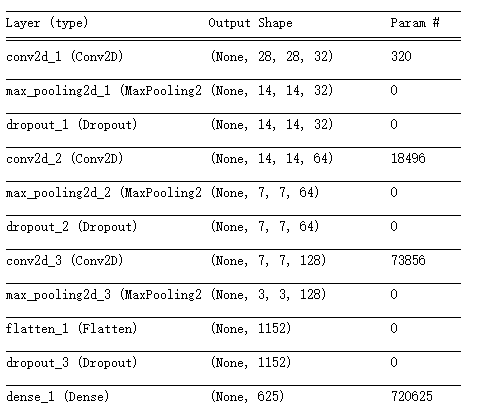
model.summary()
model.compile(optimizer=RMSprop(lr=0.001,rho=0.9),loss="categorical_crossentropy",\
metrics=['accuracy'])
import time
start_time=time.time()
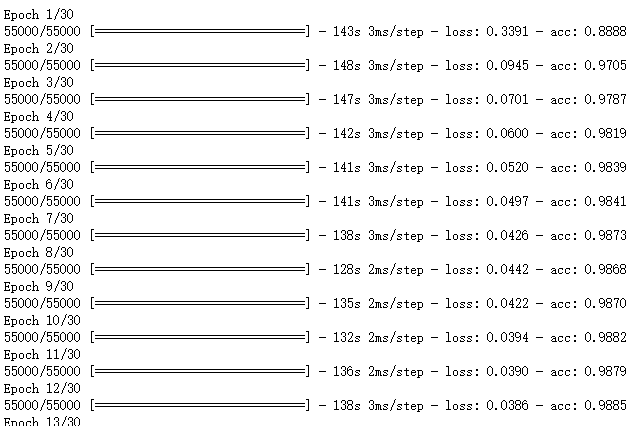
model.fit(train_x,train_y,epochs=30,batch_size=128,verbose=1)
end_time=time.time()
print("running time:%.2f"%(end_time-start_time))
evaluation=model.evaluate(test_x,test_y,batch_size=128,verbose=1)
print("model loss:%.4f"%(evaluation[0]),"model accuracy:%.4f"%(evaluation[1]))

# https://github.com/fchollet/keras/issues/431
def get_activations(model, model_inputs, print_shape_only=True, layer_name=None):
import keras.backend as K
print('----- activations -----')
activations = []
inp = model.input
model_multi_inputs_cond = True
if not isinstance(inp, list):
# only one input! let's wrap it in a list.
inp = [inp]
model_multi_inputs_cond = False
outputs = [layer.output for layer in model.layers if
layer.name == layer_name or layer_name is None] # all layer outputs
funcs = [K.function(inp + [K.learning_phase()], [out]) for out in outputs] # evaluation functions
if model_multi_inputs_cond:
list_inputs = []
list_inputs.extend(model_inputs)
list_inputs.append(1.)
else:
list_inputs = [model_inputs, 1.]
# Learning phase. 1 = Test mode (no dropout or batch normalization)
# layer_outputs = [func([model_inputs, 1.])[0] for func in funcs]
layer_outputs = [func(list_inputs)[0] for func in funcs]
for layer_activations in layer_outputs:
activations.append(layer_activations)
if print_shape_only:
print(layer_activations.shape)
else:
print(layer_activations)
return activations
# https://github.com/philipperemy/keras-visualize-activations/blob/master/read_activations.py
def display_activations(activation_maps):
import numpy as np
import matplotlib.pyplot as plt
"""
(1, 28, 28, 32)
(1, 14, 14, 32)
(1, 14, 14, 32)
(1, 14, 14, 64)
(1, 7, 7, 64)
(1, 7, 7, 64)
(1, 7, 7, 128)
(1, 3, 3, 128)
(1, 1152)
(1, 1152)
(1, 625)
(1, 625)
(1, 10)
"""
batch_size = activation_maps[0].shape[0]
assert batch_size == 1, 'One image at a time to visualize.'
for i, activation_map in enumerate(activation_maps):
print('Displaying activation map {}'.format(i))
shape = activation_map.shape
if len(shape) == 4:
activations = np.hstack(np.transpose(activation_map[0], (2, 0, 1)))
elif len(shape) == 2:
# try to make it square as much as possible. we can skip some activations.
activations = activation_map[0]
num_activations = len(activations)
if num_activations > 1024: # too hard to display it on the screen.
square_param = int(np.floor(np.sqrt(num_activations)))
activations = activations[0: square_param * square_param]
activations = np.reshape(activations, (square_param, square_param))
else:
activations = np.expand_dims(activations, axis=0)
else:
raise Exception('len(shape) = 3 has not been implemented.')
#plt.imshow(activations, interpolation='None', cmap='binary')
fig, ax = plt.subplots(figsize=(18, 12))
ax.imshow(activations, interpolation='None', cmap='binary')
plt.show()
###One image at a time to visualize.
activations = get_activations(model, (test_x[0,:,:,:])[np.newaxis,:])

(test_x[0,:,:,:])[np.newaxis,:].shape
display_activations(activations)

plt.imshow(test_x[0,:,:,0],cmap='gray')
pred_value=model.predict_classes((test_x[0,:,:,:])[np.newaxis,:],batch_size=1)
print(pred_value)

吴裕雄 python神经网络 手写数字图片识别(5)的更多相关文章
- 吴裕雄 python 神经网络——TensorFlow 卷积神经网络手写数字图片识别
import os import tensorflow as tf from tensorflow.examples.tutorials.mnist import input_data INPUT_N ...
- 用Keras搭建神经网络 简单模版(三)—— CNN 卷积神经网络(手写数字图片识别)
# -*- coding: utf-8 -*- import numpy as np np.random.seed(1337) #for reproducibility再现性 from keras.d ...
- 深度学习(一):Python神经网络——手写数字识别
声明:本文章为阅读书籍<Python神经网络编程>而来,代码与书中略有差异,书籍封面: 源码 若要本地运行,请更改源码中图片与数据集的位置,环境为 Python3.6x. 1 import ...
- 用Keras搭建神经网络 简单模版(四)—— RNN Classifier 循环神经网络(手写数字图片识别)
# -*- coding: utf-8 -*- import numpy as np np.random.seed(1337) from keras.datasets import mnist fro ...
- caffe+opencv3.3dnn模块 完成手写数字图片识别
最近由于项目需要用到caffe,学习了下caffe的用法,在使用过程中也是遇到了些问题,通过上网搜索和问老师的方法解决了,在此记录下过程,方便以后查看,也希望能为和我一样的新手们提供帮助. 顺带附上老 ...
- 基于Numpy的神经网络+手写数字识别
基于Numpy的神经网络+手写数字识别 本文代码来自Tariq Rashid所著<Python神经网络编程> 代码分为三个部分,框架如下所示: # neural network class ...
- TensorFlow 卷积神经网络手写数字识别数据集介绍
欢迎大家关注我们的网站和系列教程:http://www.tensorflownews.com/,学习更多的机器学习.深度学习的知识! 手写数字识别 接下来将会以 MNIST 数据集为例,使用卷积层和池 ...
- 一文全解:利用谷歌深度学习框架Tensorflow识别手写数字图片(初学者篇)
笔记整理者:王小草 笔记整理时间2017年2月24日 原文地址 http://blog.csdn.net/sinat_33761963/article/details/56837466?fps=1&a ...
- Tensorflow学习教程------模型参数和网络结构保存且载入,输入一张手写数字图片判断是几
首先是模型参数和网络结构的保存 #coding:utf-8 import tensorflow as tf from tensorflow.examples.tutorials.mnist impor ...
随机推荐
- [java,2018-01-16] HttpClient发送、接收 json 请求
最近需要用到许多在后台发送http请求的功能,可能需要发送json和xml类型的数据. 就抽取出来写了一个帮助类: 首先判断发送的数据类型是json还是xml: import org.dom4j.Do ...
- 五大排序算法(Python)
冒泡排序 冒泡排序通常是在CS入门课程中教的,因为它清楚地演示了排序是如何工作的,同时又简单易懂.冒泡排序步骤遍历列表并比较相邻的元素对.如果元素顺序错误,则交换它们.重复遍历列表未排序部分的元素,直 ...
- 关于oracle中varchar2与nvarchar2的一点认识
今天在oracle 10g下测试了下varchar2与nvarchar2这两种类型,网上有很多关于这两种类型的区别的帖子,我还是自己测试了下. varchar2(size type),size最大为4 ...
- Java swing 代码例子
package com; import java.awt.Button; import java.awt.Container; import java.awt.event.ActionEvent; i ...
- 虚拟机中安装CentOS7
初始安装: 1.安装新虚拟机时,选择稍后安装操作系统,这可以自己设置语言等信息 2.修改自定义硬件:为网卡生成一个mac地址,(这里需要注意,有时网卡会冲突,导致连接时好时坏,以后可以删除掉网卡,重新 ...
- web:频繁刷新浏览器的页面【小工具】
[目的] 频繁刷新某一浏览器页面,小测试一下加载性能,或者打开的文件是否及时关闭,会不会导致服务器奔溃 [小工具] 新建txt,输入以下内容,并保存为html的格式,然后在浏览器中打开,则会定时刷新指 ...
- 插件:★★★ !!!图片懒加载 lazyload.js 、 jquery.scrollLoading.js
插件:图片懒加载 jquery.lazyload.js 2016-3-31 插件说明:http://www.w3cways.com/1765.html (小插件,好用) 下载地址: https://r ...
- Timer TimerTask schedule scheduleAtFixedRate
jdk 自带的 timer 框架是有缺陷的, 其功能简单,而且有时候它的api 不好理解. import java.util.Date; import java.util.Timer; import ...
- 对比各节点host 与 标准节点host差异脚本
把各节点host拷贝到一台节点 这可以采用读主机名配置的方式 我这里偷懒了 echo 'starting' ssh hadoop01 "cp /etc/hosts ~/hadoop01-ho ...
- hdfs dfsadmin 命令详解
hdfs dfsadmin [-report [-live] [-dead] [-decommissioning]] [-safemode <enter | leave | get | wait ...