Spring全家桶之spring boot(四)
spring boot拦截器、过滤器、servlet和健康检查机制
spring boot拦截器
spring boot配置拦截器与原来大致相同,只是需要在拦截器的配置类上添加@Configuration注解,让spirng boot将拦截器加入spring容器中。
1、首先这里我们像之前一样创建一个普通的拦截器
package com.scm.mybatis.Interceptor;

import org.springframework.web.servlet.HandlerInterceptor;

import org.springframework.web.servlet.ModelAndView;

import javax.servlet.http.HttpServletRequest;

import javax.servlet.http.HttpServletResponse;

public class MyInterceptor implements HandlerInterceptor {

    @Override

    public boolean preHandle(HttpServletRequest request, HttpServletResponse response, Object handler) throws Exception {

        System.out.println("拦截器的preHandle()方法");

        return true;

    }

    @Override

    public void postHandle(HttpServletRequest request, HttpServletResponse response, Object handler, ModelAndView modelAndView) throws Exception {

        System.out.println("拦截器的postHandle()方法");

    }

    @Override

    public void afterCompletion(HttpServletRequest request, HttpServletResponse response, Object handler, Exception ex) throws Exception {

        System.out.println("拦截器的afterCompletion()方法");

    }

}
2、创建一个拦截器配置类
package com.scm.mybatis.Interceptor;

import org.springframework.context.annotation.Configuration;

import org.springframework.web.servlet.config.annotation.InterceptorRegistration;

import org.springframework.web.servlet.config.annotation.InterceptorRegistry;

import org.springframework.web.servlet.config.annotation.WebMvcConfigurer;

@Configuration

public class InterceptorConfig implements WebMvcConfigurer {

    @Override

    public void addInterceptors(InterceptorRegistry registry) {

        InterceptorRegistration r = registry.addInterceptor(new MyInterceptor());

        r.addPathPatterns("/*");

        r.excludePathPatterns("/myInterceptor");

    }

}
这里需要注意的一点就是要加入@Configuration注解,表示该类会被加入到spring容器中。addPathPatterns()表示要拦截的请求,excludePathPatterns()表示不拦截的请求。当然我们可以创建多个拦截器,在拦截器的配置类上加上@Configuration注解即可。
3、创建一个controller
package com.scm.mybatis.controller;

import org.springframework.web.bind.annotation.GetMapping;

import org.springframework.web.bind.annotation.RestController;

@RestController

public class InController {

    @GetMapping("/Interceptor")

    public String Interceptor1(){

        return "The request is intercepted";//被拦截的请求

    }

    @GetMapping("/myInterceptor")

    public String Interceptor2(){

        return "The request is not intercepted";//不被拦截的请求

    }

}
之后在浏览器中输入相应的url进行测试。"Interceptor" 请求会输出 "The request is intercepted", "myInterceptor"请求输出" The request is not intercepted"。
spring boot过滤器(两种方式)
方式一:创建普通的filter
1、首先创建一个普通的过滤器,过滤器中我们过滤掉有请求,我们在自定义的过滤器上加上一个@WebFilter注解。
package com.scm.mybatis.Filter;

import javax.servlet.*;

import javax.servlet.annotation.WebFilter;

import java.io.IOException;

@WebFilter("/*")

public class MyFilter implements Filter {

    @Override

    public void init(FilterConfig filterConfig) throws ServletException {

        System.out.println("过滤器init()方法");

    }

    @Override

    public void doFilter(ServletRequest servletRequest, ServletResponse servletResponse, FilterChain filterChain) throws IOException, ServletException {

        System.out.println("过滤器doFilter()方法");

    }

    @Override

    public void destroy() {

        System.out.println("过滤器destroy()方法");

    }

}
2、接着我们在主函数启动入口上加入一个@ServletComponentScan注解,加上该注解之后spring boot会扫描servlet相关的所有注解。比如@WebServlet、@WebFilter、@WebListener,注解中的参数就是我们自定义过滤器的所在包。
package com.scm.mybatis;

import org.springframework.boot.SpringApplication;

import org.springframework.boot.autoconfigure.SpringBootApplication;

import org.springframework.boot.web.servlet.ServletComponentScan;

@SpringBootApplication

@ServletComponentScan("com.scm.mybatis.Filter")

public class Application {

    public static void main(String[] args) {

        SpringApplication.run(Application.class, args);

    }

}
3、创建Filter的controller
package com.scm.mybatis.controller;

import org.springframework.web.bind.annotation.GetMapping;

import org.springframework.web.bind.annotation.RestController;

@RestController

public class filterController {

    @GetMapping("/myFilter")

    public String filterTest(){

        return "This is a Filter";

    }

}
当然我们还可根据需求过滤掉我们所需要的请求,只需要修改@WebFilter()中的参数就可以了,这里就不在展示了。
方式二:创建一个过滤器的配置类,这里MyFilter上不需要@WebFilter注解,启动类上也不需要@ServletComponentScan注解了,不同的就是需要添加一个过滤器配置类。
package com.scm.mybatis.Filter;

import org.springframework.boot.web.servlet.FilterRegistrationBean;

import org.springframework.context.annotation.Bean;

import org.springframework.context.annotation.Configuration;

@Configuration

public class FilterConfig {

    @Bean

    public FilterRegistrationBean myFilterRegistration() {

        FilterRegistrationBean registration = new FilterRegistrationBean(new MyFilter());

        registration.addUrlPatterns("/*");

        return registration;

    }

}
@Bean标签就相当于以前spring配置文件中的bean标签。第二种方式中只需要将第一种方式的MyFilter类中的@WebFilter注解删除其他内容一样,启动类上的@ServletComponentScan也要删除,controller与第一种方式相同。
spring boot配置servlet
spring boot配置servlet与配置过滤器相同,同样有两种方式。
方式一:通过@WebServlet和@ServletComponentScan注解
1、首先创建一个servlet,这里同样是在MyServlet类上加上@WebServlet注解。
package com.scm.mybatis.servlet;

import javax.servlet.ServletException;

import javax.servlet.annotation.WebServlet;

import javax.servlet.http.HttpServlet;

import javax.servlet.http.HttpServletRequest;

import javax.servlet.http.HttpServletResponse;

import java.io.IOException;

@WebServlet("/myServlet")

public class MyServlet extends HttpServlet {

    private static final long serialVersionUID = -4134217146900871026L;

    @Override

    protected void doGet(HttpServletRequest req, HttpServletResponse resp) throws ServletException, IOException {

        resp.getWriter().print("This is my servlet");

    }

    @Override

    protected void doPost(HttpServletRequest req, HttpServletResponse resp) throws ServletException, IOException {

        this.doGet(req, resp);

    }

}
2、在主函数启动入口加上@ServletComponentScan注解,之前我们说过该注解可以扫描到@WebServlet注解。
package com.scm.mybatis;

import org.springframework.boot.SpringApplication;

import org.springframework.boot.autoconfigure.SpringBootApplication;

import org.springframework.boot.web.servlet.ServletComponentScan;

@SpringBootApplication

@ServletComponentScan("com.scm.mybatis.servlet")

public class Application {

    public static void main(String[] args) {

        SpringApplication.run(Application.class, args);

    }

}
方式二:创建一个servlet配置类
这里我们将servlet请求参数写在ServletRegistrationBean()方法内。
package com.scm.mybatis.servlet;

import org.springframework.boot.web.servlet.ServletRegistrationBean;

import org.springframework.context.annotation.Bean;

import org.springframework.context.annotation.Configuration;

@Configuration

public class ServletConfig {

    @Bean

    public ServletRegistrationBean myServletRegistrationBean(){

        ServletRegistrationBean registration = new ServletRegistrationBean(new MyServlet(), "/myServlet");

        return registration;

    }

}
将方式一中@WebServlet和@ServletComponentScan注解删除之后,其他均相同。
spring boot健康检查机制
健康检查机制在我们开发阶段用处并不大,但是将项目部署到生产环境之后就要对项目进行运维,这时就会用到健康检查机制,通过该机制我们可以实时监控项目的状态。在生产环境中,需要实时监控程序的可用性,出现问题之后我们需要快速定位,spring-boot 的 actuator 功能提供了很多监控所需的接口。actuator是spring boot提供的对应用系统的自省和监控的集成功能,可以对应用系统进行配置查看、健康检查、相关功能统计等;方便运维人员查看spring boot的运行状况。
使用actuator(client端)
spring boot为actuator提供了起步依赖starter,我们需要在pom中添加下面starter。
<!--web依赖-->

<dependency>

    <groupId>org.springframework.boot</groupId>

    <artifactId>spring-boot-starter-web</artifactId>

</dependency>

<!--添加actuator依赖-->

<dependency>

    <groupId>org.springframework.boot</groupId>

    <artifactId>spring-boot-starter-actuator</artifactId>

</dependency>

<!--spring boot admin依赖 该依赖是集成的,而不是spring官方的-->

<dependency>

    <groupId>de.codecentric</groupId>

    <artifactId>spring-boot-admin-starter-client</artifactId>

</dependency>
如果不想手动添加,我们在创建模块时将以上依赖勾选即可,勾选后pom.xml中会自动生成相关依赖。
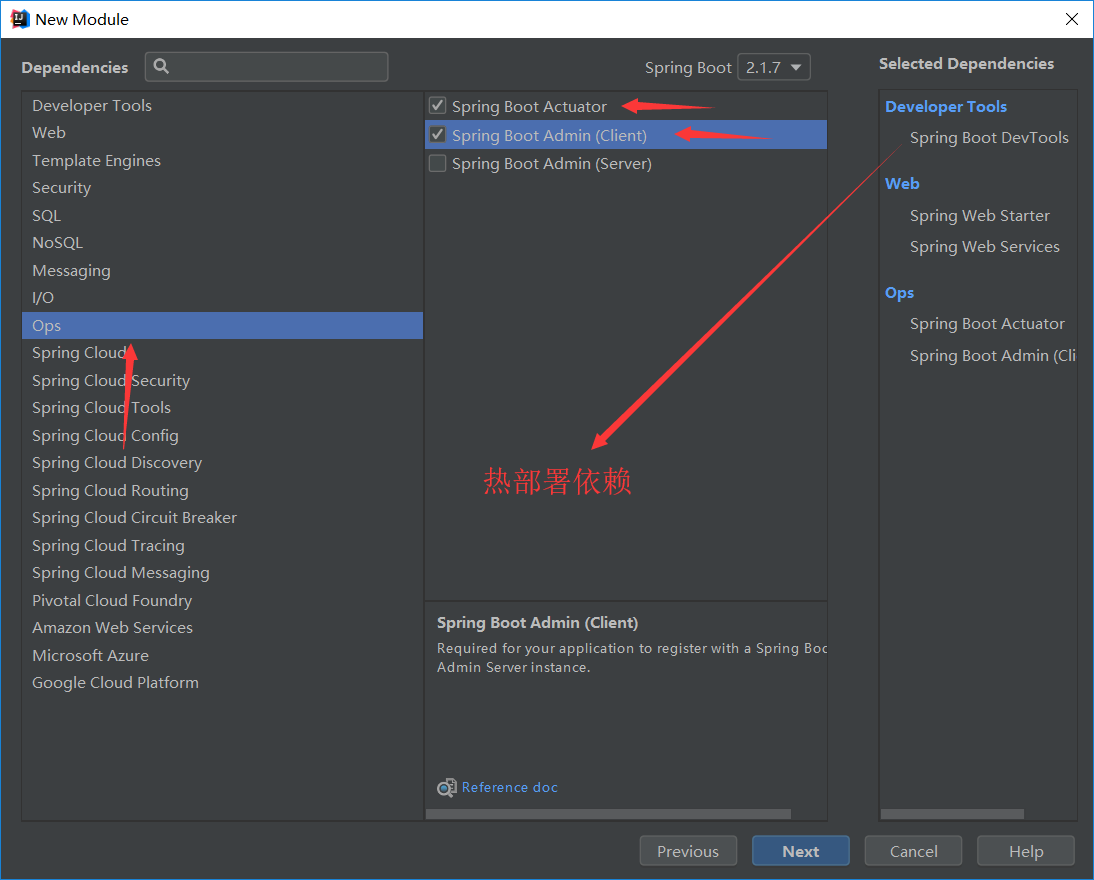
我们先创建一个actuator-client,在client端中添加完相关依赖之后我们只需要在application.properties添加相关配置项即可。
#设置actuator监控端口

management.server.port=8088

#开启所有监控,默认只开启health和info

management.endpoints.web.exposure.include=*

#添加info信息

info.author=scm

info.url=www.baidu.com
上述代码分析:
1、般程序运行默认端口为8080,这里我们将actuator-client端口设置为8088。
2、management.endpoints.web.exposure.include作用是开启所有的监控,里边有项目的一些信息,默认只开启了health和info,还有其他如bean可以查看spring容器中有哪些bean对象。如果想要具体了解可以查看spring官网文档,地址如下。从文档部分截图看出health和info是默认开启的。
https://docs.spring.io/spring-boot/docs/2.1.7.RELEASE/reference/html/production-ready-endpoints.html

3、上边说到了info,那么在actuator中info到底是什么呢?Info其实就是开发者自定义的一些信息。例如我们在上述代码中写入了info.author和info.url(info.后的参数可以是任意的),启动spring boot之后,我们可以在浏览器中输入如下代码查看相关信息。注意输入时端口号要与配置文件中端口号一致,端口号之后要加上actuator。也可以将info改为health和bean查看其他相关信息。如果我们在配置文件中没有开启所有监控那么除了info和health之外其他是无法查看的。
http://localhost:8088/actuator/info
在actuator中提供了很多接口,通过这些接口可以监控一些信息,这里列举一部分:
beans
展示了bean的别名、类型、是否单例、类的地址、依赖等信息。
env
展示了系统环境变量的配置信息,包括使用的环境变量、JVM 属性等。
health
描述了应用程序的整体健康状态,UP 表明应用程序是健康的。
mappings
URl路径和控制器的映射关系。
spring boot admin图形化界面(server端)
上面通过actuator提供的rest接口,返回的数据都是json格式,这个对于不懂json格式的人来说不太方便,因此就产生了spring boot admin,它提供了图形化界面,通过界面来展示这些数据。在actuator-client客户端一般放入一些业务逻辑,通常会再创建一个actuator-server服务端来专用于监控。
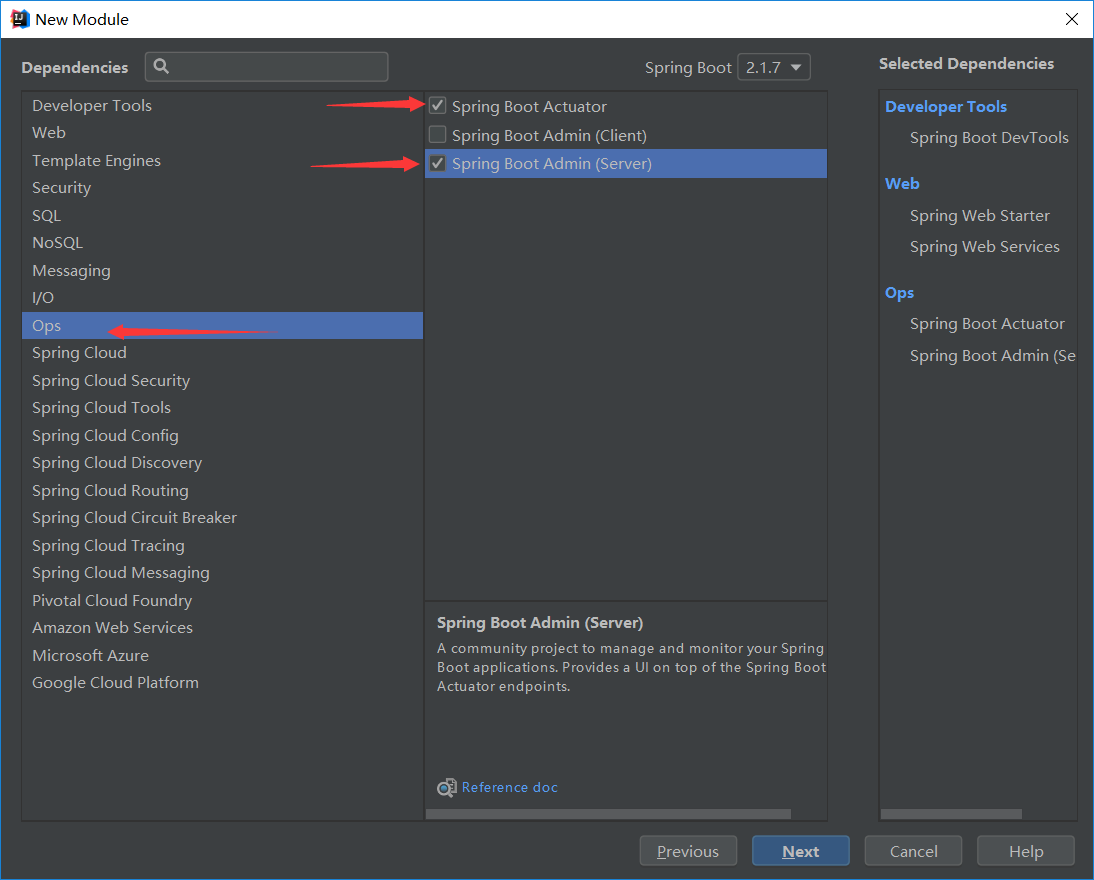
以下是需要添加的相关依赖,或在创建模块时直接勾选,无需手动添加。
        <dependency>

            <groupId>org.springframework.boot</groupId>

            <artifactId>spring-boot-starter-actuator</artifactId>

        </dependency>

        <dependency>

            <groupId>org.springframework.boot</groupId>

            <artifactId>spring-boot-starter-web</artifactId>

        </dependency>

        <dependency>

            <groupId>org.springframework.boot</groupId>

            <artifactId>spring-boot-starter-web-services</artifactId>

        </dependency>

        <dependency>

            <groupId>de.codecentric</groupId>

            <artifactId>spring-boot-admin-starter-server</artifactId>

        </dependency>

        <dependency>

            <groupId>org.springframework.boot</groupId>

            <artifactId>spring-boot-devtools</artifactId>

            <scope>runtime</scope>

            <optional>true</optional>

        </dependency>
与之前不一样的是这里我们需要勾选Server,之前我们勾选的是Client。
1、创建完actuator-server之后需要在application.properties配置文件中配置服务端端口
#server端端口号

server.port=8089
2、在actuator-server的主函数启动入口上需要加上@EnableAdminServer注解用于开启SBA服务。
package com.monkey.server;

import de.codecentric.boot.admin.server.config.EnableAdminServer;

import org.springframework.boot.SpringApplication;

import org.springframework.boot.autoconfigure.SpringBootApplication;

@SpringBootApplication

@EnableAdminServer//开启SBA服务

public class ApplicationServer {

    public static void main(String[] args) {

        SpringApplication.run(ApplicationServer.class, args);

    }

}
上面的项目是作为server端,将之前的spring boot项目作为client端,由server端统一监控client端。client的模块中,在配置文件里面添加下面内容:
3、在actuator-client端的application.properties配置文件中我们还需要指定服务端的主机地址,添加如下代码:
#配置actuator admin主机地址

spring.boot.admin.client.url=http://localhost:8089
全部完成之后,启动server和client,访问server端,http://localhost:8089 就可以看到spring boot admin的页面了。访问的地址为actuator-server端的端口号。
健康检查机制总结:
1、需要创建actuator-clietn和actuator-server两个模块(client端可以创建多个,如果创建多个在server端都可以看到),两个模块所添加的依赖不完全相同,具体参考上述。
2、client需要配置client端端口号、开启所有监控服务、可以使用info添加自定义信息、还要指定server端的地址。
3、server需要配置server端端口号、在主函数启动入口添加@EnableAdminServer注解用于开启SBA服务。
4、通过地址栏访问client端时要在端口号之后加上actuator,之后加上rest接口名。要想访问server端直接输入server端口号即可,但要将client和server端两个启动入口同时开启。
Spring全家桶之spring boot(四)的更多相关文章
- Spring全家桶之spring boot(三)
spring boot集成mybatis 众所周知,spring与springmvc可以无缝集成,而mybatis不是spring旗下的框架,因此需要进行配置,当然,这里的配置也是非常简单的. 1.首 ...
- Spring全家桶之spring boot(二)
spring boot的两种配置文件: 虽然spring boot可以帮助我们进行一些配置项,但是有些内容还是需要开发者自己进行配置,因此spring boot提供了配置文件以供开发者配置.sprin ...
- Spring全家桶之spring boot(一)
spring boot框架抛弃了繁琐的xml配置过程,采用大量的默认配置简化我们的开发过程.使用spring boot之后就不用像以前使用ssm的时候添加那么多配置文件了,spring boot除了支 ...
- Spring全家桶之spring boot(五)
Thymeleaf简介 Thymeleaf是一个流行的模板引擎,该模板引擎采用Java语言开发,模板引擎是一个技术名词,是跨领域跨平台的概念,在Java语言体系下有模板引擎,在C#.PHP语言体系下也 ...
- Spring全家桶之springMVC(四)
路径变量PathVariable PathVariable Controller除了可以接收表单提交的数据之外,还可以获取url中携带的变量,即路径变量,此时需要使用@PathVariable ...
- 10分钟详解Spring全家桶7大知识点
Spring框架自2002年诞生以来一直备受开发者青睐,它包括SpringMVC.SpringBoot.Spring Cloud.Spring Cloud Dataflow等解决方案.有人亲切的称之为 ...
- Java秋招面试复习大纲(二):Spring全家桶+MyBatis+MongDB+微服务
前言 对于那些想面试高级 Java 岗位的同学来说,除了算法属于比较「天方夜谭」的题目外,剩下针对实际工作的题目就属于真正的本事了,热门技术的细节和难点成为了面试时主要考察的内容. 这里说「天方夜谭」 ...
- 一文解读Spring全家桶 (转)
Spring框架自2002年诞生以来一直备受开发者青睐,它包括SpringMVC.SpringBoot.Spring Cloud.Spring Cloud Dataflow等解决方案.有人亲切的称之为 ...
- 【转】Spring全家桶
Spring框架自诞生以来一直备受开发者青睐,有人亲切的称之为:Spring 全家桶.它包括SpringMVC.SpringBoot.Spring Cloud.Spring Cloud Dataflo ...
随机推荐
- 用 Python 获取百度搜索结果链接
前言 近期有许多项目需要这个功能,由于Python实现起来比较简单就这么做了,代码贴下来觉得好点个赞吧~ 代码 # coding: utf-8 import os import time import ...
- thinkphp5.0 模型的应用
<?php namespace app\admin\controller; use app\common\controller\BaseController; use think\Db;//数据 ...
- ST3 package control
view-> showconsole (ctrl+`) import urllib.request,os,hashlib; h = 'df21e130d211cfc94d9b0905775 ...
- 数据包的抓取[tcpdump]的应用
[root@server ~]# yum install tcpdump [root@server ~]# yum install wireshark 1.默认情况下,直接启动tcpdump将监视第一 ...
- 如何优雅的维护 K8S Worker 节点
前言 正常维护工作节点的流程 当我们要进行 K8S 节点维护时往往需要执行 kubectl drain, 等待节点上的 Pod 被驱逐后再进行维护动作. 命令行如下: kubectl drain NO ...
- Android:finish()与System.exit(0)之间的区别
finish()与System.exit(0)都是用来退出.但是两者还是有一定的区别: finish是Activity的类,仅仅针对Activity,当调用finish()时,只是将活动推向后台,并没 ...
- Spring Boot中的测试
文章目录 简介 添加maven依赖 Repository测试 Service测试 测试Controller @SpringBootTest的集成测试 Spring Boot中的测试 简介 本篇文章我们 ...
- 计算2的n次幂htm代码
<!DOCTYPE html> <html lang="en"> <head> <meta charset="UTF-8&quo ...
- Babel 在浏览器环境使用方法
Babel 也可以用于浏览器环境.但是,从 Babel 6.0 开始,不再直接提供浏览器版本,而是要用构建工具构建出来.如果你没有或不想使用构建工具 1.通过安装5.x版本的babel-core模块获 ...
- Shiro(三):Spring-boot如何集成Shiro(下)
上一篇文章介绍了shiro在spring-boot中通过filter实现authentication流程(通过设置filterMaps也可以达到authorization的目的):这篇文章主要介绍sp ...