
Spring全家桶之spring boot(五)
Thymeleaf简介
Thymeleaf是一个流行的模板引擎,该模板引擎采用Java语言开发,模板引擎是一个技术名词,是跨领域跨平台的概念,在Java语言体系下有模板引擎,在C#、PHP语言体系下也有模板引擎。除了thymeleaf之外还有Velocity、FreeMarker等模板引擎,功能类似。
Thymeleaf的主要目标在于提供一种可被浏览器正确显示的、格式良好的模板创建方式,因此也可以用作静态建模。你可以使用它创建经过验证的XML与HTML模板。使用thymeleaf创建的html模板可以在浏览器里面直接打开(展示静态数据),这有利于前后端分离。需要注意的是thymeleaf不是spring旗下的。这里我们使用thymeleaf 3版本。
thymeleaf官方网址:https://www.thymeleaf.org/
thymeleaf官方在线文档网址:https://www.thymeleaf.org/doc/tutorials/3.0/usingthymeleaf.html
第一个thymeleaf程序
1、要想使用thymeleaf,首先需要添加thymeleaf依赖,这里与之前不一样的是我们需要勾选thymeleaf模板引擎依赖,其他的几个依赖我们之前已经说过,这里就不再进行讲解了。
<dependency>

    <groupId>org.springframework.boot</groupId>

    <artifactId>spring-boot-starter-thymeleaf</artifactId>

</dependency>
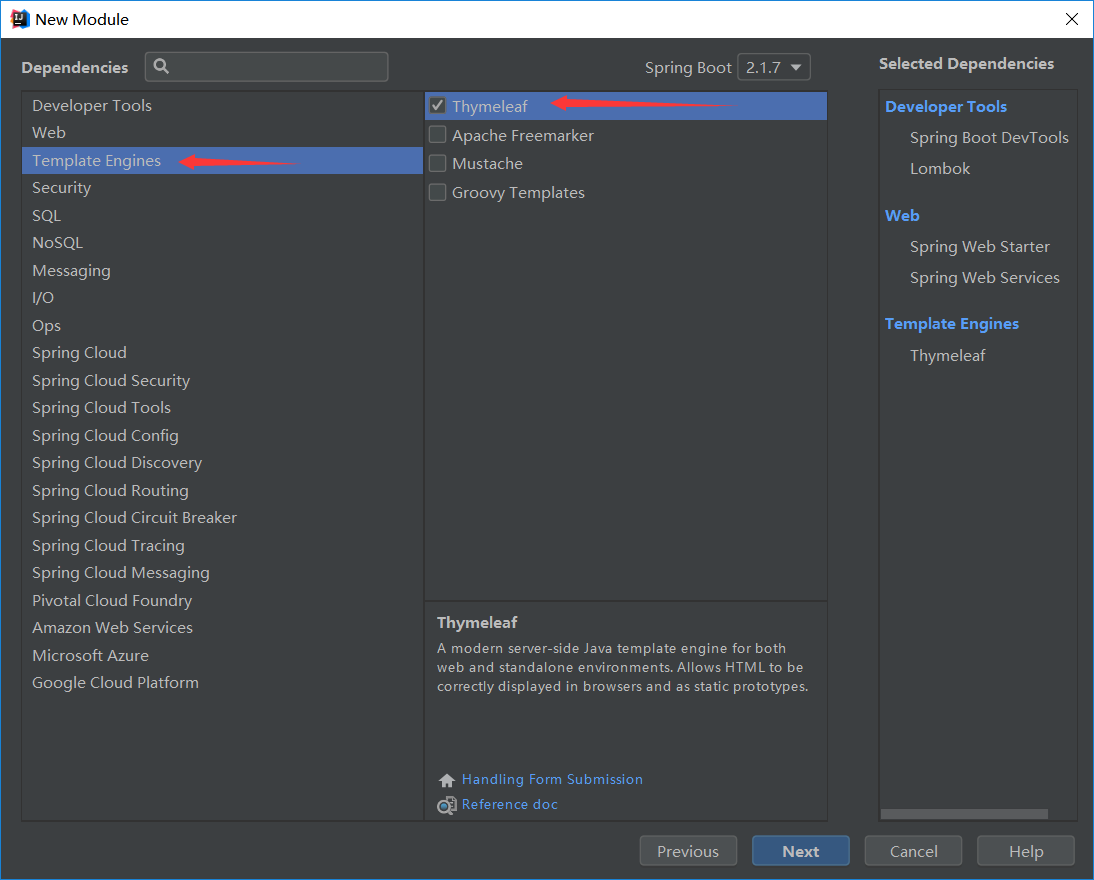
2、修改spring boot配置文件添加如下代码,在开发阶段建议关闭thymeleaf缓存,因为我们需要对开发项目进行实时修改,所以在这里我们先将缓存关闭。
#关闭thymeleaf缓存
spring.thymeleaf.cache=false
3、thymeleaf会对html中的标签进行严格的校验,如果标签缺少结束的话thymeleaf会报错,比如之前我们在html中写的<input>标签,如果缺少</input>则会报错。类似于这种错误不容易发现所以我们可以通过下面的方式去除thymeleaf的严格校验,首先添加依赖(需要手动添加,无法自动生成):
 <dependency>

      <groupId>net.sourceforge.nekohtml</groupId>

      <artifactId>nekohtml</artifactId>

      <version>1.9.22</version>

  </dependency>
pom.xml中添加完依赖之后,在spring boot配置文件中添加如下内容(完成以上两步之后就可以关闭thymeleaf的严格校验了):
spring.thymeleaf.mode=LEGANCYHTML5
4、创建controller,通过Model向html中传递数据,这里我们需要跳转html,不需要转换Json数据所以不需要使用RestController,Controller即可。thymeleaf默认的视图解析器为html,所以controller跳转时不需要再加html后缀,直接写"index"。
package com.scm.thymeleaf.controller;

import org.springframework.stereotype.Controller;

import org.springframework.ui.Model;

import org.springframework.web.bind.annotation.RequestMapping;

@Controller

public class ThymeleafController {

    @RequestMapping("/firstThymeleaf")

    public String thymeleafTest(Model model){

        model.addAttribute("info","This is my first thymeleaf!");

        return "index";

    }

}
5、在resources/templates里面创建一个index.html,填写下面内容。
注意:这里我们使用了thymeleaf,所以我们在<html>标签中添加 xmlns:th="http://www.thymeleaf.org"
<!DOCTYPE html>

<html xmlns:th="http://www.thymeleaf.org">

<head>

    <meta charset="UTF-8"/>

    <title>Spring boot集成 Thymeleaf</title>

</head>

<body>

<p th:text="${info}">Spring boot集成 Thymeleaf</p>

</body>

</html>
在html中我们通过th:text属性接收controller的"info"参数。并且将动态数据替换掉静态数据"Spring boot集成 Thymeleaf";
Springboot使用thymeleaf作为视图展示的时候,我们将模板文件放置在resource/templates目录下,静态资源放置在resource/static目录下。
Thymeleaf表达式
标准变量表达式
先创建一个controller用于向html传递数据,这里我们创建了一个User类。
package com.scm.thymeleaf.bean;

import lombok.Data;

@Data

public class User {

    private int id;

    private String Name;

    private String Phone;

    public User(){}

    public User(int id,String Name,String Phone){

        this.id = id;

        this.Name = Name;

        this.Phone = Phone;

    }

}
Controller
package com.scm.thymeleaf.controller;

import com.scm.thymeleaf.bean.User;

import org.springframework.stereotype.Controller;

import org.springframework.ui.Model;

import org.springframework.web.bind.annotation.RequestMapping;

@Controller

public class userInfo {

    @RequestMapping("/userInfo")

    public String userInfos(Model model){

        User user = new User(1000,"scm","188888888");

        model.addAttribute("u",user);

        model.addAttribute("hello","Hello World");

        return "user";

    }

}
user.html
html中我们接收了controller中传递的User对象,html中的${对象名.属性},对象名是addAttribute("键",“值”)方法中的键,而不是我们创建的User类。
在<td></td>标签中我们写入了静态数据,这些静态数据会被动态数据所取代,但是如果我们找到html本地路径,在本地直接打开user.html的话会显示静态资源,而不显示动态资源。
<!DOCTYPE html>

<html xmlns:th="http://www.thymeleaf.org">

<head>

    <meta charset="UTF-8">

    <title>Title</title>

</head>

<body>

<table>

    <tr>

        <td th:text="${u.id}">1</td>

        <td th:text="${u.name}">a</td>

        <td th:text="${u.phone}">137</td>

    </tr>

</table>

</body>

</html>
选择变量表达式
在标准变量表达式中我们通过${对象名.属性}的方式接收controller传递的参数。如果User类中有几十个属性甚至更多,那么岂不是要写几十次对象名,这样就显得麻烦。而使用选择变量表达式之后我们只需要声明一次对象名就可以了。代码如下:
<table>
    <tr th:object="${u}">
        <td th:text="*{id}">1</td>
        <td th:text="*{name}">a</td>
        <td th:text="*{phone}">137</td>
    </tr>
</table>
在<tr></tr>标签中我们声明了一个th:object获取了controller中的User对象,那么在这个<tr>标签中,我们就可以直接用*{属性名}的方式。这样如果User中的属性多的话我们只需要写属性名即可。
url表达式
将后台传入的数据拼接到url中,通过url表达式可以动态的拼接url。这里使用th:href属性,前两个为非Restful风格的get请求,后两个为Restful风格请求。
<a href="info.html" th:href="@{/user/info(id=${u.id})}">参数拼接</a>

<a href="info.html" th:href="@{/user/info(id=${u.id},phone=${u.phone})}">多参数拼接</a>

<a href="info.html" th:href="@{/user/info/{uid}(uid=${u.id})}">restful风格</a>

<a href="info.html" th:href="@{/user/info/{uid}/abc(uid=${u.id})}">restful风格</a>


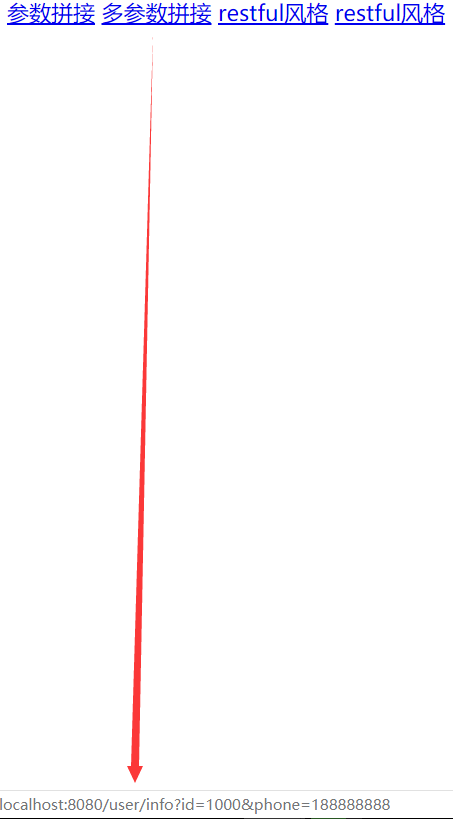
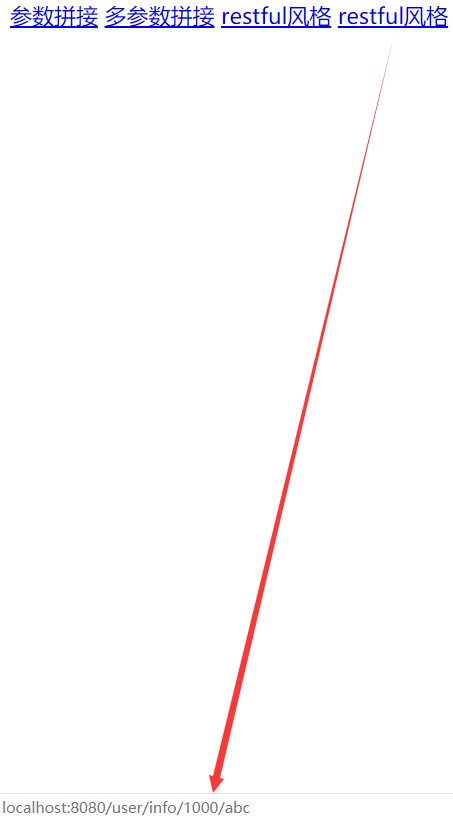
从图中看出我们将鼠标悬浮在超链接上,在下方我们可以看到动态拼接的url,这些url中的动态数据都是从controller中传递到url中的。
Thymeleaf运算符和表达式
重新创建一个controller,先在这里设置一些我们将要用到的参数。
package com.scm.thymeleaf.controller;

import com.scm.thymeleaf.bean.User;

import org.springframework.stereotype.Controller;

import org.springframework.ui.Model;

import org.springframework.web.bind.annotation.RequestMapping;

import javax.servlet.http.HttpSession;

import java.util.Date;

@Controller

public class userInfo {

    @RequestMapping("/userInfo1")

    public String userInfos1(Model model, HttpSession seesion){

        model.addAttribute("page",5);//字符串拼接

        model.addAttribute("sex",1);//三目运算符

        seesion.setAttribute("phone","16666666666");//session内置对象

        model.addAttribute("myDate",new Date());//#Date类

        return "user";

    }

}
字符串拼接(两种方式)
方式一:这种方式与java中字符串拼接类似。
<span th:text="'当前是第'+${page}+'页 ,共'+${page}+'页'"></span>
方式二:使用“|”减少了字符串的拼接,在| |之间thymeleaf可以自动识别 ${}表达式。
<span th:text="|当前是第${page}页,共${page}页|"></span>
三目运算符
<span th:text="${sex eq 0} ? '男' : '女'">未知</span>
基本运算和关系判断
算术运算:+ , - , * , / , %

关系比较: > , < , >= , <= ( gt , lt , ge , le )

相等判断:== , != ( eq , ne )
thymeleaf内置对象
模板引擎提供了一组内置的对象,这些内置的对象可以直接在模板中使用,这些对象由#号开始引用。
1、#request:相当于是HttpServletRequest对象
<span th:text="${#request.getContextPath()}"></span><br>
2、#session: 相当于是HttpSession对象
<span th:text="${#session.getAttribute('phone')}"></span><br>
除了上面的对象之外,工作中常使用的数据类型,如集合,时间,数值,thymeleaf的专门提供了功能性对象来处理它们,下面列举一部分。
1、#dates: java.util.Date对象的实用方法,可以调用里面的方法。#后边都多加一个s,例如#dates就是Date类。myDate参数是在controller创建的一个new Date();
<span th:text="${#dates.format(myDate, 'yyyy-MM-dd HH:mm:ss')}"></span>
2、#numbers: 格式化数字对象的实用方法;(Number类)
3、#strings: 字符串对象的实用方法;(String类)
4、#objects: 对objects操作的实用方法;(Object类)
5、#lists: list的实用方法,比如<span th:text="${#lists.size(datas)}">(List类)
6、#aggregates: 对数组或集合创建聚合的实用方法;(Aggregate类)
Thymeleaf常用属性
th:each
该属性较为常用,比如从后台传来一个对象集合那么就可以使用此属性遍历输出,它与JSTL中的<c: forEach>类似,此属性既可以循环遍历集合,也可以循环遍历数组及Map。
1、循环list集合
先创建controller构建list数据,这里我们还使用上边的User类。
package com.scm.thymeleaf.controller;

import com.scm.thymeleaf.bean.User;

import org.springframework.stereotype.Controller;

import org.springframework.ui.Model;

import org.springframework.web.bind.annotation.RequestMapping;import java.util.ArrayList;

import java.util.Date;

@Controller

public class userInfo {

    @RequestMapping("/userInfo2")

    public String userInfo3(Model model){

        ArrayList al = new ArrayList();

        for(int i = 0;i < 10;i++){

            User user = new User(i,"scm"+i,"1666666666"+i);

            al.add(user);

        }

        model.addAttribute("list",al);

        return "user";

    }

}
user.html
<table>

    <tr th:each="user, interStat : ${list}">

        <td th:text="${interStat.index}"></td>

        <td th:text="${user.id}"></td>

        <td th:text="${user.name}"></td>

        <td th:text="${user.phone}"></td>

    </tr>

</table>
让我们来分析一下html中的代码。首先我们通过${list}接收到了controller传递的ArrayList集合。那么引号中的user和interStat又分别是什么呢?其实这两个都是我们其的一个别名,在list集合中存入了User对象,注意不要将html中的user和User对象混淆,html中的user是可以随意命名的,比如这里我们可以把html中的user换成u,那么在td中的${}我们就要改为u.id、u.name和u.phone。通俗的讲我们就是把集合中的对象起了一个别名,然后通过别名去遍历获取集合中的值。interStat同样是我们起的一个别名,这里的interStat类似于jstl里面foreach的varStatus,可以获取到当前的迭代信息。
这里有另一种写法就是将interStat省略,这样thymeleaf会自动为我们起一个名字,命名规则为对象别名+Stat。本例我们对象别名为user,所以当我们省略interStat时,thymeleaf为我们自动起一个userStat的名字,然后通过userStat.index可以达到同样的效果。再比如我们将别名改为u,这时自动生成的就是uStat。如下的代码与上边的代码是等效的。
<tr th:each="user:${list}">

        <td th:text="${userStat.index}"></td>

        <td th:text="${user.id}"></td>

        <td th:text="${user.name}"></td>

        <td th:text="${user.phone}"></td>

</tr>
总结两种写法,第一种写法我们手动起了两个别名,一个用于调用对象属性,另一个用于查看迭代信息。第二种写法只需要我们起一个别名,另外一个别名是thymeleaf根据我们起的对象别名自动生成的。下面是interStat里面一些属性的含义:
index: 当前迭代对象的index(从0开始计算)

count: 当前迭代对象的个数(从1开始计算)

size: 被迭代对象的大小

current: 当前迭代变量

even/odd: 布尔值,当前循环是否是偶数/奇数(从0开始计算)

first: 布尔值,当前循环是否是第一个

last: 布尔值,当前循环是否是最后一个
2、遍历map集合
controller构建map数据
@RequestMapping("/userInfo3")

    public String userInfo3(Model model){

        HashMap<String, User> userMap = new HashMap<>();

        for (int i = 0; i < 10; i++) {

            User user = new User();

            user.setId(i);

            user.setName("scm" + i);

            user.setPhone("13"+i+"11111111");

            userMap.put(String.valueOf(i), user);

        }

        model.addAttribute("userMap", userMap);

        return "user";

    }
html,myMapVal.key相当于map的键,myMapVal.value相当于map中的值。
<div th:each="myMapVal : ${userMap}">

    <span th:text="${myMapValStat.count}"></span>

    <span th:text="${myMapVal.key}"></span>

    <span th:text="${myMapVal.value.name}"></span>

    <span th:text="${myMapVal.value.phone}"></span>

    <br/>

</div>
遍历map与遍历list集合原理类似,只不过map是以键值对的形式存在的,所以我们需要通过别名.key方式获取键,别名.value获取值。
3、遍历循环数组
controller构建数组数据
@RequestMapping(value="/usersArray")

public String selectAllUserArray (Model model) {

    User[] userArray = new User[10];

    for (int i = 0; i < 10; i++) {

        User user = new User();

        user.setId(i);

        user.setName("scm" + i);

        user.setPhone("13"+i+"11111111");

        userArray[i] = user;

    }

    model.addAttribute("userArray", userArray);

    return "user";

}
user.html
<div th:each="myArrayVal : ${userArray}">

    <div th:text="${myArrayVal.id}"></div>

    <div th:text="${myArrayVal.name}"></div>

    <div th:text="${myArrayVal.phone}"></div>

</div>
th:id
动态设置html标签中的id属性,比如:我们从后台传入一个字符串hello,那么就可以将${hello)的值作为span标签的id。
<span th:id="${hello}">good</span>
th:if
条件判断,比如后台传来一个变量,判断该变量的值,0为男,1为女:
<span th:if="${sex} == 0" >

    男:<input type="radio" name="sex"  th:value="男" />

</span>

<span th:if="${sex} == 1">

    女:<input type="radio" name="sex" th:value="女"  />

</span>
th:switch/th:case
switch,case判断语句,比如:
<div th:switch="${sex}">

  <p th:case="0">性别:男</p>

  <p th:case="1">性别:女</p>

  <p th:case="*">性别:未知</p>

</div>
这里的*表示默认,当上面的case都是false的时候,会执行默认的内容。
th:value
类似html标签中的value属性,能对某元素的value属性进行赋值,比如:
<input type="hidden" id="userId" name="userId" th:value="${userId}">
th:inline
th:inline 有三个取值类型
- text(从后台取出数据展示)
<span th:inline="text">Hello, [[${name}]]</span>

等同于:

<span>Hello, <span th:text="${name}"></span></span>
类似于第二行代码中的例子。我们需要在第一个span中的Hello,后动态获取数据,这时需要再写一个span标签然后使用th:text属性。但是我们可以使用th:inline="text"直接实现等同的效果。
- none(有时候希望在html中直接显示[[1, 2, 3], [4, 5]],此时可以使用none)
在th:inline="text"中使用[[${ }]]的方式获取controller的数据。那么当我们想直接输出[[1,2,3]]这样的字符串类型的怎么办呢。如果我们直接<div>[[1,2,3]]</div>发现会报错,因为thymeleaf自动将[[ ]]识别为获取传递的数据。这时就要用到th:linline="none"了。
<p th:inline="none"> [[1, 2, 3], [4, 5]]!</p>
使用none之后就相当于告诉thymeleaf这个双中括号内的内容不是传递的参数,你不需要去识别。这样thymeleaf就会知道了。
- javascript(如果希望在JavaScript中获取后台相应的数据,可以使用下面内容:)
创建controller构建数据
    @RequestMapping("/userInfo4")

    public String userInfo4(Model model){

        model.addAttribute("name","scm");

        return "javascript";

    }
javascript.html
<!DOCTYPE html>

<html xmlns:th="http://www.thymeleaf.org">

<head>

    <meta charset="UTF-8">

    <title>Title</title>

</head>

<body>

</body>

<script th:inline="javascript" type="text/javascript">

    var msg  = "Hello," + [[${name}]];

    alert(msg);

</script>

</html>
可以看到在th:inline="javascript"可以让我们在javascript中获取controller传递的数据,同样是[[${ }]]的格式接收数据。
到这里为止thymeleaf的第一个程序和thymeleaf相关的常用表达式和相关属性就讲完了,一些不太常用的这里就不做讲解了。如果发现错误或有疑问的地方请及时评论,谢谢。
Spring全家桶之spring boot(五)的更多相关文章
- Spring全家桶之spring boot(三)
spring boot集成mybatis 众所周知,spring与springmvc可以无缝集成,而mybatis不是spring旗下的框架,因此需要进行配置,当然,这里的配置也是非常简单的. 1.首 ...
- Spring全家桶之spring boot(二)
spring boot的两种配置文件: 虽然spring boot可以帮助我们进行一些配置项,但是有些内容还是需要开发者自己进行配置,因此spring boot提供了配置文件以供开发者配置.sprin ...
- Spring全家桶之spring boot(一)
spring boot框架抛弃了繁琐的xml配置过程,采用大量的默认配置简化我们的开发过程.使用spring boot之后就不用像以前使用ssm的时候添加那么多配置文件了,spring boot除了支 ...
- Spring全家桶之spring boot(四)
spring boot拦截器.过滤器.servlet和健康检查机制 spring boot拦截器 spring boot配置拦截器与原来大致相同,只是需要在拦截器的配置类上添加@Configurat ...
- 10分钟详解Spring全家桶7大知识点
Spring框架自2002年诞生以来一直备受开发者青睐,它包括SpringMVC.SpringBoot.Spring Cloud.Spring Cloud Dataflow等解决方案.有人亲切的称之为 ...
- Java秋招面试复习大纲(二):Spring全家桶+MyBatis+MongDB+微服务
前言 对于那些想面试高级 Java 岗位的同学来说,除了算法属于比较「天方夜谭」的题目外,剩下针对实际工作的题目就属于真正的本事了,热门技术的细节和难点成为了面试时主要考察的内容. 这里说「天方夜谭」 ...
- 一文解读Spring全家桶 (转)
Spring框架自2002年诞生以来一直备受开发者青睐,它包括SpringMVC.SpringBoot.Spring Cloud.Spring Cloud Dataflow等解决方案.有人亲切的称之为 ...
- 【转】Spring全家桶
Spring框架自诞生以来一直备受开发者青睐,有人亲切的称之为:Spring 全家桶.它包括SpringMVC.SpringBoot.Spring Cloud.Spring Cloud Dataflo ...
- Spring全家桶–SpringBoot Rest API
Spring Boot通过提供开箱即用的默认依赖或者转换来补充Spring REST支持.在Spring Boot中编写RESTful服务与SpringMVC没有什么不同.总而言之,基于Spring ...
随机推荐
- 树莓派4b 上手三板斧
树莓派4b 上手三板斧 1.无屏幕和网线连接准备 windows / mac 电脑下载安装Notepad++ 新建文件并保存为ssh(该文件为空文件) 新建文件wpa_supplicant.conf ...
- 数据挖掘入门系列教程(十点五)之DNN介绍及公式推导
深度神经网络(DNN,Deep Neural Networks)简介 首先让我们先回想起在之前博客(数据挖掘入门系列教程(七点五)之神经网络介绍)中介绍的神经网络:为了解决M-P模型中无法处理XOR等 ...
- python正则表达式详解之Match类及其方法
1.Match对象简介 match对象通常是由正则表达式对象的match 方法,search 方法等经过匹配之后而产生.可以直接当做bool值使用,如果匹配则相当于True, 如果不匹配,则返回Non ...
- 获取 ProgramData 文件夹路径
]; if (SHGetFolderPathA( NULL, CSIDL_COMMON_STARTUP, NULL, , startUpDir) != S_OK) { printf("SHG ...
- Vue移动端项目中下拉刷新和上拉加载
Vue2.0中引入Mint-UI的下拉刷新和上拉加载.简单粗暴 安装Mint-UI npm i mint-ui -S 引入 打开项目的main.js入口文件,引入并使用.注意,为了方便,这里是全部引入 ...
- [svc]frp内网穿透
什么是穿透 可以任意暴漏内网任何服务,加入你在你的办公网络有台pc,可以上网就可以了, 你可以在你电脑上安装各类服务器, 暴漏如80 22等端口, 注意 这可以暴漏到公网哦, 在出口不做任何nat情况 ...
- Codeforces Round #561 (Div. 2) A. Silent Classroom(贪心)
A. Silent Classroom time limit per test1 second memory limit per test256 megabytes inputstandard inp ...
- 洛谷P1217 回文质数
题目描述 因为 151 既是一个质数又是一个回文数(从左到右和从右到左是看一样的),所以 151 是回文质数. 写一个程序来找出范围 [a,b] (5 \le a < b \le 100,000 ...
- Java中常用的获取从当前月开始的前第i个月、取结束时间与开始时间相差多少个月份等的方法
@RunWith(SpringRunner.class) @SpringBootTest public class DateTest { @Test public void test(){ DateF ...
- 基于3D NAND层差异的固态盘请求调度算法研究立项 报告
Abstract SSD(Solid State Drive),因其超高的读写性能,以及价格的走低趋势逐渐占据市场,为人们带来更好的用户体验,也为企业级的高并行业务需要提供了一定支持,近几年来SSD的 ...