win10//ubuntu安装tensorflow-gpu与kears,并用minist测试
WIn10
安装cuda
先安装VS,然后根据自己的版本安装CUDA、
安装完后,打开cmd命令行输入nvcc -V,检测是否安装成功
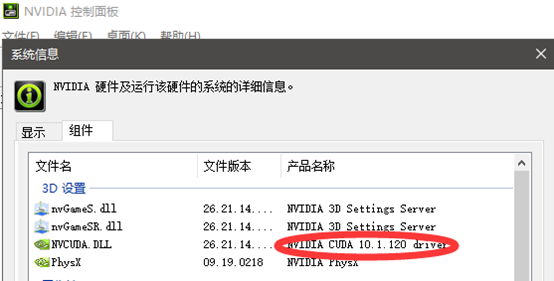
安装cuDDN
安装对应版本,解压后覆盖到CUDA的地址,默认为C:\Program Files\NVIDIA GPU Computing Toolkit\CUDA\v10.1
使用anaconda安装tensorflow-gpu
创建一个新的环境
conda create -n env_name python=version
激活并进入环境中
conda activate tensorflow
更换清华源(https://mirrors.tuna.tsinghua.edu.cn/help/anaconda/)(也可使用其他源)
conda config --add channels https://mirrors.tuna.tsinghua.edu.cn/anaconda/pkgs/free/
conda config --add channels https://mirrors.tuna.tsinghua.edu.cn/anaconda/pkgs/main/
conda config --set show_channel_urls yes
安装
conda install tensorflow-gpu (或者是pip,注意版本,这里是1.x,需要安装keras,后续keras已经自带,不需要单独安装)
测试
安装keras
conda install keras
使用jupyter
Jupyter Notebook
添加其他conda虚拟环境
https://blog.csdn.net/u011606714/article/details/77741324
Ubunt/18.04
1、安装驱动
2、nvidia-smi,查看自己的驱动和CUDA版本,没有cuda也可以在conda里装
3、安装anaconda
4、新建一个虚拟环境
5、激活虚拟环境,以下操作在虚拟环境中进行conda create -n env_name python=version
pip 和 conda 更新清华源 https://mirrors.tuna.tsinghua.edu.cn/help/pypi/
6、conda list 看有没有cuda,cudnn,没有的话再装(conda install cudatoolkit conda install cudnn)
7、conda install python==3.7 ,安装python是为了后面使用虚拟环境的python,不会和本机环境打架(如果已经装了,就不用再装了)
8、pip install tensorflow-gpu
(安装的是tf2,里面自带keras。如果需要其他版本自行设定。 注意!!! tf2-gpu 需要cuda10.0,10.1会报错,至少截止目前(2019.11.20)是这样)
updata 2020.1.8
conda search tensorflow-gpu
conda install tensorflow-gpu=2.0.0
遇到的问题(重点):
记录遇到的一些环境问题
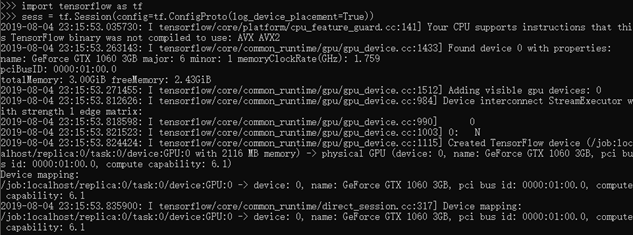
目前已知tf2-gpu无法在cuda10.1上运行,错误提示:缺少动态链接库
退回到cuda10.0,cudnn7,6,遇到Could not create cudnn handle: CUDNN_STATUS_INTERNAL_ERROR
在 https://github.com/tensorflow/tensorflow/issues/24496 找到解决办法
```
import tensorflow as tf
config = tf.compat.v1.ConfigProto()
config.gpu_options.allow_growth = True
session = tf.compat.v1.Session(config=config)
```
或者是
```
physical_devices = tf.config.experimental.list_physical_devices('GPU')
tf.config.experimental.set_memory_growth(physical_devices[0], True)
```
这个的意思大概是tf会默认占用所有闲置现存,然后加上这个后,就动态分配现存
看评论说,这个问题多出现在RTX显卡上。而且这种解决方法会影响速度,暂时没有其他方法
下面用搭建CNN测试环境
import tensorflow as tf

from tensorflow.keras import datasets, layers, models, losses

'''

    第一步:选择模型

'''

model = models.Sequential()

'''

   第二步:构建网络层

'''

# 第1层卷积,卷积核大小为3*3,32个,28*28为待训练图片的大小

model.add(layers.Conv2D(32, (3, 3), activation='relu', input_shape=(28, 28, 1)))

model.add(layers.MaxPooling2D((2, 2)))

# 第2层卷积,卷积核大小为3*3,64个

model.add(layers.Conv2D(64, (3, 3), activation='relu'))

model.add(layers.MaxPooling2D((2, 2)))

# 第3层卷积,卷积核大小为3*3,64个

model.add(layers.Conv2D(64, (3, 3), activation='relu'))

model.add(layers.Flatten())

model.add(layers.Dense(64, activation='relu'))

model.add(layers.Dense(10, activation='softmax'))

model.summary()

'''

   第三步:编译

'''

# sgd = SGD(lr=0.01, decay=1e-6, momentum=0.9,  nesterov=True)  # 优化函数,设定学习率(lr)等参数

# 使用交叉熵作为loss函数

# compile()方法只有三个参数: 优化器optimizer,损失函数loss和指标列表metrics

model.compile(optimizer='adam',

              loss='sparse_categorical_crossentropy',

              metrics=['accuracy'])

'''

   第四步:训练

   .fit的一些参数

   batch_size:对总的样本数进行分组,每组包含的样本数量

   epochs :训练次数

   shuffle:是否把数据随机打乱之后再进行训练

   validation_split:拿出百分之多少用来做交叉验证

   verbose:屏显模式 0:不输出  1:输出进度  2:输出每次的训练结果

   validation_data:指定验证集, 此参数将覆盖validation_spilt。

'''

(X_train, Y_train), (X_test, Y_test) = datasets.mnist.load_data()

# 使用Keras自带的mnist工具读取数据(第一次需要联网)

# 由于mist的输入数据维度是(num, 28, 28),这里需要把后面的维度直接拼起来变成784维

X_train = X_train.reshape(X_train.shape[0], 28, 28, 1).astype('float32') / 255

X_test = X_test.reshape(X_test.shape[0], 28, 28, 1).astype('float32') / 355

model.fit(X_train, Y_train, batch_size=200,

          epochs=20,  validation_split=0.2, verbose=1)

'''

    第五步:输出结果

'''

scores = model.evaluate(X_test, Y_test, batch_size=200)

print('Test loss:', scores[0])

print('Test accuracy:', scores[1])
从本地读取npz格式数据minist
 from __future__ import absolute_import, division, print_function, unicode_literals

 import numpy as np

 import tensorflow as tf

 import tensorflow_datasets as tfds

 FILE_PATH = '/xxx/mnist.npz'

 with np.load(FILE_PATH) as data:

   train_examples = data['x_train'] / 255.0

   train_labels = data['y_train']

   test_examples = data['x_test'] / 255.0

   test_labels = data['y_test']

 train_dataset = tf.data.Dataset.from_tensor_slices((train_examples, train_labels))

 test_dataset = tf.data.Dataset.from_tensor_slices((test_examples, test_labels))

 BATCH_SIZE = 64

 SHUFFLE_BUFFER_SIZE = 100

 train_dataset = train_dataset.shuffle(SHUFFLE_BUFFER_SIZE).batch(BATCH_SIZE)

 test_dataset = test_dataset.batch(BATCH_SIZE)

 model = tf.keras.Sequential([

     tf.keras.layers.Flatten(input_shape=(28, 28)),

     tf.keras.layers.Dense(128, activation='relu'),

     tf.keras.layers.Dropout(0.2),

     tf.keras.layers.Dense(10, activation='softmax')

 ])

 model.compile(optimizer=tf.keras.optimizers.RMSprop(),

                 loss=tf.keras.losses.SparseCategoricalCrossentropy(),

                 metrics=[tf.keras.metrics.SparseCategoricalAccuracy()])

 model.fit(train_dataset, epochs=10)

 model.evaluate(test_dataset)
ubuntu解决终端不走vpn
export http_proxy="http://localhost:port"

export https_proxy="http://localhost:port"
再推荐一个好用的下载软件
axel
安装:
sudo apt-get install axel
- 一般使用:axel url(下载文件地址)
- 限速使用:加上 -s 参数,如 -s 10240,即每秒下载的字节数,这里是 10 Kb
- 限制连接数:加上 -n 参数,如 -n 5,即打开 5 个连接
win10//ubuntu安装tensorflow-gpu与kears,并用minist测试的更多相关文章
- ubuntu安装 tensorflow GPU
安装支持GPU的tensorflow前提是正确安装好了 CUDA 和 cuDNN. CUDA 和 cuDNN的安装见 Nvidia 官网和各种安装教程,应该很容易,重点是要选准了支持自己GPU的 CU ...
- 【Tensorflow】Ubuntu 安装 Tensorflow gpu
安装环境:Ubuntu 16.04lts 64位,gcc5.4 1.安装Cuda 1. 下载cuda toolkit. 下载cuda8.0 地址:https://developer.nvidia.co ...
- Ubuntu在Anaconda中安装TensorFlow GPU,Keras,Pytorch
安装TensorFlow GPU pip install --ignore-installed --upgrade tensorflow-gpu 安装测试: $ source activate tf ...
- 通过Anaconda在Ubuntu16.04上安装 TensorFlow(GPU版本)
一. 安装环境 Ubuntu16.04.3 LST GPU: GeForce GTX1070 Python: 3.5 CUDA Toolkit 8.0 GA1 (Sept 2016) cuDNN v6 ...
- win10系统下安装TensorFlow GPU版本
首先要说,官网上的指南是最好的指南. https://www.tensorflow.org/install/install_windows 需要FQ看. 想要安装gpu版本的TensorFlow.我们 ...
- ubuntu16.04下安装TensorFlow(GPU加速)----详细图文教程【转】
本文转载自:https://blog.csdn.net/zhaoyu106/article/details/52793183 le/details/52793183 写在前面 一些废话 接触深度学习已 ...
- ubuntu 安装TensorFlow
1.安装pip $ sudo apt-get install python-pip python-dev 2.安装 TensorFlow for Python 2.7 # Ubuntu/Linux - ...
- win10+anaconda安装tensorflow和keras遇到的坑小结
win10下利用anaconda安装tensorflow和keras的教程都大同小异(针对CPU版本,我的gpu是1050TI的MAX-Q,不知为啥一直没安装成功),下面简单说下步骤. 一 Anaco ...
- Win10上安装TensorFlow(官方文档翻译)
一.推荐两个网站 TensorFlow官方文档:https://www.tensorflow.org/install/install_windows TensorFlow中文社区:http://www ...
- windows安装tensorflow GPU
一.安装Anaconda Anaconda是Python发行包,包含了很多Python科学计算库.它是比直接安装Python更好的选择. 二.安装Tensorflow 如果安装了tensorflow, ...
随机推荐
- java基础二 分支循环
分支循环: if... if...else... if...else if... if...else if...else... switch...case...defau ...
- Leetcode -- 两数之和Ⅰ
1. 两数之和 题目描述:给定一个整数数组 nums 和一个目标值 target,请你在该数组中找出和为目标值的那两个整数,并返回他们的数组下标. 示例:给定 nums = [2, 7, 11, 15 ...
- Centos配置NAT模式下的静态ip
一.查看所在的ip段 点击 编辑-->虚拟网卡编辑器 选中vmware8网卡,点击 DHCP设置 二.编辑网卡配置文件 查看网卡 ip addr 命令打开配置文件 vi /etc/sysconf ...
- 查路由途径 traceroute tracert
linux 用 traceroute IP windows用 tracert IP 虚拟机下使用无效
- 计算机网络(2): http的基础上用SSL或TSL加密
加密过程具体TCP实现 步骤 1 : 客户端通过发送Client Hello报文开始SSL通信(这里是在TCP的三次握手已经完成的基础上进行的).报文中包含客户端支持的SSL的指定版本.加密组件列表( ...
- C++内联函数作用及弊端
为什么要使用内联函数? 因为函数调用时候需要创建时间.参数传入传递等操作,造成了时间和空间的额外开销.C++追求效率所以引入了内联的概念. 通过编译器预处理,在调用内联函数的地方将内联函数内的语句Co ...
- 史上最难PHPer笔试题,40分就能月薪过万!附答案
请批判性的学习,欢迎大牛指正错误 1.有关PHP字符串的说法,不对的是:A.如果一个脚本的编码是 ISO-8859-1,则其中的字符串也会被编码为 ISO-8859-1.B.PHP的字符串在内部是字节 ...
- 函数的配置对象Configuration Objects
配置对象通常用在API库的实现中,当程序中需要编写要多次的模块,也可以采用这种模式.这种模式的好处是接口明确,扩展方便.比如,一个 addPerson在设计的最初需要两个参数作为初始化时人的姓名: f ...
- Gradle project sync failed. Please fix your project and try again
https://stackoverflow.com/questions/29808199/error-running-android-gradle-project-sync-failed-please ...
- placeholder在IE下的兼容问题
最近写项目要求兼容到ie8,写完了去ie测试的时候,发现了placeholder在ie下的兼容问题,为了解决,搜罗网上各种牛人的解决方案,自己总结如下: css样式(设置各浏览器下placeholde ...