
.NET Core 3.x之下的配置框架
一.配置框架的核心类库
首先我们使用.NET Core的配置框架需要安装额外的NuGet扩展包,下面是列举最常用的几个扩展包以及所对应的配置功能
| NuGet Package | Description |
|---|---|
| Microsoft.Extensions.Configuration | 配置框架的核心库,提供有关Configuration的抽象类和实现类 |
| Microsoft.Extensions.Configuration.CommandLine | 能够使用命令参数进行配置 |
| Microsoft.Extensions.Configuration.EnvironmentVariables | 能够使用环境变量进行配置 |
| Microsoft.Extensions.Configuration.Json | 能够使用json文件进行配置 |
| Microsoft.Extensions.Configuration.Xml | 能够使用xml文件进行配置 |
| Microsoft.Extensions.Configuration.Ini | 能够使用Ini文件进行配置 |
| Microsoft.Extensions.Configuration.Binder | 支持强类型对象绑定配置 |
二.一个Configuration的构建
下面我们在控制台使用内存存储配置信息并且完成一个Configuration的构造,代码如下:
 static void Main(string[] args)

{

    //定义一个ConfigurationBuilder

    IConfigurationBuilder builder = new ConfigurationBuilder();

    //添加ConfigurationSource

    builder.AddInMemoryCollection(new Dictionary<string, string>()

    {

        {"Name","Foo"},

        {"Sex","Male" },

        {"Job","Student" },

    });

    //通过Build构建出IConfiguration

    IConfiguration configuration = builder.Build();

     foreach (var item in configuration.GetChildren())

     {

        Console.WriteLine($"{item.Key}:{item.Value}");

     }

     Console.ReadLine();

}
输出结果:
Job:Student

Name:Foo

Sex:Male
那么我们可以看到一个configuration的构建的步骤:
定义ConfigurationBuilder
为ConfigurationBuilder添加ConfigurationSource
通过ConfigurationBuilder的Build方法完成构建
三.通过命令行配置
首先我们在项目的调试的应用程序参数加入命令行参数:
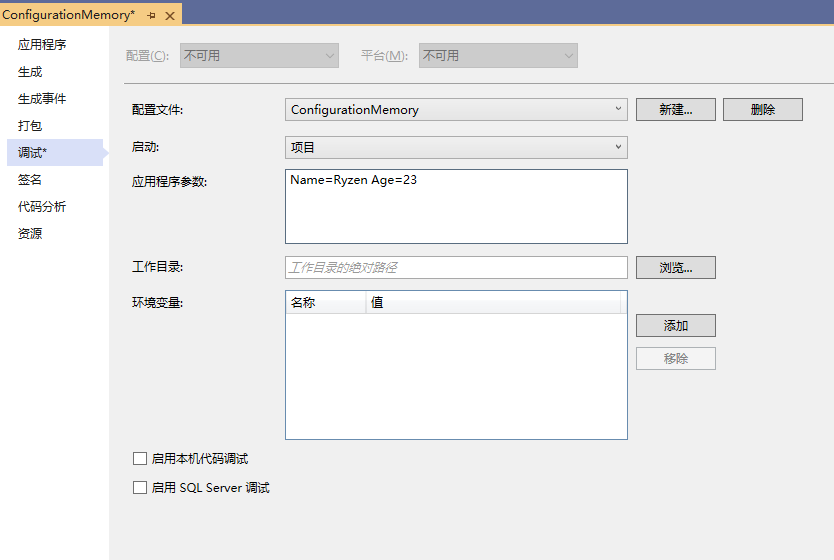
代码修改如下:
 builder.AddInMemoryCollection(new Dictionary<string, string>()

 {

      {"Name","Foo"},

      {"Sex","Male" },

      {"Job","Student" },

 })

 .AddCommandLine(args);
输出:
Age:23

Job:Student

Name:Ryzen

Sex:Male
同时我们在输出结果看到,key为Name的value变化了,证明当不同配置源存在相同Key时,会被后添加的配置源覆盖其value
四.通过环境变量配置
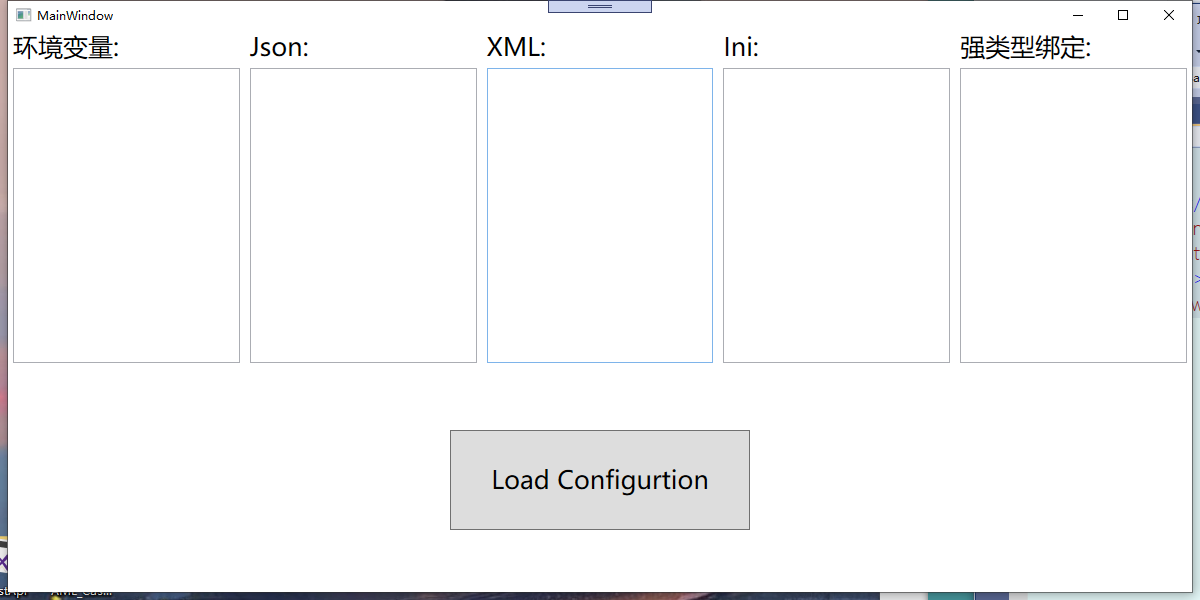
下面的环节由于出于演示效果,通过WPF程序来演示,首先创建好一个wpf项目,界面如下:
我们在项目的调试的环境变量添加几个参数:
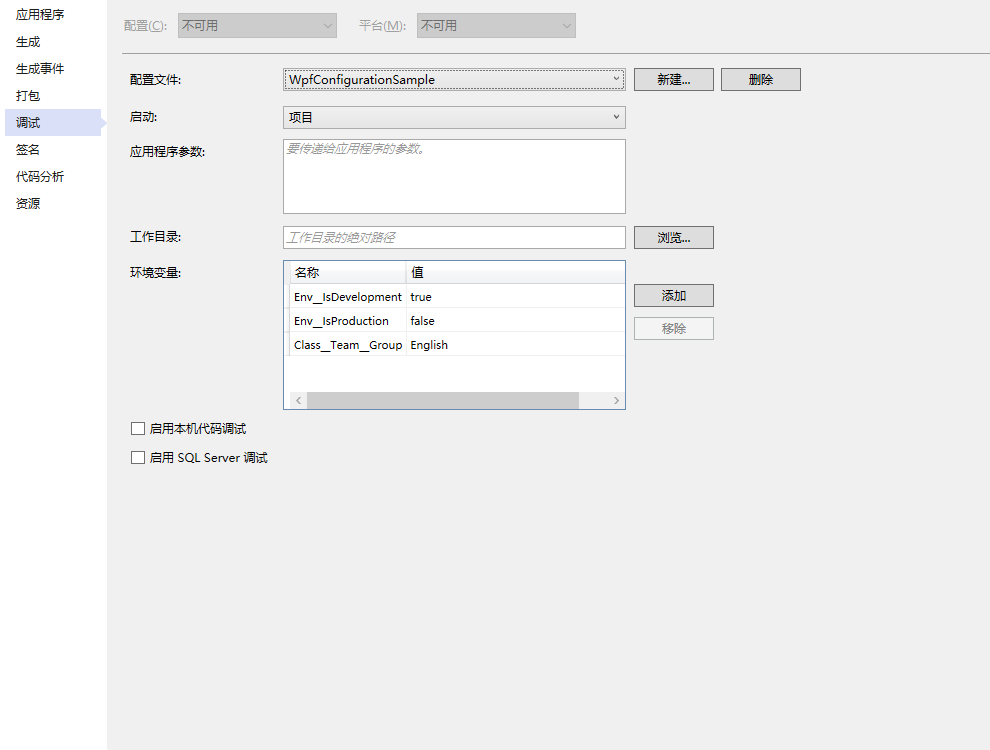
在App.cs中构建一个静态属性IConfiguration,代码如下:
    public partial class App : Application

    {

       public static IConfiguration MyConfigration => new ConfigurationBuilder()

            .AddEnvironmentVariables()

    }
MainWindow.cs:
    public partial class MainWindow : Window

    {

        public MainWindow()

        {

            InitializeComponent();

        }

        private void Button_Click(object sender, RoutedEventArgs e)

        {

            LoadEnv();

        }

        private void LoadEnv()

        {

            string envString = string.Empty;

            this.textbox_env.Text = $"Env__IsProduction:{App.MyConfigration.GetSection("Env")["IsProduction"]}"+"\n";

            this.textbox_env.Text += $"Env__IsDevelopment:{App.MyConfigration.GetSection("Env")["IsDevelopment"] }"+"\n";

            this.textbox_env.Text += $"Class__Team__Group:{App.MyConfigration.GetSection("Class:Team")["Group"]}";

        }

    }
实现效果:
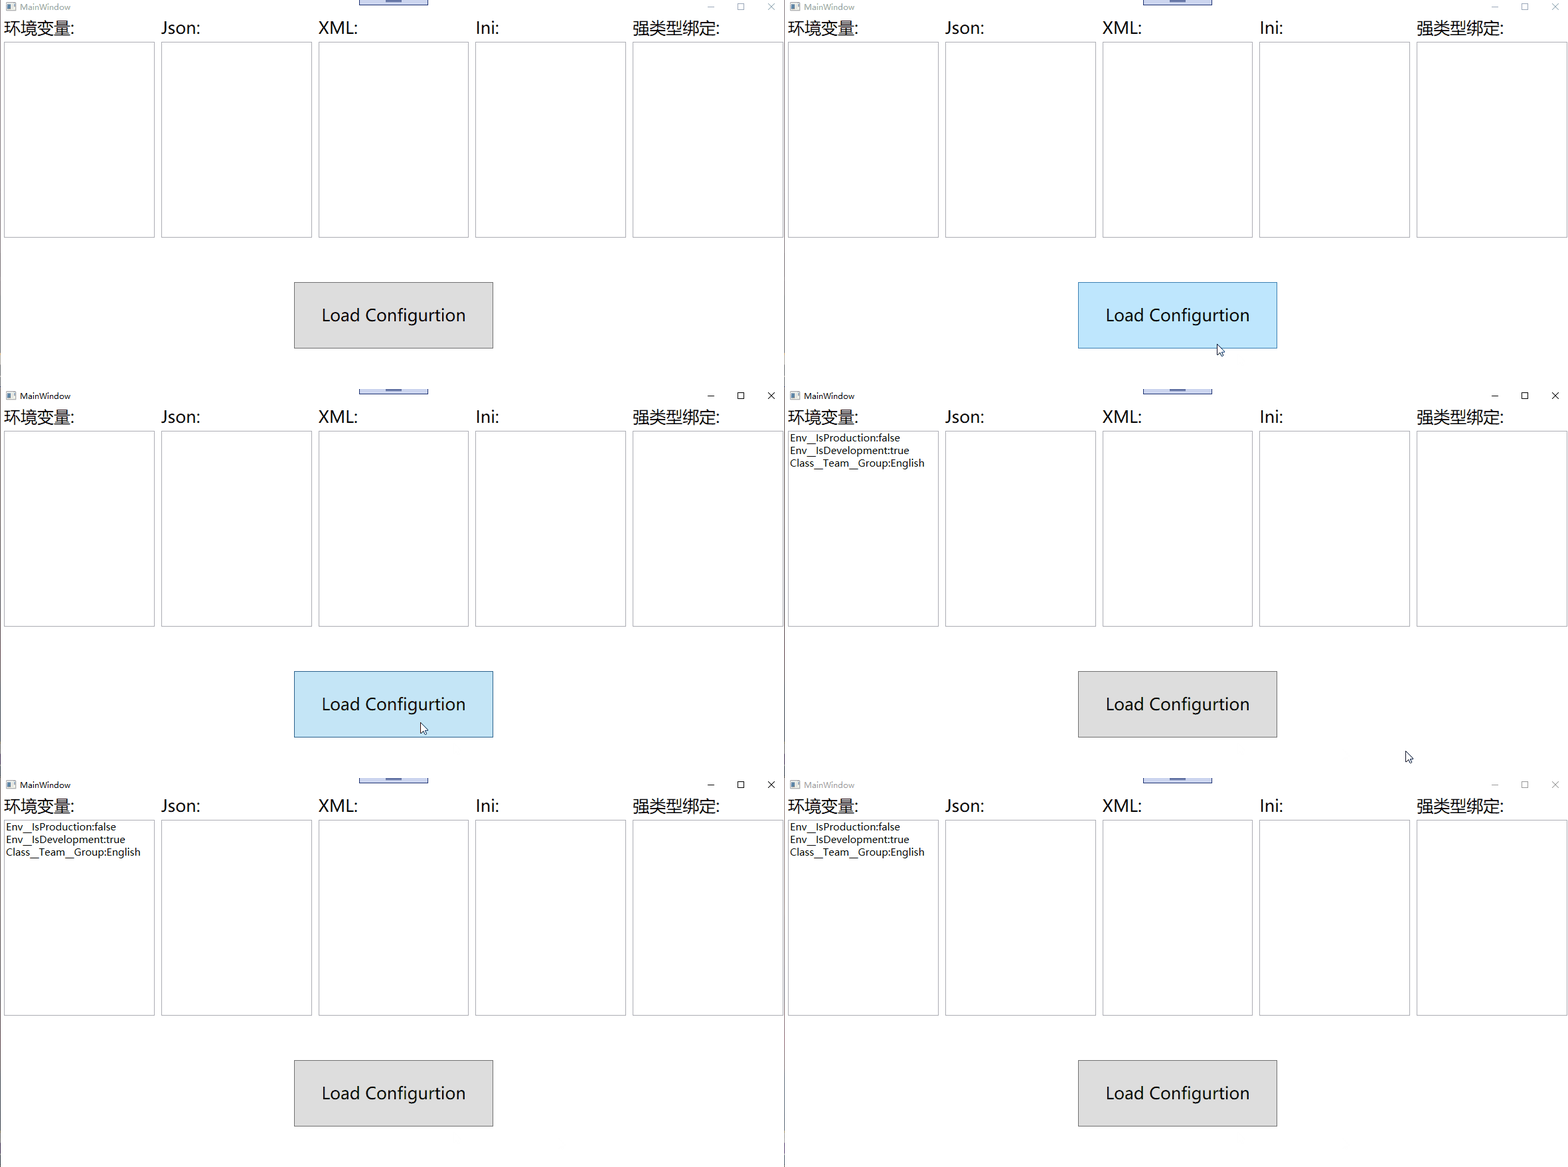
在注入环境变量时,还支持去前缀过滤筛选注入,修改App.cs:
    public partial class App : Application

    {

       public static IConfiguration MyConfigration => new ConfigurationBuilder()

            .AddEnvironmentVariables("Env:")

    }
修改MainWindow.cs:
        private void LoadEnv()

        {

            string envString = string.Empty;

            this.textbox_env.Text = $"Env__IsProduction:{App.MyConfigration.GetSection("Env")["IsProduction"]}"+"\n";

            this.textbox_env.Text += $"Env__IsDevelopment:{App.MyConfigration.GetSection("Env")["IsDevelopment"] }"+"\n";

            this.textbox_env.Text += $"Class__Team__Group:{App.MyConfigration.GetSection("Class:Team")["Group"]}" +"\n";

            //过滤前缀后

            this.textbox_env.Text += $"IsProduction:{App.MyConfigration["IsProduction"]}";

        }
效果如下:
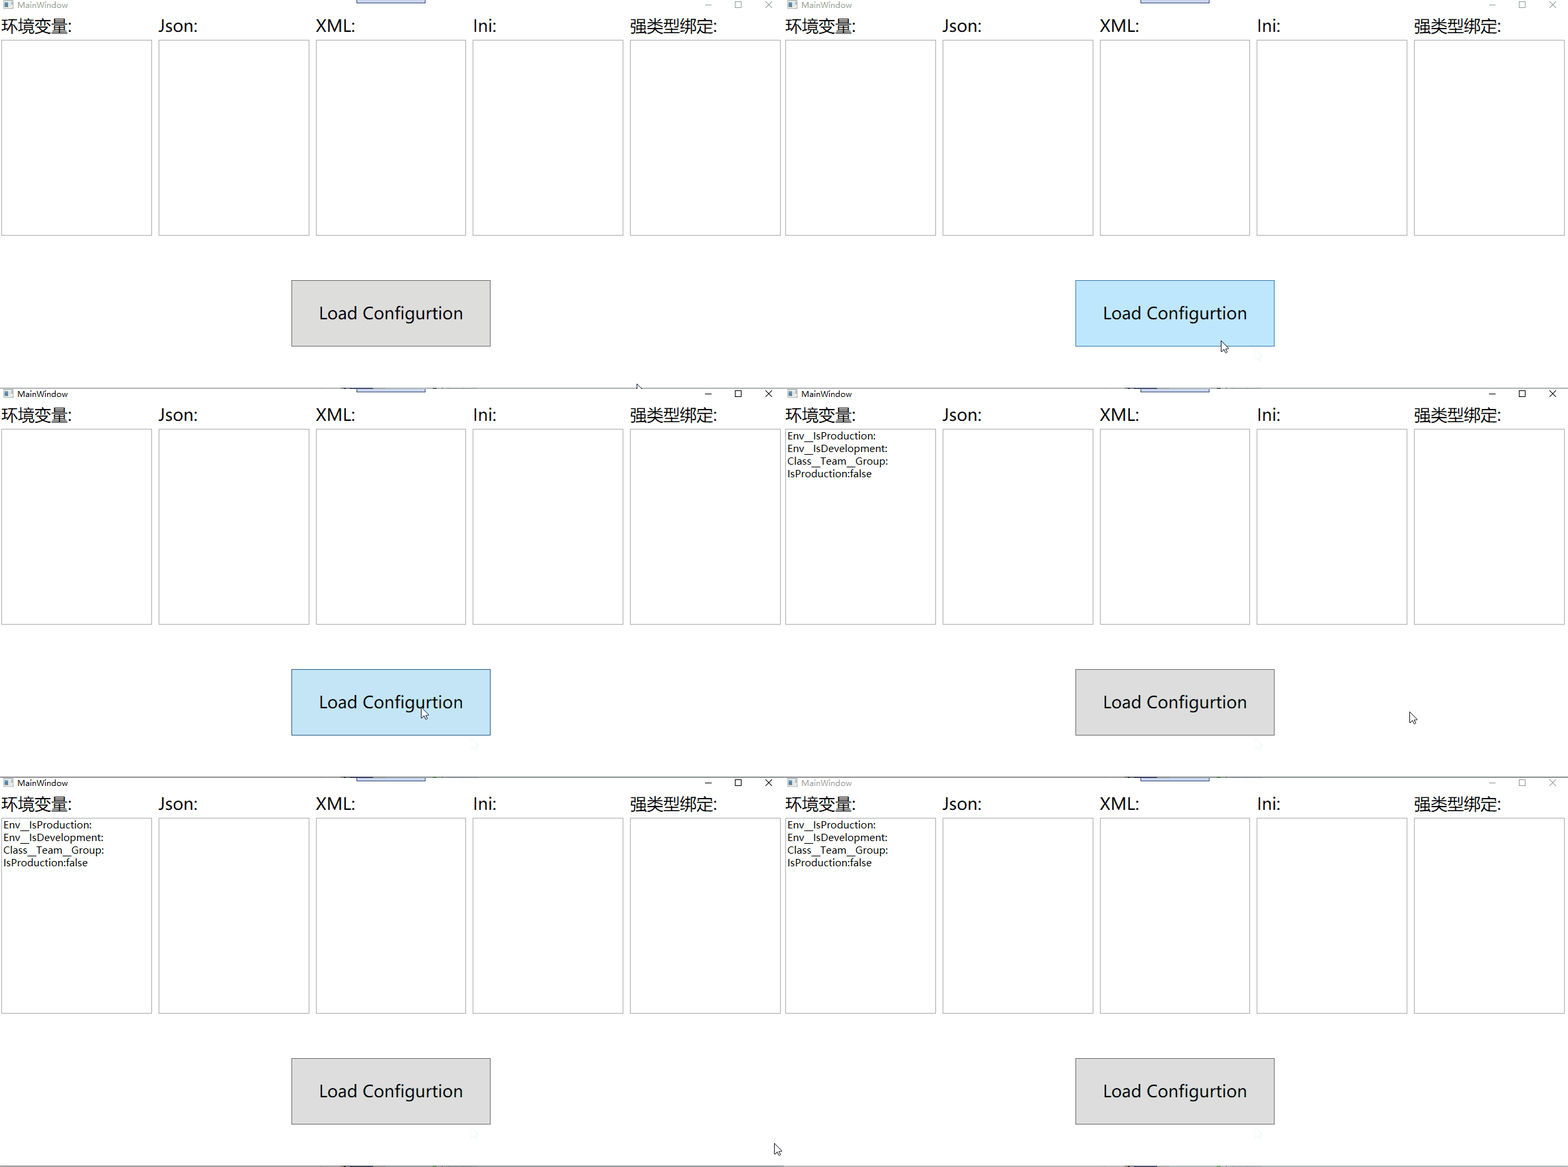
我们会发现,之前的环境变量都被过滤了,只能读取被过滤前缀后的环境变量
配置环境变量时的注意点:
- 和json等文件不同,环境变量的Key是以__双下划线为分层键,而不是:冒号
- 分层读取的时候是以冒号:来进行读取
五.通过文件来配置
1.创建和读取配置文件
首先我们新建一个Configurations文件夹,然后再该文件夹创建三个配置文件
appsetting.json:
{

  "Human": {

    "Name": "Foo",

    "Body": {

      "Height": 190,

      "Weight": 170

    },

    "Sex": "Male",

    "Age": 24,

    "IsStudent": true

  }

}
appsetting.xml:
<?xml version="1.0" encoding="utf-8" ?>

<Configuration>

  <DbServers>

    <SqlSever>12</SqlSever>

    <MySql>11</MySql>

  </DbServers>

</Configuration>
appsetting.ini:
[Ini]

IniKey1=IniValue1

IniKey2=IniValue2
在App.cs分别注入这三个文件:
    public partial class App : Application

    {

       public static IConfiguration MyConfigration => new ConfigurationBuilder()

            .AddEnvironmentVariables("Env:")

            .AddJsonFile(@"Configurations\appsetting.json", false, true)

            .AddXmlFile(@"Configurations\appsetting.xml", false, true)

            .AddIniFile(@"Configurations\appsetting.Ini")

            .Build();

    }
修改MainWindow代码,分别读取这三个文件:
private void Button_Click(object sender, RoutedEventArgs e)

{

     LoadEnv();

     LoadJson();

     LoadXML();

     LoadIni();

 }

private void LoadJson()

 {

     var jsonString = string.Empty;

     foreach (var item in App.MyConfigration.GetSection("Human").GetChildren())

     {

        if (item.Key.Contains("Body"))

        {

            foreach (var body in item.GetChildren())

            {

                jsonString += $"{body.Key}:{body.Value} \n";

            }

        }

        else

        {

           jsonString += $"{item.Key}:{item.Value} \n";

        }

     }

     this.textbox_json.Text = jsonString;

 }

private void LoadXML()

{

   var xmlString = string.Empty;

   foreach (var item in App.MyConfigration.GetSection("DbServers").GetChildren())

   {

       xmlString += $"{item.Key}:{item.Value} \n";

   }

   this.textbox_xml.Text = xmlString;

}

private void LoadIni()

{

   var iniString = string.Empty;

   foreach (var item in App.MyConfigration.GetSection("Ini").GetChildren())

   {

      iniString += $"{item.Key}:{item.Value} \n";

   }

   this.textbox_ini.Text = iniString;

}
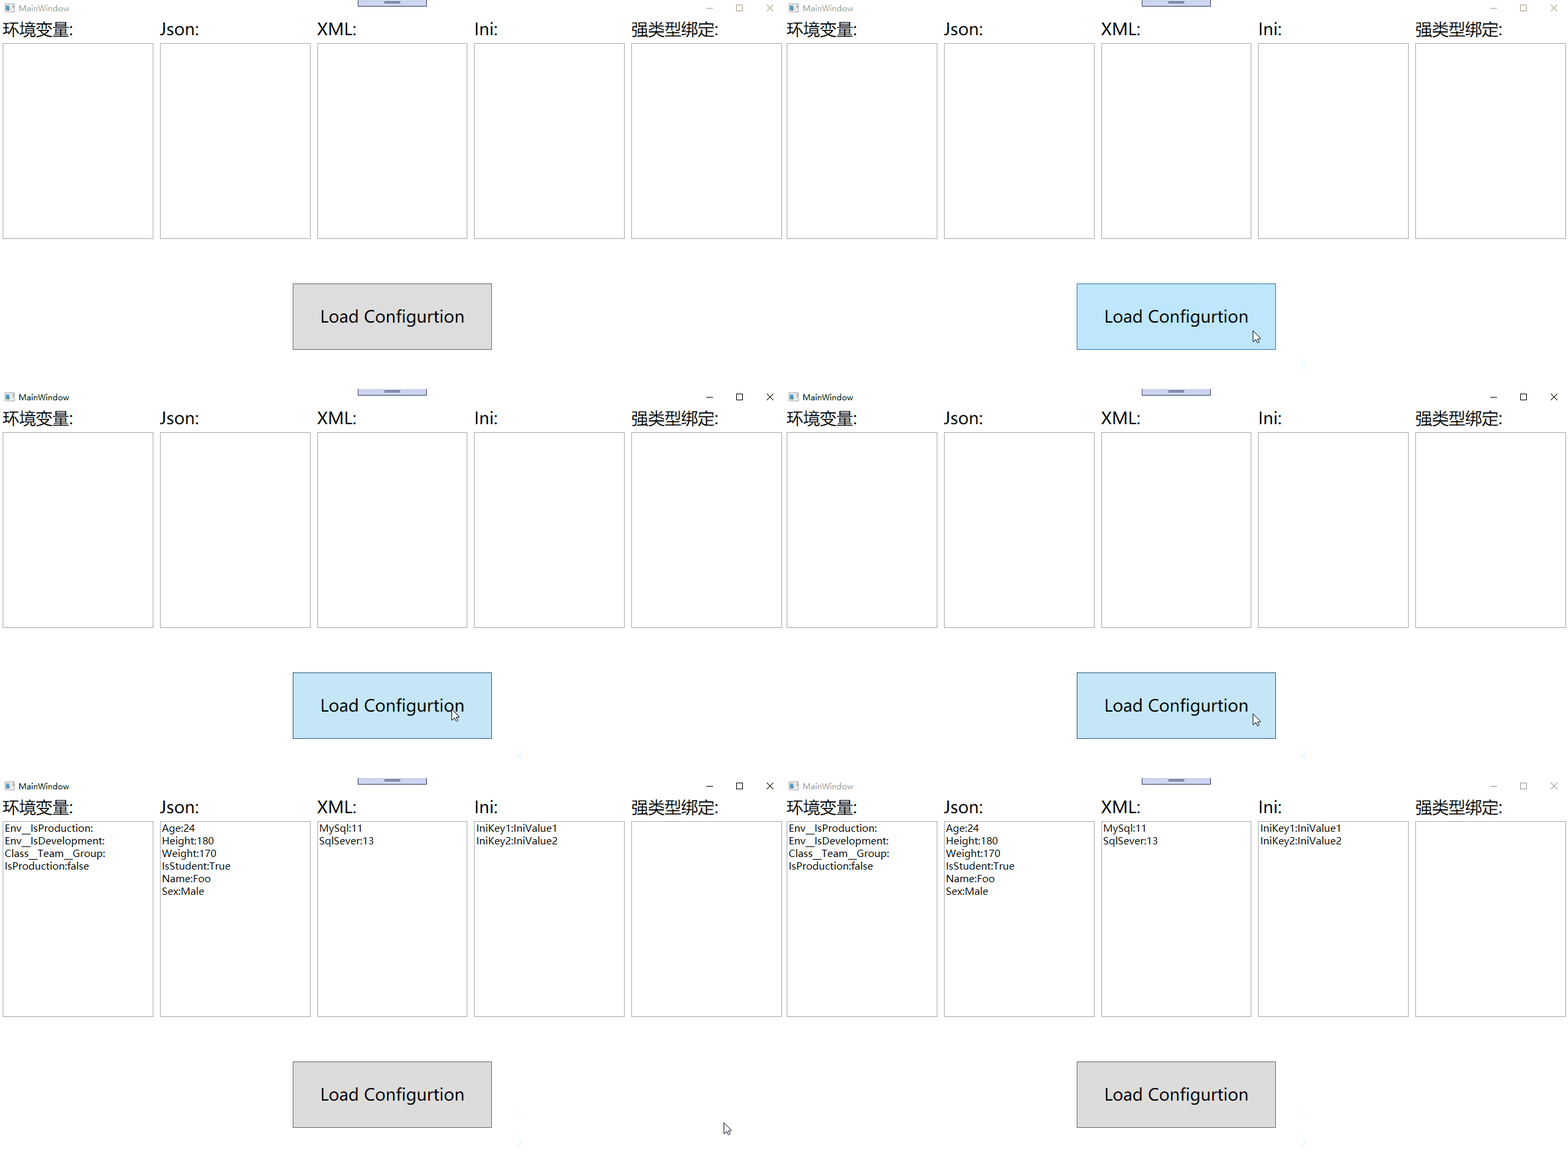
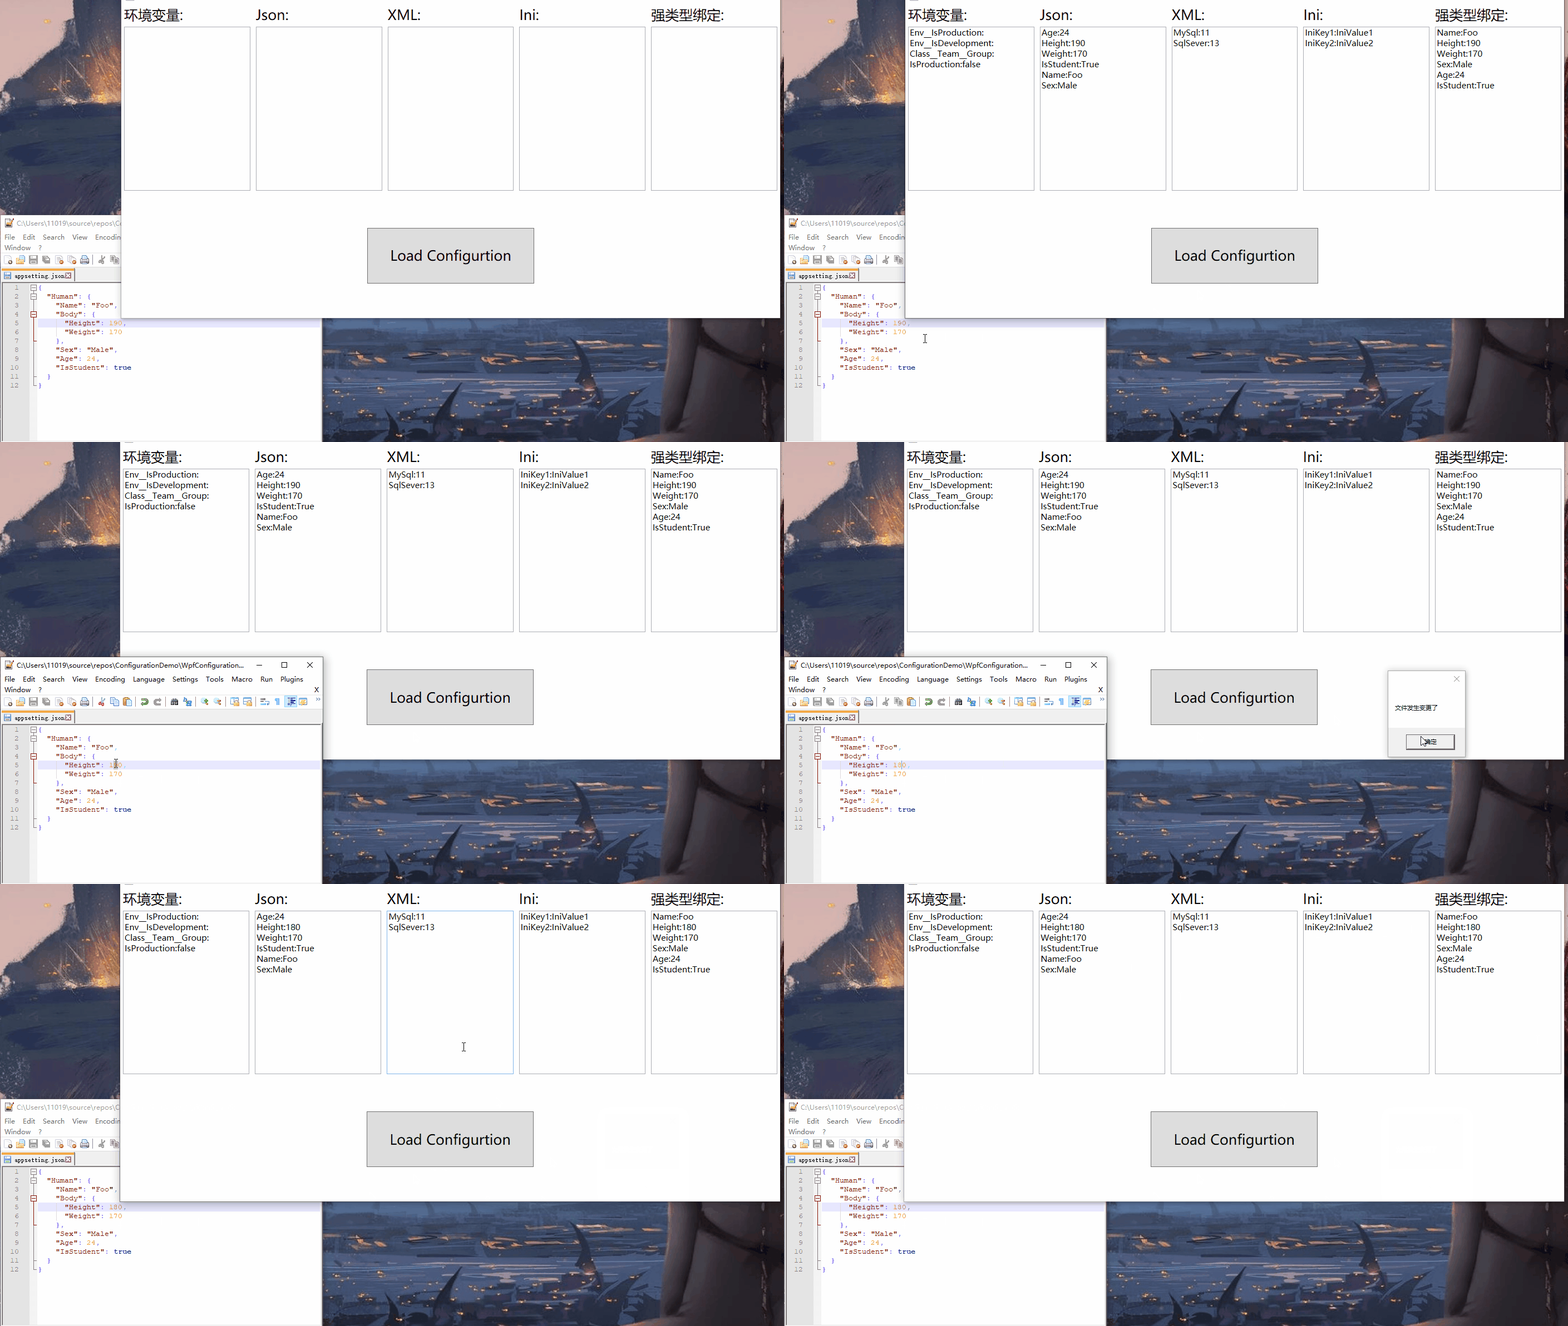
效果如下:
2.支持文件变更时重新读取和设置变更监视
以json文件为例,我们在App.cs注入json文件时调用此方法
AddJsonFile(@"Configurations\appsetting.json", false, true)
该方法有是一个重载方法,最常用的是三个参数的重载方法,下面是三个参数的作用
path:文件路径
optional:默认为false,当找不到该文件路径会报错,true则不报错
reloadOnChange:默认为false,当为true时支持配置文件变更后重新读取
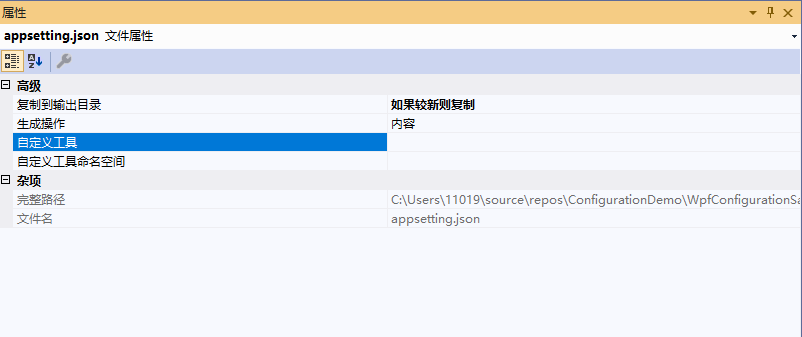
首先,我们为appsetting.json文件设置属性,复制到输出目录=>如果较新则复制,生成操作=>内容
然后我们通过一个内置的静态方法监控文件变更,修改MainWindows.cs:
public MainWindow()

{

   InitializeComponent();

   ChangeToken.OnChange(() => App.MyConfigration.GetReloadToken(), () =>

   {

       MessageBox.Show("文件发生变更了");

   });

}
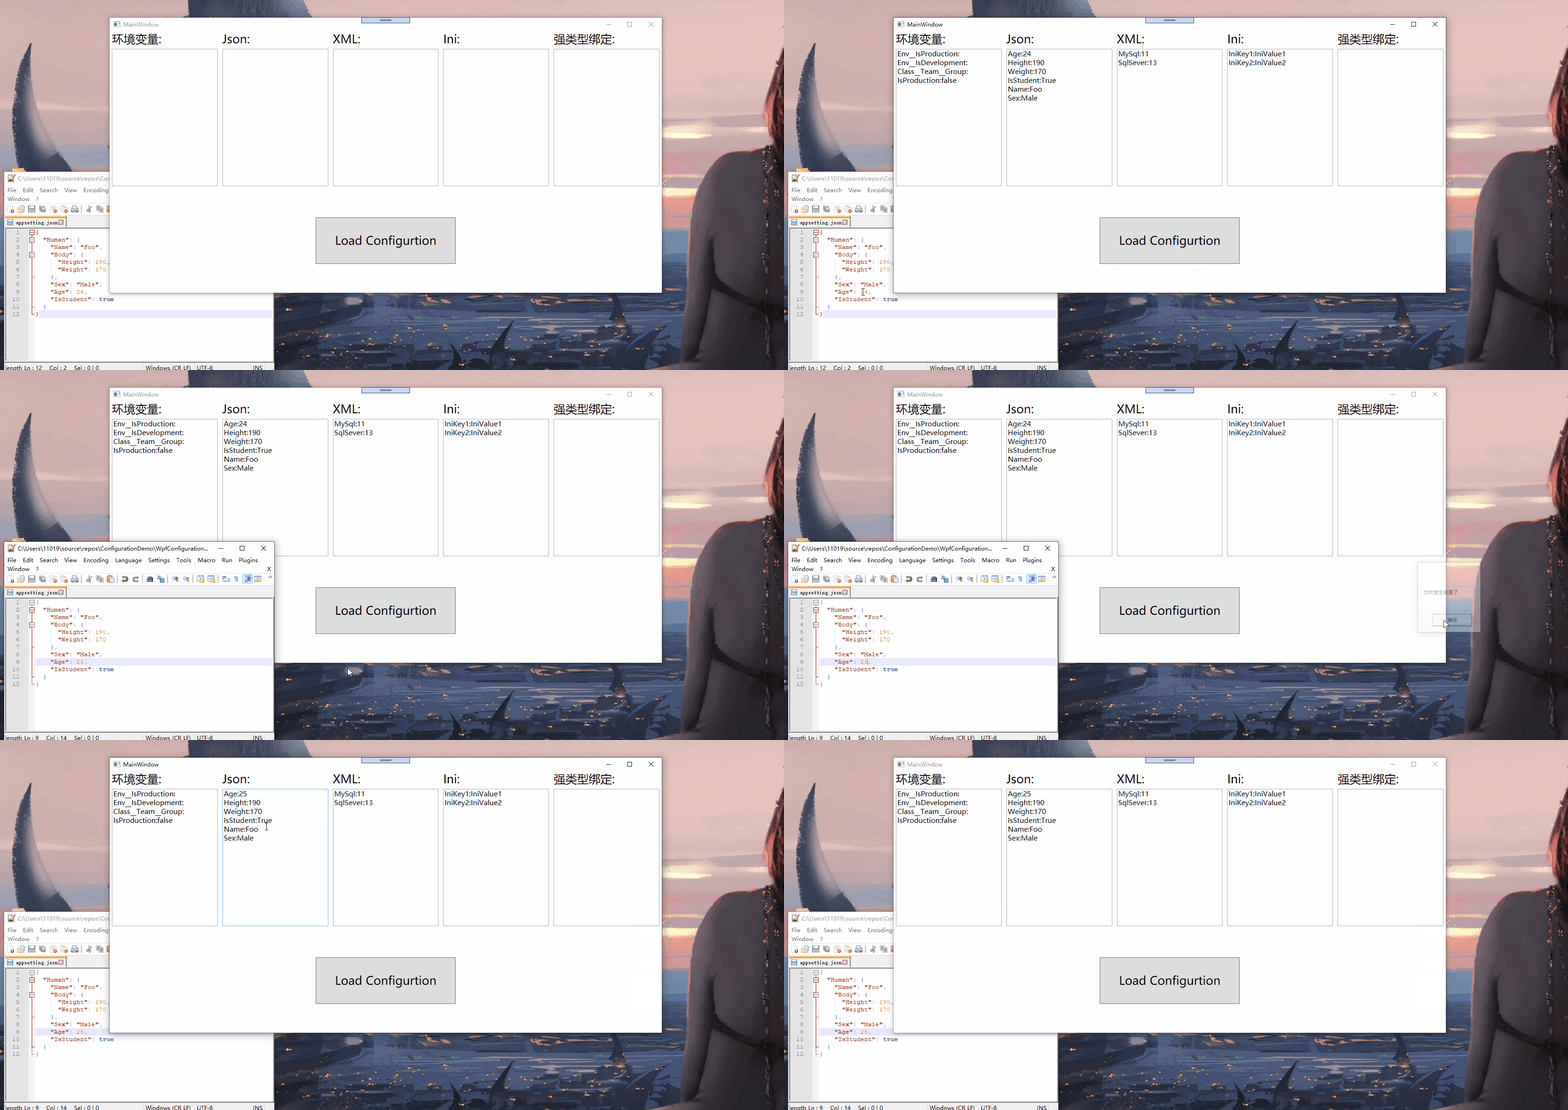
效果如下:
六.强类型绑定配置
首先我们创建一个类用于绑定配置,代码如下:
    public class MyHumanConfig

    {

        public string Name { get; set; }

        public Body Body { get; set; }

        public string Sex { get; set; }

        public int Age { get; set; }

        public bool IsStudent { get; set; }

    }

    public class Body

    {

        public int Height { get; set; }

        public int Weight { get; set; }

    }
在Mainwindow.cs新增以下代码:
  private void Button_Click(object sender, RoutedEventArgs e)

  {

       LoadEnv();

       LoadJson();

       LoadXML();

       LoadIni();

       LoadBind();

  }

  private void LoadBind()

  {

      var bindString = string.Empty;

      MyHumanConfig config = new MyHumanConfig();//声明变量

      App.MyConfigration.GetSection("Human").Bind(config);//绑定变量

      foreach (var configProperty in config.GetType().GetProperties())

      {

         if (configProperty.PropertyType==typeof(Body))

         {

             var body = configProperty.GetValue(config) as Body;

             foreach (var bodyProperty in body.GetType().GetProperties())

             {

                bindString += $"{bodyProperty.Name}:{bodyProperty.GetValue(body)} \n";

             }

         }

         else

         {

            bindString += $"{configProperty.Name}:{configProperty.GetValue(config)} \n";

         }

      }

      this.textbox_bind.Text = bindString;

  }
效果如下:
.NET Core 3.x之下的配置框架的更多相关文章
- ASP.NET Core 1.0 基础之配置
来源https://docs.asp.net/en/latest/fundamentals/configuration.html ASP.NET Core 1.0支持不同的配置选项.应用配置数据可以是 ...
- Linux CentOS7部署ASP.NET Core应用程序,并配置Nginx反向代理服务器
前言: 本篇文章主要讲解的是如何在Linux CentOS7操作系统搭建.NET Core运行环境并发布ASP.NET Core应用程序,以及配置Nginx反向代理服务器.因为公司的项目一直都是托管在 ...
- Asp.Net SignalR 使用记录 技术回炉重造-总纲 动态类型dynamic转换为特定类型T的方案 通过对象方法获取委托_C#反射获取委托_ .net core入门-跨域访问配置
Asp.Net SignalR 使用记录 工作上遇到一个推送消息的功能的实现.本着面向百度编程的思想.网上百度了一大堆.主要的实现方式是原生的WebSocket,和SignalR,再次写一个关于A ...
- IDM主机上安装融合应用程序配置框架
IDM主机上安装融合应用程序配置框架 安装Oracle融合应用程序>设置>身份和访问管理节点安装融合应用程序配置框架 由于我们使用Oracle VirtualBox虚拟机这一次,我们在 ...
- NET Core度身定制的AOP框架
NET Core度身定制的AOP框架 多年从事框架设计开发使我有了一种强迫症,那就是见不得一个应用里频繁地出现重复的代码.之前经常Review别人的代码,一看到这样的程序,我就会想如何将这些重复的代码 ...
- asp.net core 教程(五)-配置
Asp.Net Core-配置 Asp.Net Core-配置 在这一章,我们将讨论 ASP.NET Core项目的相关的配置.在解决方案资源管理器中,您将看到 Startup.cs 文件.如果你有以 ...
- Dora.Interception,为.NET Core度身打造的AOP框架:全新的版本
Dora.Interception 1.0(Github地址:可以访问GitHub地址:https://github.com/jiangjinnan/Dora)推出有一段时间了,最近花了点时间将它升级 ...
- Dora.Interception, 一个为.NET Core度身打造的AOP框架:不一样的Interceptor定义方式
相较于社区其他主流的AOP框架,Dora.Interception在Interceptor提供了完全不同的编程方式.我们并没有为Interceptor定义一个接口,正是因为不需要实现一个预定义的接口, ...
- Dora.Interception, 一个为.NET Core度身打造的AOP框架[3]:Interceptor的注册
在<不一样的Interceptor>中我们着重介绍了Dora.Interception中最为核心的对象Interceptor,以及定义Interceptor类型的一些约定.由于Interc ...
随机推荐
- form中采用图片作为提交按钮
<span style="font-size:14px;"><FORM name="formName" action="xxxx&q ...
- iOS UICollectionViewCell 的拖动
1.长按cell的情况下实现拖动,所以理应想到用长按手势. 2.既然实现移动cell,就要看看UICollectionView 有没有方法或者协议可以移动的.通过查看UICollectionView的 ...
- 5)添加分发参数c,选择控制器
目录关系: 代码展示: newnewnew.controller.class.php <?php /** * Created by PhpStorm. * User: Interact * D ...
- deeplearning.ai 改善深层神经网络 week1 深度学习的实用层面
1. 应用机器学习是高度依赖迭代尝试的,不要指望一蹴而就,必须不断调参数看结果,根据结果再继续调参数. 2. 数据集分成训练集(training set).验证集(validation/develop ...
- [LC] 746. Min Cost Climbing Stairs
On a staircase, the i-th step has some non-negative cost cost[i] assigned (0 indexed). Once you pay ...
- jQuery中的bind(), live(), on(), delegate()
当我们试图绑定一些事件到DOM元素上的时候,我相信上面这4个方法是最常用的.而它们之间到底有什么不同呢?在什么场合下用什么方法是最有效的呢? 准备知识: 当我们在开始的时候,有些知识是必须具备的: D ...
- MariaDB 外键
drop database literatureDB; create database literatureDB; use literatureDB; # 类型表 create table `type ...
- 多线程并发 了解 Thread
通过上一篇 多线程并发 (一) 了解 Java 虚拟机 - JVM 了解了java 虚拟机的构成以及对象的创建等.从Java虚拟机栈我们知道每当我们创建一个线程JVM就会给我们的线程分配一个私有的内存 ...
- 推荐几位jenkins发布war包和jar包大佬的博客
jenkins部署tomcat的war包和jar包 https://blog.csdn.net/liuxiaoming1109/article/details/89311696
- java集合 list与Set、Map区别
1.List,Set都是继承自Collection接口,Map则不是. 2.List特点:元素有放入顺序,元素可重复 ,Set特点:元素无放入顺序,元素不可重复,重复元素会覆盖掉 ,(注意:元素虽 ...