[转帖]03-rsync传输模式(本地传输、远程方式传输、守护进程模式传输)
https://developer.aliyun.com/article/885801?spm=a2c6h.24874632.expert-profile.282.7c46cfe9h5DxWK
1.Rsync传输模式
rsync大致使用三种主要的数据传输方式
本地方式
远程方式
1.1.rsync语法格式
本地传输
rsync [option] src dest
远程通道传输
pull(拉):rsync [option] [user@]host:src dest(从服务端下载至本地,src就是服务端的数据,dest就是本地的存储路径)
push(推):rsync [option] src [user@]host:dest(从本地上传至服务器,src就是本地存储,dest就是远程服务端)
守护进程方式传输
pull(拉):rsync [option] [user@]host::src dest
rsync [option] rsync://[user@]host[:port]/src…[dest]
push(推):rsync [option] src… [user@]host::dest
rsync [option] src… rsync://[user@]host[:port]/dest
命令参数 1.2.本地方式
本地方式就类似于cp命令
1.本地传输方式,单个主机本地之间的数据传输(此时类似于cp命令)
rsync [option] src dest
rsync --备份命令
[option] --选项
src --本地源文件
dest --本地目标文件
最常用的选项-avz
1.2.1.文件同步
[root@localhost ~]# rsync /etc/passwd /data/

[root@localhost ~]# rsync -avz /etc/fstab /data/

sending incremental file list

fstab

sent 346 bytes  received 35 bytes  762.00 bytes/sec

total size is 465  speedup is 1.22

[root@localhost ~]# rsync -avzP /etc/profile /data/

sending incremental file list

profile

          1,819 100%    0.00kB/s    0:00:00 (xfr#1, to-chk=0/1)

sent 934 bytes  received 35 bytes  1,938.00 bytes/sec

total size is 1,819  speedup is 1.88

[root@localhost ~]#
新建几个账号再同步一次/etc/passwd,会有明显的编号,rsync每次都是增量数据
[root@localhost ~]# for i in {1..10};do

> useradd jiang$i

> done

[root@localhost ~]# ls /home/

jiang1  jiang10  jiang2  jiang3  jiang4  jiang5  jiang6  jiang7  jiang8  jiang9  jxl

[root@localhost ~]# rsync -avz /etc/passwd /data/

sending incremental file list

passwd

sent 1,184 bytes  received 35 bytes  2,438.00 bytes/sec

total size is 2,999  speedup is 2.46
1.2.2.目录同步
两种区别命令后面带“/”和不带"/"
总结:
如果需要同步的是目录里面的内容,命令中目录的后面必须要加/或者/*
如果要同步的是目录本身及其内容,则命令中只需写目录名
完全同步:加–delete选项,源和目标内容完全一致
带“/”案例
带/表示只同步该目录下的所以文件包括目录
[root@localhost ~]# rsync -avx /data/ /opt

sending incremental file list

./

fstab

passwd

profile

dir1/

dir2/

dir3/

[root@localhost ~]# ls /opt/

fstab  passwd  profile dir1  dir2  dir3
不带“/”案例
会将整个目录同步过去,也就是将目录本身即自身下的所有文件同步过去
[root@localhost data]# rsync -zva /data /opt/

sending incremental file list

data/

data/fstab

data/passwd

data/profile

data/dir1/

data/dir2/

data/dir3/

sent 2,521 bytes  received 89 bytes  5,220.00 bytes/sec

total size is 5,283  speedup is 2.02

[root@localhost data]# ls /opt/

data  dir1  dir2  dir3  fstab  passwd  profile

[root@localhost data]# tree /opt/

/opt/

├── data

│   ├── dir1

│   ├── dir2

│   ├── dir3

│   ├── fstab

│   ├── passwd

│   └── profile

├── dir1

├── dir2

├── dir3

├── fstab

├── passwd

└── profile
delete选项主要作用就是删除目标端存在但源端不存在的文件,保持双方一致,谨慎使用
1.首选删除几个文件,和目标端保持不一致

[root@localhost data]# rm -rf dir3/

[root@localhost data]# rm -rf profile

[root@localhost data]# tree

.

├── dir1

├── dir2

├── fstab

└── passwd

2 directories, 2 files

[root@localhost data]# tree /opt/

/opt/

├── data

│   ├── dir1

│   ├── dir2

│   ├── dir{3}

│   ├── fstab

│   ├── passwd

│   └── profile

├── dir1

├── dir2

├── dir3

├── fstab

├── passwd

└── profile

7 directories, 6 files

2.开始同步,使用--delete选项

[root@localhost data]# rsync -avz /data/ /opt/ --delete

sending incremental file list

deleting dir3/

deleting data/dir{3}/

deleting data/dir2/

deleting data/dir1/

deleting data/profile

deleting data/passwd

deleting data/fstab

deleting data/

deleting profile

./

sent 144 bytes  received 139 bytes  566.00 bytes/sec

total size is 3,464  speedup is 12.24

[root@localhost data]# tree /opt/

/opt/

├── dir1

├── dir2

├── fstab

└── passwd

2 directories, 2 files

[root@localhost data]#
1.3.远程方式
远程方式和scp命令格式一致,都是基于ssh协议
远程和本地服务器都要安装rsync
将本地文件上传至远程服务器(push)

[root@localhost ~]# rsync -avz /etc/hosts root@192.168.81.220

sending incremental file list

hosts

sent 169 bytes  received 35 bytes  408.00 bytes/sec

total size is 195  speedup is 0.96

将文件从远程服务器下载到本地(pull)

[root@localhost ~]# rsync -avz root@192.168.81.220:/root/aa.txt .

root@192.168.81.220's password:

receiving incremental file list

aa.txt

sent 43 bytes  received 92 bytes  30.00 bytes/sec

total size is 3  speedup is 0.02
1.4.守护进程传输模式
守护进程是rsync自身非常重要的功能,不需要用户真实存在,路径也可以自定义,不会暴露真实路径
1.4.1.rsync配置文件详解
rsync分为全局模块和局部模块,全局模块针对所有局部模块生效,局部模块用来定义备份路径,有多个备份路径就定义多个局部模块
全局模块参数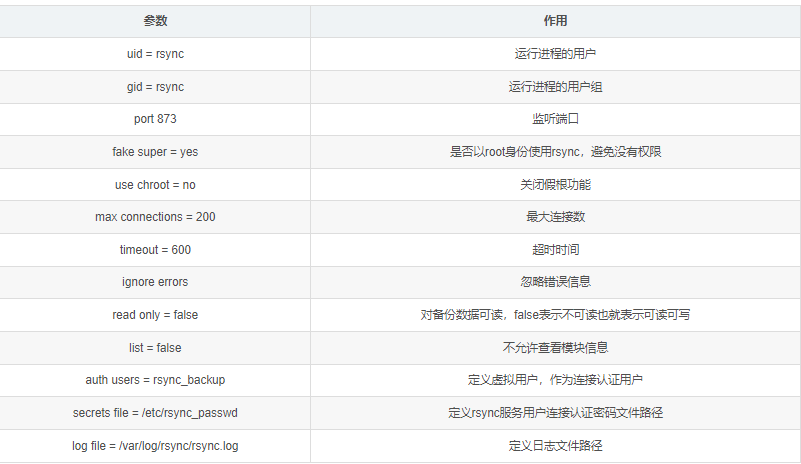 局部模块参数
1.4.2.服务器端配置-多模块
虚拟用户----系统用户
管理员不想让别人知道自己的真实身份,因此会伪装自己,当用户访问虚拟用户时会跳转至系统程序用户,也就是访问rsyncd_backup时会跳转到rsync程序用户
1.安装软件包(多台服务器都需要安装)
[root@localhost ~]# yum -y install rsync
2.修改配置文件
1)查找配置文件

两种方法:

[root@localhost ~]# rpm -ql rsync | grep etc

[root@localhost ~]# rpm -qc rsync

/etc/rsyncd.conf

/etc/sysconfig/rsyncd

2)修改配置文件

[root@localhost ~]# vim /etc/rsyncd.conf

#全局模块

uid = rsync

gid = rsync

port 873

fake super = yes

use chroot = no

max connections = 200

timeout = 600

ignore errors

read only = false

list = false

auth users = rsyncd_backup

secrets file = /etc/rsyncd_passwd

log file = /var/log/rsync/rsync.log

#局部模块

[web_backup]

comment = commit

path = /data

3)花里胡哨增加一个模块

[root@localhost data]# cat >> /etc/rsyncd.conf <<EOF

> [mysql_backup]

> comment = mysql bak

> path = /mysql_bak

> EOF
3.创建rsync用户
[root@localhost ~]# useradd rsync -M -s /sbin/nologin
4.创建目录,并修改所属
[root@localhost ~]# mkdir /data

[root@localhost ~]# mkdir /mysql_bak

[root@localhost ~]# chown -R rsync:rsync /data

[root@localhost ~]# chown -R rsync:rsync /mysql_bak
5.创建虚拟用户认证文件
左边用户右边密码,中间冒号隔开

[root@localhost ~]# echo "rsyncd_backup:123456" >/etc/rsyncd_passwd

[root@localhost ~]# chmod 600 /etc/rsyncd_passwd
6.启动服务
[root@localhost ~]# systemctl restart rsyncd

[root@localhost ~]# systemctl enable rsyncd

[root@localhost ~]# lsof -i:873

COMMAND   PID USER   FD   TYPE DEVICE SIZE/OFF NODE NAME

rsync   67937 root    3u  IPv4 152956      0t0  TCP *:rsync (LISTEN)

rsync   67937 root    5u  IPv6 152957      0t0  TCP *:rsync (LISTEN)
1.4.3.客户端配置
1.安装软件包
[root@localhost ~]# yum -y install rsync
2.推:上传,需要考虑写权限
将本地/etc/passwd文件推送至服务端web_backup模块中

[root@jxl ~]# rsync -avz /etc/passwd rsyncd_backup@192.168.81.210::mysql_backup

清空服务端web_backup模块中的内容

[root@jxl ~]# rsync -avz /null/ rsyncd_backup@192.168.81.210::web_backup --delete
3.拉:下载,需要考虑读权限
将服务器mysql_backup中的数据下载到本地
[root@jxl ~]# rsync -avz rsyncd_backup@192.168.81.210::mysql_backup /tmp/

Password:

receiving incremental file list

./

passwd

sent 50 bytes  received 1,191 bytes  496.40 bytes/sec

total size is 2,758  speedup is 2.22
4.免密登录
方法一:定义密码文件
[root@jxl ~]# echo "123456" > /etc/rsyncd_passwd

[root@jxl ~]# chmod 600 /etc/rsyncd_passwd

[root@jxl ~]# rsync -avz /etc/vsftpd/vsftpd.conf rsyncd_backup@192.168.81.210::mysql_backup --password-file=/etc/rsyncd_passwd

sending incremental file list

vsftpd.conf

sent 2,332 bytes  received 43 bytes  4,750.00 bytes/sec

total size is 5,157  speedup is 2.17
方法二:使用变量,强烈推荐,常用于脚本中
[root@jxl ~]# export RSYNC_PASSWORD=123456

[root@jxl ~]# echo $RSYNC_PASSWORD

123456

[root@jxl ~]# rsync -avz /etc/yum.repos.d/CentOS-Base.repo rsyncd_backup@192.168.81.210::mysql_backup

sending incremental file list

CentOS-Base.repo

sent 666 bytes  received 43 bytes  472.67 bytes/sec

total size is 2,523  speedup is 3.56
1.4.4.排查
1.客户端使用rsync报错信息:auth failed on module backup
可以查看服务端/var/log/messages日志文件,一般这种错误就是认证文件权限导致的
 解决办法:chmod 600 /etc/rsyncd_passwd
2.拉时需要注意有没有读权限,如果没有读权限则会报错,同样推时也要主要服务端有没有写权限
[转帖]03-rsync传输模式(本地传输、远程方式传输、守护进程模式传输)的更多相关文章
- Linux Rsync备份服务介绍及部署守护进程模式
rsync介绍 rsync是一款开源的.快速的.多功能的.可实现全量及增量的本地或远程数据同步备份工具 在常驻模式(daemon mode)下,rsync默认监听TCP端口873,以原生rsync传输 ...
- rsync 守护进程模式搭建 与常见报错
守护进程模式搭建 1.环境准备 2.安装rsync(做备份的服务器都安装) [root@backup ~]# yum install -y rsync 3.服务端配置 [root@backup ~]# ...
- Linux架构--------Rsync守护进程推和拉
一.Rsync基本概述 rsync是一款开源.快速.多功能.可实现全量及增量的本地或远程数据同步备份的优秀工具.rsync软件适用于Unix/linux/Windows等多种操作系统平台. 二.Rsy ...
- Linux架构之Rsync守护进程推和拉
第三十三章 Rsync服务 33.1)Rsync基本概述 rsync是一款开源.快速.多功能.可实现全量及增量的本地或远程数据同步备份的优秀工具.rsync软件适用于Unix/linux/Window ...
- rsync 守护进程及实时同步
目录 rsync 守护进程及实时同步 rsync简介 rsync特性 rsync应用场景 cp命令 scp命令 rsync的传输方式 rsync的传输模式 rsync实际使用 rsync命令 案例 r ...
- 树莓派 Learning 002 装机后必要的操作 --- 10 实现本地电脑与远程桌面之间复制粘贴(传输)文件
树莓派 装机后必要的操作 - 实现本地电脑与远程桌面之间复制粘贴(传输)文件 我的树莓派型号:Raspberry Pi 2 Model B V1.1 装机系统:NOOBS v1.9.2 PC端系统:w ...
- Lsyncd搭建同步镜像-用Lsyncd实现本地和远程服务器之间实时同步
Lysncd即Live Syncing Daemon,它是开源的数据实时同步工具(后台进程),基于inotify和rsync. lsyncd会密切监测本地服务器上的参照目录,当发现目录下有文件或目录变 ...
- 使用jvisualVm监控本地和远程的jvm
jvisualVm是jdk自带的可视化监控工具,功能很强大,可安装各种扩展插件.本篇不打算讲解如果使用详细的功能,只讲在windows环境怎么监控本地和远端(一般是无界面的linux系统)的java进 ...
- InfluxDB数据备份和恢复方法,支持本地和远程备份
本文属于<InfluxDB系列教程>文章系列,该系列共包括以下 17 部分: InfluxDB学习之InfluxDB的基本概念 InfluxDB学习之InfluxDB的基本操作 Influ ...
- NFS +inotify+rsync 实现数据的远程挂载与实时增量备份
NFS 网络文件系统 功能: 用户可以像访问自己的本地文件系统一样使用网络中的远端系统上的文件 原理: 用户进程-->RPC服务(portman)-->tcp/ip协议栈-->远端主 ...
随机推荐
- DevOps|研发效能|平台工程
欢迎加入我们的「研发效能DevOps」微信群. - 我的文章主要首发在微信公众号 scmroad - 主要关注领域 {研发效能.研发工具链.持续集成.交付.DevOps.效能度量.微服务治理.容器.云 ...
- 教你几个部署多个nginx-ingress的注意事项
本文分享自华为云社区<nginx-ingress工作原理以及多nginx-ingress部署注意事项>,作者: 可以交个朋友. 一.nginx-ingress工作原理 nginx-ingr ...
- 十大 CI/CD 安全风险(一)
CI/CD 环境.流程和系统是现代软件组织的核心.他们将代码从开发工程师的工作站传递到生产环境.结合 DevOps 和微服务架构的兴起,CI/CD 系统和流程重塑了工程生态系统: 技术堆栈更加多样化, ...
- 从飞书妙记秒开率提升,看火山引擎A/B测试在研发场景的应用
作者:DataTester 用户体验是决定互联网产品能否长久生存的关键,每一个基于产品功能.使用和外观的微小体验,都将极大地影响用户留存和满意度. 对于企业协作平台飞书而言,用户体验旅程从打开 ...
- 对话 BitSail Contributor | 吴畅:从好奇,到深入
更多技术交流.求职机会,欢迎关注字节跳动数据平台微信公众号,回复[1]进入官方交流群 2022 年 10 月,字节跳动 BitSail 数据引擎正式开源.同期,社区推出 Contributor 激励计 ...
- 【JAVA基础】Session使用
Session使用 用户注册 详见: https://blog.csdn.net/maxiangyu_/article/details/124088948 BaseController package ...
- 【HZERO】数据导入
#数据导入 ##文档整理 通用导入客户端 https://open.hand-china.com/hzero-docs/v1.3/zh/docs/service/import/import/ 开放平台 ...
- async await 异步下载 异步代码加锁 lock 异步缓存
async await 异步下载 异步代码加锁 lock 异步缓存 FTP异步下载代码: /// <summary> /// 异步下载文件 /// </summary> /// ...
- VMware Workstation centos7 虚拟机桥接方式联网,获取动态IP
在VMware中安装 Centos7 虚拟机,日常需要带着电脑外出.因此在远程连接虚拟机时,就要求与宿主机在同一网段.在不修改路由器的情况下,让宿主与centos7都动态从路由器获取IP地址,就能解决 ...
- 【TCP】学习笔记:application/octet-stream
当浏览器在请求资源时,会通过http返回头中的content-type决定如何显示/处理将要加载的数据,如果这个类型浏览器能够支持阅览,浏览器就会直接展示该资源,比如png.jpeg.video等格式 ...