前端小菜鸡使用Vue+Element笔记(二)
记录一下在使用Vue和Element做项目时遇到过的难点。。。
1、在 <el-table>表格中嵌入 select下拉选择框,以及 tooltip提示框的使用
主要定义格式如红色标记代码
riderPlanListTableData : 是用来填充表格的数据
type='index' 是对每行都做个序号标记,方便取单行数据以及给单行数据赋值
特别说明一下这个 slot-scope="scope" :这个能定位到行数据,表格中有很多行时,需要通过scope.row去定位行数据 和index一起使用
          <el-table

                :data="riderPlanListTableData"

                stripe

                border

                type="index"

                fit

                style="width: 100%"

                @select-all='selectAll'

                @select="handleSelect">

                <el-table-column

                  prop="careerLevelList"

                  label="产品">

                   <template slot-scope="scope"> <!-- scope.row.riderCGroupName 其中riderPlanListTableData中的属性-->

                    <el-select v-model="scope.row.riderCGroupName" placeholder="产品" clearable class="filter-item" @change="prdnameChange(scope.$index, scope.row)" style="width: 420px" >

                      <el-option v-for="(item,index) in  scope.row.careerLevelList" :key="index" :label="item.riderCName+'-'+item.riderEName" :value="item.riderCode+'_'+item.careerLevel" />

                      <!-- 当 循环的key定义为index时,会自动取出每一条 能避免key重复的问题 -->

                    </el-select>

                    <el-input v-model='scope.row.riderType'  type='hidden' class="filter-item"/>  <!-- 设定一个隐藏的input框,因为后面需要用到这个riderType值 >

                   </template>

                </el-table-column>

                <el-table-column

                  prop="sumassured"

                  label="额度">

                  <template slot-scope="scope"> <!-- el-tooltip 这个是在当前输入框中加上提示信息,可以通过在content前面加 : 冒号,动态填充tooltip需要提示的值 -->

                    <el-tooltip class="item" effect="dark" :content="sumassuredTips" placement="top">

                      <el-input v-model="scope.row.sumassured"  @change="sumassuredChange(scope.$index, scope.row)" @focus="sumassuredFocus(scope.row)"   class="filter-item"/>

                    </el-tooltip>

                  </template>

                </el-table-column>
</el-table>
响应表格中的额度输入框onFocus的方法:sumassuredFocus(scope.row) : 这个scope.row可以取到表格中当前行所有的列数据
响应表格中的onchange方法:sumassuredChange(scope.$index,scope.row): index可以定位行序号,row可以定为当前行数据
let 和 var: let 定义的是局部变量,var 定义的是全局变量
this.$set(this.inputForm,'attribute','attributeValue'); //通过这句话可以给this.inputForm对应的属性赋值
    /**附加产品保额变化的change事件:计算出对应的保费 */

    sumassuredChange(index,row) {

        let inputForm = this.inputForm;

        this.tmpSplit = (row.riderCGroupName).split('_');

        this.$set(this.inputForm,'riderCode','1234');  //如果this.inputForm对象中有riderCode属性,1234则会覆盖riderCode属性值,如果没有则会创建一个riderCode属性并且赋值为1234

        this.$set(this.inputForm,'careerLevel',this.tmpSplit[1]);

        this.$set(this.inputForm,'sumAssured',row.sumassured);this.INPUT_FORM(this.inputForm);

        let inputObj = JSON.stringify(this.inputForm);

        let tmpThis = this; //这里这样子定义是因为进入CalRiderPremiumByCode方法后不能直接使用this,需要使用变量接收this值,然后再在方法里面使用变量

        let indexs = index;

        let row1 = row;

    /** 这一段代码是与后台进行交互
      1、inputObj是方法的入参对象 ,因为在api.js中指定了入参格式为 application/json,所以应该先调用 JSON.stringify()方法格式化入参,再传给后台
          2、CalRiderPremiumByCode方法需要在 service包下的 api.js文件中定义,并且在当前使用的文件中声明
        import {CalRiderPremiumByCode} from '../service/api'  //此声明语句应放在<script>标签下面
         3、res是后台交互方法 CalRiderPremiumByCode(inputObj)的返回值
      4、 tmpThis.$set(...) :这是使用后台返回的数据 给表格中的当前行指定的列输入框赋值,

      */
        CalRiderPremiumByCode(inputObj).then(function(res){

          if(res.code == '200' && res.msg == 'ok'){

              tmpThis.$set(tmpThis.riderPlanListTableData[indexs],'premiumperyear',res.data.result.annuallypremium);

            }else{

              alert('后台访问出错,请刷新页面');

            }

        }).catch(function(error){

            console.log(error)

        })

      }else{

        alert('保额不属于限定范围内,请重新输入!保额的最小值为:'+ row.minSumAssured+",最大值为:"+ row.maxSumAssured);

      }

    },
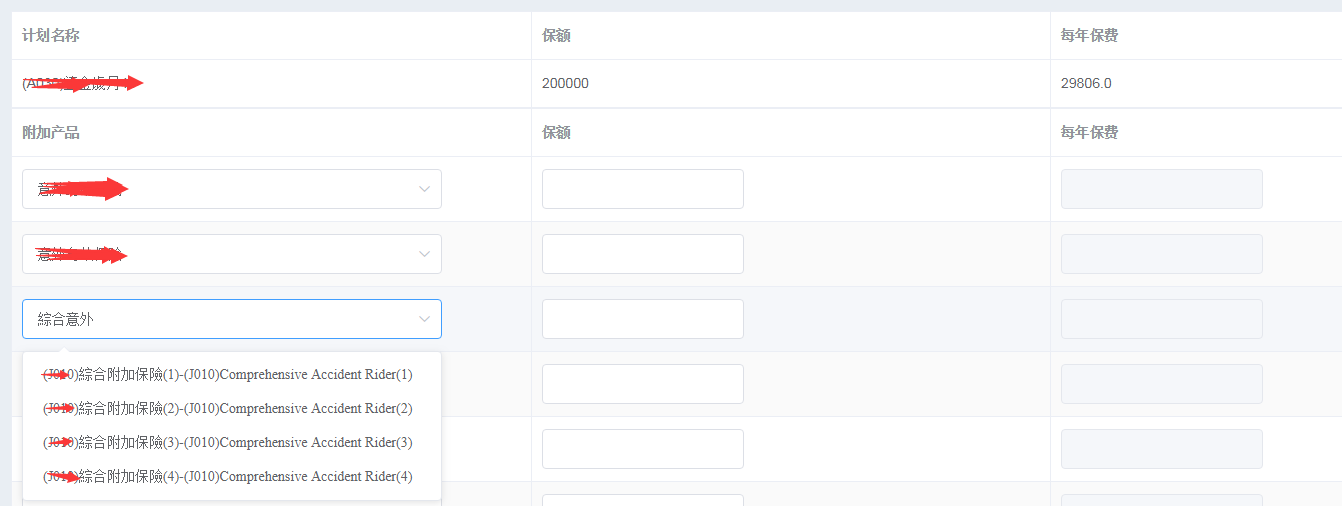
表格中嵌套select选择框的效果图:
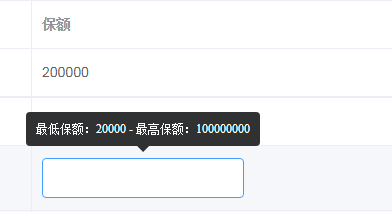
tooltip提示框的效果图:
2、<el-input>框设置为不可编辑时可使用 disabled='true' 或者 readonly='true'
区别: disabled为true:不可编辑且输入框颜色变深
readonly为true: 不可编辑,输入框颜色不变
3、页面交互参数使用 query 与 params定义
query: 相当于get方法,参数以及参数值会显示在URL上
params: 相当于post方法,参数以及参数值不会显示在URL上
params---- 请求中的使用:
使用格式: params:{ xxxx:'123' }
注意params必须和name一起使用,且请求前面不需要加 /
 this.$router.push({

        name: 'toMain',

        params: {

          handPrepaidAnnualTot:this.handPrepaidAnnualTot ,

          handPrepaidAnnualPrm:this.handPrepaidAnnualPrm,

          paymodeOptions: this.paymodeOptions,

          currencyOptions: this.currencyOptions,

        }

      })
},
params ---- 在请求 toMain对应的 xxxx .vue页面参数获取 : this.$route.params.xxx
    /** 初始化调用的方法   */

    selectInit() {

     //1.获取从附加保障页面点击上一步 传过来的参数,如果有值则直接使用当前值填充页面数据(复显)

      let tmpPrdInfoList = this.$route.params.onlProposalProductInfoList;

      let tmpPrdCategoryList = this.$route.params.onlProposalCategoryInfoList;

      let tmpSelectedPrdInfoList = this.$route.params.selectedPrdInforList;

      let tmpPaymodeList = this.$route.params.paymodeOptions;

      let tmpCurrencyList = this.$route.params.currencyOptions;

    },
query 请求中的使用:
注意 query必须和path一起使用,并且请求需要加 /
nextStep(){

  this.$router.push({

        path: '/toMain',

        query: {

          handPrepaidAnnualTot:this.handPrepaidAnnualTot ,

          handPrepaidAnnualPrm:this.handPrepaidAnnualPrm,

          selectedPrdInforList: this.prdcodeOptions,

          paymodeOptions: this.paymodeOptions,

          currencyOptions: this.currencyOptions,

        }

},
query-- 在请求 toMain对应的 xxxx .vue页面参数获取 : this.$route.query.xxx
selectInit() {//1.获取从附加保障页面点击上一步 传过来的参数,如果有值则直接使用当前值填充页面数据(复显)

      let tmpPrdInfoList = this.$route.query.onlProposalProductInfoList;

      let tmpPrdCategoryList = this.$route.query.onlProposalCategoryInfoList;

      let tmpSelectedPrdInfoList = this.$route.query.selectedPrdInforList;

      let tmpPaymodeList = this.$route.query.paymodeOptions;

      let tmpCurrencyList = this.$route.query.currencyOptions;

}
前端小菜鸡使用Vue+Element笔记(二)的更多相关文章
- 前端小菜鸡使用Vue+Element笔记(一)
关于使用Vue+Element的项目简介~ 最近因为项目组缺前端人员,所以自己现学现做页面,先把前后台功能调通 觉得前端可真的是不容易呀哎呀~ 首先记录一下相关的Vue入门的教程: vue环境搭建示例 ...
- vue学习笔记(二)vue的生命周期和钩子函数
前言 通过上一章的学习,我们已经初步的了解了vue到底是什么东西,可以干什么,而这一篇博客主要介绍vue的生命周期和它常用的钩子函数,如果有学过java的园友可能有接触到在学习servlet的时候学过 ...
- 小菜鸡学习---<正则表达式学习笔记2>
正则表达式学习笔记2 一.修饰符 前面我们学习的都是用于匹配的基本的关键的一些表达式符号,现在我们来学习修饰符.修饰符不写在正则表达式里,修饰符位于表达式之外,比如/runoob/g,这个最后的g就是 ...
- Vue学习笔记二:v-cloak,v-text,v-html的使用
目录 v-cloak:解决插值表达式闪烁问题 安装插件Live Server 右键以HTTP形式运行HTML v-text:以属性方式使用插值表达式 v-cloak和v-text的区别 v-html: ...
- VUE 学习笔记 二 生命周期
1.除了数据属性,Vue 实例还暴露了一些有用的实例属性与方法.它们都有前缀 $,以便与用户定义的属性区分开来 var data = { a: 1 } var vm = new Vue({ el: ' ...
- vue使用笔记二
es6\es2015特性http://lib.csdn.net/article/reactnative/58021?knId=1405 使用express-generator初始化你的项目目录http ...
- VUE学习笔记二
package.json不可以写注释!!!!!!!!!!初始化:npm init -y 有时候使用 npm i node-sass -D 装不上,这时候,就必须使用 cnpm i node-sass ...
- vue学习笔记二:v-if和v-show的区别
v-if vs v-show v-if 是“真正的”条件渲染,因为它会确保在切换过程中条件块内的事件监听器和子组件适当地被销毁和重建. v-if 也是惰性的:如果在初始渲染时条件为假,则什么也不做—— ...
- 循序渐进VUE+Element 前端应用开发(20)--- 使用组件封装简化界面代码
VUE+Element 前端应用,比较不错的一点就是界面组件化,我们可以根据重用的指导方针,把界面内容拆分为各个不同的组合,每一个模块可以是一个组件,也可以是多个组件的综合体,而且这一个过程非常方便. ...
随机推荐
- 从flask视角理解angular(二)Blueprint VS Component
Component类似flask app下面的每个blueprint. import 'rxjs/add/operator/switchMap'; import { Component, OnInit ...
- (转)C# System.Diagnostics.Process.Start使用
经常会遇到在Winform或是WPF中点击链接或按钮打开某个指定的网址, 或者是需要打开电脑中某个指定的硬盘分区及文件夹, 甚至是"控制面板"相关的东西, 如何做呢? 方法:使用 ...
- 关于 Oracle DB CONSTRAINT约束的一些SQL ORA-02292: integrity constraint violated
ALTER TABLE table_name DISABLE CONSTRAINT constraint_name; select * from all_constraints where owner ...
- Docker用途 & 和tomcat的区别
两者不是同一种类型.1.docker 是容器,tomcat是jsp应用服务器2.tomcat可以安装在物理机上,虚拟机上,也可以安装在Docker上.所以从这个角度讲,Docker也可以看做是一种超轻 ...
- Winform开发框架之框架演化
Winform开发框架方面的文章我介绍很多了,有宏观介绍,也有部分技术细节的交流,每次我希望能从不同角度,不同方面来介绍我的WInform开发框架,这些其实都是来源于客户的需求,真实的项目场景.本文主 ...
- p1459 Sorting a Three-Valued Sequence
如果将1和3都放到正确的位置,2自然也在正确的位置.那么统计1,2,3的数量num1,num2,num3.再看前num1个数有几个(设x个)不是1,那么x个1肯定要移.设前num1个数有y个3,最后n ...
- JavaScript 入门笔记
JavaScript 1.JS和DOM的关系 浏览器有渲染html代码的功能,把html源码在内存里形成一个DOM对象,就是文档对象 浏览器内部有一个JS的解释器/执行/引擎,如chrome用v8 ...
- python基础之数据类型操作补充,集合及其操作,深浅拷贝
内容概要: 数据类型操作补充 集合及其操作 深浅拷贝1.基础数据类型补充 1.1字符串的操作补充li = ["李嘉诚", "麻花藤", "黄海峰&qu ...
- oracle中rownum和row_number()
row_number()over(partition by col1 order by col2)表示根据col1分组,在分组内部根据col2排序,而此函数计算的值就表示每组内部排序后的顺序编号(组内 ...
- java正则中的requireEnd和hitEnd
package test; import java.util.regex.Matcher; import java.util.regex.Pattern; public class main { // ...