
How To Install Linux, nginx, MySQL, PHP (LEMP) stack on CentOS 6
About Lemp
LEMP stack is a group of open source software to get web servers up and running. The acronym stands for Linux, nginx (pronounced Engine x), MySQL, and PHP. Since the server is already running CentOS, the linux part is taken care of. Here is how to install the rest.
Step One—Install the Required Repositories
We will be installing all of the required software with Yum. However, because nginx is not available straight from CentOS, we'll need to install the epel repository.
sudo yum install epel-release
Step Two—Install MySQL
The next step is to begin installing the server software on the virtual private server, starting with MySQL and dependancies.
sudo yum install mysql-server
Once the download is complete, restart MySQL:
sudo /etc/init.d/mysqld restart
You can do some configuration of MySQL with this command:
sudo /usr/bin/mysql_secure_installation
The prompt will ask you for your current root password.
Since you just installed MySQL, you most likely won’t have one, so leave it blank by pressing enter.
Enter current password for root (enter for none):

OK, successfully used password, moving on...
Then the prompt will ask you if you want to set a root password. Go ahead and choose Y and follow the instructions.
CentOS automates the process of setting up MySQL, asking you a series of yes or no questions.
It’s easiest just to say Yes to all the options. At the end, MySQL will reload and implement the changes.
By default, a MySQL installation has an anonymous user, allowing anyone

to log into MySQL without having to have a user account created for

them.  This is intended only for testing, and to make the installation

go a bit smoother.  You should remove them before moving into a

production environment.

Remove anonymous users? [Y/n] y

 ... Success!

Normally, root should only be allowed to connect from 'localhost'.  This

ensures that someone cannot guess at the root password from the network.

Disallow root login remotely? [Y/n] y

... Success!

By default, MySQL comes with a database named 'test' that anyone can

access.  This is also intended only for testing, and should be removed

before moving into a production environment.

Remove test database and access to it? [Y/n] y

 - Dropping test database...

 ... Success!

 - Removing privileges on test database...

 ... Success!

Reloading the privilege tables will ensure that all changes made so far

will take effect immediately.

Reload privilege tables now? [Y/n] y

 ... Success!

Cleaning up...

All done!  If you've completed all of the above steps, your MySQL

installation should now be secure.

Thanks for using MySQL!
Step Three—Install nginx
As with MySQL, we will install nginx on our virtual private server using yum:
sudo yum install nginx
nginx does not start on its own. To get nginx running, type:
sudo /etc/init.d/nginx start
You can confirm that nginx has installed on your virtual private server by directing your browser to your IP address.
You can run the following command to reveal your server’s IP address.
ifconfig eth0 | grep inet | awk '{ print $2 }'
Step Four—Install PHP
The php-fpm package is located within the REMI repository, which, at this point, is disabled. The first thing we need to do is enable the REMI repository and install php and php-fpm:
sudo yum install php-fpm php-mysql
Step Five—Configure php
We need to make one small change in the php configuration. Open up php.ini:
sudo vi /etc/php.ini
Find the line, cgi.fix_pathinfo=1, and change the 1 to 0.
cgi.fix_pathinfo=0
If this number is kept as a 1, the php interpreter will do its best to process the file that is as near to the requested file as possible. This is a possible security risk. If this number is set to 0, conversely, the interpreter will only process the exact file path—a much safer alternative. Save and Exit.
Step Six—Configure nginx
Open up the default nginx config file:
sudo vi /etc/nginx/nginx.conf
Raise the number of worker processes to 4 then save and exit that file.
Now we should configure the nginx virtual hosts.
In order to make the default nginx file more concise, the virtual host details are in a different location.
sudo vi /etc/nginx/conf.d/default.conf
The configuration should include the changes below (the details of the changes are under the config information):
#

# The default server

#

server {

    listen       80;

    server_name example.com;

    location / {

        root   /usr/share/nginx/html;

        index index.php  index.html index.htm;

    }

    error_page  404              /404.html;

    location = /404.html {

        root   /usr/share/nginx/html;

    }

    error_page   500 502 503 504  /50x.html;

    location = /50x.html {

        root   /usr/share/nginx/html;

    }

    # pass the PHP scripts to FastCGI server listening on 127.0.0.1:9000

    #

    location ~ \.php$ {

        root           /usr/share/nginx/html;

        fastcgi_pass   127.0.0.1:9000;

        fastcgi_index  index.php;

        fastcgi_param  SCRIPT_FILENAME   $document_root$fastcgi_script_name;

        include        fastcgi_params;

    }

}
Here are the details of the changes:
- Add index.php within the index line.
- Change the server_name to your domain name or IP address (replace the example.com in the configuration)
- Change the root to /usr/share/nginx/html;
- Uncomment the section beginning with "location ~ \.php$ {",
- Change the root to access the actual document root, /usr/share/nginx/html;
- Change the fastcgi_param line to help the PHP interpreter find the PHP script that we stored in the document root home.
Save and Exit
Open up the php-fpm configuration:
sudo vi /etc/php-fpm.d/www.conf
Replace the apache in the user and group with nginx:
[...]

; Unix user/group of processes

; Note: The user is mandatory. If the group is not set, the default user's group

;	will be used.

; RPM: apache Choosed to be able to access some dir as httpd

user = nginx

; RPM: Keep a group allowed to write in log dir.

group = nginx

[...]
Finish by restarting php-fpm.
sudo service php-fpm restart
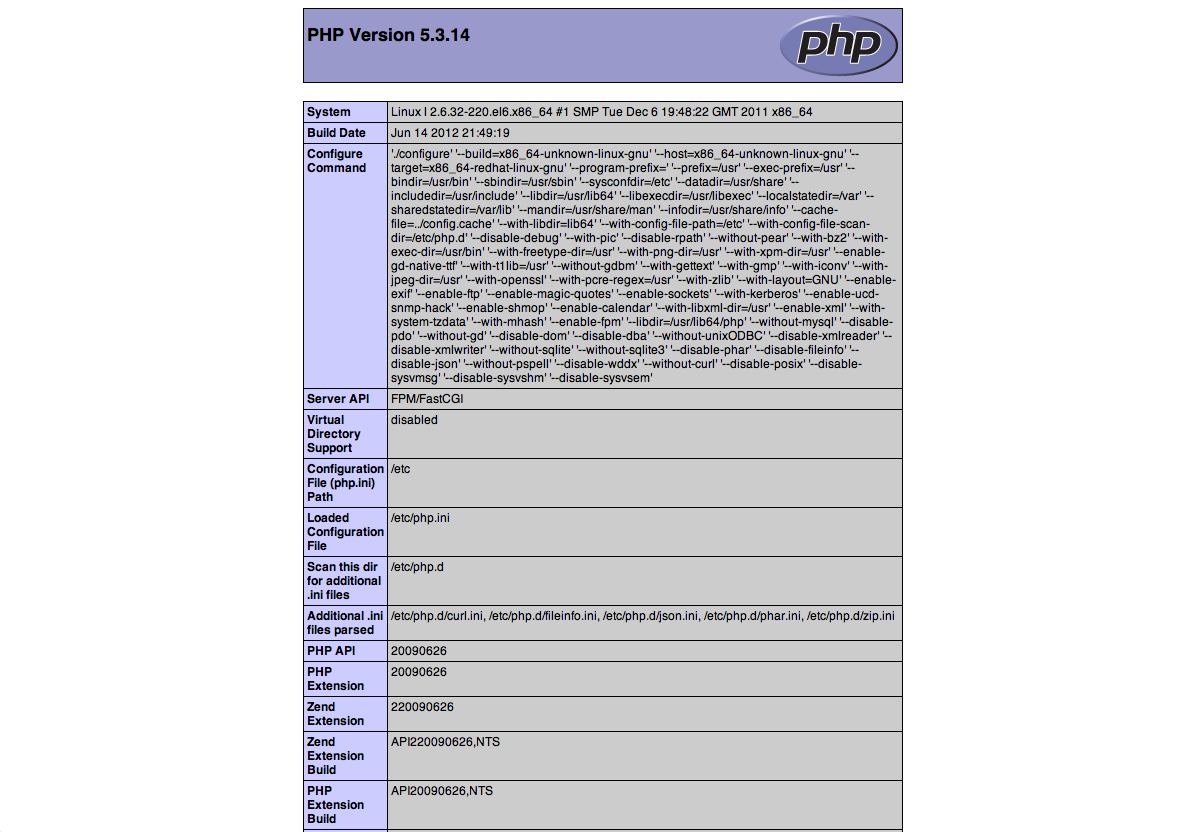
Step Seven—RESULTS: Create a php info page
Although LEMP is installed, we can still take a look and see the components online by creating a quick php info page
To set this up, first create a new file:
sudo vi /usr/share/nginx/html/info.php
Add in the following line:
<?php

phpinfo();

?>
Then Save and Exit.
Restart nginx so that all of the changes take effect:
sudo service nginx restart
Finish up by visiting your php info page (make sure you replace the example ip address with your correct one): http://12.34.56.789/info.php
It should look similar to this.
Step Eight—Set Up Autostart
You are almost done. The last step is to set all of the newly installed programs to automatically begin when the VPS boots.
sudo chkconfig --levels 235 mysqld on

sudo chkconfig --levels 235 nginx on

sudo chkconfig --levels 235 php-fpm on
How To Install Linux, nginx, MySQL, PHP (LEMP) stack on CentOS 6的更多相关文章
- How To Install Linux & Nginx & MySQL & PHP (LEMP) stack on Raspberry Pi 3,Raspberry Pi 3,LEMP,Nginx,PHP, LEMP (not LNMP)
1. How To Install Linux & Nginx & MySQL & PHP (LEMP) stack on Raspberry Pi 3 R ...
- How To Install Linux, Nginx, MySQL, PHP (LEMP) Stack on Debian 7
https://www.digitalocean.com/community/tutorials/how-to-install-linux-nginx-mysql-php-lemp-stack-on- ...
- How to Install Linux, Apache, MySQL, PHP (LAMP) stack on CentOS 6 【Reliable】
About LAMP LAMP stack is a group of open source software used to get web servers up and running. The ...
- 如何在Ubuntu16.04 中安装Linux, Nginx, MySQL, PHP (LEMP 栈)
介绍 LEMP 栈是用来开发动态网页和web 应用程序的一系列软件集合,LEMP描述的是Linux操作系统,Nginx web 服务器,以及后端数据存储MySQL/MariaDB数据库和服务器端动态脚 ...
- ubuntu14.04 LEMP(linux+nginx+mysql+php5)构建环境
Install LEMP (Linux, Nginx, MySQL and PHP) Stack on Ubuntu Linux 14.04 LTS by VIVEK GITE on DECEMBER ...
- Linux Debian 7部署LEMP(Linux+Nginx+MySQL+PHP)网站环境
我们在玩VPS搭建网站环境的时候,都经常看到所谓的LAMP.LNMP.LEMP,LAMP, 其中的A代表APECHE WEB驱动环境,LNMP中的N代表NGINX驱动环境,只不过海外的叫法NGINX ...
- 阿里云服务器部署php的laravel项目,在阿里云买ECS 搭建 Linux+Nginx+Mysql+PHP环境的
在阿里云买ECS的时候选择自己习惯的镜像系统,我一般都是使用Linux Ubuntu,所以,以下的配置都是在Ubuntu 14.04稳定支持版的环境中搭建Linux+Nginx+Mysql+PHP环境 ...
- linux+nginx+mysql+php
LNMP(linux+nginx+mysql+php)服务器环境配置 一.简介 Nginx是俄罗斯人编写的十分轻量级的HTTP服务器,Nginx,它的发音为 “engine X”, 是一个高性能的 ...
- LNMP(Linux+Nginx+Mysql+PHP---源码)环境搭建
LNMP(Linux+Nginx+Mysql+PHP(Perl)) Linux:[root@dep5 mysql]# cat /etc/issueRed Hat Enterprise Linux Se ...
随机推荐
- Windows常用shell命令大全(转)
[Windows常用shell命令大全] 基于鼠标操作的后果就是OS界面外观发生改变, 就得多花学习成本.更主要的是基于界面引导Path与命令行直达速度是难以比拟的.另外Geek很大一部分是键盘控,而 ...
- [技巧篇]00.TrimFilter去掉jsp页面空白,提升访问速度
最近感觉项目访问的速度有点慢,我就在网络中一顿搜索,发下了一个好东东,忍不住跟大家分享,希望大家可以试一试,确实有提升的空间啊!要求去除空白区.提取公用代码.减小页面. 胖先生乱搜之下,找到了Trim ...
- Log4J使用实例---日志进行邮件发送或是存入数据库
部分转摘:http://blog.csdn.net/azhao_dn/article/details/9118667 1.根类别(在类别层次结构的顶部,即全局性的日志级别) 配置根Logger,其语法 ...
- Robotframework Web自动化实战课程
想学习的小伙伴,现在可以报名了!!!7月1日正式开课本期课程主要是web自动化为主,根据平时工作经验整理的一套流程以及使用过程中常见的问题总结.学完后能很快上手,即学即用,课后遇到问题在线解答,远程协 ...
- [LeetCode] 12. Integer to Roman ☆☆
Given an integer, convert it to a roman numeral. Input is guaranteed to be within the range from 1 t ...
- [POI2008]BLO-Blockade
https://www.luogu.org/problem/show?pid=3469 题目描述 There are exactly towns in Byteotia. Some towns ar ...
- leetcode 刷题日志 2018-3-28
树: 404. 左叶子之和 求所有左叶子结点之和 . 递归法 分析:递归法遍历结点,找左叶子结点 空指针判断 有左子节点?是叶子结点?是的话更新value的值 int sumOfLeftLeaves( ...
- asyncio Lock,Queue
# # total = 0 # # async def add(): # #1. dosomething1 # #2. io操作 # # 1. dosomething3 # global total ...
- PHP网页架站
目前,Windows下已经有集成的PHP网页架站工具,例如:AppServ.WampServer.这些软件将Apache.PHP.MySQL.phpMyAdmin集成到一起,极大地方便了开发者架站.但 ...
- 打印菱形(c语言)
#define _CRT_SECURE_NO_WARNINGS #include <stdio.h> #include <stdlib.h> int main() { // 定 ...