iOS: 本地通知的前后变化(iOS10)
一、介绍
通知和推送是应用程序中很重要的组成部分。本地通知可以为应用程序注册一些定时任务,例如闹钟、定时提醒等。远程推送则更强大,提供了一种通过服务端主动推送消息到客户端的方式,服务端可以更加灵活地控制通知逻辑,例如广告的推送、定时任务的提醒、即时通信类应用离线消息的提醒等。本文先着重着介绍本地通知,由于iOS系统的不断更新,本地通知的API也需要根据设备的系统来进行选择和兼容。
- 在iOS10之前,开发者需要使用UILocalNotification类来实现本地通知;
- 在iOS10之后,苹果为了加强对通知和推送的统一管理,提高通知界面的高可定制性,引入了UserNotification框架。
二、UILocalNotification
1、简介
ULLocalNotification是iOS8中的一个类(In iOS 8.0 and later),用来实现本地通知功能。通知,实际上是由iOS系统管理的一个功能,比如注册了通知,则系统会在通知被触发时给应用程序发送消息。但是,ULLocalNotification仅能提供开发者去编辑消息,消息推送到app上展示的样式和交互则是固定的,开发者自定制的难度相当大。
2、添加步骤
- 创建通知对象
- 设置触发时间
- 设置通知属性
- 执行本地通知
/// 添加本地推送

-(void)addLocalNotification {

    //1、创建通知对象

    UILocalNotification *notification = [[UILocalNotification alloc] init];

    //2、设置触发时间

    notification.fireDate = [NSDate dateWithTimeIntervalSinceNow:5];//5秒后

    //3、设置通知属性

    notification.alertTitle = @"本地推送";          /// 通知标题

    notification.alertBody = @"HELLO,欢迎哥的到来"; /// 通知主体

    notification.applicationIconBadgeNumber = ;  /// 应用程序图标的消息数

    notification.hasAction = YES;                 /// 待机界面开启左滑按钮

    notification.alertAction = @"打开应用";        ///  待机界面的滑动按钮提示

    notification.userInfo = @{@"name":@"xyq"};   ///  传递的用户数据

    notification.soundName = UILocalNotificationDefaultSoundName; /// 在收到通知时播放的声音,默认消息声音

    //4、执行本地通知

    [[UIApplication sharedApplication] scheduleLocalNotification:notification];

}
3、处理逻辑
- 申请通知授权
- 添加本地通知
- 收到通知处理
- (BOOL)application:(UIApplication *)application didFinishLaunchingWithOptions:(NSDictionary *)launchOptions {

    // Override point for customization after application launch.

    //如果已经得到授权,就直接添加本地通知,否则申请询问授权

    if ([[UIApplication sharedApplication] currentUserNotificationSettings].types == UIUserNotificationTypeNone) {

        //开始授权

        [[UIApplication sharedApplication] registerUserNotificationSettings:[UIUserNotificationSettings settingsForTypes:UIUserNotificationTypeBadge | UIUserNotificationTypeAlert | UIUserNotificationTypeSound categories:nil]];

    }

    //如果我们的应用程序处于关闭状态时,然后被通知唤醒后,直接在完成正常启动流程的代理函数中获取通知对象

    UILocalNotification *notification = [launchOptions valueForKey:UIApplicationLaunchOptionsLocationKey];

    if (notification) {

        NSDictionary *userInfo = notification.userInfo;

        NSLog(@"1----notification------- %@",notification);

        NSLog(@"1----userInfo------- %@",notification.userInfo);

    }

    return YES;

}
/// 当用户点击允许或者不允许时,会执行如下代理方法,我们在其中实现处理逻辑

-(void)application:(UIApplication *)application didRegisterUserNotificationSettings:(UIUserNotificationSettings *)notificationSettings {

    if (notificationSettings.types != UIUserNotificationTypeNone) {

        [self addLocalNotification];

    }

}

/// 当我们的应用进入前台时,需要清除应用图标的数字

-(void)applicationWillEnterForeground:(UIApplication *)application {

    [[UIApplication sharedApplication] setApplicationIconBadgeNumber:];

}

/// 当我们的应用程序在前台或者从后台进入前台时,收到本地通知

-(void)application:(UIApplication *)application didReceiveLocalNotification:(UILocalNotification *)notification {

    if (notification) {

        NSDictionary *userInfo = notification.userInfo;

        NSLog(@"2----notification------- %@",notification);

        NSLog(@"2----userInfo------- %@",notification.userInfo);

    }

}
4、演示示例
-- ::33.991404+ 本地推送[:] ----notification------- <UIConcreteLocalNotification: 0x600000932080>{fire date = Friday, November ,  at :: PM China Standard Time, time zone = (null), repeat interval = , next fire date = (null), user info = {

    name = xyq;

}}

-- ::33.991612+ 本地推送[:] ----userInfo------- {

    name = xyq;

}


三、UserNotification
1、简介
UserNotification是iOS10后苹果提出的一个整合的通知和推送框架,对之前的通知和推送功能进行了全面的重构和优化,功能更强大,定制更灵活。表现如下:
- 通知处理代码从AppDelegate中剥离
- 通知的注册、设置、处理更加结构化,更易于进行模块的开发
- 支持自定义通知音效和启动图
- 支持向通知内容中添加媒体附件,例如音效、视频
- 支持开发者定义多套通知展示模块
- 支持完全自定义的通知界面
- 支持自定义通知中的用户交互按钮
- 通知的触发更加容易管理
2、核心类结构图

- UNNotificationCenter:通知管理中心单例设计,负责通知的注册、接收通知后的回调处理等,是UserNofitication框架的核心。
- UNNotification:通知对象,其中封装了通知请求
- UNNoticationSettings:通知相关设置
- UNNotificationCategory:通知模板
- UNNotificationAction:用于定义通知模板中的用户交互行为
- UNNotificationRequest:注册通知请求,其中定义了通知的内容和触发方式
- UNNotificationResponse:接收到通知后的回执
- UNNotificationContent:通知的具体内容
- UNNotificationAttachment:通知所携带的附件,为通知内容添加
- UNNotificationSound:定义通知音效, (音频文件必须位于bundle或者Library/Sounds目录下)
- UNNotificationTrigger:通知触发器,由其子类具体定义
- UNPushNotificationTrigger:远程推送触发器,UNNotificationTrigger的子类
- UNTimerInrevalNotificationTrigger:计时器触发器,UNNotificationTrigger的子类
- UNCalendarNotificationTrigger:周期日历触发器,UNNotificationTrigger的子类
- UNLocationNotificationTrigger:地域触发器,UNNotificationTrigger的子类
- UNNotificationCenterDelegate:协议,其中方法用于监听通知状态
注意:
- 媒体附件大小

- 对于收到的附件通知,可以把消息下拉看到完整的附件内容(见下面的代码示例图所展示的样子)
- 内容附件实例中options配置字典键/值作用,本示例代码中options默认置为nil
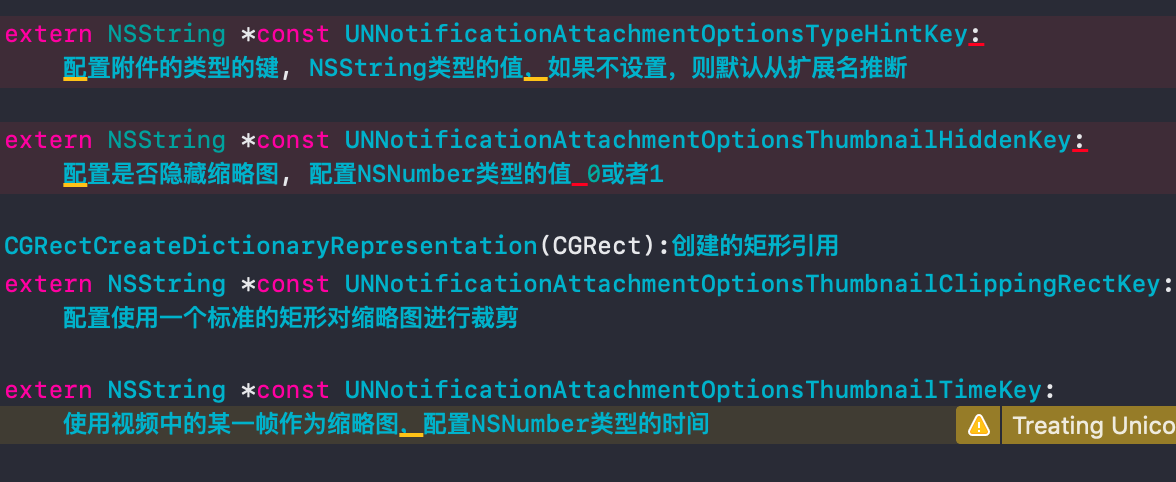
- 附件资源放置位置Bundle目录下

3、权限申请 和 附件资源包位置(Bundle目录下)
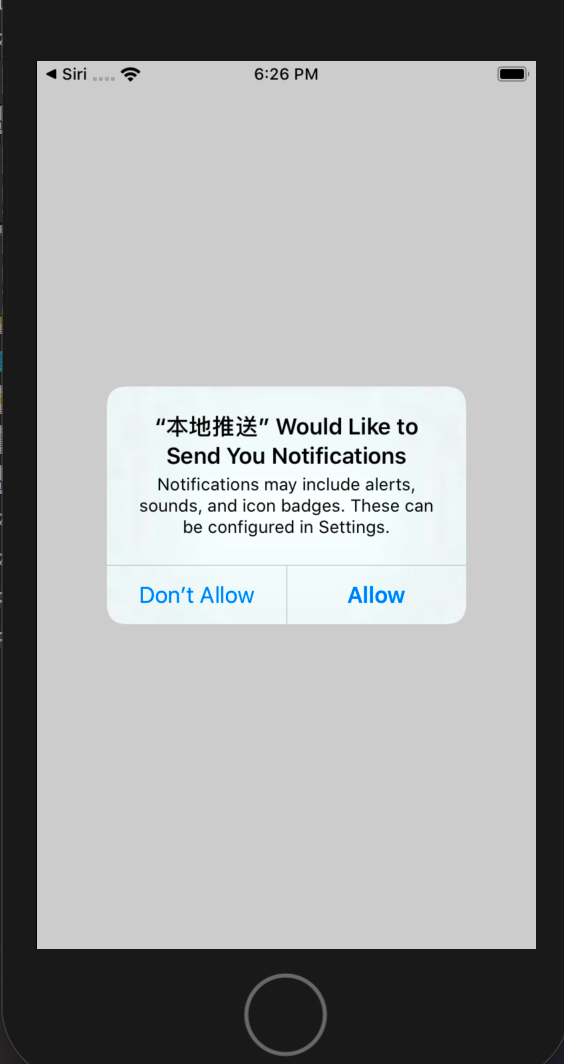
//进行用户权限申请

[[UNUserNotificationCenter currentNotificationCenter] requestAuthorizationWithOptions:UNAuthorizationOptionBadge|UNAuthorizationOptionSound|UNAuthorizationOptionAlert|UNAuthorizationOptionCarPlay completionHandler:^(BOOL granted, NSError * _Nullable error) {

        //在block中会传入布尔值granted,表示用户是否同意

        if (granted) {

            //如果用户申请权限成功,则可以设置通知中心的代理

            //[UNUserNotificationCenter currentNotificationCenter].delegate = self;

            //添加通知

            [self addNormalLocationNotification];

        }

    }];
4、创建通知
4-1:普通通知
/// 创建普通的通知

- (void)addNormalLocationNotification {

    //通知内容类

    UNMutableNotificationContent *content = [UNMutableNotificationContent new];

    //设置通知请求发送时APP图标上显示的数字

    content.badge = @;

    //设置通知的内容

    content.body = @"iOS10新通知内容,普通通知,欢迎哥来了";

    //设置通知提示音

    content.sound = [UNNotificationSound defaultSound];

    //设置通知的副标题

    content.subtitle = @"这是通知副标题";

    //设置通知的标题

    content.title = @"这是通知标题";

    //设置从通知激活App时的lanunchImage图片

    content.launchImageName = @"lun";

    //设置触发器

    //1-计时器触发器:5s后执行

    UNTimeIntervalNotificationTrigger *timrTrigger = [UNTimeIntervalNotificationTrigger triggerWithTimeInterval: repeats:NO];

    //2-周期日历触发器

    /*

    NSDateComponents *components = [[NSDateComponents alloc] init];

    components.year = 2019;

    components.month = 11;

    components.day = 2;

    UNCalendarNotificationTrigger *calendarTrigger = [UNCalendarNotificationTrigger triggerWithDateMatchingComponents:components repeats:NO];

    //3-地域触发器

    CLRegion *region = [[CLCircularRegion alloc] initWithCenter:CLLocationCoordinate2DMake(33.0, 110.0) radius:100 identifier:@"region"];

    UNLocationNotificationTrigger *locationTrigger = [UNLocationNotificationTrigger triggerWithRegion:region repeats:NO];

    */

    //设置通知请求

    UNNotificationRequest *request = [UNNotificationRequest requestWithIdentifier:@"UNNotificationDefault" content:content trigger:timrTrigger];

    //添加通知请求

    [[UNUserNotificationCenter currentNotificationCenter] addNotificationRequest:request withCompletionHandler:^(NSError * _Nullable error) {

        if (!error) {

            NSLog(@"添加通知成功");

        }

    }];

}
4-2:图片通知
//创建图片附件通知

-(void)addImageAttachLocationNotification {

    /*

    attachments:虽然这是一个数组,但是系统的通知模板只能展示其中的一个附件,设置多个附件也不会有额外的效果,但是如果开发者自定义通知模板UI,

                次数组就派上用场了。

    */

    //通知内容类

    UNMutableNotificationContent *content = [UNMutableNotificationContent new];

    //设置图片附件

    UNNotificationAttachment *imageAttach = [UNNotificationAttachment attachmentWithIdentifier:@"imageAttach" URL:[NSURL fileURLWithPath:[[NSBundle mainBundle] pathForResource:@"image" ofType:@"jpg"]] options:nil error:nil];

    content.attachments = @[imageAttach];

    //设置通知请求发送时APP图标上显示的数字

    content.badge = @;

    //设置通知的内容

    content.body = @"iOS10新通知内容,图片附件通知,欢迎哥来了";

    //设置通知提示音

    content.sound = [UNNotificationSound defaultSound];

    //设置通知的副标题

    content.subtitle = @"这是通知副标题";

    //设置通知的标题

    content.title = @"这是通知标题";

    //设置从通知激活App时的lanunchImage图片

    content.launchImageName = @"lun";

    //设置触发器

    //计时器触发器:5s后执行

    UNTimeIntervalNotificationTrigger *timrTrigger = [UNTimeIntervalNotificationTrigger triggerWithTimeInterval: repeats:NO];

    //设置通知请求

    UNNotificationRequest *request = [UNNotificationRequest requestWithIdentifier:@"UNNotificationDefault" content:content trigger:timrTrigger];

    //添加通知请求

    [[UNUserNotificationCenter currentNotificationCenter] addNotificationRequest:request withCompletionHandler:^(NSError * _Nullable error) {

        if (!error) {

            NSLog(@"");

        }

    }];

}
4-3:音频通知
//创建音频附件通知

-(void)addAudioAttachLocationNotification {

    /*

     attachments:虽然这是一个数组,但是系统的通知模板只能展示其中的一个附件,设置多个附件也不会有额外的效果,但是如果开发者自定义通知模板UI,

                  次数组就派上用场了。

    */

    //通知内容类

    UNMutableNotificationContent *content = [UNMutableNotificationContent new];

    //设置图片附件

    UNNotificationAttachment *soundAttach = [UNNotificationAttachment attachmentWithIdentifier:@"soundAttach" URL:[NSURL fileURLWithPath:[[NSBundle mainBundle] pathForResource:@"sound" ofType:@"mp3"]] options:nil error:nil];

    content.attachments = @[soundAttach];

    //设置通知请求发送时APP图标上显示的数字

    content.badge = @;

    //设置通知的内容

    content.body = @"iOS10新通知内容,音频附件通知,欢迎哥来了";

    //设置通知提示音

    content.sound = [UNNotificationSound defaultSound];

    //设置通知的副标题

    content.subtitle = @"这是通知副标题";

    //设置通知的标题

    content.title = @"这是通知标题";

    //设置从通知激活App时的lanunchImage图片

    content.launchImageName = @"lun";

    //设置触发器

    //计时器触发器:5s后执行

    UNTimeIntervalNotificationTrigger *timrTrigger = [UNTimeIntervalNotificationTrigger triggerWithTimeInterval: repeats:NO];

    //设置通知请求

    UNNotificationRequest *request = [UNNotificationRequest requestWithIdentifier:@"UNNotificationDefault" content:content trigger:timrTrigger];

    //添加通知请求

    [[UNUserNotificationCenter currentNotificationCenter] addNotificationRequest:request withCompletionHandler:^(NSError * _Nullable error) {

        if (!error) {

            NSLog(@"");

        }

    }];

}
4-4:视频通知
//创建视频附件通知

-(void)addMoiveAttachLocationNotification {

    /*

     attachments:虽然这是一个数组,但是系统的通知模板只能展示其中的一个附件,设置多个附件也不会有额外的效果,但是如果开发者自定义通知模板UI,

                  次数组就派上用场了。

    */

    //通知内容类

    UNMutableNotificationContent *content = [UNMutableNotificationContent new];

    //设置图片附件

    UNNotificationAttachment *moiveAttach = [UNNotificationAttachment attachmentWithIdentifier:@"moiveAttach" URL:[NSURL fileURLWithPath:[[NSBundle mainBundle] pathForResource:@"moive" ofType:@"mov"]] options:nil error:nil];

    content.attachments = @[moiveAttach];

    //设置通知请求发送时APP图标上显示的数字

    content.badge = @;

    //设置通知的内容

    content.body = @"iOS10新通知内容,视频附件通知,欢迎哥来了";

    //设置通知提示音

    content.sound = [UNNotificationSound defaultSound];

    //设置通知的副标题

    content.subtitle = @"这是通知副标题";

    //设置通知的标题

    content.title = @"这是通知标题";

    //设置从通知激活App时的lanunchImage图片

    content.launchImageName = @"lun";

    //设置触发器

    //计时器触发器:5s后执行

    UNTimeIntervalNotificationTrigger *timrTrigger = [UNTimeIntervalNotificationTrigger triggerWithTimeInterval: repeats:NO];

    //设置通知请求

    UNNotificationRequest *request = [UNNotificationRequest requestWithIdentifier:@"UNNotificationDefault" content:content trigger:timrTrigger];

    //添加通知请求

    [[UNUserNotificationCenter currentNotificationCenter] addNotificationRequest:request withCompletionHandler:^(NSError * _Nullable error) {

        if (!error) {

            NSLog(@"");

        }

    }];

}

5、使用模板
除了上面介绍的强大的附件通知外,我们还可以把UserNotification提供的模板功能和用户行为利用起来。在iOS系统中,聊天类软件常常采用后台推送的方式推送消息,用户可以在不进入应用程序的情况下,直接在桌面回复通过通知推送过来的消息,这种功能就是通过UNNotificationCategory和UNNotificationAction用户行为来实现的。对于文本回复框,UserNotification框架提供了UNTextInputNotificationAction类,也即UNNotificationAction的子类。
5-1:UNTextInputNotificationAction创建文本回复框
//支持在桌面对本地通知消息进行回复

-(void)supportLocationNotificationReply {

    //创建回复框

    //UNNotificationActionOptionAuthenticationRequired: 需要在解开锁屏后使用

    UNTextInputNotificationAction *inputAction = [UNTextInputNotificationAction actionWithIdentifier:@"action" title:@"回复" options:UNNotificationActionOptionAuthenticationRequired textInputButtonTitle:@"发送" textInputPlaceholder:@"请输入回复内容"];

    //创建通知模板

    UNNotificationCategory *category = [UNNotificationCategory categoryWithIdentifier:@"myNotificationCategoryText" actions:@[inputAction] intentIdentifiers:@[] options:UNNotificationCategoryOptionCustomDismissAction];

    //通知内容类

    UNMutableNotificationContent *content = [UNMutableNotificationContent new];

    //设置通知请求发送时APP图标上显示的数字

    content.badge = @;

    //设置通知的内容

    content.body = @"iOS10新通知内容,普通通知,欢迎哥来了,期待你的回复!!!!";

    //设置通知提示音

    content.sound = [UNNotificationSound defaultSound];

    //设置通知的副标题

    content.subtitle = @"这是通知副标题";

    //设置通知的标题

    content.title = @"这是通知标题";

    //设置从通知激活App时的lanunchImage图片

    content.launchImageName = @"lun";

    //设置通知模板

    //categoryIdentifier要与上面创建category的标识保持一致

    content.categoryIdentifier = @"myNotificationCategoryText";

    [[UNUserNotificationCenter currentNotificationCenter] setNotificationCategories:[NSSet setWithObjects:category, nil]];

    //设置触发器

    //计时器触发器:5s后执行

    UNTimeIntervalNotificationTrigger *timrTrigger = [UNTimeIntervalNotificationTrigger triggerWithTimeInterval: repeats:NO];

    //设置通知请求

    UNNotificationRequest *request = [UNNotificationRequest requestWithIdentifier:@"UNNotificationDefault" content:content trigger:timrTrigger];

    //添加通知请求

    [[UNUserNotificationCenter currentNotificationCenter] addNotificationRequest:request withCompletionHandler:^(NSError * _Nullable error) {

        if (!error) {

            NSLog(@"");

        }

    }];

}

5-2:UNNotificationAction创建用户交互按钮
//支持在桌面对本地通知进行按钮交互

-(void)supportLocationNotificationUserInterfaceButton {

    //创建交互按钮(系统模板最多支持添加4个交互按钮)

    //UNNotificationActionOptionNone: 无设置

    UNNotificationAction *action1 = [UNNotificationAction actionWithIdentifier:@"action" title:@"用户交互按钮1" options:UNNotificationActionOptionNone];

    UNNotificationAction *action2 = [UNNotificationAction actionWithIdentifier:@"action" title:@"用户交互按钮2" options:UNNotificationActionOptionNone];

    UNNotificationAction *action3 = [UNNotificationAction actionWithIdentifier:@"action" title:@"用户交互按钮3" options:UNNotificationActionOptionNone];

    UNNotificationAction *action4 = [UNNotificationAction actionWithIdentifier:@"action" title:@"用户交互按钮4" options:UNNotificationActionOptionNone];

    //创建通知模板

    UNNotificationCategory *category = [UNNotificationCategory categoryWithIdentifier:@"myNotificationCategoryButton" actions:@[action1,action2,action3,action4] intentIdentifiers:@[] options:UNNotificationCategoryOptionCustomDismissAction];

    //通知内容类

    UNMutableNotificationContent *content = [UNMutableNotificationContent new];

    //设置通知请求发送时APP图标上显示的数字

    content.badge = @;

    //设置通知的内容

    content.body = @"iOS10新通知内容,普通通知,欢迎哥来了!!!!";

    //设置通知提示音

    content.sound = [UNNotificationSound defaultSound];

    //设置通知的副标题

    content.subtitle = @"这是通知副标题";

    //设置通知的标题

    content.title = @"这是通知标题";

    //设置从通知激活App时的lanunchImage图片

    content.launchImageName = @"lun";

    //设置通知模板

    //categoryIdentifier要与上面创建category的标识保持一致

    content.categoryIdentifier = @"myNotificationCategoryButton";

    [[UNUserNotificationCenter currentNotificationCenter] setNotificationCategories:[NSSet setWithObjects:category, nil]];

    //设置触发器

    //计时器触发器:5s后执行

    UNTimeIntervalNotificationTrigger *timrTrigger = [UNTimeIntervalNotificationTrigger triggerWithTimeInterval: repeats:NO];

    //设置通知请求

    UNNotificationRequest *request = [UNNotificationRequest requestWithIdentifier:@"UNNotificationDefault" content:content trigger:timrTrigger];

    //添加通知请求

    [[UNUserNotificationCenter currentNotificationCenter] addNotificationRequest:request withCompletionHandler:^(NSError * _Nullable error) {

        if (!error) {

            NSLog(@"");

        }

    }];

}

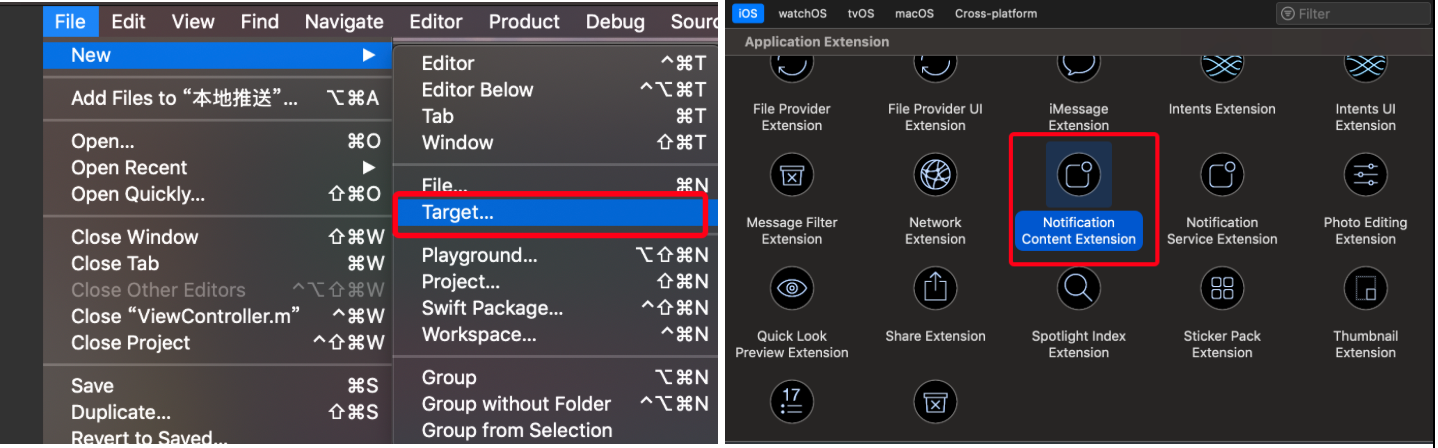
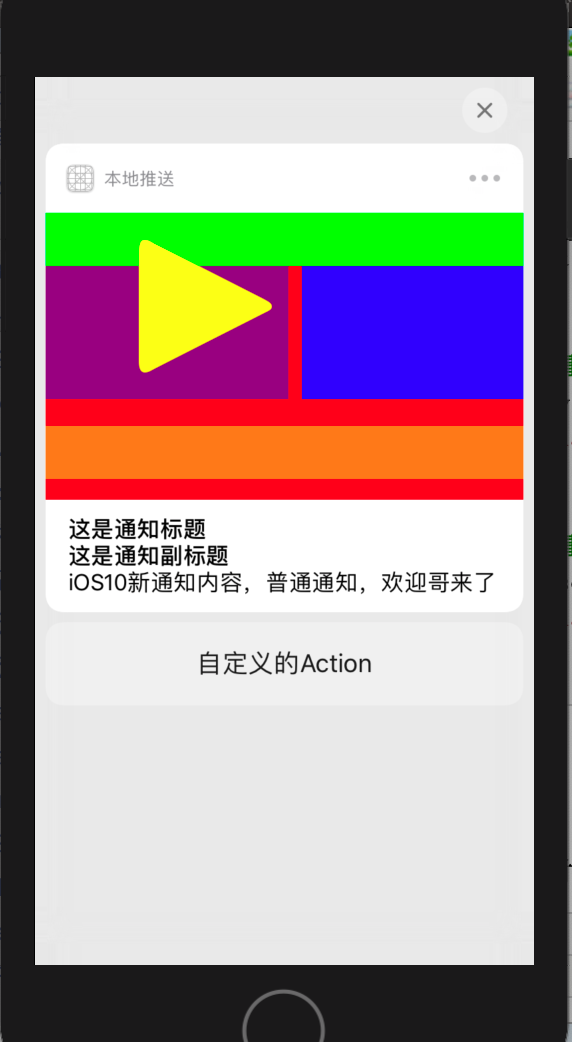
6、通知扩展
通过UserNotification框架,开发者已经可以完成从前很难实现的效果。然后这都不是这个框架最强大的地方,它的最强大的功能是通过扩展实现完全自定义的通过UI界面。也即Notification Content Extension。在项目新建一个Target后,然后选择Notification Content Extension扩展文件并创建,此时这个扩展文件自带了一个故事板storyBoard和一个NotificationViewCenter类,开发者可以在storyBoard中或者NotificationViewCenter中直接定制需要的UI界面即可,具体方法可以去看API。需要注意的是,NotificationViewCenter类自动遵守了UNNotificationContentExtension协议,这个协议专门用来处理自定义的通知UI的内容展示。
注意:
在自定义的的通知界面上,虽然可以放置按钮或者任何UI控件,但其不能进行用户交互,唯一可以进行交互的方式是通过协议中的媒体按钮及其回调方法。
//当用户点击通知中的用户交互按钮时会调用,开发者可以从notification对象中拿到附件等内容进行UI刷新

- (void)didReceiveNotification:(UNNotification *)notification;

- (void)didReceiveNotificationResponse:(UNNotificationResponse *)response completionHandler:(void (^)(UNNotificationContentExtensionResponseOption option))completion;

//返回媒体按钮位置

@property (nonatomic, readonly, assign) CGRect mediaPlayPauseButtonFrame;

//返回媒体按钮颜色

@property (nonatomic, readonly, copy) UIColor *mediaPlayPauseButtonTintColor;

//点击播放和暂停播放按钮的回调

- (void)mediaPlay;

- (void)mediaPause;

//打开和关闭通知的回调

- (void)performNotificationDefaultAction;

- (void)dismissNotificationContentExtension

//媒体开始播放和暂停的回调

- (void)mediaPlayingStarted;

- (void)mediaPlayingPaused .
当定义好通知的UI模板后,若要使用,还需要在Notification Content扩展中的info.plist文件的NSExtension的NSExtentionAttributes字典中进行一些配置。配置键如下:

6-1:创建扩展
6-2:配置plist

6-3:定制界面
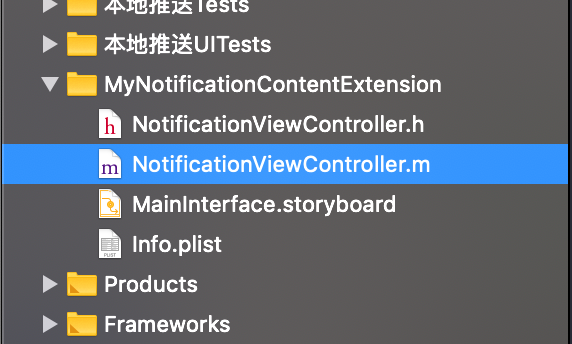
//  NotificationViewController.m

//  MyNotificationContentExtension

#import "NotificationViewController.h"

#import <UserNotifications/UserNotifications.h>

#import <UserNotificationsUI/UserNotificationsUI.h>

@interface NotificationViewController () <UNNotificationContentExtension>

@property (nonatomic, strong) UILabel      *customTitleLabel1;

@property (nonatomic, strong) UILabel      *customTitleLabel2;

@property (nonatomic, strong) UIImageView  *customImageView1;

@property (nonatomic, strong) UIImageView  *customImageView2;

@end

@implementation NotificationViewController

- (void)viewDidLoad {

    [super viewDidLoad];

    //屏幕宽

    CGFloat screen_width = [UIScreen mainScreen].bounds.size.width;

    self.view.backgroundColor = [UIColor redColor];

    //自定义Label

    self.customTitleLabel1 = [[UILabel alloc] initWithFrame:CGRectMake(, , screen_width, )];

    self.customTitleLabel1.textColor = [UIColor whiteColor];

    self.customTitleLabel1.textAlignment = NSTextAlignmentCenter;

    self.customTitleLabel1.backgroundColor = [UIColor greenColor];

    //自定义UIImageView

    self.customImageView1 = [[UIImageView alloc] initWithFrame:CGRectMake(, , screen_width/, )];

    self.customImageView2 = [[UIImageView alloc] initWithFrame:CGRectMake(screen_width/, , screen_width/, )];

    self.customImageView1.backgroundColor = [UIColor purpleColor];

    self.customImageView2.backgroundColor = [UIColor blueColor];

    //自定义Label

    self.customTitleLabel2 = [[UILabel alloc] initWithFrame:CGRectMake(, CGRectGetMaxY(self.customImageView1.frame)+, screen_width, )];

    self.customTitleLabel2.textColor = [UIColor whiteColor];

    self.customTitleLabel2.textAlignment = NSTextAlignmentCenter;

    self.customTitleLabel2.backgroundColor = [UIColor orangeColor];

    //添加控件

    [self.view addSubview:self.customTitleLabel1];

    [self.view addSubview:self.customTitleLabel2];

    [self.view addSubview:self.customImageView1];

    [self.view addSubview:self.customImageView2];

}

/**

收到通知时触发,但是这个是退出进程之后才使用,只适用于远程推送(所以本地推送,这两个方法是不会执行的)

拿到推送通知内容,刷新自定义的UI

*/

- (void)didReceiveNotification:(UNNotification *)notification {

    NSLog(@"notification---------%@",notification);

}

//用户交互时触发

- (void)didReceiveNotificationResponse:(UNNotificationResponse *)response completionHandler:(void (^)(UNNotificationContentExtensionResponseOption option))completion {

    NSLog(@"response----------%@",response);

}

@end
6-4:模板使用
//支持完全自定义UI的通知

-(void)supportCustomUILocationNotification {

    //创建交互按钮

    UNNotificationAction *action = [UNNotificationAction actionWithIdentifier:@"action" title:@"自定义的Action" options:UNNotificationActionOptionNone];

    //创建通知模板

    //"myNotificationCategory"要与plist中配置的保持一样

    UNNotificationCategory *category = [UNNotificationCategory categoryWithIdentifier:@"myNotificationCategory" actions:@[action] intentIdentifiers:@[] options:UNNotificationCategoryOptionCustomDismissAction];

    //通知内容类

    UNMutableNotificationContent *content = [UNMutableNotificationContent new];

    //设置通知请求发送时APP图标上显示的数字

    content.badge = @;

    //设置通知的内容

    content.body = @"iOS10新通知内容,普通通知,欢迎哥来了";

    //设置通知提示音

    content.sound = [UNNotificationSound defaultSound];

    //设置通知的副标题

    content.subtitle = @"这是通知副标题";

    //设置通知的标题

    content.title = @"这是通知标题";

    //设置从通知激活App时的lanunchImage图片

    content.launchImageName = @"lun";

    //设置通知模板

    //categoryIdentifier要与上面创建category的标识保持一致

    content.categoryIdentifier = @"myNotificationCategory";

    [[UNUserNotificationCenter currentNotificationCenter] setNotificationCategories:[NSSet setWithObjects:category, nil]];

    //设置触发器

    //计时器触发器:5s后执行

    UNTimeIntervalNotificationTrigger *timrTrigger = [UNTimeIntervalNotificationTrigger triggerWithTimeInterval: repeats:NO];

    //设置通知请求

    UNNotificationRequest *request = [UNNotificationRequest requestWithIdentifier:@"UNNotificationCustomUIH" content:content trigger:timrTrigger];

    //添加通知请求

    [[UNUserNotificationCenter currentNotificationCenter] addNotificationRequest:request withCompletionHandler:^(NSError * _Nullable error) {

        if (!error) {

            NSLog(@"");

        }

    }];

}

7、重写媒体按钮
#pragma mark - 重写媒体按钮

//重写媒体按钮的frame

- (CGRect)mediaPlayPauseButtonFrame {

    return CGRectMake(, , , );

}

//重写媒体按钮的颜色

- (UIColor *)mediaPlayPauseButtonTintColor {

    return [UIColor yellowColor];

}

//重写媒体按钮类型

- (UNNotificationContentExtensionMediaPlayPauseButtonType)mediaPlayPauseButtonType {

    return UNNotificationContentExtensionMediaPlayPauseButtonTypeDefault;

}

//接收媒体按钮播放事件

-(void)mediaPlay {

    NSLog(@"mediaPlay---------------开始播放");

}

//接收媒体按钮暂停事件

-(void)mediaPause {

    NSLog(@"mediaPause---------------暂停播放");
8、通知的代理方法
UserNotification框架对于通知的回调处理,是通过UNNotificationCenterDelegate协议来实现的。代理方法如下:
#pragma mark - UNUserNotificationCenterDelegate

/*

仅当应用程序在前台时,才会调用该方法。 如果未实现该方法或未及时调用该处理程序,则不会显示该通知。 应用程序可以选择将通知显示为声音,徽章,警报和/或显示在通知列表中。 该决定应基于通知中的信息是否对用户可见。

*/

- (void)userNotificationCenter:(UNUserNotificationCenter *)center willPresentNotification:(UNNotification *)notification withCompletionHandler:(void (^)(UNNotificationPresentationOptions options))completionHandler {

    NSLog(@"------------当前应用在前台,收到了通知消息----------------");

    completionHandler(UNNotificationPresentationOptionBadge | UNNotificationPresentationOptionSound | UNNotificationPresentationOptionAlert);

}

/*

当接收到通知后,在用户点击通知激活应用程序时调用这个方法,无论是在前台还是后台

*/

- (void)userNotificationCenter:(UNUserNotificationCenter *)center didReceiveNotificationResponse:(UNNotificationResponse *)response withCompletionHandler:(void(^)(void))completionHandler {

    NSLog(@"------------当前应用无论是在前台还是后台,收到了通知消息,用户点击该消息----------------");

    completionHandler();

}
-- ::47.618298+ 本地推送[:]

-- ::52.636497+ 本地推送[:] ------------当前应用在前台,收到了通知消息----------------

-- ::21.748096+ 本地推送[:] ------------当前应用无论是在前台还是后台,收到了通知消息,用户点击该消息----------------
iOS: 本地通知的前后变化(iOS10)的更多相关文章
- IOS 本地通知 UILocalNotification
IOS 本地通知 UILocalNotification [本文章第四部分中的代码逻辑来自网上的借鉴,并非我自己原创] 大概一个月前,我开始跟着做IOS项目了.学习C++,了解Objective-C, ...
- iOS 本地通知 操作
iOS 本地通知 操作 1:配置通知:然后退出程序: UILocalNotification *localNotif = [[UILocalNotification alloc] init]; loc ...
- xamarin.ios 本地通知推送
由于ios10版本以后UILocalNotification被标为弃用了,所以要添加新的本地通知推送功能,下面提供一些代码参考. 一.先在AppDelegate.cs上注册本地通知推送功能. publ ...
- IOS本地通知
发送通知: UILocalNotification *newNotification = [[UILocalNotification alloc] init]; if (newNotifica ...
- IOS本地通知:UILocalNotification使用记录
第一次接触IOS的本地通知的使用,看到别人写的一个比较详细的记录,自己整理过来,方便以后再次使用和拓展: 1.创建一个本地通知,添加到系统: // 初始化本地通知对象 UILocalNotificat ...
- IOS 本地通知推送消息
在现在的移动设备中,好多应用性的APP都用到了推送服务,但是有好多推送的内容,比如有的只是单纯的进行推送一个闹钟类型的,起了提醒作 用,有的则是推送的实质性的内容,这就分为推送的内容来区别用什么推送, ...
- IOS 本地通知
操作流程 1.接收通知 2.注册发送通知 用途:提示时间,闹钟 //接收本地通知(在Appdelegate里面实现) - (void)application:(UIApplication *)appl ...
- iOS(本地通知与远程通知)
iOS 推送通知有两种:本地推送.远程推送. 本地推送 : 在不需要联网的情况下,由APP发出推送,常用于某一时刻的通知,如闹钟.本地通送有局限性在于当APP处于后台或者退出时就无法发出通知. 远程 ...
- IOS 本地通知UILocalNotification
//发送通知 UILocalNotification *notification=[[UILocalNotification alloc] init]; if (notificati ...
随机推荐
- Linux(Centos7)下redis5集群搭建和使用
1.简要说明 2018年十月 Redis 发布了稳定版本的 5.0 版本,推出了各种新特性,其中一点是放弃 Ruby的集群方式,改为 使用 C语言编写的 redis-cli的方式,是集群的构建方式复杂 ...
- [Go] 实现websocket服务端
直接使用官方子包可以实现websocket协议, golang.org/x/net/websocket 如果在这个目录没有这个包就去github下载net库,放进这个目录$GOPATH/src/gol ...
- 每天学点HTML01
HTML背景 HTML 又叫超文本标记语言 ,诞生于20世纪90年代初 <html> <head><title>demo1</title> </h ...
- http并发访问模型(2)
目录 http并发 并发访问模型 响应流程 从IO的角度看待响应 从函数的角度看待响应 日志处理 我叫张贺,贪财好色.一名合格的LINUX运维工程师,专注于LINUX的学习和研究,曾负责某中型企业的网 ...
- 关于eclipse的maven项目Java Build Path中maven依赖报错问题
场景描述: respository仓库位置变动过,代码注解等报错 解决方法: 选中项目,点击maven ->update Project即可.
- 一年半前端工作经验试水杭州:我是如何拿下网易、阿里和滴滴 offer 的
前言 笔者毕业于东北大学,大学毕业社招进入环球网,前端开发工程师一职.技术栈:React+node,Github 地址 成果 来到杭州的目标非常的明确,大厂.其实就是网易.阿里和滴滴.好在基本三家都拿 ...
- 01-Java类加载机制详解
类的加载过程 在使用java命令运行主类(main)的时候,首先要通过类加载器将类加载到JVM内存中去.主类在运行过程中如果用到其他的类就会逐步加载这些类.jar包里的类并不是一次性加载的,是使用的时 ...
- HTML——CSS基础
一.引入CSS样式表 1.行内式 通过标记的style属性来设置元素的样式.基本语法如下: <标记名 style="属性1:属性值1; 属性2:属性值2; 属性3:属性值3;" ...
- Vue的MVVM框架理解
图示 只上图,请不要怪楼主懒. 这是楼主梳理后画的,因为毕竟自己画的印象深刻,更觉得香啊. 黄线: 表示View->Model, 红线: 表示Model->View 具体代码,请查看Vue ...
- IIFE,回调函数
回调函数: 当函数A作为一个参数在函数B中被调用时,就称A为B的回调函数 IIFE:匿名函数自调用 (function(){})() 作用:防止污染全局命名空间 隐藏实现