通俗易懂了解Vue组件的生命周期
1.前言
在使用vue2.0进行日常开发中,我们总有这样的需求,我就想在页面刚一加载出这个表格组件时就发送请求去后台拉取数据,亦或者我想在组件加载前显示个loading图,当组件加载出来就让这个loading图消失等等这样或那样的需求,要实现这些需求,最重要的一点就是我怎么知道这个组件什么时候加载,换句话说我该什么时候向后台发送请求,为了解决这种问题,组件的生命周期钩子函数就应运而生,博主自己作为一个vue2.0的初学者,以自己对vue2.0的组件生命周期的理解,力求以最通俗易懂的语言剖析vue2.0组件生命周期的各个过程,如有理解上的差错,还请大佬们不吝赐教,话不多说,现在开始。
2.生命周期图示
首先给出官方文档上的组件生命周期过程图示:
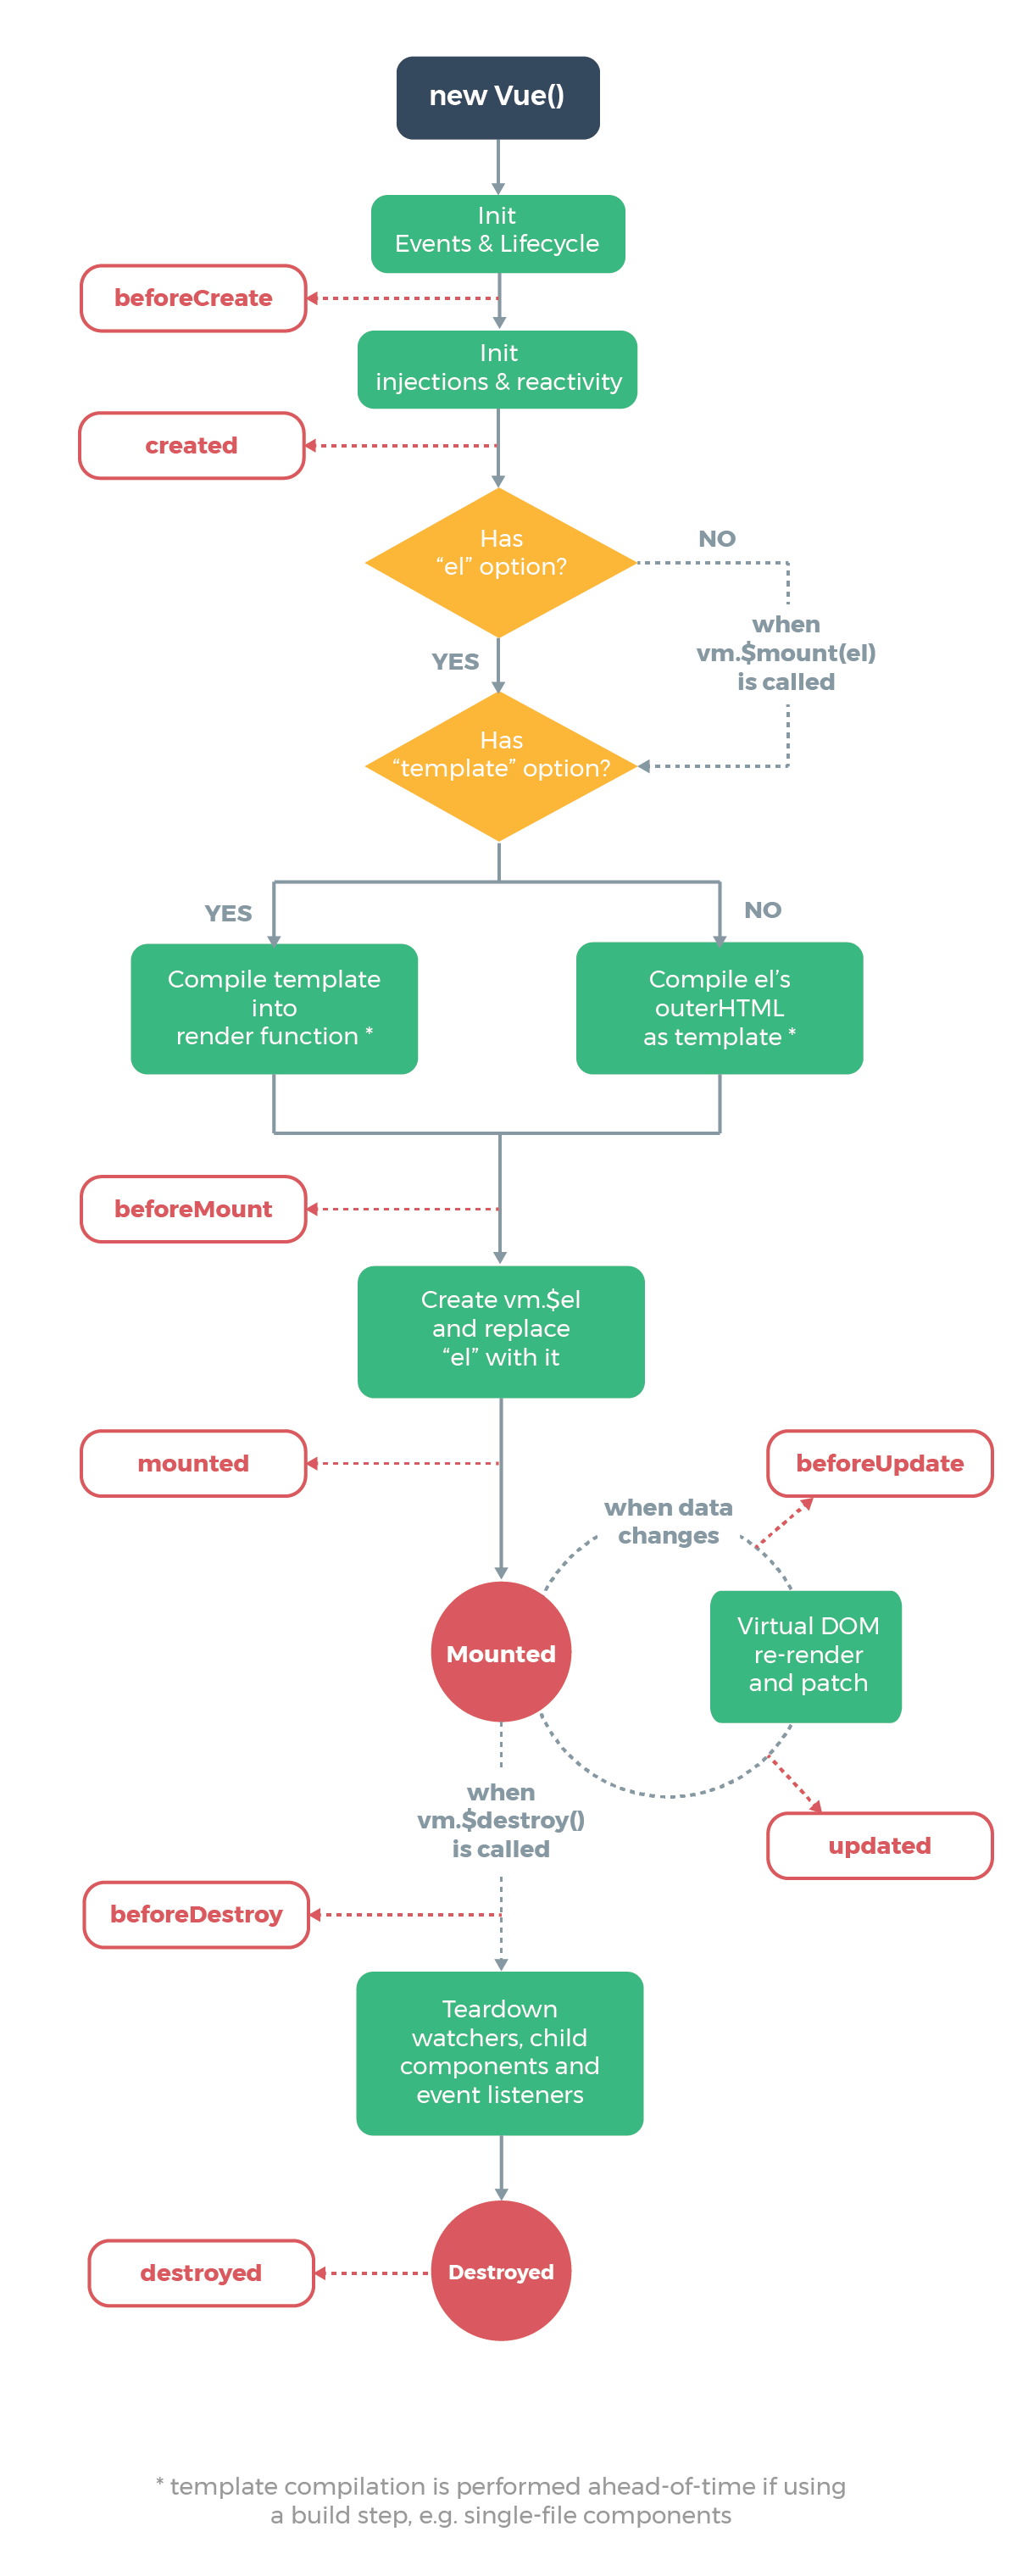
这是官方文档给出的一个组件从被创建出来到最后被销毁所要经历的一系列过程,所以这个过程也叫做一个组件的生命周期图。从图中我们可以看到,一个组件从被创建到最后被销毁,总共要经历以下8个过程:
- beforeCreate:组件创建之前
- created:组件创建完毕
- beforeMount:组件挂载之前
- mounted:组件挂载完毕
- beforeUpate:组件更新之前
- upated:组件更新完毕
- beforeDestoy:组件销毁之前
- destoyed:组件销毁完毕
3.代码演示
了解了组件生命周期各个过程后,我们放一波代码,真正的看一看一个组件从生到死到底经历了什么。
<!DOCTYPE html>

<html lang="en">

<head>

    <meta charset="UTF-8">

    <title>Title</title>

</head>

<body>

<div id="app">

    <h1>{{ message }}</h1>

</div>

<script src="vue.js"></script>

<script type="text/javascript">

    var app = new Vue({

        el: '#app',

        data: {

            message : "难凉热血——通俗易懂了解Vue2.0生命周期"

        },

        //组件创建之前

        beforeCreate(){

            console.group('beforeCreate 组件创建之前状态===============》');

            console.log("%c%s", "color:red" , "el     : " + this.$el);

            console.log("%c%s", "color:red","data   : " + this.$data);

            console.log("%c%s", "color:red","message: " + this.message)

        },

        //组件创建完毕

        created(){

            console.group('created 组件创建完毕状态===============》');

            console.log("%c%s", "color:red","el     : " + this.$el);

            console.log("%c%s", "color:red","data   : " + this.$data);

            console.log("%c%s", "color:red","message: " + this.message);

        },

        // 组件挂载之前

        beforeMount(){

            console.group('beforeMount 组件挂载之前状态===============》');

            console.log("%c%s", "color:red","el     : " + (this.$el));

            console.log(this.$el);

            console.log("%c%s", "color:red","data   : " + this.$data);

            console.log("%c%s", "color:red","message: " + this.message);

        },

        // 组件挂载完毕

        mounted(){

            console.group('mounted 组件挂载完毕状态===============》');

            console.log("%c%s", "color:red","el     : " + this.$el);

            console.log(this.$el);

            console.log("%c%s", "color:red","data   : " + this.$data);

            console.log("%c%s", "color:red","message: " + this.message);

        },

        // 组件更新之前

        beforeUpdate(){

            console.group('beforeUpdate 组件更新之前状态===============》');

            console.log("%c%s", "color:red","el     : " + this.$el);

            console.log(this.$el);

            console.log("%c%s", "color:red","data   : " + this.$data);

            console.log("%c%s", "color:red","message: " + this.message);

        },

        // 组件更新完毕

        updated(){

            console.group('updated 组件更新完毕状态===============》');

            console.log("%c%s", "color:red","el     : " + this.$el);

            console.log(this.$el);

            console.log("%c%s", "color:red","data   : " + this.$data);

            console.log("%c%s", "color:red","message: " + this.message);

        },

        // 组件销毁之前

        beforeDestroy(){

            console.group('beforeDestroy 组件销毁之前状态===============》');

            console.log("%c%s", "color:red","el     : " + this.$el);

            console.log(this.$el);

            console.log("%c%s", "color:red","data   : " + this.$data);

            console.log("%c%s", "color:red","message: " + this.message);

        },

        // 组件销毁完毕

        destroyed(){

            console.group('destroyed 组件销毁完毕状态===============》');

            console.log("%c%s", "color:red","el     : " + this.$el);

            console.log(this.$el);

            console.log("%c%s", "color:red","data   : " + this.$data);

            console.log("%c%s", "color:red","message: " + this.message)

        }

    })

</script>

</body>

</html>
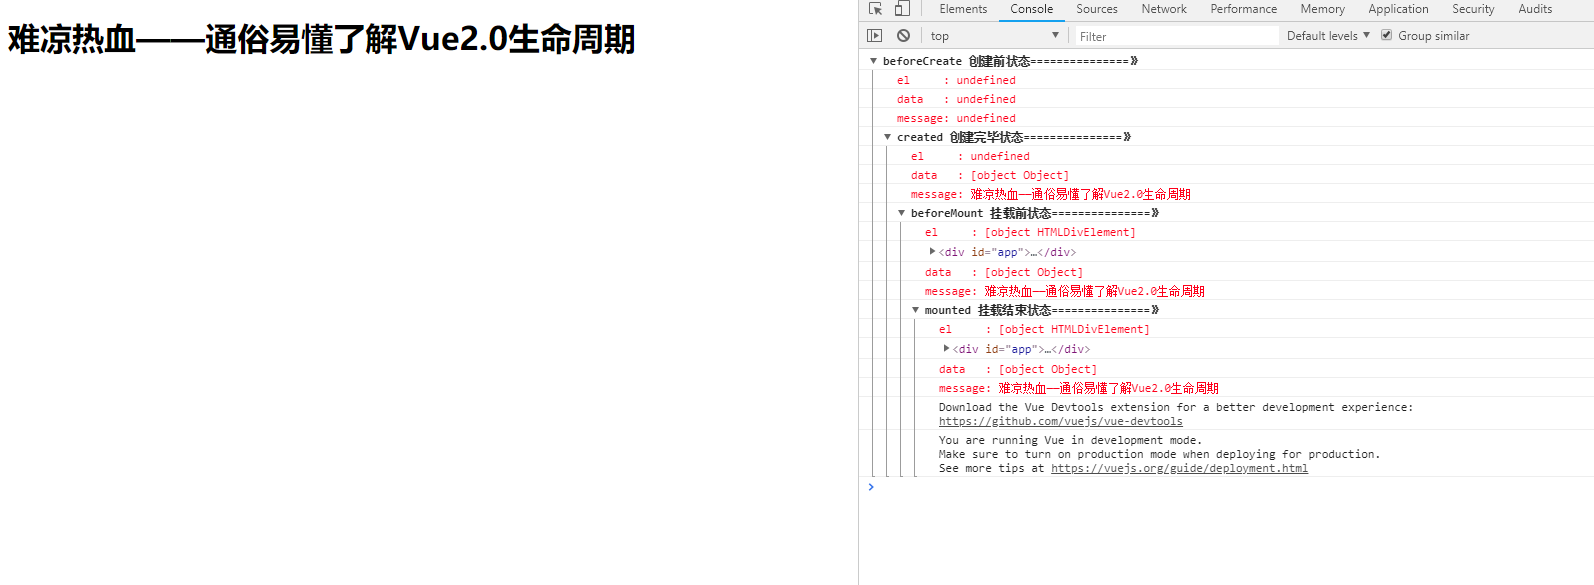
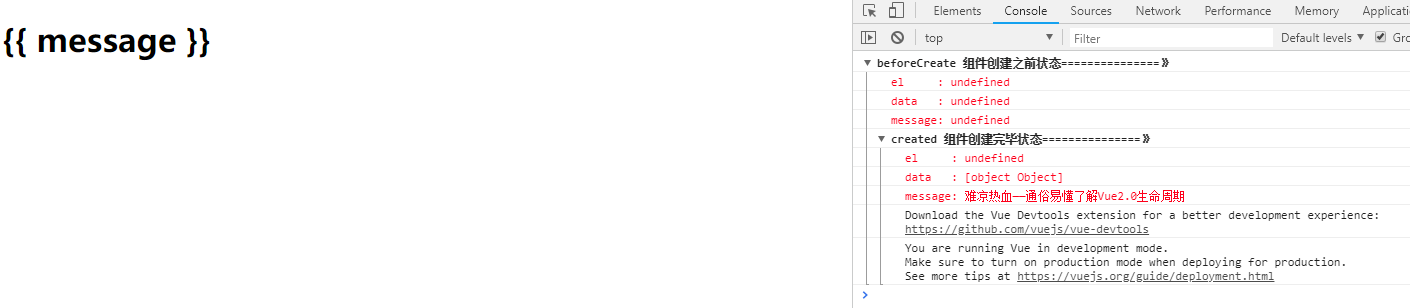
运行上面代码,我们在控制台中可以看到:
4.各个过程详解
4.1 beforeCreate和created
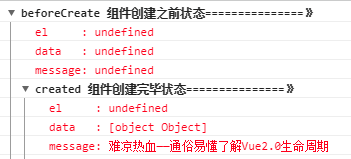
针对组件创建之前和组件创建完毕这两个过程,我们从控制台打印的结果中可以看出:
在组件创建之前beforeCreate:组件的el和data都未被创建。
在组件创建完毕后created:组件的数据data已经被创建好,但是el还处于未被创建状态。
4.2 beforeMount和mounted
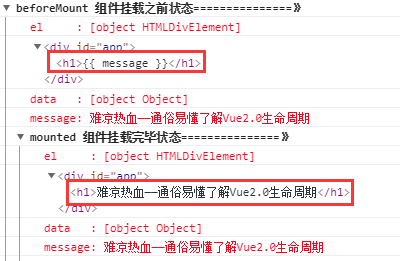
针对组件挂载之前和组件挂载完毕这两个过程,我们从控制台打印的结果中可以看出:
在组件挂载之前beforeMount:组件的el就会被创建,但是值得注意的是:虽然数据data里的message早已经被创建好,但是它还未被应用到真是的DOM元素中。
在组件挂载完毕mounted:组件的el,data都已经全部被创建好,并且data里的message也已经被正确的应用到DOM元素中。
4.3 beforeUpdate和updated
针对组件更新之前和组件更新完毕这两个过程,我们向控制台中输入以下一行代码:
app.message="十年饮冰,难凉热血"
接着,页面和控制台会变成如下样子:
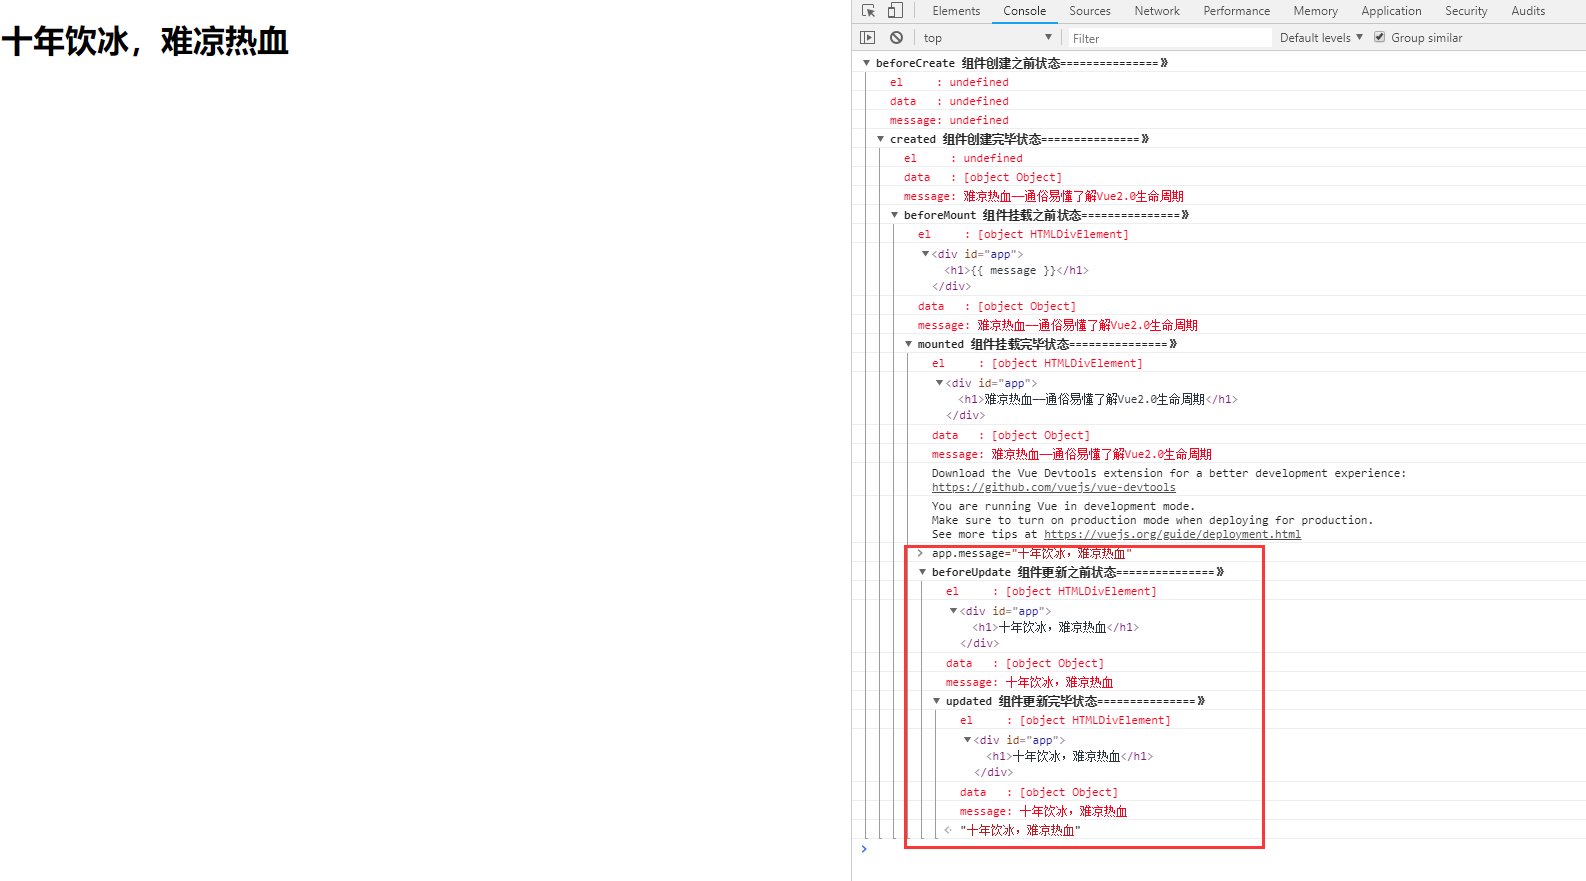
从图中我们可以看到,当我们将data里的message值改变之后,会触发组件的beforeUpdate和update钩子函数。
4.4 beforeDestroy和destroyed
针对组件销毁之前和组件销毁完毕这两个过程,我们向控制台中输入以下一行代码:
app.$destroy();
输入之后并回车,控制台发生了如下变化:

到此之后,整个组件便走完了自己的一生,从创建到被销毁,销毁之后,此时该组件将不再受vue管理,组件上的所有事件监听都会被移除,所以指令都会被解绑。
如若不信,我们再执行以下一行代码,试试再改变一下message的值,看看页面还会不会有什么变化:
app.message="组件真的被销毁了吗?"
执行结果如图:
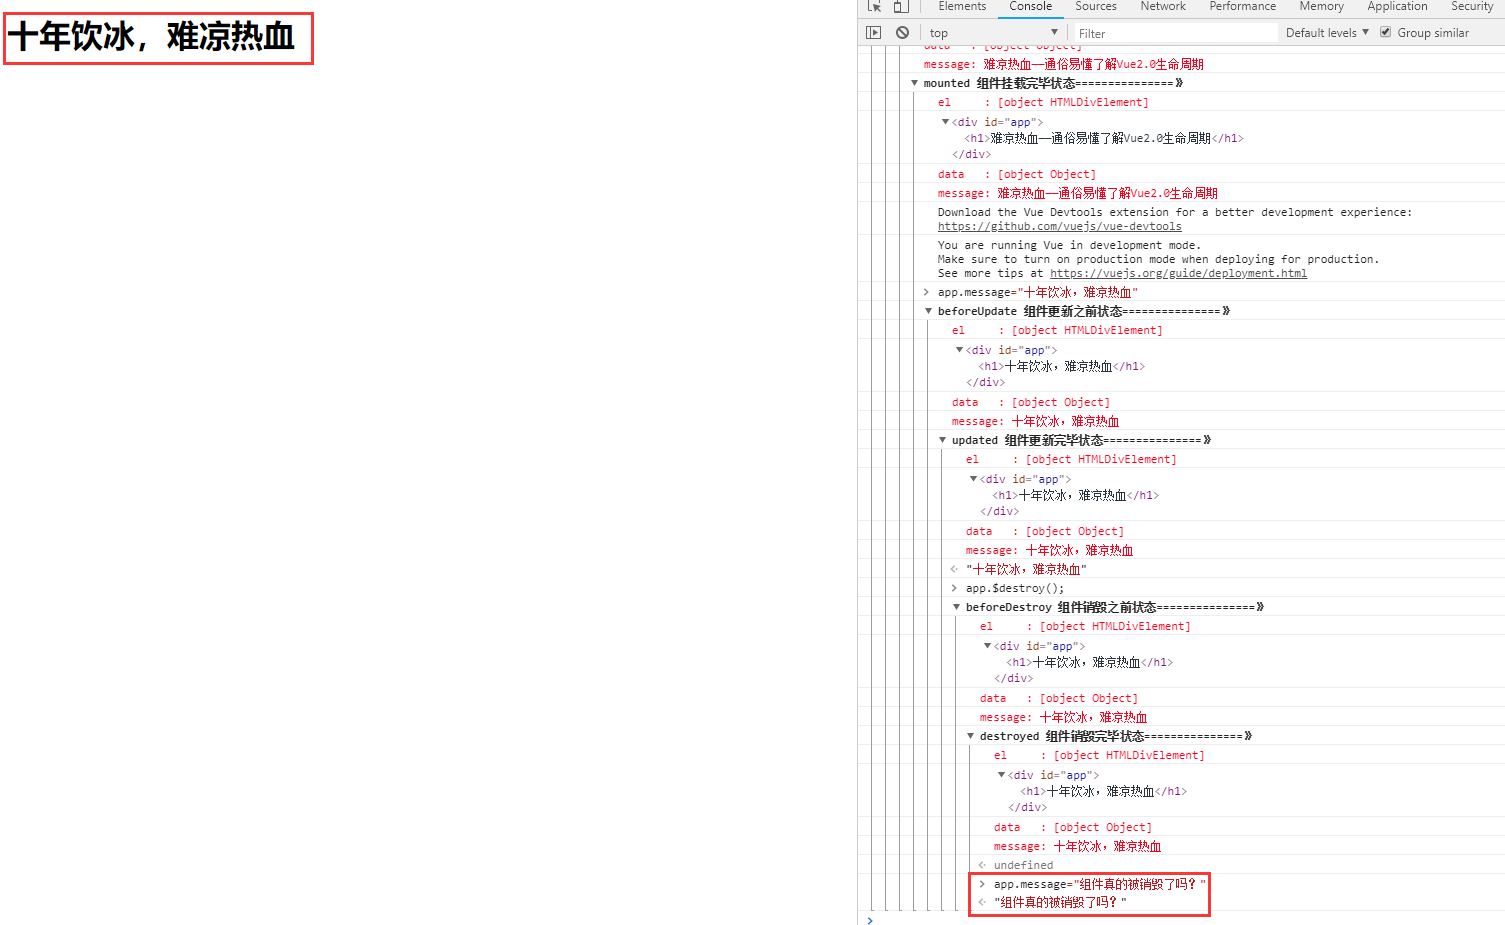
从图中我们可以看到,当组件被销毁之后,再怎么对组件进行操作已经全然无用了。
5.总结
以上就是vue2.0中组件生命周期钩子函数执行的各个过程以及执行的时机,但是这些钩子函数到底该怎么用呢?针对前言中提出的需求我们又该怎么解决呢?在这里,给大家举个例子:
例如有一个表格组件:
1.我们想在表格加载之前显示个loading图,那么我们可以在组件创建之前的钩子函数beforeCreate里面将loading图显示。
2.当组件加载出来,我们可以在created钩子函数里让这个loading图消失。
3.当表格被加载好之后我们想让它马上去拉取后台数据,那么我们可以在组件挂载之前的钩子函数beforeMount里面去发送请求。
。。。
6.遗留问题
针对官方文档中的组件生命周期流程图中的这一部分(下图所示),在上文中我们没有说明,有的同学还有一些疑问,我们在这里统一说明一下:
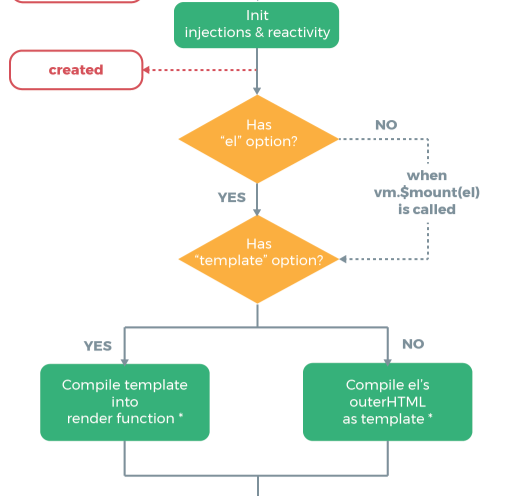
在组件创建之后created和组件被挂载之前beforeMount这期间,发生的事情还是蛮多的,我们一步一步分析一下:
6.1 是否有el选项
当组件被创建之后,vue首先会去查看vue实例(一个组件就是一个vue实例)内是否有el选项。如果有,则正常往下进行,那如果没有呢?我们来做做实验,看如下代码:
<!DOCTYPE html>

<html lang="en">

<head>

    <meta charset="UTF-8">

    <title>Title</title>

</head>

<body>

<div id="app">

    <h1>{{ message }}</h1>

</div>

<script src="vue.js"></script>

<script type="text/javascript">

    var app = new Vue({

        // el: '#app',

        data: {

            message : "难凉热血——通俗易懂了解Vue2.0生命周期"

        },

        //组件创建之前

        beforeCreate(){

            console.group('beforeCreate 组件创建之前状态===============》');

            console.log("%c%s", "color:red" , "el     : " + this.$el);

            console.log("%c%s", "color:red","data   : " + this.$data);

            console.log("%c%s", "color:red","message: " + this.message)

        },

        //组件创建完毕

        created(){

            console.group('created 组件创建完毕状态===============》');

            console.log("%c%s", "color:red","el     : " + this.$el);

            console.log("%c%s", "color:red","data   : " + this.$data);

            console.log("%c%s", "color:red","message: " + this.message);

        },

        // 组件挂载之前

        beforeMount(){

            console.group('beforeMount 组件挂载之前状态===============》');

            console.log("%c%s", "color:red","el     : " + (this.$el));

            console.log(this.$el);

            console.log("%c%s", "color:red","data   : " + this.$data);

            console.log("%c%s", "color:red","message: " + this.message);

        },

        // 组件挂载完毕

        mounted(){

            console.group('mounted 组件挂载完毕状态===============》');

            console.log("%c%s", "color:red","el     : " + this.$el);

            console.log(this.$el);

            console.log("%c%s", "color:red","data   : " + this.$data);

            console.log("%c%s", "color:red","message: " + this.message);

        },

        // 组件更新之前

        beforeUpdate(){

            console.group('beforeUpdate 组件更新之前状态===============》');

            console.log("%c%s", "color:red","el     : " + this.$el);

            console.log(this.$el);

            console.log("%c%s", "color:red","data   : " + this.$data);

            console.log("%c%s", "color:red","message: " + this.message);

        },

        // 组件更新完毕

        updated(){

            console.group('updated 组件更新完毕状态===============》');

            console.log("%c%s", "color:red","el     : " + this.$el);

            console.log(this.$el);

            console.log("%c%s", "color:red","data   : " + this.$data);

            console.log("%c%s", "color:red","message: " + this.message);

        },

        // 组件销毁之前

        beforeDestroy(){

            console.group('beforeDestroy 组件销毁之前状态===============》');

            console.log("%c%s", "color:red","el     : " + this.$el);

            console.log(this.$el);

            console.log("%c%s", "color:red","data   : " + this.$data);

            console.log("%c%s", "color:red","message: " + this.message);

        },

        // 组件销毁完毕

        destroyed(){

            console.group('destroyed 组件销毁完毕状态===============》');

            console.log("%c%s", "color:red","el     : " + this.$el);

            console.log(this.$el);

            console.log("%c%s", "color:red","data   : " + this.$data);

            console.log("%c%s", "color:red","message: " + this.message)

        }

    })

</script>

</body>

</html>
与之前代码不同的是,在上述代码中我们注释掉了这行代码:
// el: '#app',
我们再来运行一下,看看控制台结果:
从结果中,我们可以看到,当vue实例中没有el选项时,将不会再往下执行,意味着组件的生命周期就此中断,
但如何再次让组件起死回生呢,我们在控制台执行如下一行代码:
app.$mount(“#app”)
再看结果:
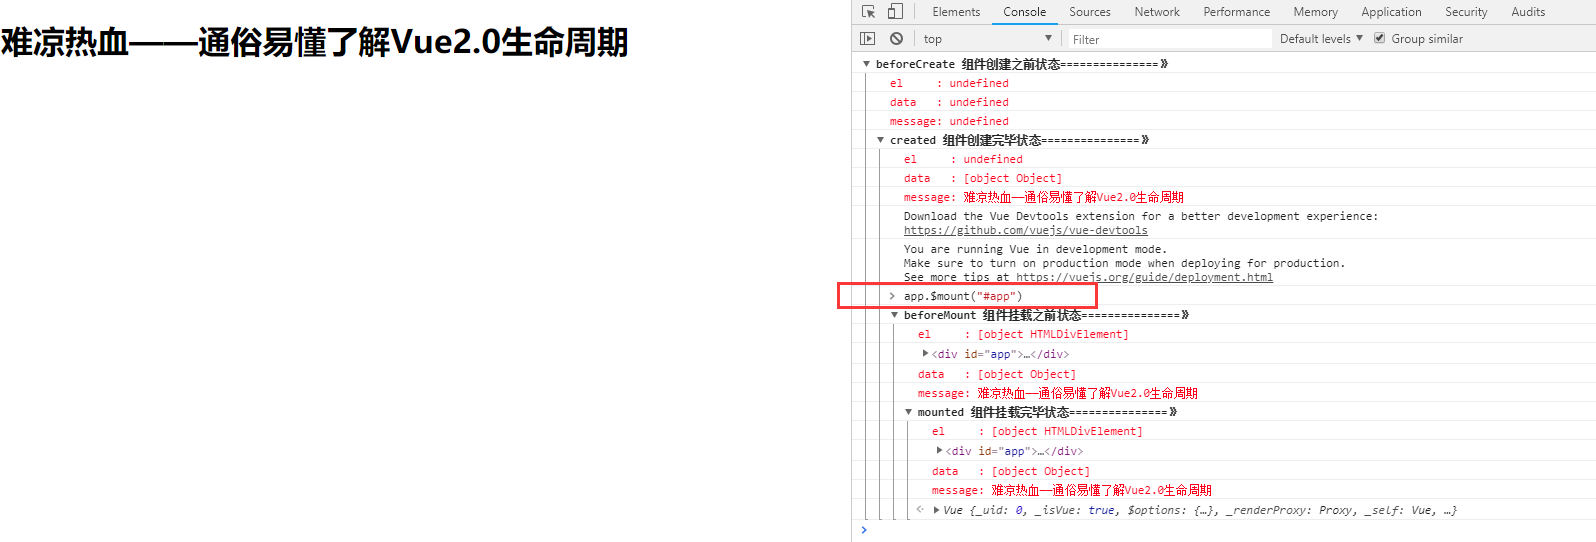
执行完后,我们可以看到,组件又继续往下生存了。
其实,vue实例内的el选项和app.$mount(“#app”)都是在告诉vue实例组件该挂载到哪个DOM节点上。
因此,当vue在发现vue实例内没有el选项时,就会中断组件的生命周期,直到明确了组件该挂载到哪个DOM节点上后再继续往下执行。
6.2 是否有template选项
继续往下看,在解决了vue实例内是否有el选项之后,vue还会查看实例内是否有template选项。在之前的代码中,我们在vue实例内没有加template选项,而是把template写在实例外面,接下来,我们在实例内外都加上template,看看有什么区别,看如下代码:
<!DOCTYPE html>

<html lang="en">

<head>

    <meta charset="UTF-8">

    <title>Title</title>

</head>

<body>

<div id="app">

    <h1>这是vue实例外的template:{{ message }}</h1>

</div>

<script src="vue.js"></script>

<script type="text/javascript">

    var app = new Vue({

        el: '#app',

        data: {

            message : "难凉热血——通俗易懂了解Vue2.0生命周期"

        },

        template:"<h1>这是vue实例内的template: {{ message }}</h1>",

        //组件创建之前

        beforeCreate(){

            console.group('beforeCreate 组件创建之前状态===============》');

            console.log("%c%s", "color:red" , "el     : " + this.$el);

            console.log("%c%s", "color:red","data   : " + this.$data);

            console.log("%c%s", "color:red","message: " + this.message)

        },

        //组件创建完毕

        created(){

            console.group('created 组件创建完毕状态===============》');

            console.log("%c%s", "color:red","el     : " + this.$el);

            console.log("%c%s", "color:red","data   : " + this.$data);

            console.log("%c%s", "color:red","message: " + this.message);

        },

        // 组件挂载之前

        beforeMount(){

            console.group('beforeMount 组件挂载之前状态===============》');

            console.log("%c%s", "color:red","el     : " + (this.$el));

            console.log(this.$el);

            console.log("%c%s", "color:red","data   : " + this.$data);

            console.log("%c%s", "color:red","message: " + this.message);

        },

        // 组件挂载完毕

        mounted(){

            console.group('mounted 组件挂载完毕状态===============》');

            console.log("%c%s", "color:red","el     : " + this.$el);

            console.log(this.$el);

            console.log("%c%s", "color:red","data   : " + this.$data);

            console.log("%c%s", "color:red","message: " + this.message);

        },

        // 组件更新之前

        beforeUpdate(){

            console.group('beforeUpdate 组件更新之前状态===============》');

            console.log("%c%s", "color:red","el     : " + this.$el);

            console.log(this.$el);

            console.log("%c%s", "color:red","data   : " + this.$data);

            console.log("%c%s", "color:red","message: " + this.message);

        },

        // 组件更新完毕

        updated(){

            console.group('updated 组件更新完毕状态===============》');

            console.log("%c%s", "color:red","el     : " + this.$el);

            console.log(this.$el);

            console.log("%c%s", "color:red","data   : " + this.$data);

            console.log("%c%s", "color:red","message: " + this.message);

        },

        // 组件销毁之前

        beforeDestroy(){

            console.group('beforeDestroy 组件销毁之前状态===============》');

            console.log("%c%s", "color:red","el     : " + this.$el);

            console.log(this.$el);

            console.log("%c%s", "color:red","data   : " + this.$data);

            console.log("%c%s", "color:red","message: " + this.message);

        },

        // 组件销毁完毕

        destroyed(){

            console.group('destroyed 组件销毁完毕状态===============》');

            console.log("%c%s", "color:red","el     : " + this.$el);

            console.log(this.$el);

            console.log("%c%s", "color:red","data   : " + this.$data);

            console.log("%c%s", "color:red","message: " + this.message)

        }

    })

</script>

</body>

</html>
运行结果:

从结果中,我们可以看到:
当vue实例内有template选项时,vue会优先使用实力内的template,而外部的template将不会被使用;当vue实例内没有template选项时,才会使用外部的template。
至此,vue2.0组件生命周期说明完毕。
(完)
通俗易懂了解Vue组件的生命周期的更多相关文章
- vue组件的生命周期
先来张组件生命周期的示意图: 文档里是这样描述的:你不需要立马弄明白所有的东西,不过以后它会有帮助.传送门. Vue2.0的生命周期钩子一共有10个,同样结合官方文档作出了下表 生命周期钩子 详细 b ...
- vue组件的生命周期详解
1.生命周期&生命周期函数 生命周期:指一个组件从创建->运行->销毁的整个阶段,强调的是一个时间段. 生命周期函数:由vue框架提供的内置函数,会伴随着组件的生命周期,自动按序执 ...
- vue学习之生命周期和钩子函数
参考文章:Vue2.0 探索之路——生命周期和钩子函数的一些理解 抛出问题: 我们有时候会在几个钩子函数里做一些事情,那么什么时候做,该在哪个函数里做? 生命周期简介 结合代码看el 和 data以及 ...
- vue的组件和生命周期
Vue里组件的通信 通信:传参.控制.数据共享(A操控B做一个事件) 模式:父子组件间.非父子组件 父组件可以将一条数据传递给子组件,这条数据可以是动态的,父组件的数据更改的时候,子组件接收的也会变化 ...
- python 全栈开发,Day91(Vue实例的生命周期,组件间通信之中央事件总线bus,Vue Router,vue-cli 工具)
昨日内容回顾 0. 组件注意事项!!! data属性必须是一个函数! 1. 注册全局组件 Vue.component('组件名',{ template: `` }) var app = new Vue ...
- Vue之组件的生命周期
<!DOCTYPE html> <html lang="en"> <head> <meta charset="UTF-8&quo ...
- 《微信小程序七日谈》- 第三天:玩转Page组件的生命周期
<微信小程序七日谈>系列文章: 第一天:人生若只如初见: 第二天:你可能要抛弃原来的响应式开发思维: 第三天:玩转Page组件的生命周期: 第四天:页面路径最多五层?导航可以这么玩 前两篇 ...
- Vue01 Vue介绍、Vue使用、Vue实例的创建、数据绑定、Vue实例的生命周期、差值与表达式、指令与事件、语法糖
1 Vue介绍 1.1 官方介绍 vue是一个简单小巧的渐进式的技术栈,它提供了Web开发中常用的高级功能:视图和数据的解耦.组件的服用.路由.状态管理.虚拟DOM 说明:简单小巧 -> 压缩后 ...
- Vue.js-07:第七章 - Vue 实例的生命周期
一.前言 在之前的 Vue 学习中,我们在使用 Vue 时,都会创建一个 Vue 的实例,而每个 Vue 实例在被创建时都要经过一系列的初始化过程.例如,需要设置数据监听.编译模板.将实例挂载到 D ...
随机推荐
- 服务网关Spring Cloud Zuul
Spring Cloud Zuul 开发环境 idea 2019.1.2 jdk1.8.0_201 Spring Boot 2.1.9.RELEASE Spring Cloud Greenwich S ...
- 某CTF平台一道PHP代码审计
这道题不是说太难,但是思路一定要灵活,灵活的利用源码中给的东西.先看一下源码. 首先要理解大意. 这段源码的大致的意思就是,先将flag的值读取放在$flag里面. 后面再接受你输入的值进行判断(黑名 ...
- 数据表管理admin
知识预览 admin组件使用 admin源码解析 回到顶部 admin组件使用 Django 提供了基于 web 的管理工具. Django 自动管理工具是 django.contrib 的一部分.你 ...
- spring5 源码深度解析----- 事务的回滚和提交(100%理解事务)
上一篇文章讲解了获取事务,并且通过获取的connection设置只读.隔离级别等,这篇文章讲解剩下的事务的回滚和提交 回滚处理 之前已经完成了目标方法运行前的事务准备工作,而这些准备工作最大的目的无非 ...
- wx.navigateTo、wx.redirectTo、wx.reLaunch、wx.switchTab和wx.navigateBack的区别
wx.navigateTo.wx.redirectTo.wx.reLaunch.wx.switchTab和wx.navigateBack有什么区别呢? **wx.navigateTo:** 用于保留当 ...
- AWVS安全渗透扫描
1.打开软件,点击New Scan 2.在website url中输入被扫描的网址,点击next 3.在scanning profile中选择测试的漏洞类型,默认选择default(默认) 在scan ...
- LeetCode初级算法--链表02:合并两个有序链表
LeetCode初级算法--链表02:合并两个有序链表 搜索微信公众号:'AI-ming3526'或者'计算机视觉这件小事' 获取更多算法.机器学习干货 csdn:https://blog.csdn. ...
- Redis系列(一):Redis简介
一.Redis概述 Redis是一个开源(遵循BSD协议)Key-Value数据结构的内存存储系统,用作数据库.缓存和消息代理.它支持5种数据结构:字符串string.哈希hash.列表list.集合 ...
- 帝国CMS 6.5功能解密:网站安全防火墙使用说明
有关帝国CMS新版防火墙介绍可以查看:http://bbs.phome.net/showthread-13-136169-0.html 本文为大家讲解如何使用网站防火墙:一.配置“网站防火墙”有下面两 ...
- CTF-SMB渗透
环境 Kali ip 192.168.56.102 Smb 靶机ip 192.168.56.103 靶场下载: 链接:https://pan.baidu.com/s/1OwNjBf7ZEGmFlRq ...