SpringBoot启动原理(基于2.3.9.RELEASE版本)
版本
以下源码的 SpringBoot 版本:2.3.9.RELEASE。
总体上
分为两大步:
- 启动类上注解:@SpringBootApplication
- 启动类中的main方法:org.springframework.boot.SpringApplication#run(java.lang.Class<?>, java.lang.String...)
main方法上的注解:@SpringBootApplication
源码
三个注解核心注解:@SpringBootConfiguration,@EnableAutoConfiguration和@ComponentScan。
@Target(ElementType.TYPE)

@Retention(RetentionPolicy.RUNTIME)

@Documented

@Inherited

@SpringBootConfiguration

@EnableAutoConfiguration

@ComponentScan(excludeFilters = { @Filter(type = FilterType.CUSTOM, classes = TypeExcludeFilter.class),

		@Filter(type = FilterType.CUSTOM, classes = AutoConfigurationExcludeFilter.class) })

public @interface SpringBootApplication {
@SpringBootConfiguration
根据Javadoc可知,该注解作用就是将当前的类作为一个JavaConfig,然后触发注解@EnableAutoConfiguration和@ComponentScan的处理,本质上与@Configuration注解没有区别。
@ComponentScan
扫描的 Spring 对应的组件,如 @Componet,@Repository。
我们可以通过 basePackages 等属性来细粒度的定制 @ComponentScan 自动扫描的范围,如果不指定,则默认Spring框架实现会从声明 @ComponentScan 所在类的package进行扫描,所以 SpringBoot 的启动类最好是放在根package下,我们自定义的类就放在对应的子package下,这样就可以不指定 basePackages。
@EnableAutoConfiguration
@EnableAutoConfiguration总结
@AutoConfigurationPackage
- 注册当前启动类的根 package
- 注册 org.springframework.boot.autoconfigure.AutoConfigurationPackages 的 BeanDefinition。
@Import(AutoConfigurationImportSelector.class)
- 可以看到实现了 DeferredImportSelector 接口,该接口继承自 ImportSelector,根据
Javadoc可知,多用于导入被 @Conditional 注解的Bean,之后会进行filter操作 - AutoConfigurationImportSelector.AutoConfigurationGroup#process 方法,
SpringBoot启动时会调用该方法,进行自动装配的处理,见SpringApplication#run(java.lang.String...)源码解析- SpringApplication#run(java.lang.String...)
- SpringApplication#refreshContext(即 Spring IOC 容器初始化的过程中)
- ConfigurationClassParser#parse
- AutoConfigurationImportSelector.AutoConfigurationGroup#process
- 通过SpringFactoriesLoader#loadFactoryNames获取应考虑的自动配置名称,例如来源于
spring-boot-autoconfigurejar包下的 META-INF/spring.factories 文件下的配置 - 通过 filter 过滤掉当前环境不需要自动装配的类,各种 @Conditional 不满足就被过滤掉
- 将需要自动装配的全路径类名注册到
SpringIOC容器,自此 SpringBoot 自动装配完成!
- 可以看到实现了 DeferredImportSelector 接口,该接口继承自 ImportSelector,根据
源码
@AutoConfigurationPackage

@Import(AutoConfigurationImportSelector.class)

public @interface EnableAutoConfiguration {
SpringBoot 自动装配的核心注解,在 Spring 框架中就提供了各种以@Enable开头的注解,例如: @EnableCircuitBreaker、@EnableScheduling等;
@EnableAutoConfiguration,借助@Import的支持,收集和注册特定场景相关的bean定义;
自动装配的类,通常是 @Configuration 类,通过 SpringFactoriesLoader 加载到 Spring 容器。
@AutoConfigurationPackage
注册当前启动类的根package;
注册 org.springframework.boot.autoconfigure.AutoConfigurationPackages 的BeanDefinition。
AutoConfigurationImportSelector
public class AutoConfigurationImportSelector implements DeferredImportSelector, BeanClassLoaderAware,

  ResourceLoaderAware, BeanFactoryAware, EnvironmentAware, Ordered {
可以看到实现了 DeferredImportSelector 接口,该接口继承自ImportSelector,根据Javadoc可知,多用于导入被@Conditional注解的Bean
DeferredImportSelector接口中有个process方法,SpringBoot启动时会调用该方法,进行自动装配的处理,大体流程如下:
- SpringApplication#run(java.lang.String...)
- SpringApplication#refreshContext
- ConfigurationClassParser#parse
- AutoConfigurationImportSelector.AutoConfigurationGroup#process
AutoConfigurationImportSelector.AutoConfigurationGroup#process方法的源码:
调用了AutoConfigurationImportSelector#getAutoConfigurationEntry方法,获取需要自动装配类
public void process(AnnotationMetadata annotationMetadata, DeferredImportSelector deferredImportSelector) {

 Assert.state(deferredImportSelector instanceof AutoConfigurationImportSelector,

   () -> String.format("Only %s implementations are supported, got %s",

     AutoConfigurationImportSelector.class.getSimpleName(),

     deferredImportSelector.getClass().getName()));

    // 获取需要自动装配类

 AutoConfigurationEntry autoConfigurationEntry = ((AutoConfigurationImportSelector) deferredImportSelector)

   .getAutoConfigurationEntry(annotationMetadata);

 this.autoConfigurationEntries.add(autoConfigurationEntry);

 for (String importClassName : autoConfigurationEntry.getConfigurations()) {

  this.entries.putIfAbsent(importClassName, annotationMetadata);

 }

}
AutoConfigurationImportSelector#getAutoConfigurationEntry大体流程如下:
通过SpringFactoriesLoader#loadFactoryNames获取应考虑的自动配置名称,例如来源于
spring-boot-autoconfigurejar包下的META-INF/spring.factories文件下的配置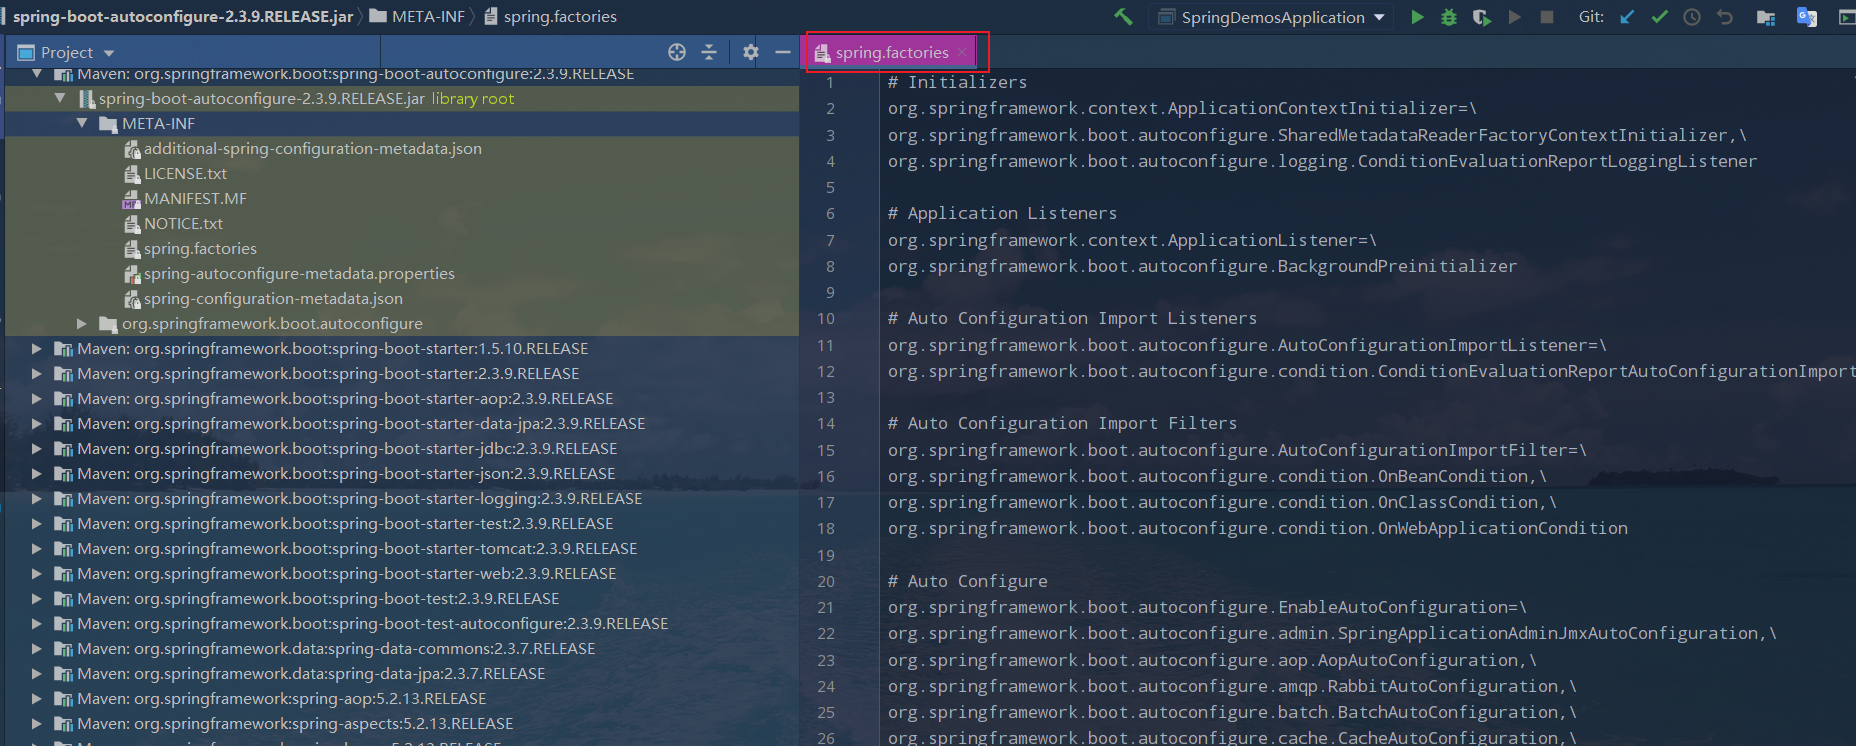
通过filter过滤掉当前环境不需要自动装配的类,比如没有集成RabbitMQ,就不需要,或者有的条件@Conditional不满足也不需要自动装配
返回需要自动装配的全路径类名
源码如下:
protected AutoConfigurationEntry getAutoConfigurationEntry(AnnotationMetadata annotationMetadata) {

 if (!isEnabled(annotationMetadata)) {

  return EMPTY_ENTRY;

 }

 AnnotationAttributes attributes = getAttributes(annotationMetadata);

    // 获取预先定义的应考虑的自动配置类名称

 List<String> configurations = getCandidateConfigurations(annotationMetadata, attributes);

 configurations = removeDuplicates(configurations);

 Set<String> exclusions = getExclusions(annotationMetadata, attributes);

 checkExcludedClasses(configurations, exclusions);

 configurations.removeAll(exclusions);

    // 通过filter过滤掉当前环境不需要自动装配的类,比如没有集成RabbitMQ,就不需要,或者有的条件@Conditional不满足也不需要自动装配

 configurations = getConfigurationClassFilter().filter(configurations);

 fireAutoConfigurationImportEvents(configurations, exclusions);

    // 返回需要自动装配的全路径类名

 return new AutoConfigurationEntry(configurations, exclusions);

}
AutoConfigurationImportSelector#getCandidateConfigurations源码如下:
protected List<String> getCandidateConfigurations(AnnotationMetadata metadata, AnnotationAttributes attributes) {

 List<String> configurations = SpringFactoriesLoader.loadFactoryNames(getSpringFactoriesLoaderFactoryClass(),

   getBeanClassLoader());

 Assert.notEmpty(configurations, "No auto configuration classes found in META-INF/spring.factories. If you "

   + "are using a custom packaging, make sure that file is correct.");

 return configurations;

}
通过SpringFactoriesLoader#loadFactoryNames获取应考虑的自动配置名称,通过META-INF/spring.factories下的配置,例如:
spring-boot-autoconfigure jar包下的
spring.factories文件: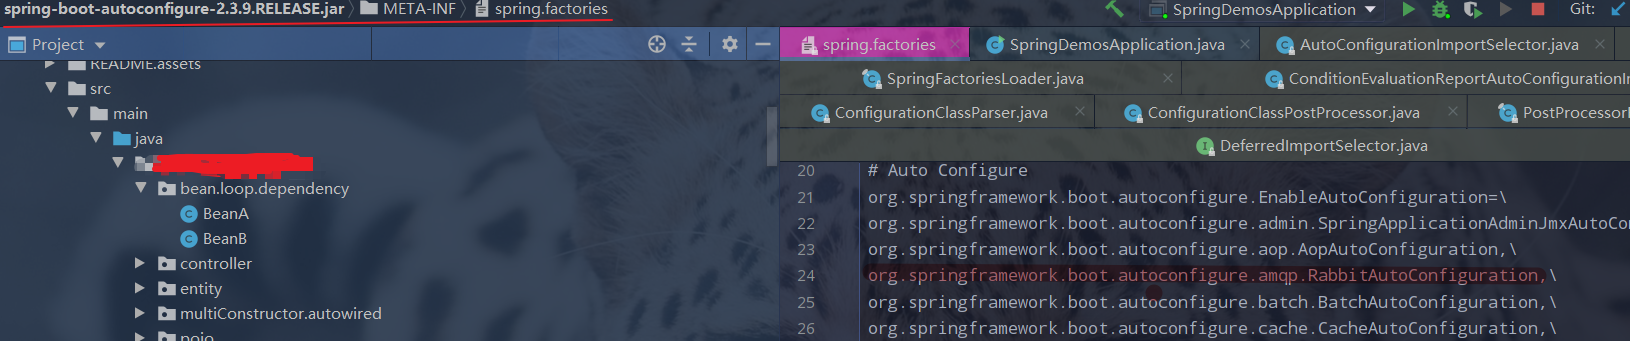
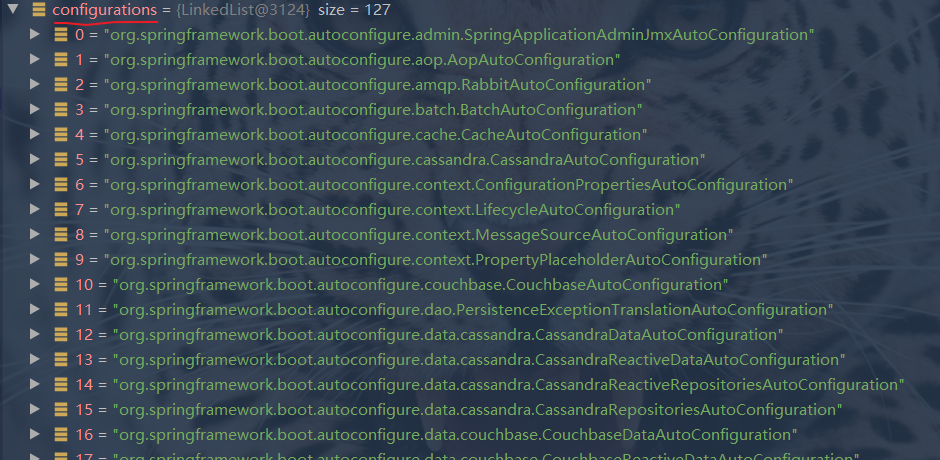
执行完
configurations = getConfigurationClassFilter().filter(configurations);之后,各种@Conditional不满足就被过滤掉,剩下35个了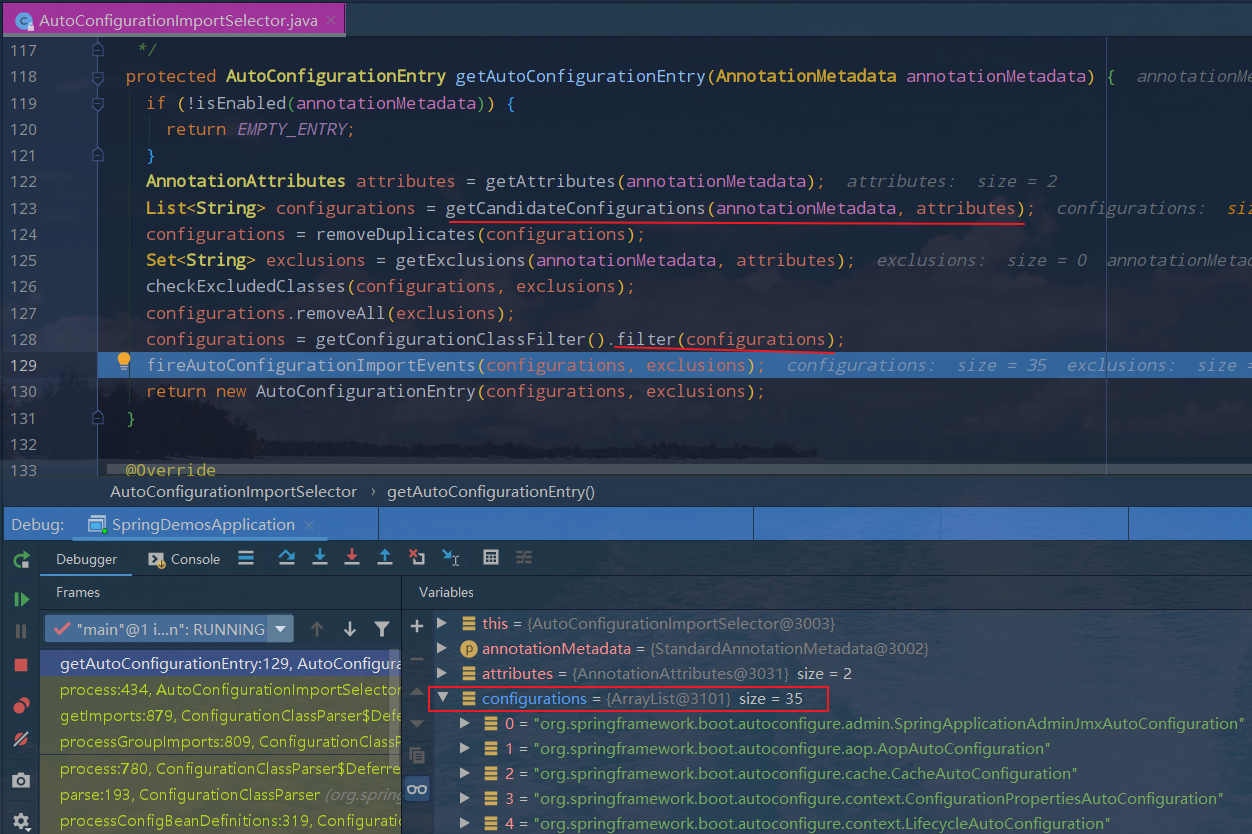
可以通过如下方法进行验证,结果没有
RabbitAutoConfiguration相关的Bean,抛出异常NoSuchBeanDefinitionException@SpringBootApplication
public class SpringDemosApplication implements ApplicationContextAware {
private static ApplicationContext applicationContext; public static void main(String[] args) {
SpringApplication.run(SpringDemosApplication.class, args);
System.out.println(applicationContext.getBean(AopAutoConfiguration.class));
System.out.println(applicationContext.getBean(RabbitAutoConfiguration.class));
} @Override
public void setApplicationContext(ApplicationContext applicationContext) throws BeansException {
SpringDemosApplication.applicationContext = applicationContext;
}
}
main方法
例子
main方法里调用org.springframework.boot.SpringApplication#run(java.lang.Class<?>, java.lang.String...)方法
@SpringBootApplication

public class SpringDemosApplication {

    public static void main(String[] args) {

        SpringApplication.run(SpringDemosApplication.class, args);

    }

}
SpringApplication#run
调用另外一个同名的重载方法run
public static ConfigurableApplicationContext run(Class<?> primarySource, String... args) {

 return run(new Class<?>[] { primarySource }, args);

}
实例化SpringApplication对象
- 首先会实例化SpringApplication一个对象
- 在构造方法里初始化一些属性,比如webApplicationType,比如"SERVLET",初始化一些listeners
public static ConfigurableApplicationContext run(Class<?>[] primarySources, String[] args) {

 return new SpringApplication(primarySources).run(args);

}
public SpringApplication(ResourceLoader resourceLoader, Class<?>... primarySources) {

 this.resourceLoader = resourceLoader;

 Assert.notNull(primarySources, "PrimarySources must not be null");

 this.primarySources = new LinkedHashSet<>(Arrays.asList(primarySources));

    // 初始化webApplicationType,比如"SERVLET"

 this.webApplicationType = WebApplicationType.deduceFromClasspath();

 setInitializers((Collection) getSpringFactoriesInstances(ApplicationContextInitializer.class));

    // 初始化一些listeners

 setListeners((Collection) getSpringFactoriesInstances(ApplicationListener.class));

 this.mainApplicationClass = deduceMainApplicationClass();

}
SpringApplication#run(java.lang.String...)源码解析
经典的观察者模式,只要你把事件广播的顺序理解了,那整个流程就很容易串起来了:
- 创建一个StopWatch实例,用来记录SpringBoot的启动时间
- 通过SpringFactoriesLoader加载listeners:比如EventPublishingRunListener
- 发布SprintBoot开始启动事件(EventPublishingRunListener#starting())
- 创建和配置environment(environmentPrepared())
- 打印SpringBoot的banner和版本
- 创建对应的ApplicationContext:Web类型,Reactive类型,普通的类型(非Web)
- prepareContext
- 准备ApplicationContext,Initializers设置到ApplicationContext(contextPrepared())
- 打印启动日志,打印profile信息(如dev, test, prod)
- 最终会调用到AbstractApplicationContext#refresh方法,实际上就是Spring IOC容器的创建过程,并且会进行自动装配的操作,以及发布ApplicationContext已经refresh事件,标志着ApplicationContext初始化完成(contextLoaded())
- afterRefresh hook方法
- stopWatch停止计时,日志打印总共启动的时间
- 发布SpringBoot程序已启动事件(started())
- 调用ApplicationRunner和CommandLineRunner
- 最后发布就绪事件ApplicationReadyEvent,标志着SpringBoot可以处理就收的请求了(running())
public ConfigurableApplicationContext run(String... args) {

    // 创建一个StopWatch实例,用来记录SpringBoot的启动时间

 StopWatch stopWatch = new StopWatch();

 stopWatch.start();

 ConfigurableApplicationContext context = null;

 Collection<SpringBootExceptionReporter> exceptionReporters = new ArrayList<>();

 configureHeadlessProperty();

    // 通过SpringFactoriesLoader加载listeners:比如EventPublishingRunListener

 SpringApplicationRunListeners listeners = getRunListeners(args);

    // 发布SprintBoot启动事件:ApplicationStartingEvent

 listeners.starting();

 try {

  ApplicationArguments applicationArguments = new DefaultApplicationArguments(args);

     // 创建和配置environment,发布事件:SpringApplicationRunListeners#environmentPrepared

  ConfigurableEnvironment environment = prepareEnvironment(listeners, applicationArguments);

  configureIgnoreBeanInfo(environment);

     // 打印SpringBoot的banner和版本

  Banner printedBanner = printBanner(environment);

     // 创建对应的ApplicationContext:Web类型,Reactive类型,普通的类型(非Web)

  context = createApplicationContext();

  exceptionReporters = getSpringFactoriesInstances(SpringBootExceptionReporter.class,

    new Class[] { ConfigurableApplicationContext.class }, context);

     // 准备ApplicationContext,Initializers设置到ApplicationContext后发布事件:ApplicationContextInitializedEvent

     // 打印启动日志,打印profile信息(如dev, test, prod)

     // 调用EventPublishingRunListener发布ApplicationContext加载完毕事件:ApplicationPreparedEvent

  prepareContext(context, environment, listeners, applicationArguments, printedBanner);

     // 最终会调用到AbstractApplicationContext#refresh方法,实际上就是Spring IOC容器的创建过程,并且会进行自动装配的操作

     // 以及发布ApplicationContext已经refresh事件,标志着ApplicationContext初始化完成

  refreshContext(context);

     // hook方法

  afterRefresh(context, applicationArguments);

     // stopWatch停止计时,日志打印总共启动的时间

  stopWatch.stop();

  if (this.logStartupInfo) {

   new StartupInfoLogger(this.mainApplicationClass).logStarted(getApplicationLog(), stopWatch);

  }

     // 发布SpringBoot程序已启动事件ApplicationStartedEvent

  listeners.started(context);

     // 调用ApplicationRunner和CommandLineRunner

  callRunners(context, applicationArguments);

 }

 catch (Throwable ex) {

  handleRunFailure(context, ex, exceptionReporters, listeners);

  throw new IllegalStateException(ex);

 }

 try {

     // 最后发布就绪事件ApplicationReadyEvent,标志着SpringBoot可以处理就收的请求了

  listeners.running(context);

 }

 catch (Throwable ex) {

  handleRunFailure(context, ex, exceptionReporters, null);

  throw new IllegalStateException(ex);

 }

 return context;

}
SpringBoot启动事件
SpringApplicationRunListeners的唯一实现是EventPublishingRunListener;
整个SpringBoot的启动,流程就是各种事件的发布,调用EventPublishingRunListener中的方法。
只要明白了EventPublishingRunListener中事件发布的流程,也就明白了SpringBoot启动的大体流程
EventPublishingRunListener
方法说明如下:
public class EventPublishingRunListener implements SpringApplicationRunListener, Ordered {

 private final SpringApplication application;

 private final String[] args;

 private final SimpleApplicationEventMulticaster initialMulticaster;

 public EventPublishingRunListener(SpringApplication application, String[] args) {

  this.application = application;

  this.args = args;

  this.initialMulticaster = new SimpleApplicationEventMulticaster();

  for (ApplicationListener<?> listener : application.getListeners()) {

   this.initialMulticaster.addApplicationListener(listener);

  }

 }

 @Override

 public int getOrder() {

  return 0;

 }

    // SpringBoot启动事件

 @Override

 public void starting() {

  this.initialMulticaster.multicastEvent(new ApplicationStartingEvent(this.application, this.args));

 }

    // 创建和配置环境

 @Override

 public void environmentPrepared(ConfigurableEnvironment environment) {

  this.initialMulticaster

    .multicastEvent(new ApplicationEnvironmentPreparedEvent(this.application, this.args, environment));

 }

    // 准备ApplicationContext

 @Override

 public void contextPrepared(ConfigurableApplicationContext context) {

  this.initialMulticaster

    .multicastEvent(new ApplicationContextInitializedEvent(this.application, this.args, context));

 }

    // 发布ApplicationContext已经refresh事件,标志着ApplicationContext初始化完成

 @Override

 public void contextLoaded(ConfigurableApplicationContext context) {

  for (ApplicationListener<?> listener : this.application.getListeners()) {

   if (listener instanceof ApplicationContextAware) {

    ((ApplicationContextAware) listener).setApplicationContext(context);

   }

   context.addApplicationListener(listener);

  }

  this.initialMulticaster.multicastEvent(new ApplicationPreparedEvent(this.application, this.args, context));

 }

    // SpringBoot已启动事件

 @Override

 public void started(ConfigurableApplicationContext context) {

  context.publishEvent(new ApplicationStartedEvent(this.application, this.args, context));

  AvailabilityChangeEvent.publish(context, LivenessState.CORRECT);

 }

    // "SpringBoot现在可以处理接受的请求"事件

 @Override

 public void running(ConfigurableApplicationContext context) {

  context.publishEvent(new ApplicationReadyEvent(this.application, this.args, context));

  AvailabilityChangeEvent.publish(context, ReadinessState.ACCEPTING_TRAFFIC);

 }

 @Override

 public void failed(ConfigurableApplicationContext context, Throwable exception) {

  ApplicationFailedEvent event = new ApplicationFailedEvent(this.application, this.args, context, exception);

  if (context != null && context.isActive()) {

   // Listeners have been registered to the application context so we should

   // use it at this point if we can

   context.publishEvent(event);

  }

  else {

   // An inactive context may not have a multicaster so we use our multicaster to

   // call all of the context's listeners instead

   if (context instanceof AbstractApplicationContext) {

    for (ApplicationListener<?> listener : ((AbstractApplicationContext) context)

      .getApplicationListeners()) {

     this.initialMulticaster.addApplicationListener(listener);

    }

   }

   this.initialMulticaster.setErrorHandler(new LoggingErrorHandler());

   this.initialMulticaster.multicastEvent(event);

  }

 }

 private static class LoggingErrorHandler implements ErrorHandler {

  private static final Log logger = LogFactory.getLog(EventPublishingRunListener.class);

  @Override

  public void handleError(Throwable throwable) {

   logger.warn("Error calling ApplicationEventListener", throwable);

  }

 }

}
SpringIOC 容器初始化过程
由于现在大都是用SpringBoot开发,所以呢,Spring IOC 初始化的源码,就是AnnotationConfigApplicationContext中的源码,IOC的初始化就是该类实例创建的过程。
创建的过程(AnnotationConfigApplicationContext的构造方法),由于debug过这个源码,我个人把它分为两大步(暂时我先写出我的总结,后续看是否有时间能写一篇关于debug的过程):
- 给我们的Bean,创建与之对应的BeanDefinition,然后把他们放入ConcurrentHashMap(key:beanName和value:beanDefinition)中;BeanDefinition实际上包括一些Bean的信息,比如BeanName, Scope, 是否被@Primary注解修饰,是否是@Lazy,以及@Description等注解
- refresh()方法: 创建IOC需要的资源
- 初始化BeanFactory, set一些属性,如BeanClassLoader,systemEnvironment
- 如果是SpringBoot程序,会调用方法进行自动装配:AutoConfigurationImportSelector.AutoConfigurationGroup#process,见:@EnableAutoConfiguration的总结
- 注册MessageSource,国际化相关的资源,到ApplicationContext
- 注册ApplicationListener到ApplicationContext
- 实例化化lazy-init的Bean
- 最后,publish相关的事件,ApplicationContext 就初始化完成,整个IOC容器初始化完成(IOC容器的本质就是初始化BeanFactory和ApplicationContext),就可以从IOC容器中获取Bean自动注入了
SpringBoot启动原理(基于2.3.9.RELEASE版本)的更多相关文章
- SpringBoot启动原理及相关流程
一.springboot启动原理及相关流程概览 springboot是基于spring的新型的轻量级框架,最厉害的地方当属自动配置.那我们就可以根据启动流程和相关原理来看看,如何实现传奇的自动配置 二 ...
- SpringBoot启动原理
SpringBoot启动原理 我们开发任何一个Spring Boot项目,都会用到如下的启动类: @SpringBootApplication public class Application { p ...
- 深度好文,springboot启动原理详细分析
我们开发任何一个Spring Boot项目,都会用到如下的启动类 1 @SpringBootApplication 2 public class Application { 3 public stat ...
- springboot启动原理解析
springboot核心原理: 1.基于springmvc无配置文件完全注解化 + 内置web容器实现springboot框架.main函数方式的启动 2.通过maven快速整合第三方框架 sprin ...
- SpringBoot启动原理分析
用了差不多两年的SpringBoot了,可以说对SpringBoot已经很熟了,但是仔细一想SpringBoot的启动流程,还是让自己有点懵逼,不得不说是自己工作和学习的失误,所以以此文对Spring ...
- SpringBoot启动原理详解
SpringBoot和Spring相比,有着不少优势,比如自动配置,jar直接运行等等.那么SpringBoot到底是怎么启动的呢? 下面是SpringBoot启动的入口: @SpringBootAp ...
- 带着萌新看springboot源码11(springboot启动原理 源码上)
通过前面这么多讲解,springboot原理应该也大概有个轮廓了,一些基本的配置,从客户端url到controller(配置一些要用的组件,servlet三大组件,处理器映射器,拦截器,视图解析器这些 ...
- [转]springboot启动原理
参考文章:https://www.jianshu.com/p/ef6f0c0de38f
- SpringBoot之旅第六篇-启动原理及自定义starter
一.引言 SpringBoot的一大优势就是Starter,由于SpringBoot有很多开箱即用的Starter依赖,使得我们开发变得简单,我们不需要过多的关注框架的配置. 在日常开发中,我们也会自 ...
- SpringBoot启动流程及其原理
Spring Boot.Spring MVC 和 Spring 有什么区别? 分别描述各自的特征: Spring 框架就像一个家族,有众多衍生产品例如 boot.security.jpa等等:但他们的 ...
随机推荐
- 探秘Transformer系列之(32)--- Lookahead Decoding
探秘Transformer系列之(32)--- Lookahead Decoding 目录 探秘Transformer系列之(32)--- Lookahead Decoding 0x00 概述 0x0 ...
- SQL 强化练习(三)
继续来练习 sql 查询, 似乎也没有什么窍门, 跟着写多了, 自然就记住了, 这个帖子, 来记录一波, 模糊查询 like; 四表关联查询: 老师名 -> 老师id -> 课程id -. ...
- WindowsPE文件格式入门02.选项头其它和节表
https://www.bpsend.net/thread-444-1-1.html 选项头 IMAGE_OPTIONAL_HEADER:以供操作系统加载PE文件使用,32位必选. 重要字段: DWO ...
- 【uni-app】在windows10系统中HBuliderX用iPhone苹果手机进行调试运行详细说明
测试准备: 1)iphone13 ios18.4.1 和一根可以读取数据的苹果线 2)HBuliderX打开uni-app项目文件(项目图标是正方形内一个U) 3)windows10系统 测试目标 ...
- AI生成应用:图片批量重命名工具 - 自动化整理您的图片库
图片批量重命名工具 - 自动化整理您的图片库 GitHub项目地址: https://github.com/dependon/renameImage 项目介绍 这是一个基于Python开发的图形界面工 ...
- 如何在 .NET 中构建一个好用的动态查询生成器
前言 自从.NET Framework 3.5提供了LINQ之后,集合数据查询基本被LINQ统一了.这大幅提高了编写数据查询代码的效率和质量,但是在需要编写动态查询的时候反而很困难,特别是最常用的wh ...
- 2023电赛E题代码
openmv: import sensor, image, time from pyb import LED, UART #import lcd import json, ustruct class ...
- 「Log」2023.8.16 小记
序幕 早上昏迷,九点才到校,少听了四道题,问题不大. 点咖啡喝. SAM 题也抽象.线段树合并,不会. 写个 AC 自动机板子. \(\color{royalblue}{P3808\ [模板]AC\ ...
- iStore实现 SmartDNS + AdGuard Home IP优选+广告屏蔽
iStore实现 SmartDNS + AdGuard Home IP优选+广告屏蔽 参考自openwrt 官方版 安装配置 AdGuard Home + smartdns 告别广告烦扰 教程 软路由 ...
- kubernetes之HPA详细介绍
一.HPA说明 HPA(Horizontal Pod Autoscaler)是kubernetes的一种资源对象,能够根据某些指标对在statefulset.replicacontroller.rep ...