
Spring Boot 多模块与 Maven 私有仓库
前言
系统复杂了,抽离单一职责的模块几乎是必须的;若需维护多个项目,抽离公用包上传私有仓库管理也几乎是必须的。其优点无需赘述,以下将记录操作过程。

1. 多模块拆分
在.NET 中由于其统一性,实现上更自然一点。Spring Boot 通过 Maven 构建多模块工程也不麻烦,假如我的项目中包含以下几个包:

我需要将他们分别拆分成独立模块,首先要修改的是根目录下的 pom.xml,packaging 类型改为 pom,并添加 modules 节点:
<?xml version="1.0" encoding="UTF-8"?>

<project xmlns="http://maven.apache.org/POM/4.0.0" xmlns:xsi="http://www.w3.org/2001/XMLSchema-instance"

	xsi:schemaLocation="http://maven.apache.org/POM/4.0.0 http://maven.apache.org/xsd/maven-4.0.0.xsd">

	<modelVersion>4.0.0</modelVersion>

	<groupId>com.youclk.multi-package</groupId>

	<artifactId>parent</artifactId>

	<version>0.0.1-SNAPSHOT</version>

	<modules>

		<module>api</module>

		<module>service</module>

		<module>dao</module>

	</modules>

	<packaging>pom</packaging>

	<parent>

		<groupId>org.springframework.boot</groupId>

		<artifactId>spring-boot-starter-parent</artifactId>

		<version>1.5.10.RELEASE</version>

		<relativePath/> <!-- lookup parent from repository -->

	</parent>

	<properties>

		<project.build.sourceEncoding>UTF-8</project.build.sourceEncoding>

		<project.reporting.outputEncoding>UTF-8</project.reporting.outputEncoding>

		<java.version>1.8</java.version>

		<lombok>1.16.20</lombok>

	</properties>

	<dependencies>

		<dependency>

			<groupId>org.springframework.boot</groupId>

			<artifactId>spring-boot-starter-test</artifactId>

			<scope>test</scope>

		</dependency>

		<dependency>

			<groupId>org.projectlombok</groupId>

			<artifactId>lombok</artifactId>

			<version>${lombok}</version>

		</dependency>

	</dependencies>

</project>
之后新建一个个 Module,将对应的代码移植过去:
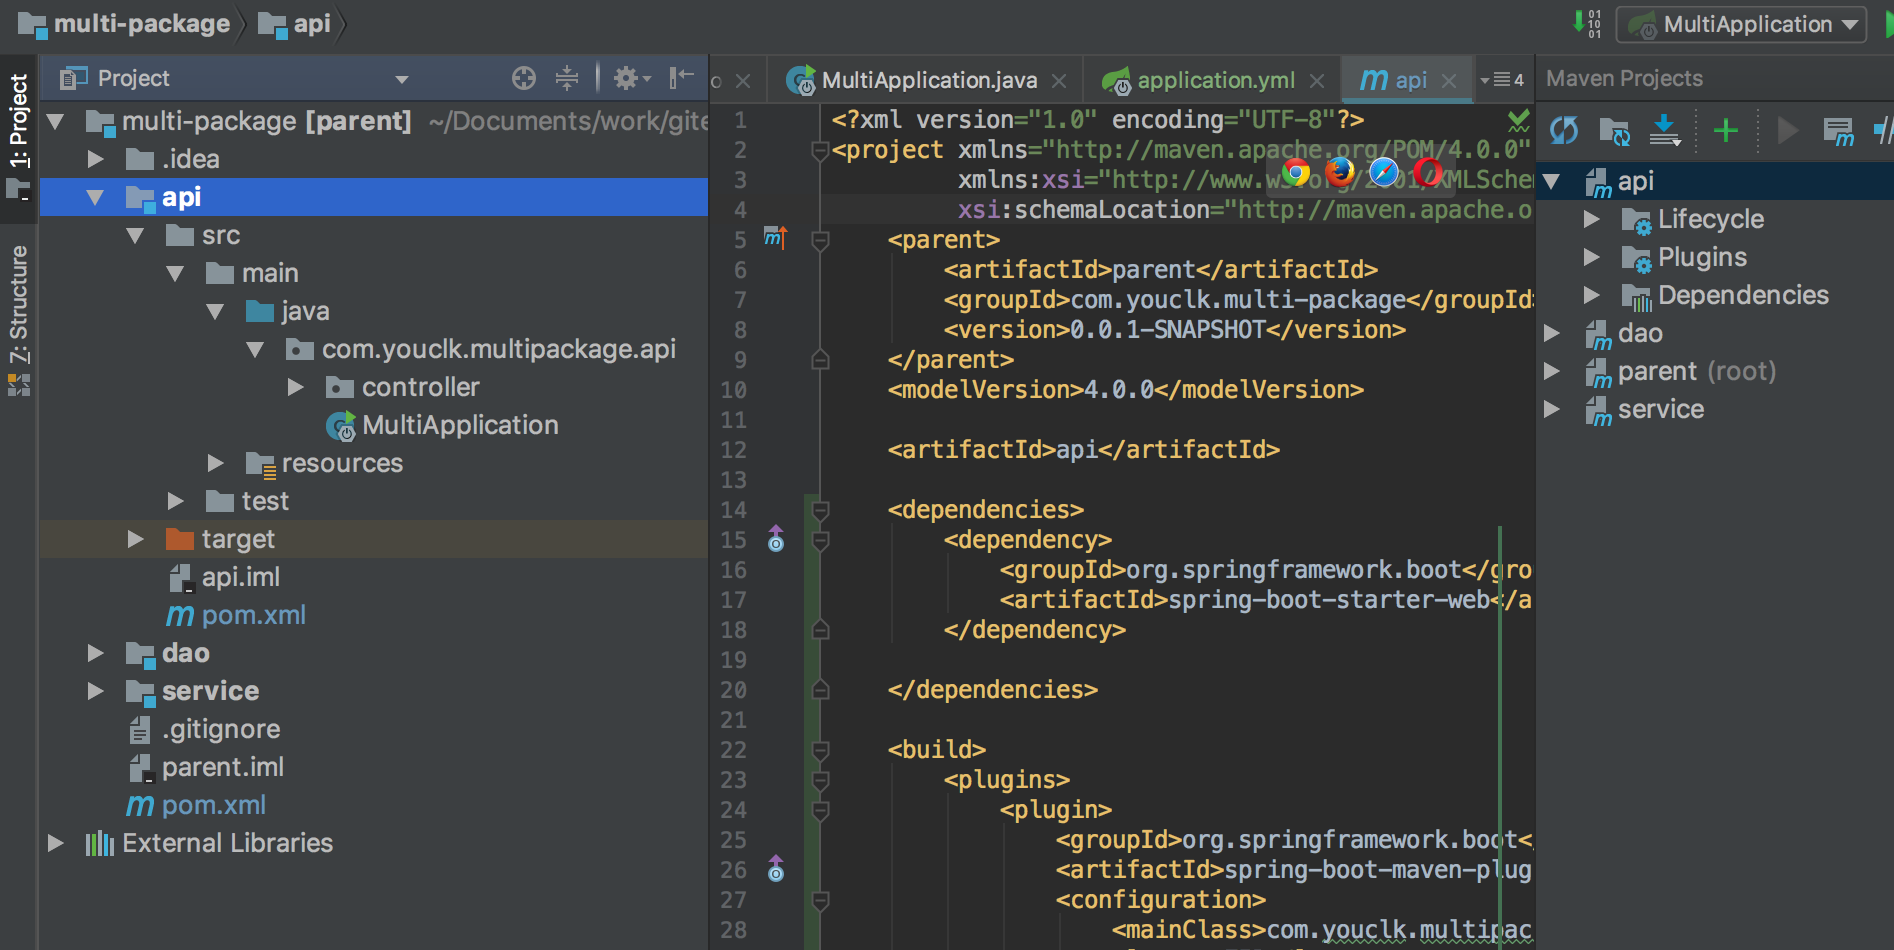
需要注意的是在启动模块的 pom.xml 中需要指定启动类:
<build>

    <plugins>

        <plugin>

            <groupId>org.springframework.boot</groupId>

            <artifactId>spring-boot-maven-plugin</artifactId>

            <configuration>

                <mainClass>com.youclk.multipackage.api.MultiApplication</mainClass>

                <layout>ZIP</layout>

            </configuration>

        </plugin>

    </plugins>

</build>
统一升级版本命令:mvn versions:set -DnewVersion=0.0.1-SNAPSHOT,到此差不多完成了,引用方式与普通的依赖包一致:
<dependency>

    <groupId>com.youclk.multi-package</groupId>

    <artifactId>service</artifactId>

    <version>0.0.1-SNAPSHOT</version>

</dependency>
补充
外层 pom :
<?xml version="1.0" encoding="UTF-8"?>

<project xmlns="http://maven.apache.org/POM/4.0.0"

         xmlns:xsi="http://www.w3.org/2001/XMLSchema-instance"

         xsi:schemaLocation="http://maven.apache.org/POM/4.0.0 http://maven.apache.org/xsd/maven-4.0.0.xsd">

    <modelVersion>4.0.0</modelVersion>

    <groupId>com.youclk</groupId>

    <artifactId>et2</artifactId>

    <packaging>pom</packaging>

    <version>${own-project.version}</version>

    <parent>

        <groupId>org.springframework.boot</groupId>

        <artifactId>spring-boot-starter-parent</artifactId>

        <version>2.1.0.RELEASE</version>

        <relativePath/> <!-- lookup parent from repository -->

    </parent>

    <modules>

        <module>start</module>

        <module>service</module>

        <module>client</module>

    </modules>

    <properties>

        <project.build.sourceEncoding>UTF-8</project.build.sourceEncoding>

        <project.reporting.outputEncoding>UTF-8</project.reporting.outputEncoding>

        <java.version>1.8</java.version>

        <own-project.version>1.0.0</own-project.version>

    </properties>

    <dependencyManagement>

        <dependencies>

            <dependency>

                <groupId>com.youclk</groupId>

                <artifactId>start</artifactId>

                <version>${own-project.version}</version>

            </dependency>

            <dependency>

                <groupId>com.youclk</groupId>

                <artifactId>service</artifactId>

                <version>${own-project.version}</version>

            </dependency>

        </dependencies>

    </dependencyManagement>

    <dependencies>

        <dependency>

            <groupId>org.springframework.boot</groupId>

            <artifactId>spring-boot-starter</artifactId>

        </dependency>

        <dependency>

            <groupId>org.springframework.boot</groupId>

            <artifactId>spring-boot-starter-aop</artifactId>

        </dependency>

        <dependency>

            <groupId>org.springframework.boot</groupId>

            <artifactId>spring-boot-starter-test</artifactId>

            <scope>test</scope>

        </dependency>

        <dependency>

            <groupId>org.springframework.boot</groupId>

            <artifactId>spring-boot-starter-web</artifactId>

        </dependency>

        <dependency>

            <groupId>org.projectlombok</groupId>

            <artifactId>lombok</artifactId>

        </dependency>

    </dependencies>

</project>
内层 pom
<?xml version="1.0" encoding="UTF-8"?>

<project xmlns="http://maven.apache.org/POM/4.0.0"

         xmlns:xsi="http://www.w3.org/2001/XMLSchema-instance"

         xsi:schemaLocation="http://maven.apache.org/POM/4.0.0 http://maven.apache.org/xsd/maven-4.0.0.xsd">

    <modelVersion>4.0.0</modelVersion>

    <parent>

        <groupId>com.youclk</groupId>

        <artifactId>et2</artifactId>

        <version>1.0.0</version>

    </parent>

    <artifactId>service</artifactId>

    <packaging>jar</packaging>

    <version>${own-project.version}</version>

</project>
<?xml version="1.0" encoding="UTF-8"?>

<project xmlns="http://maven.apache.org/POM/4.0.0"

         xmlns:xsi="http://www.w3.org/2001/XMLSchema-instance"

         xsi:schemaLocation="http://maven.apache.org/POM/4.0.0 http://maven.apache.org/xsd/maven-4.0.0.xsd">

    <modelVersion>4.0.0</modelVersion>

    <parent>

        <groupId>com.youclk</groupId>

        <artifactId>et2</artifactId>

        <version>1.0.0</version>

    </parent>

    <artifactId>start</artifactId>

    <packaging>jar</packaging>

    <version>${own-project.version}</version>

    <dependencies>

        <dependency>

            <groupId>com.youclk</groupId>

            <artifactId>service</artifactId>

        </dependency>

    </dependencies>

</project>

注意 start 模块下的包结构为根结构,不要加 .start,否则要指定需要扫描的包。
2. Nexus3 私有仓库搭建
Docker 时代一切都变得异常简单,Compose 配置如下:
version: '3.5'

services:

  nexus:

    image: sonatype/nexus3:3.10.0

    networks:

      - proxy

      - youclk

    volumes:

      - /mnt/nas/db/nexus-data:/nexus-data

    deploy:

      mode: replicated

      labels:

        - com.df.notify=true

        - com.df.port=8081

        - com.df.serviceDomain=nexus.youclk.com

      restart_policy:

        condition: any

        max_attempts: 3

      update_config:

        delay: 5s

        order: start-first

      resources:

        limits:

          cpus: '0.50'

          memory: 1g

networks:

  proxy:

    external: true

  youclk:

    external: true
启动过程需要一分钟左右:


需要注意的是如果你的 ssl 是在负载均衡或者其他的反向代理之上,那么必须在 HTTP 头中指定 X-Forwarded-Proto 传输协议为 HTTPS,然后,就可以愉快地玩耍了。
3. 上传与引用
3.1 上传
首先需要在 Nexus 创建私有仓库,例如我的:


其次在本地 maven 设置中添加 server 节点,默认在 ~/.m2/settings.xml:
<servers>

  <server>

    <id>youclk</id>

    <username>admin</username>

    <password>youclk</password>

  </server>

</servers>
pom.xml 中添加上传地址:
<distributionManagement>

    <repository>

        <id>nexus</id>

        <name>Releases Repository</name>

        <url>https://nexus.youclk.com/repository/youclk-releases/</url>

    </repository>

    <snapshotRepository>

        <id>nexus</id>

        <name>Snapshot Repository</name>

        <url>https://nexus.youclk.com/repository/youclk-snapshots/</url>

    </snapshotRepository>

</distributionManagement>
最后执行 mvn clean deploy 便会上传至私有仓库,单独传包命令如下:
mvn deploy:deploy-file -DgroupId=com.youclk -DartifactId=utils -Dversion=0.0.1-SNAPSHOT -Dpackaging=jar -Dfile=target/utils-0.0.1-SNAPSHOT.jar -Durl=https://nexus.youclk.com/repository/youclk/ -DrepositoryId=youclk
管理和查看:

3.1 引用
Finally,最后的最后就是怎么使用啦~ 如果需要全局引用的话需要在 settings.xml 添加和激活仓库:
<?xml version="1.0" encoding="UTF-8"?>

<settings>

    <mirrors>

        <mirror>

            <id>aliyun</id>

            <mirrorOf>central</mirrorOf>

            <name>central mirror</name>

            <url>http://maven.aliyun.com/mvn/repository</url>

        </mirror>

        <mirror>

            <id>nexus</id>

            <mirrorOf>maven-public</mirrorOf>

            <name>private mirror</name>

            <url>http://local-nexus.youclk.com/repository/maven-public/</url>

        </mirror>

    </mirrors>

    <servers>

        <server>

            <id>nexus</id>

            <username>admin</username>

            <password>youclk</password>

        </server>

    </servers>

     <profiles>

        <profile>

            <id>nexus</id>

            <repositories>

                <repository>

                    <id>maven</id>

                    <name>local private nexus</name>

                    <url>http://local-nexus.youclk.com/repository/maven-public/</url>

                    <releases>

                        <enabled>true</enabled>

                    </releases>

                    <snapshots>

                        <enabled>true</enabled>

                    </snapshots>

                </repository>

            </repositories>

            <pluginRepositories>

                <pluginRepository>

                    <id>maven</id>

                    <name>local private nexus</name>

                    <url>http://local-nexus.youclk.com/repository/maven-public/</url>

                    <releases>

                        <enabled>true</enabled>

                    </releases>

                    <snapshots>

                        <enabled>true</enabled>

                    </snapshots>

                </pluginRepository>

            </pluginRepositories>

        </profile>

    </profiles>

    <activeProfiles>

        <activeProfile>nexus</activeProfile>

    </activeProfiles>

</settings>
不过一般不推荐这么写,settings.xml 应该尽可能保持简洁,精简配置,此处留下代理和权限认证即可,其余的可以移植到 pom.xml 中:
<repositories>

    <repository>

        <id>aliyun</id>

        <url>http://maven.aliyun.com/nexus/content/groups/public/</url>

    </repository>

    <repository>

        <id>nexus</id>

        <url>http://local-nexus.youclk.com/repository/maven-public/</url>

    </repository>

</repositories>

<pluginRepositories>

    <pluginRepository>

        <id>central</id>

        <url>

            http://maven.aliyun.com/nexus/content/groups/public/

        </url>

    </pluginRepository>

    <pluginRepository>

        <id>maven-public</id>

        <url>http://local-nexus.youclk.com/repository/maven-public/</url>

    </pluginRepository>

</pluginRepositories>
小结
我的公众号《有刻》,我们共同成长!

Spring Boot 多模块与 Maven 私有仓库的更多相关文章
- Maven 搭建spring boot多模块项目(附源码),亲测可以,感谢原创
原创地址:https://segmentfault.com/a/1190000005020589 我的DEMO码云地址,持续添加新功能: https://gitee.com/itbase/Spring ...
- Maven 搭建spring boot多模块项目
Maven 搭建spring boot多模块项目 备注:所有项目都在idea中创建 1.idea创建maven项目 1-1: 删除src,target目录,只保留pom.xml 1-2: 根目录pom ...
- 实战maven私有仓库三部曲之一:搭建和使用
在局域网内搭建maven私有仓库,可避免每次都从中央仓库下载公共jar包,另外将A模块作为二方库发布到私有仓库后,B模块可以很方便的引用,今天我们就来实战maven私有仓库的搭建和使用: 原文地址:h ...
- 使用Nexus配置Maven私有仓库
使用Nexus配置Maven私有仓库 作者:尹正杰 版权声明:原创作品,谢绝转载!否则将追究法律责任. 一.安装配置Nexus 1>.下载nexus 下载地址:https://www.sonat ...
- Spring Boot 多模块项目创建与配置 (一) (转)
Spring Boot 多模块项目创建与配置 (一) 最近在负责的是一个比较复杂项目,模块很多,代码中的二级模块就有9个,部分二级模块下面还分了多个模块.代码中的多模块是用maven管理的,每个模块都 ...
- Spring Boot 多模块项目创建与配置 (一)
最近在负责的是一个比较复杂项目,模块很多,代码中的二级模块就有9个,部分二级模块下面还分了多个模块.代码中的多模块是用maven管理的,每个模块都使用spring boot框架.之前有零零散散学过一些 ...
- 安装Maven并搭建Maven私有仓库
一.说明 Maven是基于项目对象模型(POM),可以通过一小段描述信息来管理项目的构建,报告和文档的软件项目管理工具.我们在进行Java代码开发的时候,Eclipse+Maven+Jetty是一个十 ...
- 【图文并茂】 做开发这么久了,还不会搭建服务器Maven私有仓库?这也太Low了吧
大家好,我是冰河~~ 最近不少小伙伴想在自己公司的内网搭建一套Maven私服环境,可自己搭建的过程中,或多过少的总会出现一些问题,问我可不可以出一篇如何搭建Maven私服的文章.这不,就有了这篇文章嘛 ...
- Spring Boot 多模块项目创建与配置 (转)
转载:https://www.cnblogs.com/MaxElephant/p/8205234.html 最近在负责的是一个比较复杂项目,模块很多,代码中的二级模块就有9个,部分二级模块下面还分了多 ...
随机推荐
- 根据iOS 10 的新特性,创建iMessage App,可用于自定义表情
第一. 介绍(原文作者 澳大利亚19岁少年--Davis Allie ----原文地址) 随着iOS10的发布,苹果对开发者开放了Messages应用程序,开发人员现在可以创建他们自己的各种类型 并且 ...
- System.getProperty()的用途
偶尔用到 System.getProperty(),找起来也不方便.这里做下记录备忘: 编写的测试类: public class TestSystemproperty { public stat ...
- 09 ExpanableListView 的代码例子
<span style="font-size:18px;">package com.qf.day09_expandablelistview03; import andr ...
- Java中封装性的使用
//Java面对对象基本特性之一:封装性 //作用:保护某些属性和方法不被外部所看见 //封装的实现:通过关键字private声明 //鼠标右键--->Source---->Generat ...
- K-均值聚类算法(K-means)
K-means是一种无监督的学习,将相似的对象归到同一个簇中.可以将一批数据分为K个不同的簇,并且每个簇的中心采用簇中所含样本的均值计算而成. K-means算法的K值需要由用户指定, ...
- android 解析服务器数据使用json还是xml方式
整理自百度搜索: 现在的Android应用程序,几乎没有不与服务端交换数据的了!那么,android应用在与服务端交换数据的时候,我们有哪些选择呢?哪种数据交换格式要更好吗?下面文章简单为 andro ...
- 设计模式之——工厂模式(B)
本文是在学习中的总结,欢迎转载但请注明出处:http://blog.csdn.net/pistolove/article/details/41142929 工厂方法模式定义了一个创建对象的接口,但由子 ...
- 基于MSRDS机器人仿真平台的多机器人PID编队控制算法
自己调试的编队PID算法,效果也还可以,具体使用教程参考视频链接: http://v.youku.com/v_show/id_XMTUwNjc3NjMyNA 仿真中三个机器人保持编队,做直线运动,队形 ...
- C++在单继承、多继承、虚继承时,构造函数、复制构造函数、赋值操作符、析构函数的执行顺序和执行内容
一.本文目的与说明 1. 本文目的:理清在各种继承时,构造函数.复制构造函数.赋值操作符.析构函数的执行顺序和执行内容. 2. 说明:虽然复制构造函数属于构造函数的一种,有共同的地方,但是也具有一定的 ...
- (四十九)Quartz2D自定义控件
利用Quartz2D来自定义UIImageView: 模仿UIImageView: 设置frame,设置图片. 注意一个细节,自定义的imageView,应该通过重写set方法来设置图片并且重绘,否则 ...