RabbitMQ学习之:(四)回头看刚才写的程序 (转贴+我的评论)
转自:http://lostechies.com/derekgreer/2012/03/18/rabbitmq-for-windows-hello-world-review/
我的心得:
1. 在创建ConnectFactory时,我们可以传入主机名、端口号、用户名/密码、虚拟Host等参数。
2. 也可以使用ampq://用户名:密码@主机名:端口号/%2f
3. Channel是轻量级的TCP/IP连接, 而Connection是非常Expensive的。
4. 消息不是直接发到Queue的,而是Producer通过Exchange来发送的。
5. 每当声明一个Queue时,会自动绑定到默认的Exchange上。而且不能解绑、不能删除、不能显式声明,只能用来发消息。
RabbitMQ for Windows: Hello World Review
This is the third installment to the series: RabbitMQ for Windows. In the last installment, we discussed some basic messaging concepts and created our first RabbitMQ application. In this installment, we’ll be taking a closer look at our Hello World application to help round out our understanding of the basic concepts involved.
Hello World Review
In the previous installment, we walked through creating a Hello World example. Let’s review the Producer and Consumer code again:
Producer
class Program

{

  static void Main(string[] args)

  {

    var connectionFactory = new ConnectionFactory();

    IConnection connection = connectionFactory.CreateConnection();

    IModel channel = connection.CreateModel();

    channel.QueueDeclare("hello-world-queue", false, false, false, null);

    byte[] message = Encoding.UTF8.GetBytes("Hello, World!");

    channel.BasicPublish(string.Empty, "hello-world-queue", null, message);

    Console.WriteLine("Press any key to exit");

    Console.ReadKey();

    channel.Close();

    connection.Close();

  }

}
Consumer
class Program

{

  static void Main(string[] args)

  {

    var connectionFactory = new ConnectionFactory();

    IConnection connection = connectionFactory.CreateConnection();

    IModel channel = connection.CreateModel();

    channel.QueueDeclare("hello-world-queue", false, false, false, null);

    BasicGetResult result = channel.BasicGet("hello-world-queue", true);

    if (result != null)

    {

      string message = Encoding.UTF8.GetString(result.Body);

      Console.WriteLine(message);

    }

    Console.WriteLine("Press any key to exit");

    Console.ReadKey();

    channel.Close();

    connection.Close();

  }

}
In both the Producer and Consumer projects, we started our Main() method by establishing a Connection to the RabbitMQ server. We then created a Channel to establish a line of communication with the server and declared a Queue to send and receive our messages. In our Producer, we called BasicPublish() to place a message on the queue. In our Consumer, we called BasicGet() to retrieve a message from the queue and print the message to the console. In both the Producer and Consumer projects, we ended the Main() method by closing the channel and connection to the server.
Establishing the Connection
Let’s first discuss how our example connects to the RabbitMQ server. In our example, we’re establishing a connection using the default connection settings.
var connectionFactory = new ConnectionFactory();
This assumes we have a RabbitMQ server running on our local development machine. To connect to this instance, the ConnectionFactory uses a default host name of “localhost” and a default port of 5672. A user name and password must also be provided to connect to the server. When not specified, the ConnectionFactory uses a default user name and password of “guest”. The “guest” user was pre-configured with full administrator rights when we first installed our instance of RabbitMQ. The final parameter of interest is the Virtual Host. RabbitMQ utilizes virtual hosts (i.e. virtual instances of RabbitMQ) to allow multiple projects or teams to manage and secure their own set of queues from within a single RabbitMQ installation.
When we first installed RabbitMQ, a default virtual host named “/” was created. The ConnectionFactory uses this virtual host when one is not specified.
Specified explicitly, we might have configured these default values as follows:
var connectionFactory = new ConnectionFactory

                          {

                            HostName = "localhost",

                            Port = 5672,

                            UserName = "guest",

                            Password = "guest",

                            VirtualHost = "/"

                          };

IConnection connection = connectionFactory.CreateConnection();
RabbitMQ also supports the AMQP URI Specification which allows these parameters to be specified as a single URI. Using the URI option, we need to percent-encode the virtual host as “%2f”. The following is how me might have established our connection using the amqp URI:
var connectionFactory = new ConnectionFactory {Uri = "amqp://guest:guest@localhost:5672/%2f"};

IConnection connection = connectionFactory.CreateConnection();
Creating a Channel
After establishing a connection with the server, the next step we take in both the Producer and Consumer projects is to create a Channel.
IModel channel = connection.CreateModel();
A channel is a light-weight connection used by RabbitMQ to enable multiple communication sessions through a single TCP/IP connection. Operating systems have a limit to the number of TCP/IP connections that can be opened simultaneously, and creating these connections can be relatively expensive. Through the use of channels, we are free to create as many virtual connections with the server as we want without incurring this overhead or being limited by the number of available TCP/IP connections.
Channels are intended to be used for sequencing communication with the server such as declaring queues or the sending and receiving of messages. A single channels should not be used by multiple threads simultaneously. For this reason, it is recommended that channels simply not be shared across threads.
Declaring the Queue
After opening a channel within our connection, the next step we take is to declare a Queue.
channel.QueueDeclare("hello-world-queue", false, false, false, null);
A queue can be thought of as a sort of “mailbox”. Messages put in the mailbox sit there until a recipient retrieves the mail.
In our example, we named our queue “hello-world-queue”. The queue name (along with the RabbitMQ host name and port number) serves as a sort of “mailbox address”. When we publish the encoded string “Hello, World!”, it is placed in the queue named “hello-world-queue’ and awaits until a consumer retrieves and acknowledges the message.
Before discussing the parameters used in our call to QueueDeclare, it will be helpful to take a short detour and discuss how our message actually gets routed from the Producer to the Consumer.
Message Routing
When looking at our example, it appears as though the Producer sends our message directly to the “hello-world-queue”. What actually occurs, however, is that the message is routed to the “hello-world-queue” through an Exchange.
When using RabbitMQ, messages aren’t actually published to a queue, but rather are published to an exchange which then routes messages to queues. An exchange can be thought as a “post office”. Just as we don’t generally put mail directly in a recipient’s mailbox, in RabbitMQ we don’t publish messages directly to a queue.
To receive messages, a queue must first have an exchange binding established. Part of establishing the binding includes specifying which messages should be routed to the queue.[PunCha:这里我没看懂,收消息和Exchange有什么关系?] In most cases, this is achieved by specifying a routing key which serves as a filter for which messages are delivered to which queues.
The following diagram depicts how messages are published in RabbitMQ:
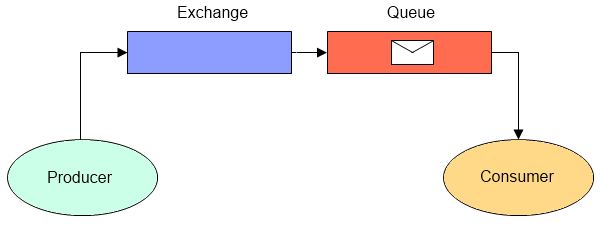
The reason our code looks like it sends messages directly to the queue is due to the fact that we’re taking advantage of a convenience provided by theRabbitMQ server(是server定义的). Whenever a queue is declared, it is automatically bound to a default exchange with a routing key equal to the queue name. Messages published to the default exchange with a routing key equal to the value of a declared queue name are routed to the associated queue.
In addition to being implicitly bound to all queues, the default exchange also cannot be unbound, deleted, or explicitly declared through code. The only operation that is allowed is the publishing of messages.
Queue Parameters
Returning to our discussion of queue declaration, the parameters used in our call to QueueDeclare() creates our queue as a non-durable, non-exclusive, non-auto-deleted queue.
The durability flag pertains to what happens to our queue if the server is restarted. Queues marked as durable will be recreated upon a server restart, while non-durable queues will not be.
The exclusive flag pertains to whether a queue can be declared by more than one channel. Since messages are actually published to exchanges, not queues, there may be cases where you only want a single client instance to be capable of declaring a queue bound to a particular exchange (for example, when using queues to facilitate an RPC call).
Lastly, the auto-delete flag pertains to whether the queue is automatically deleted once all consumers are removed. This flag can be a little misleading since we might suppose setting this to true would cause our “hello-world-queue” to be automatically deleted after our application exists. In fact, it wouldn’t be.
There are two different approaches to receiving messages: pulling and pushing. With the pull API, messages are retrieved on demand through a call to BasicGet(). This is the method used in our example. With the pull API, available messages are delivered to a local queue when a Consumer is bound to the channel. When setting the auto-delete flag to true, a queue will be deleted once it detects that all consumers have been removed. While we named the project which receives messages from our queue “Consumer”, the pull API doesn’t actually declare a consumer to retrieve messages. Therefore, the server is never alerted to the fact that the queue is no longer being used.
Publishing the Message
The last noteworthy point in our Producer project is the parameters to our call to BasicPublish().
channel.BasicPublish(string.Empty, "hello-world-queue", null, message);
The first parameter is the name of the exchange to publish the message to. An empty string is the designation for the default exchangediscussed earlier in the section on message routing. The second parameter is the routing key. As previously discussed, all queues are bound to the default exchange using a routing key equal to the value of the bound queue name. The third parameter is an instance of IBasicProperties. This class is used to associate a number of properties with the message, such as the message encoding, content-type, and durability. We’ll take a look at some of the uses of this class further in our series. Lastly, the fourth parameter is the byte array representing the message body.
Getting the Message
The last noteworthy point in our Consumer project is the parameters to our call to BasicGet().
BasicGetResult result = channel.BasicGet("hello-world-queue", true);
The first parameter is the queue to pull a message from which should be self-explanatory. The second parameter is a flag which controls the auto-acknowledgement of the message.
When a message is retrieved from a queue with an auto-acknowledge flag set to false, the server holds the message in an unacknowledged state until an acknowledgement or rejection of the message is received on the open channel (note that messages must be accepted or rejected on the same channel they were received on). This is useful when a consumer needs to ensure the message is processed successfully before it’s fully removed from the server. If the channel is closed without receiving an acknowledgment, the message will be requeued and delivered to the next consumer (using pull or get). In the event that a consumer determines it can’t process the message, it can reject the message with a flag indicating whether to requeue the message or not.
Conclusion
That’s it for our Hello World example review. Next time, we’ll take a look at the four basic exchange types.
RabbitMQ学习之:(四)回头看刚才写的程序 (转贴+我的评论)的更多相关文章
- com学习(四)——用 ATL 写第一个组件
建立 ATL 工程 步骤2.1:建立一个工作区(WorkSpace). 步骤2.2:在工作区中,建立一个 ATL 工程(Project).示例程序叫 Simple1,并选择DLL方式,见图一. 图一. ...
- 【DM642学习笔记四】flash烧写过程——错误记录…
(欢迎批评指正) 一,打开.cdd配置文件时出错: 解决:在FlashBurn配置窗口中,Conversion Cmd一栏可不用管: 菜单Program—Download FBTC,load ...
- RabbitMQ学习之:(六)Direct Exchange (转贴+我的评论)
From: http://lostechies.com/derekgreer/2012/04/02/rabbitmq-for-windows-direct-exchanges/ RabbitMQ fo ...
- RabbitMQ学习系列四-EasyNetQ文档跟进式学习与实践
EasyNetQ文档跟进式学习与实践 https://www.cnblogs.com/DjlNet/p/7603554.html 这里可能有人要问了,为什么不使用官方的nuget包呐:RabbitMQ ...
- rabbitmq学习(四) —— 发布订阅
为了说明这种模式,我们将建立一个简单的日志系统.这个系统将由两个程序组成,第一个将发出日志消息,第二个将接收并处理日志消息.在我们的日志系统中,每一个运行的接收程序的副本都会收到日志消息. 交换器(E ...
- rabbitMQ学习笔记(四) 发布/订阅消息
前面都是一条消息只会被一个消费者处理. 如果要每个消费者都处理同一个消息,rabbitMq也提供了相应的方法. 在以前的程序中,不管是生产者端还是消费者端都必须知道一个指定的QueueName才能发送 ...
- RabbitMQ学习笔记四:RabbitMQ命令(附疑难问题解决)
本来今天是想做RabbitMQ之优先级队列的,但是,在RabbitMQ Server创建queue时,增加优先级的最大值,头脑发热写了9999999,导致电脑内存直接飙到100%,只能重启电脑,并卸载 ...
- rabbitMQ学习(四)
按照routing key接收信息 发送端: public class EmitLogDirect { private static final String EXCHANGE_NAME = &quo ...
- rabbitmq学习(四):利用rabbitmq实现远程rpc调用
一.rabbitmq实现rpc调用的原理 ·rabbitmq实现rpc的原理是:客户端向一个队列中发送消息,并注册一个回调的队列用于接收服务端返回的消息,该消息需要声明一个叫做correaltionI ...
随机推荐
- RabbitMQ 功能
学习完了rabbitmq总一下 RabbitMQ依赖的语言 erlang 第一它可以实现不同程序之间的程序信息储存交互,在易用性.扩展性.高可用性的方面不俗. rabbitmq相当于一个中间人,我们同 ...
- 微信小程序开发(五)数据绑定
承接上篇博客. // index.js Page({ data: { time: (new Date()).toString(), addr: "北京" }, but: funct ...
- List.ForEach批量新增并发异常解决
批量新增操作在业务系统中十分常见,尤其是主从表中对从表的批量处理.昨天在对wms主从表进行业务操作时使用了c#中list自带的函数ForEach对从表批量新增,代码如下: 在无并发的情况下接口请求正常 ...
- CentOs Linux 对于编辑文本内容时无法退出的几个小命令
编辑完保存退出的四种方式 1. Esc+:+wq+回车(w是write,q是quit) 2. Esc+:+x+回车(x=wq) 3. Esc+shift+zz 4. Esc+ZZ(在大写开启下)
- git 账号密码
由于git迁移服务地址,而导致无法登陆 首先 git config --system --unset credential.helper 然后执行 git config --global cred ...
- 详解mpstat等性能监测命令的使用
mpstat是Multiprocessor Statistics的缩写,是实时监控工具,报告与cpu的一些统计信息这些信息都存在/proc/stat文件中,在多CPU系统里,其不但能查看所有的CPU的 ...
- UTC和GMT时间
来源:https://www.cnblogs.com/qiuyi21/archive/2008/03/04/1089456.html UTC和GMT时间 每个地区都有自己的本地时间,在网上以及无线电通 ...
- Linux命令之nano(简单文本编辑器)
nano 字符终端文本编辑器 补充说明 nano 是一个字符终端的文本编辑器,有点像DOS下的editor程序.它比vi/vim要简单得多,比较适合Linux初学者使用.某些Linux发行版的默认编辑 ...
- [MySQL优化] -- 如何了解SQL的执行频率
MySQL 客户端连接成功后,通过 show [session|global]status 命令 可以提供服务器状态信息,也可以在操作系统上使用 mysqladmin extended-status ...
- modbus-RTU-crc16——c语言
为确保消息数据的完整性,除了验证消息CRC之外,建议实现检查串行端口(UART)成帧错误的代码.如果接收消息中的CRC与接收设备计算的CRC不匹配,则应忽略该消息.下面的C语言代码片段显示了如何使用逐 ...