
TextView的封装和自定义
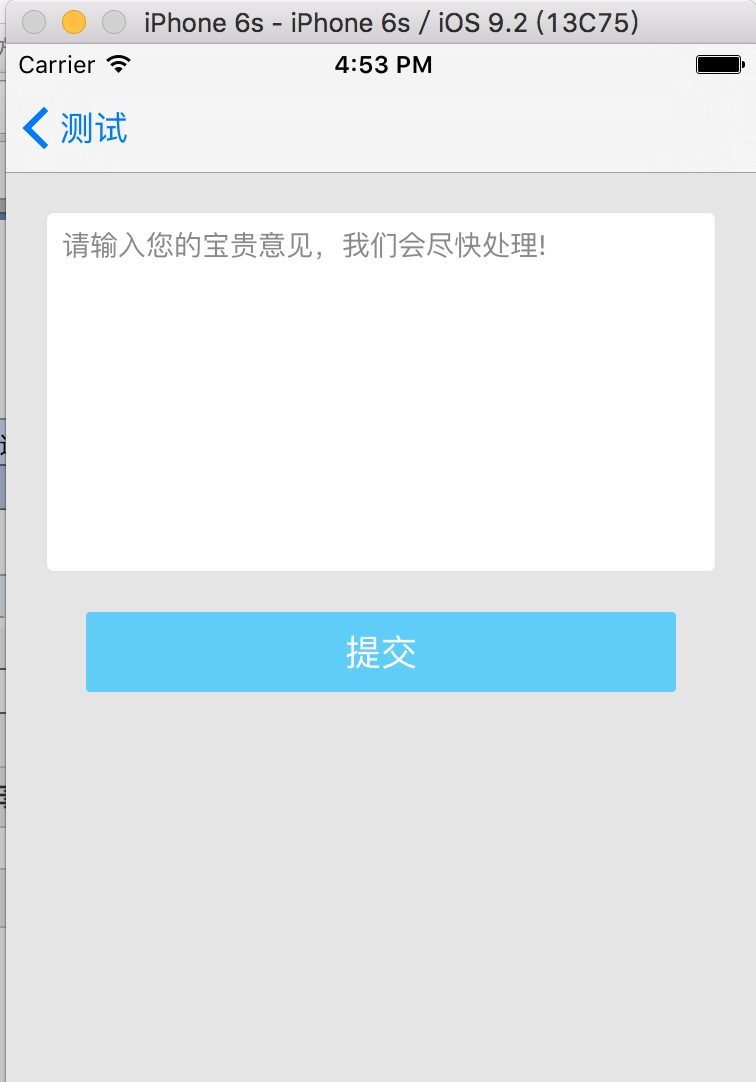
实现的效果如下:
 #import <UIKit/UIKit.h>

 @interface CustomTextView : UITextView

 @property (nonatomic , strong) UILabel *placeHolderLabel; // 默认的Label

 @property (nonatomic , strong) NSString *placeholderStr;  // 默认的文字显示

 @property (nonatomic , strong) UIColor *palceHolderColor;  //默认文字显示的颜色

 @end
 #import "CustomTextView.h"

 @implementation CustomTextView

 - (instancetype)initWithFrame:(CGRect)frame{

     self = [super initWithFrame:frame];

     if (self) {

         [self setPlaceholderStr:@""];

         [self setPalceHolderColor:[UIColor lightGrayColor]];

     }

     return self;

 }

 // 接收数据

 - (void)setPlaceholderStr:(NSString *)placeholderStr{

     if (_placeholderStr != placeholderStr) {

         _placeholderStr = placeholderStr;

         // 防止创建多个

         [self.placeHolderLabel removeFromSuperview];

         self.placeHolderLabel = nil;

         // 重新绘制  会调用drawRect方法

         [self setNeedsDisplay];

     }

 }

 - (void)drawRect:(CGRect)rect{

     [super drawRect:rect];

     if (self.placeholderStr.length > ) {

         if (_placeHolderLabel == nil) {

             _placeHolderLabel = [[UILabel alloc]initWithFrame:CGRectMake(, , self.bounds.size.width - , )];

             _placeHolderLabel.lineBreakMode = NSLineBreakByWordWrapping;

             _placeHolderLabel.numberOfLines = ;

             _placeHolderLabel.font = self.font;

             _placeHolderLabel.backgroundColor = [UIColor clearColor];

             _placeHolderLabel.textColor = self.palceHolderColor;

             _placeHolderLabel.alpha = ;

             _placeHolderLabel.tag = ;

             [self addSubview:_placeHolderLabel];

         }

         _placeHolderLabel.text = self.placeholderStr;

         //自适应宽高

         [_placeHolderLabel sizeToFit];

     }

     if ([[self text] length] ==  && [[self placeholderStr] length] >) {

         [[self viewWithTag:] setAlpha:1.0];

     }

 }
使用如下:
 #import "Button1Controller.h"

 #import "CustomTextView.h"

 #define kTextBorderColor     RGBCOLOR(227,224,216)

 #undef  RGBCOLOR

 #define RGBCOLOR(r,g,b) [UIColor colorWithRed:r/255.0 green:g/255.0 blue:b/255.0 alpha:1]

 @interface Button1Controller ()<UITextViewDelegate>

 @property (nonatomic,strong) CustomTextView *textView;

 @property (nonatomic , strong) UIButton *commitButton;

 @end

 @implementation Button1Controller

 - (void)viewDidLoad {

     [super viewDidLoad];

     self.view.backgroundColor = [UIColor colorWithRed:229.0/ green:229.0/ blue:229.0/ alpha:1.0f];

     [self.view addSubview:self.textView];

     self.automaticallyAdjustsScrollViewInsets = NO;

     [self.view addSubview:self.commitButton];

 }

 // TextView

 - (CustomTextView *)textView{

     if (!_textView) {

         _textView = [[CustomTextView alloc]initWithFrame:CGRectMake(, , self.view.frame.size.width - , )];

         _textView.backgroundColor = [UIColor whiteColor];

         _textView.delegate = self;

         _textView.font = [UIFont systemFontOfSize:.f];

         _textView.textColor = [UIColor blackColor];

         _textView.textAlignment = NSTextAlignmentLeft;

         _textView.editable = YES;

         _textView.layer.cornerRadius = 4.0f;

         _textView.layer.borderColor = kTextBorderColor.CGColor;

         _textView.layer.borderWidth = 0.5;

         _textView.palceHolderColor = RGBCOLOR(0x89, 0x89, 0x89);

         _textView.placeholderStr = @"请输入您的宝贵意见,我们会尽快处理!";

     }

     return _textView;

 }

 // CommutButton

 - (UIButton *)commitButton{

     if (!_commitButton) {

         _commitButton = [UIButton buttonWithType:UIButtonTypeCustom];

         _commitButton.layer.cornerRadius = 2.0f;

         _commitButton.frame = CGRectMake(, CGRectGetMaxY(self.textView.frame)+, self.view.frame.size.width - , );

         _commitButton.backgroundColor = [self colorWithRGBHex:0x60cdf8];

         [_commitButton setTitle:@"提交" forState:UIControlStateNormal];

         [_commitButton addTarget:self action:@selector(sendFeedBack) forControlEvents:UIControlEventTouchUpInside];

     }

     return _commitButton;

 }

 // 16进制转颜色

 - (UIColor *)colorWithRGBHex:(UInt32)hex

 {

     int r = (hex >> ) & 0xFF;

     int g = (hex >> ) & 0xFF;

     int b = (hex) & 0xFF;

     return [UIColor colorWithRed:r / 255.0f

                            green:g / 255.0f

                             blue:b / 255.0f

                            alpha:1.0f];

 }

 // 提交按钮被点击

 - (void)sendFeedBack{

     NSLog(@"提交...");

 }

 // 判断如果用户输入\n,则收回键盘

 - (BOOL)textView:(UITextView *)textView shouldChangeTextInRange:(NSRange)range replacementText:(NSString *)text{

     if ([text isEqualToString:@"\n"]) {

         [textView resignFirstResponder];

         return NO;

     }

     return YES;

 }

 - (void)textViewDidBeginEditing:(UITextView *)textView{

     self.textView.placeholderStr = @"";

 }
TextView的封装和自定义的更多相关文章
- 使用xib封装一个自定义view的步骤
使用xib封装一个自定义view的步骤 1> 新建一个继承UIView的自定义view,假设类名叫做(MJAppView) 2> 新建一个MJAppView.xib文件来描述MJAppVi ...
- OC - 31.通过封装的自定义布局快速实现商品展示
概述 实现效果 设计思路 采用MVC架构,即模型—视图-控制器架构 使用MJExtension框架实现字典转模型 使用MJRefresh框架实现上拉和下拉刷新 上拉刷新,加载新的数据 下拉刷新,加载更 ...
- Springboot学习06-Spring AOP封装接口自定义校验
Springboot学习06-Spring AOP封装接口自定义校验 关键字 BindingResult.Spring AOP.自定义注解.自定义异常处理.ConstraintValidator 前言 ...
- C#封装程序集自定义类方法注释提示
一.为什么使用封装程序集: 在很多分布式应用程序开发中,针对每一种功能可能条用的接口不一样,往往习惯将需要被调用的接口,封装成DLL给调用方应用后使用,这样既规范了调用的方式,又避免了调用出现参数请求 ...
- Struts2 请求数据的自动封装 及 自定义转换器类
请求数据自动封装: 实现原理:使用了参数拦截器.struts-default.xml中 <interceptor name="params" class="com. ...
- TextView加边框,自定义,上下左右四条线 颜色,想用哪个用哪个
1.这是一个自定义的TextView ,看吧,底下就是代码,应该都可以看懂,这里就不多说了 package com.example.admin.myutilsborder;import android ...
- iOS-AFNetworking封装Get(自定义HTTP Header)和Post请求及文件下载
前面提到AFNetworking是一个很强大的网络三方库,首先你需要引入AFNetworking三方库:如封装的有误还请指出,谢谢! 1.Get请求 /**Get请求 url 服务器请求地址 succ ...
- NoHttp封装--02 自定义请求
bean实体类请求: 1.bean import java.io.Serializable; import com.alibaba.fastjson.annotation.JSONField; pub ...
- mybatis二(参数处理和map封装及自定义resultMap)
.单个参数 mybatis不会做特殊处理. #{参数名/任意名}:取出参数值. .多个参数 mybatis会做特殊处理. 多个参数会被封装成 一个map. key:param1...paramN,或者 ...
随机推荐
- spring-mybatis+spring整合
整合之前回忆一下spring和mybatis分别做了什么: spring 通过注解/xml配置,实现AOP和DI DI: 接口实现类中, 将接口私有化,从容器中读取,而不是new一个 UserDao ...
- unity 拿到管线权限的解决方案
自己建个cmd 传给postprocess layer camera event可以加在这个cmd上控制位置 base pass post process ui都共享这段cmd 在一开始记下back ...
- linux centos ftp服务器搭建
原文参考 步骤一:构建vsftpd服务器 1)使用yum安装vsftpd软件包yum -y install vsftpdrpm -q vsftpd #确认安装成功,显示vsftpd对应版本 vsftp ...
- Java8-Lock-No.06
import java.util.concurrent.ExecutorService; import java.util.concurrent.Executors; import java.util ...
- Miller-Rabin素性测试
有时候我们想快速的知道一个数是不是素数,而这个数又特别的大导致 $O(\sqrt n)$ 的算法也难以通过,这时候我们可以对其进行 Miller-Rabin 素数测试,可以很大概率测出其是否为素数. ...
- form表单 一个input时 回车自动提交
问题描述 form表单中,如果当前表单只有一个input输入框时,单击回车会自动提交当前表单. 解决方案 在当前form表单中添加一个隐藏的input, <input style="d ...
- 详解Kafka: 大数据开发最火的核心技术
详解Kafka: 大数据开发最火的核心技术 架构师技术联盟 2019-06-10 09:23:51 本文共3268个字,预计阅读需要9分钟. 广告 大数据时代来临,如果你还不知道Kafka那你就真 ...
- 012_使用死循环实时显示 eth0 网卡发送的数据包流量
#!/bin/bash while : do echo '本地网卡 eth0 流量信息如下: ' #grep输出所找整行,awk直接输出第5列 ifconfig eth0 | grep "R ...
- CF #589 (Div. 2) D. Complete Tripartite 构造
这个 D 还是十分友好的~ 你发现这 $3$ 个集合形成了一个环的关系,所以随意调换顺序是无所谓的. 然后随便让 $1$ 个点成为第 $2$ 集合,那么不与这个点连边的一定也属于第二集合. 然后再随便 ...
- [Luogu] 魔板
https://www.luogu.org/problemnew/show/P1275 #include <iostream> #include <cstdio> #inclu ...