
OpenGL es3.0 初始化及渲染
class FOpenglEs

{

public:

    /**

    *   初始化 OpenGLES3.0

    */

    bool    initOpenGLES30(HWND hwnd)

    {

        EGLConfig config;

        EGLint majorVersion;

        EGLint minorVersion;

        EGLint contextAttribs[] = { EGL_CONTEXT_CLIENT_VERSION, , EGL_NONE };

        if ( hwnd == NULL )

        {

            return GL_FALSE;

        }

        EGLNativeDisplayType  displaytype = GetDC(hwnd);

        m_Display  = eglGetDisplay( displaytype );

        if ( m_Display == EGL_NO_DISPLAY )

        {

            return GL_FALSE;

        }

        // Initialize EGL

        if ( !eglInitialize ( m_Display, &majorVersion, &minorVersion ) )

        {

            return GL_FALSE;

        }

        GLuint flags = ES_WINDOW_RGB;

        {

            EGLint numConfigs = ;

            EGLint attribList[] =

            {

                EGL_RED_SIZE,       ,

                EGL_GREEN_SIZE,     ,

                EGL_BLUE_SIZE,      ,

                EGL_ALPHA_SIZE,     ( flags & ES_WINDOW_ALPHA ) ?  : EGL_DONT_CARE,

                EGL_DEPTH_SIZE,     ( flags & ES_WINDOW_DEPTH ) ?  : EGL_DONT_CARE,

                EGL_STENCIL_SIZE,   ( flags & ES_WINDOW_STENCIL ) ?  : EGL_DONT_CARE,

                EGL_SAMPLE_BUFFERS, ( flags & ES_WINDOW_MULTISAMPLE ) ?  : ,

                // if EGL_KHR_create_context extension is supported, then we will use

                // EGL_OPENGL_ES3_BIT_KHR instead of EGL_OPENGL_ES2_BIT in the attribute list

                EGL_RENDERABLE_TYPE, GetContextRenderableType ( m_Display),

                EGL_NONE

            };

            // Choose config

            if ( !eglChooseConfig (m_Display, attribList, &config, , &numConfigs ) )

            {

                return GL_FALSE;

            }

            if ( numConfigs <  )

            {

                return GL_FALSE;

            }

        }

        // Create a surface

        m_Surface = eglCreateWindowSurface (m_Display, config,

            hwnd, NULL );

        if ( m_Surface == EGL_NO_SURFACE )

        {

            return GL_FALSE;

        }

        // Create a GL context

        m_Context = eglCreateContext (m_Display, config,

            EGL_NO_CONTEXT, contextAttribs );

        if ( m_Context == EGL_NO_CONTEXT )

        {

            return GL_FALSE;

        }

        // Make the context current

        if ( !eglMakeCurrent (m_Display, m_Surface,

             m_Surface, m_Context ) )

        {

            return GL_FALSE;

        }

        return  true;

    }

    EGLint GetContextRenderableType ( EGLDisplay eglDisplay )

    {

#ifdef EGL_KHR_create_context

        const char *extensions = eglQueryString ( eglDisplay, EGL_EXTENSIONS );

        // check whether EGL_KHR_create_context is in the extension string

        if ( extensions != NULL && strstr( extensions, "EGL_KHR_create_context" ) )

        {

            // extension is supported

            return EGL_OPENGL_ES3_BIT_KHR;

        }

#endif

        // extension is not supported

        return EGL_OPENGL_ES2_BIT;

    }

    /**

    *   销毁OpenGLES3.0

    */

    void    destroyOpenGLES20()

    {

    }

    void SwapBuffers()

    {

        eglSwapBuffers(m_Display,m_Surface);

    }

    void setViewPort( int x,int y,int width,int height )

    {

        glViewport(GLint(x),GLint(y),GLsizei(width),GLsizei(height));

    }

    void clear(unsigned int mask)

    {

        //! GL_DEPTH_BUFFER_BIT

        //! GL_COLOR_BUFFER_BIT

        //! GL_COLOR_BUFFER_BIT

        //! GL_STENCIL_BUFFER_BIT

        //! GL_ACCUM_BUFFER_BIT;

        //! GL_TRANSFORM_BIT

        //! GL_ENABLE_BIT

        //! GL_HINT_BIT

        //! GL_EVAL_BIT

        glClear(mask);

    }

    void clearColor(float r,float g,float b,float a)

    {

        glClearColor(r,g,b,a);

    }

    void CreateOglBuffer(OglBuffer* buf)

    {

          glGenBuffers(, &buf->m_VertexBufferId);

        glBindBuffer(GL_ARRAY_BUFFER, buf->m_VertexBufferId);

        glBufferData(GL_ARRAY_BUFFER, sizeof(FVertex)* buf->m_vertexs.size(), &buf->m_vertexs[].m_Pos.x, GL_DYNAMIC_DRAW);

        glBindBuffer(GL_ARRAY_BUFFER, );

        glGenBuffers(, &buf->m_IndexBufferId);

        glBindBuffer(GL_ELEMENT_ARRAY_BUFFER, buf->m_IndexBufferId);

        glBufferData(GL_ELEMENT_ARRAY_BUFFER, sizeof(FMeshTriangle) * buf->m_Indexs.size(), &buf->m_Indexs[].index0, GL_DYNAMIC_DRAW);

        glBindBuffer(GL_ELEMENT_ARRAY_BUFFER,);

        glGenVertexArrays(,&buf->m_VaoBufferId);

        glBindVertexArray(buf->m_VaoBufferId);

        glBindBuffer(GL_ARRAY_BUFFER,buf->m_VertexBufferId);

        glEnableVertexAttribArray();

        glEnableVertexAttribArray();

        glVertexAttribPointer(,,GL_FLOAT,(GLboolean)false,sizeof(FVertex),);

        glVertexAttribPointer(,,GL_FLOAT,(GLboolean)false,sizeof(FVertex),(GLvoid*)(sizeof(float)*));

        glBindBuffer(GL_ELEMENT_ARRAY_BUFFER,buf->m_IndexBufferId);

        glBindVertexArray();

        glBindBuffer(GL_ARRAY_BUFFER,);

        glBindBuffer(GL_ELEMENT_ARRAY_BUFFER,);

        glDisableVertexAttribArray();

        glDisableVertexAttribArray();

        printf("vertex:%d bufId:%d \n",buf->m_vertexs.size(),buf->m_VertexBufferId);

        printf("index:%d  bufId:%d \n",buf->m_Indexs.size(),buf->m_IndexBufferId);

    }

    void bindVao(OglBuffer* buf)

    {

        glBindVertexArray(buf->m_VaoBufferId);

    }

    void destroyVertexBuffer( OglBuffer* buf )

    {

        glDeleteVertexArrays(,&buf->m_VaoBufferId);

        glDeleteBuffers(,&buf->m_IndexBufferId);

        glDeleteBuffers(,&buf->m_VertexBufferId);

    }

    void drawBuffers(const OglBuffer* buf)

    {

        glBindVertexArray(buf->m_VaoBufferId);

        glDrawElements(GL_TRIANGLES,buf->m_Indexs.size() *,GL_UNSIGNED_INT,);

    }

public:

    /// Display handle

    EGLNativeDisplayType eglNativeDisplay;

    /// Window handle

    EGLNativeWindowType  eglNativeWindow;

    EGLConfig   m_Config;

    EGLSurface  m_Surface;

    EGLContext  m_Context;

    EGLDisplay  m_Display;

    /// Window width

    GLint       m_width;

    /// Window height

    GLint       m_height;

};
class FVertex

{

public:

    FVertex()

    {

    }

    vec3 m_Pos;

    vec3 m_Normal;

    vec2 m_Uv;

    vec3 m_tangent;

    vec3 m_bitangent;

};

class OglBuffer

{

public:

    OglBuffer()

    {

        m_VaoBufferId = ;

        m_VertexBufferId =;

        m_IndexBufferId =;

    }

   Fuint m_VaoBufferId;

   Fuint m_VertexBufferId;

   Fuint m_IndexBufferId;

   std::vector<FVertex>       m_vertexs;

   std::vector<FMeshTriangle> m_Indexs;

};
用的时候直接这样就好了,比较方便
g_Opengles.setViewPort(,,,);

        g_Opengles.clearColor(0.1,,0.1,);

        g_Opengles.clear(GL_COLOR_BUFFER_BIT | GL_DEPTH_BUFFER_BIT);

        m_Shader.useProgram();

        m_Shader.setUniformMatrix4fv("_MVP",&m_ProjectMatrix.m00);

        g_Opengles.drawBuffers(&m_Buff);

        g_Opengles.SwapBuffers();
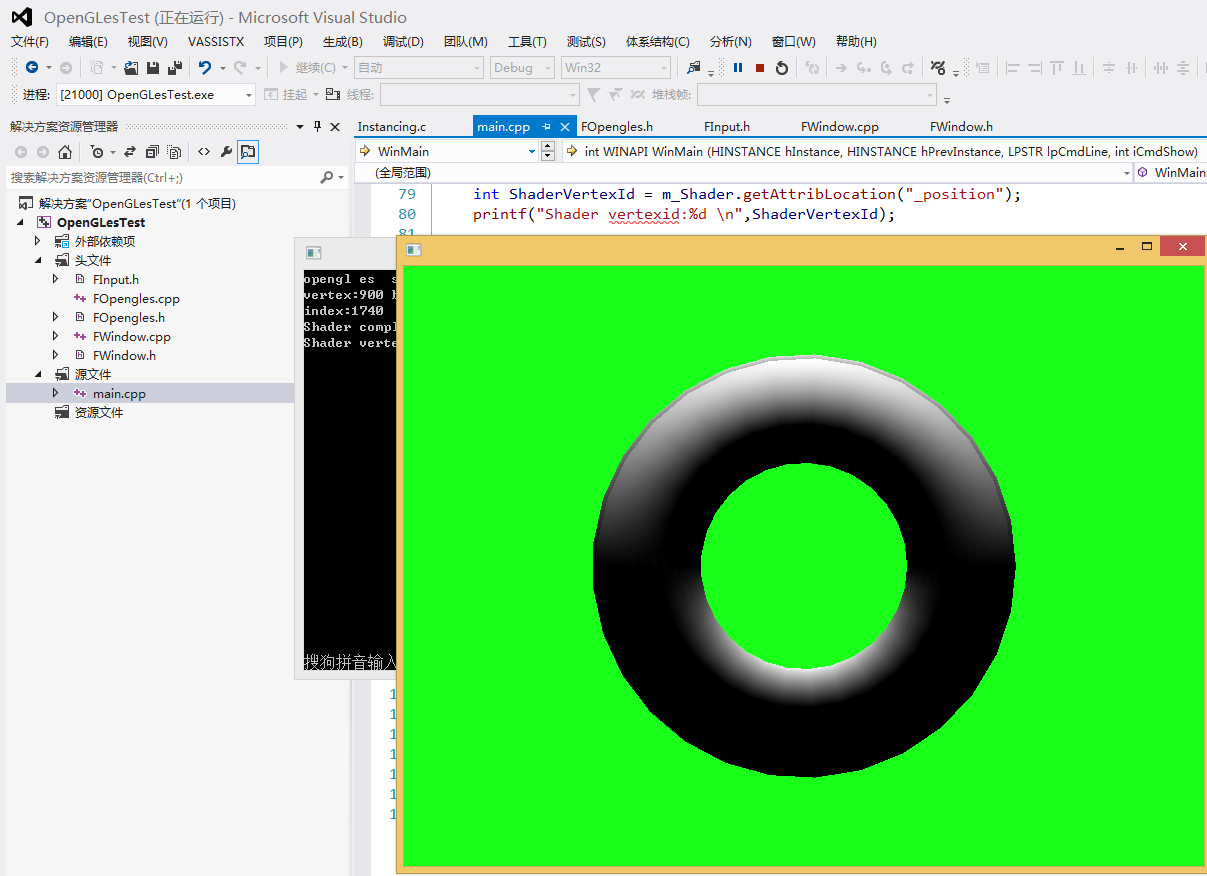
shader ,不能用varying,只能用in out这样
const char* vs  =

    {

        "#version 300 es                          \n"

        "layout(location = 0) in vec4 vPosition;  \n"

        "layout(location = 1) in vec3 vNormal;    \n"

        "uniform mat4 _MVP;                        \n"

        "out vec3 oNormal;                          \n"

        "void main()                              \n"

        "{                                        \n"

        "   gl_Position = _MVP * vPosition;         \n"

        "   oNormal  = vNormal;                      \n"

        "}                                        \n"

    };

    const char* ps  =

    {

        "#version 300 es                              \n"

        "precision mediump float;                     \n"

        "out vec4 fragColor;                          \n"

        "in  vec3 oNormal;                                \n"

        "void main()                                  \n"

        "{                                            \n"

        "                                                 \n"

        "    float dotN = dot(oNormal,vec3(0,1,0));         \n"

        "   float realColor = max(0.0,dotN);            \n"

        "   fragColor = vec4 ( realColor, realColor, realColor, 1.0 );  \n"

        "}                                            \n"

    };
OpenGL es3.0 初始化及渲染的更多相关文章
- OpenGL ES3.0
到今天,喜欢上了非常酷的图片处理和游戏,经了解,大部分都要使用opengl es,所以准备开始学习,然后深入学习cocos2d,GPUImage.平台为IOS OpenGL ES OpenGL ES ...
- [工作积累] OpenGL ES3.0: glInvalidateFramebuffer
https://www.khronos.org/opengles/sdk/docs/man3/html/glInvalidateFramebuffer.xhtml 这个在GLES2.0上只有Exten ...
- OpenGL ES3使用MSAA(多重采样抗锯齿)的方法
昨晚花费了我2个多小时的时间终于把OpenGL ES3.0中的MSAA给搞定了.在OpenGL ES2.0中,Khronos官方没有引入标准的MSAA全屏抗锯齿的方法,而Apple则采用了自己的GL_ ...
- Cocos2d-x中使用OpenGL ES2.0编写shader
这几天在看子龙山人的关于OpenGL的文章,先依葫芦画瓢,能看到些东西,才能慢慢深入了解,当入门文章不错,但是其中遇到的一些问题,折腾了一些时间,为了方便和我一样的小白们,在这篇文章中进行写补充. O ...
- iOS开发——图形编程OC篇&OpenGL ES2.0编程步骤
OpenGL ES2.0编程步骤 OpenGL ES (OpenGL for Embedded Systems) 是 OpenGL 三维图形 API 的子集,针对手机.PDA和游戏主机等嵌入式设备而设 ...
- OpenGL ES2.0入门详解
引自:http://blog.csdn.net/wangyuchun_799/article/details/7736928 1.决定你要支持的OpenGL ES的版本.目前,OpenGL ES包含 ...
- OpenGL 4.0的Tessellation Shader(细分曲面着色器)
细分曲面着色器(Tessellation Shader)处于顶点着色器阶段的下一个阶段,我们可以看以下链接的OpenGL渲染流水线的图:https://www.opengl.org/wiki/Rend ...
- OpenGL ES2.0编程三步曲 -转
原地址:http://blog.csdn.net/myarrow/article/details/7707943 1. 保存全局变量的数据结构 以下例子程序均基于Linux平台. typedef st ...
- OpenGL ES2.0 基本编程
1. EGL OpenGL ES命令须要一个rendering context和一个drawing surface. Rendering Context: 保存当前的OpenGL ES状态. Draw ...
随机推荐
- JS自动化
写在前面 记得当时刷笔试题的时候有了解过“前端工程化”,无非就是用自动化工具帮助开发人员完成一些小细节,提高工作效率之类的,不过当时可没想到可维护性这么远 构建项目 -> 模块化开发 -> ...
- 设计模式之美:Structural Patterns(结构型模式)
结构型模式涉及到如何组合类和对象以获得更大的结构. 结构型类模式采用继承机制来组合接口实现. 结构型对象模式不是对接口和实现进行组合,而是描述了如何对一些对象进行组合,从而实现新功能的一些方法. 因为 ...
- 关于消除if-else的简单总结
if-else是计算机语言中基本的分支语句,虽然很简单,但可能会出现滥用的情况,如图: 这种标记判断,嵌套成这样(其实没有必要嵌套),会让别人觉得作者水平很低. 可以看出,这些if仅仅是在判断一个变量 ...
- CI框架笔记
@update 2016-4-2 13:45:35 一.目录结构 ci_demo ├─myapp 应用主目录 │ ├─autoload.php 自定义的自动加载文件(可选) │ ├─myapp.php ...
- Nodejs学习笔记(九)--- 与Redis的交互(mranney/node_redis)入门
目录 简介和安装 redis简介 redis安装 redis运行 node_redis安装 连接到redis服务器redis.createClient() 认证 client.auth(passwor ...
- 转 CSS hack:针对IE6,IE7,firefox显示不同效果
CSS hack:针对IE6,IE7,firefox显示不同效果 做网站时经常会用到,衡量一个DIV+CSS架构师的水平时,这个也很重要. 区别不同浏览器的CSS hack写法: 区别IE6与FF: ...
- Atitit. 构造ast 语法树的总结attilax v2 q0f
Atitit. 构造ast 语法树的总结attilax v2 q0f 1. Ast结构树形1 2. ast view (自是个160k的jar )2 2.1. 多条语句ast结构2 2.2. 变量定义 ...
- atitit.atitit.hb many2one relate hibernate 多对一关联配置..
atitit.atitit.hb many2one relate hibernate 多对一关联配置.. 1. 多对一单向 @ManyToOne 1 1. 其中@JoinColumn 注解 2 2. ...
- [推荐]Zookeeper大型分布式系统的可靠协调系统知识介绍
[推荐]Zookeeper大型分布式系统的可靠协调系统知识介绍 基于Zookeeper的锁开发手册 http://wenku.baidu.com/view/acbb8fc6102de2bd960588 ...
- 史上最强大的js图表库——ECharts带你入门(转)
出处:http://www.cnblogs.com/zrtqsk/p/4019412.html PS:之前的那篇博客Highcharts——让你的网页上图表画的飞起 ,评论中,花儿笑弯了腰 和 Sta ...