
HUGO 创建属于自己的博客
Hugo 拥有超快的速度,强大的内容管理和强大的模板语言,使其非常适合各种静态网站。可以轻松安装在macOS,Linux,Windows等平台上,在开发过程中使用LiveReload可即时渲染更改
一、安装 Hugo
Mac 上安装 HUGO,很简单,通过 brew 可以快速安装
brew install hugo
检查安装版本信息
hugo version
二、使用 Hugo
1、创建网站
hugo new site iChochy 创建
其中
iChochy为你的博客目录
目录结构
iChochy

├── archetypes

│   └── default.md

├── config.toml

├── content

├── data

├── layouts

├── static

└── themes
2、添加主题
a、下载主题
以 hyde主题为例 https://github.com/spf13/hyde
直接下载主题,放到themes目录中,或通过 git 方式添加主题
git submodule add https://github.com/spf13/hyde.git themes/hyde
b、修改配置
echo 'theme = "hyde"' >> config.toml
config.toml 文件内容
baseURL = "https://ichochy.com/"

languageCode = "en-us"

title = "My New Hugo Site"

theme = "hyde"
目录结构
iChochy

├── archetypes

│   └── default.md

├── config.toml

├── content

├── data

├── layouts

├── static

└── themes

    └── hyde

        ├── CHANGELOG.md

        ├── LICENSE.md

        ├── README.md

        ├── archetypes

        │   └── default.md

        ├── go.mod

        ├── images

        │   ├── screenshot.png

        │   └── tn.png

        ├── layouts

        │   ├── 404.html

        │   ├── _default

        │   │   ├── baseof.html

        │   │   ├── list.html

        │   │   └── single.html

        │   ├── index.html

        │   └── partials

        │       ├── head.html

        │       ├── head_fonts.html

        │       ├── hook_head_end.html

        │       └── sidebar.html

        ├── static

        │   ├── apple-touch-icon-144-precomposed.png

        │   ├── css

        │   │   ├── hyde.css

        │   │   ├── poole.css

        │   │   ├── print.css

        │   │   └── syntax.css

        │   └── favicon.png

        └── theme.toml
3、编写内容
新建文章
hugo new posts/HelloWorld.md 新建
注:以 archetypes/default.md为模版创建
编写文章
vim content/posts/HelloWorld.md
HelloWorld.md 文件内容
---

title: "HelloWorld"

date: 2020-08-02T21:47:48+08:00

draft: true

---

### HelloWorld

https://ichochy.com
预览文章
hugo server -D 启动服务,访问 http://localhost:1313
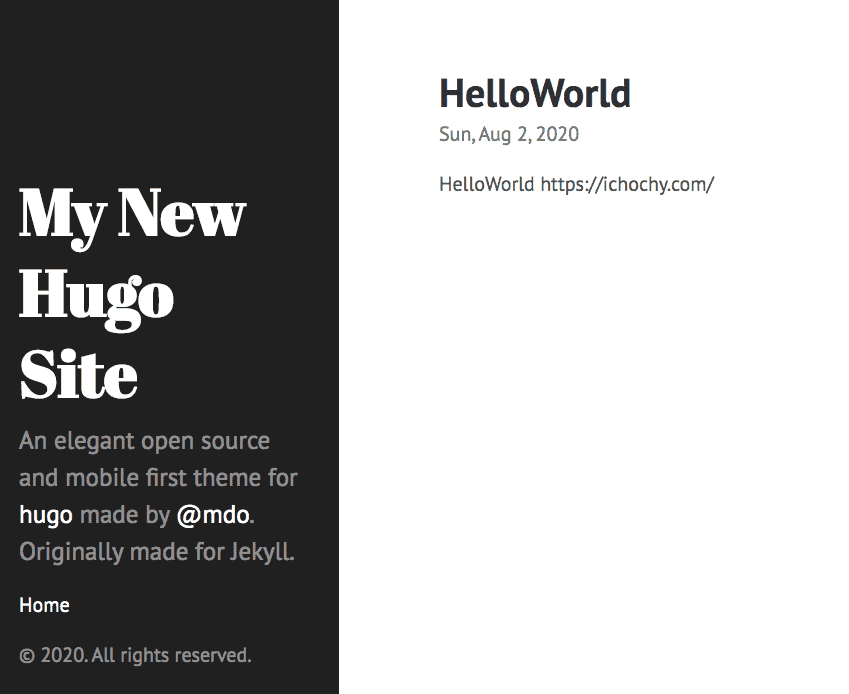
目录结构
iChochy

├── archetypes

│   └── default.md

├── config.toml

├── content

│   └── posts

│       └── HelloWorld.md

├── data

├── layouts

├── resources

│   └── _gen

│       ├── assets

│       └── images

├── static

└── themes

    └── hyde

        ├── CHANGELOG.md

        ├── LICENSE.md

        ├── README.md

        ├── archetypes

        │   └── default.md

        ├── go.mod

        ├── images

        │   ├── screenshot.png

        │   └── tn.png

        ├── layouts

        │   ├── 404.html

        │   ├── _default

        │   │   ├── baseof.html

        │   │   ├── list.html

        │   │   └── single.html

        │   ├── index.html

        │   └── partials

        │       ├── head.html

        │       ├── head_fonts.html

        │       ├── hook_head_end.html

        │       └── sidebar.html

        ├── static

        │   ├── apple-touch-icon-144-precomposed.png

        │   ├── css

        │   │   ├── hyde.css

        │   │   ├── poole.css

        │   │   ├── print.css

        │   │   └── syntax.css

        │   └── favicon.png

        └── theme.toml
部署
修改部署目录
修改 config.toml 文件
1、修改 bashURL 的部署域名
2、添加 publishDir = "docs",指定部署目录为 docs
config.toml 文件内容
baseURL = "https://ichochy.com/"

languageCode = "en-us"

title = "My New Hugo Site"

theme = "hyde"

publishDir = "docs"
生成静态文件
hugo -D 生成静态文件
目录结构
iChochy

├── archetypes

│   └── default.md

├── config.toml

├── content

│   └── posts

│       └── HelloWorld.md

├── data

├── docs

│   ├── 404.html

│   ├── apple-touch-icon-144-precomposed.png

│   ├── categories

│   │   ├── index.html

│   │   └── index.xml

│   ├── css

│   │   ├── hyde.css

│   │   ├── poole.css

│   │   ├── print.css

│   │   └── syntax.css

│   ├── favicon.png

│   ├── index.html

│   ├── index.xml

│   ├── posts

│   │   ├── helloworld

│   │   │   └── index.html

│   │   ├── index.html

│   │   └── index.xml

│   ├── sitemap.xml

│   └── tags

│       ├── index.html

│       └── index.xml

├── layouts

├── resources

│   └── _gen

│       ├── assets

│       └── images

├── static

└── themes

    └── hyde

        ├── CHANGELOG.md

        ├── LICENSE.md

        ├── README.md

        ├── archetypes

        │   └── default.md

        ├── go.mod

        ├── images

        │   ├── screenshot.png

        │   └── tn.png

        ├── layouts

        │   ├── 404.html

        │   ├── _default

        │   │   ├── baseof.html

        │   │   ├── list.html

        │   │   └── single.html

        │   ├── index.html

        │   └── partials

        │       ├── head.html

        │       ├── head_fonts.html

        │       ├── hook_head_end.html

        │       └── sidebar.html

        ├── static

        │   ├── apple-touch-icon-144-precomposed.png

        │   ├── css

        │   │   ├── hyde.css

        │   │   ├── poole.css

        │   │   ├── print.css

        │   │   └── syntax.css

        │   └── favicon.png

        └── theme.toml
部署 GitHub Pages
将整个项目推送到 GitHub,然后在项目的 Settings 中开启的 GitHub Pages,并指定分支和目录 docs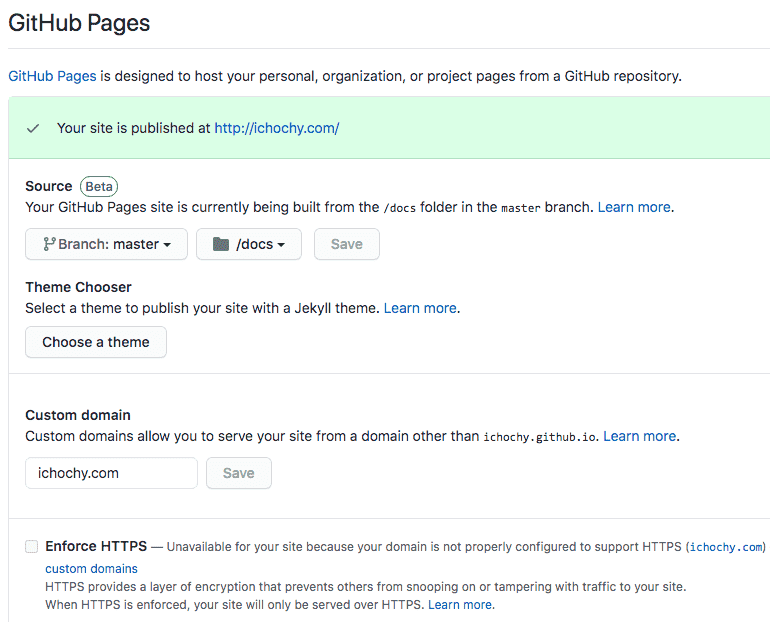
就是可以直接在线访问了,如:https://ichochy.github.io
总结
Hugo 简单、易用、快速
模版化强大,只需要关心文章的编写
默认开启 LiveReload,修改后可以实时预览,免去手去刷新操作
还有很多强大的功能,如:摘要(Summary)、文章目录(TableOfContents)、相关推荐(Related)、多语言支持(i18n)、列表分页(Pagination)、简码(Shortcodes)等。
联系方式
网站:https://ichochy.com/
源文:https://ichochy.com/posts/20200802/
HUGO 创建属于自己的博客的更多相关文章
- 用Hugo在gitee上构建博客(Windows环境下)
目录 用Hugo在gitee上构建博客(Windows环境下) 1.为什么要用gitee? 2.安装git 3.安装Hugo 4.创建远程仓库 5.搭建博客 (以下所有命令都在git bash中输入) ...
- Hugo + Github Pages 搭建个人博客
尝试过 Hexo .GatsbyJs. Vuepress 搭建博客后,对这些工具最大的不满,就是运行速度以及打包速度. 后来看到 Hugo ,号称最快的静态站点生成器后. 尝试搭建博客,发现不管是运行 ...
- 应用github pages创建自己的个人博客
首先你需要注册自己的github账号 1.登录或者注册github,登录之后点击右上角的“+”号,选择“New repository”菜单,创建仓库,用于存储和博客相关的源文件. 2.跳转页面将填写域 ...
- hexo+github创建属于自己的博客
配置环境 安装Node(必须) 作用:用来生成静态页面的 到Node.js官网下载相应平台的最新版本,一路安装即可. 安装Git(必须) 作用:把本地的hexo内容提交到github上去. 安装Xco ...
- 创建自己的网站博客--Hexo
原文地址:https://www.xingkongbj.com/blog/hexo/creat-hexo.html 安装环境 安装 node 下载对应版本并安装 node . 安装 Git Windo ...
- 如何用Hexo+Github创建自己的技术博客
注册一个github GitHub官网.按照一般的网站注册登录执行就好了,不详细说. 安装git 安装很简单,一直下一步 git安装教程 很多教程里都说要配置环境变量,我本人安装过5次左右的git,一 ...
- SpringBoot使用Hibernate,实现自动创建数据库表【博客数据库设计】
我们准备设计博客,那就要设计数据库. 我们可以使用Hibernate来自动生成数据库. 博客数据库的结构: 实体类: 博客 Blog 博客分类 Type 博客标签 Tag 博客评论 Comment 用 ...
- python基础[18]——使用django创建一个简易的博客网站
一.页面实现 index.html base.html post.html header.html footer.html <!-- index.html--> {% extends 'b ...
- Hugo + github 搭建个人博客
前言 很早以前就有想法,搭建一个个人的博客.没有实现的原因:一方面个人的服务器不太安全掉线,欠费,维护起来麻烦,另一方面,文章编辑发布起来也不方便. 后来了解到 github 提供了博客的功能,也一直 ...
随机推荐
- 封装Vue纵向表头左右结构的table表格
我们前端开发人员在使用表格的过程中,大概率碰到的都是表格头部在表格的最上边,然后呈一行展示,紧接着就是表格的每一行的每一个单元格来展示具体内容的场景,很少会遇到表格的头部呈纵向一行展示,也就是说表格的 ...
- PAT (Advanced Level) Practice 1015 Reversible Primes (20 分) 凌宸1642
PAT (Advanced Level) Practice 1015 Reversible Primes (20 分) 凌宸1642 题目描述: A reversible prime in any n ...
- js 日期加减
加: console.log(moment().format("YYYY-MM-DD HH:mm:ss")); //当前时间 console.log(moment().add(10 ...
- 【Java】 6.0 输入,输出和异常处理
[概述] 就目前而言,我们遇到的"输出"无非就是这个比: System.out.println() 更详细的输入输出会在IO中提到,那么这个笔记就是记录几种常用输入机制 [Scan ...
- OO第四单元总结暨期末总结
OO第四单元总结暨期末总结 目录 OO第四单元总结暨期末总结 第四单元三次作业架构与迭代 整体感受 HW1 HW2 HW3 四个单元架构设计与方法演进 Unit1 Unit2 Unit3 Unit4 ...
- 【剑指offer】10:矩形覆盖
题目描述: 我们可以用2*1的小矩形横着或者竖着去覆盖更大的矩形.请问用n个2*1的小矩形无重叠地覆盖一个2*n的大矩形,总共有多少种方法? 解题思路: ①方法一 对于这种题没有思路怎么办?可以先从最 ...
- ES系列(二):基于多播的集群发现实现原理解析
ES作用超强悍的搜索引擎,除了需要具有齐全的功能支持,超高的性能,还必须要有任意扩展的能力.一定程度上,它是一个大数据产品.而要做扩展性,集群自然少不了.然而单独的集群又是不够的,能够做的事情太少,所 ...
- Kubernetes 普及系列:容器基础入门
随着云原生时代的来临,云以及分布式计算已经是时下最受欢迎的技术之一了.其中 Docker 作为最知名的容器平台,到底有着怎样的魅力来让其无人不知无人不晓?废话不多说,让我们开始逐层掀开容器技术的神秘面 ...
- 使用vue-element-admin框架从后端动态获取菜单
1.前言 vue-element-admin是一个纯前端的框架,左侧菜单是根据路由生成的.实际开发中经常需要根据当前登陆人员的信息从后端获取菜单进行展示,本文将详细介绍如何实现该功能. 2.详解 ...
- php读取目录下的所有文件
php读取目录下的所有文件 $path = './use'; $result = scanFile($path); function scanFile($path) { global $result; ...